Paving stones are a material for paving paths and platforms, which has a number of advantages. It differs from paving slabs only in thickness. There are no puddles left on such a coating, it does not crack when the soil swells, and most importantly, it can easily be made independently. Do-it-yourself paving stones is the topic of this article.
What do you need?
There are two ways to manufacture such modules:
- vibration pressing;
- vibration casting.
At home, paving stones can only be reproduced using the vibration casting method.
Here's what you'll need for this:
- cement or concrete mortar;
- forms;
- vibrating table Provides dense packing of the solution into the mold, that is, without voids;
- lubricant: prevents the solution from sticking to the mold.
A lubricant is prepared from the following components:
- water: 1.5 l;
- liquid soap: 2 tablespoons;
- machine oil: 100 g.
As an alternative, drying oil and vegetable oil are used.
Tools and equipment:
- concrete mixer or drill with a mixer attachment;
- vibration table: it can be replaced with an old washing machine running in spin mode. A “shaking” structure can be constructed from a 10-mm steel plate laid on a car tire. To make the tabletop vibrate, attach a jigsaw to it and turn it on if necessary;
- Master OK;
- building level.
You will also need a piece of plastic film.
Homemade tiles from Kostya9
Kostya9FORUMHOUSE member
I want to share my experience in producing paving slabs with my own hands. The forum and the topic that homemade tiles can be better than store-bought ones prompted me to do this. The most important thing is that I need to make a blind area around the house, and some paths wouldn’t hurt. I refused the concrete blind area after studying the sad experience of forum members and neighbors. If problems arise with paving slabs, the repairs will be local.
To implement the idea, specialized network resources were studied on the topic of forms and the portal forum, on the topic of the process itself - the necessary equipment, raw materials, production technology. As it turned out, plastic and other forms are available, whatever you want, the main materials were left over from the construction site, and the existing units require relatively simple, feasible finishing. Unforeseen complications arose only with the purchase of five hundred cement - due to low demand, local traders simply did not have it, so they had to go to a neighboring town.
Manufacturing
To make the tiles as durable as possible, a circular saw was converted into a vibrating table - the working surface was replaced with a heavy plate (with springs from the nine-bar racks), and a vibration motor was placed under the plate. A typical concrete mixer for preparing the solution, ready-made polymer molds, with an imitation of the surface of sandstone, for drying - an old refrigerator, placed on its side.
The concrete proportions were also selected on the forum.
In addition to the available screenings, washed river sand and purchased cement of the required brand, a plasticizer was required for the tiles, and the choice fell on SP-1. This is a universal additive that improves the characteristics of the solution; its use increases the mechanical strength of concrete, reduces the number of pores on the surface, imparts smoothness and increases the efficiency of vibration. Although I dreamed of colored tiles, the cost of dye and white cement to obtain a rich color forced me to make do with a natural, gray shade.
The mixing proportions were as follows:
- Screenings (crushed stone fractions 0-5) – 38 kg (three ten-liter buckets);
- Sand (river, washed) – 18 kg (one ten-liter bucket);
- Cement (M-500) – 17 kg (fourteen liter bucket);
- Plasticizer – 80 grams per batch (diluted with a liter of warm water);
- Water – 8.5 liters (if the weather is hot, another 0.7 liters).
Mixing technology:
- The first thing to put into the concrete mixer is the screenings (all of them);
- Water pours in;
- A plasticizer is added;
- The mixture is thoroughly mixed;
- Cement is added;
- Mix thoroughly again;
- Sand is added;
- Final mixing (add water if necessary).
The consistency of the solution is quite thick, reminiscent of wet earth - this is a conscious choice, although many prefer to work with more fluid solutions.
Kostya9
Liquid concrete is like liquid mud - no strength.
Forms pre-lubricated with motor oil (in the corners, with a brush) are placed on a vibrating table. Filling with the solution should be uniform.
Processing time is from three to seven minutes. The vibration should not only compact the mixture, but also expel air bubbles from it. During the processing process, the forms are swapped and rotated around their axis so that the impact is uniform. As the solution shrinks, the solution is added until the form is filled to the end; you can slam it down with your hand to ensure that there are no voids left. From the vibrating table, the forms are sent to the dryer for more than a day (25-30 hours). On the advice of the thread participants, the old refrigerator, also known as the drying chamber, was turned from its side to its “back”, this significantly simplified the process of loading and removing the product.
After this period, the finished tile easily comes out of the mold due to lubrication and due to ongoing hydration processes that keep the raw material hot. If you leave the tile too long and it cools down, it will be more difficult to get it out of the plastic - you will have to pour boiling water on it so that the plastic expands. However, if you leave it not for a couple of hours, but for a couple of days, and it has time to completely cool down, it will be difficult to remove it, even using boiling water.
Having worked his hand on square tiles, the craftsman moved on to figured ones and decided to use chromium oxide as a dye.
The first test of adding dye at the rate of 1% of the binder (170 grams per batch) yielded virtually no results. It was not color that appeared, but a light, almost imperceptible tint, so the dosage was doubled, which gave the desired greenery. Like the plasticizer, the dye was pre-diluted in water.
Manufacturing technology
The procedure for home production of paving stones looks like this:
- Several forms are made. It is also possible to purchase in a store - today they are sold in a wide variety;
- prepare a solution;
- Having placed the forms on the vibrating table, lubricate them and fill in the solution. If necessary, perform reinforcement;
- leave the castings in the molds for 48 hours;
- remove the modules from the molds and leave for some time until complete hardening;
- carry out finishing treatment: painting or ironing.
Next, all stages are discussed in detail.
Necessary materials
Paving stones are made on the basis of cement mortar, but to improve the quality and appearance of the final products, a number of additional materials are added to the cement mortar. This article will describe the technology for making high quality paving stones. You can reduce your costs on materials by not using some of them, but the quality of the tiles will no longer be as high.
So, to make high-quality paving stones you need to prepare the following materials:
- Portland cement grade M400;
- coarse river or washed sand;
- fine gravel;
- plasticizer or liquid detergent;
- wire or metal rods with a diameter of at least 5 mm;
- pigment dye;
- water repellent;
- pure water.
The amount of cement, crushed stone and sand depends on the required number of tiles, but their volume ratio should be 1:2:3. Instead of metal wire and rods, you can use synthetic reinforcing additives, which are sold in stores.
Adding a plasticizer increases the strength of finished products. This occurs due to improved plasticity of concrete and its better compaction on the forming table.
Treatment with a water repellent will protect the tile from moisture and increase its service life. Pigment dye is needed to give color.
Small production of paving stones
In most cases, paving slabs are required by the owner of the site for a one-time construction of a platform or path. In this case, he needs a small number of molds (from 7 to 12) with a very limited resource, for example, made of polyurethane or silicone. You can easily make them yourself, which will reduce the cost of manufacturing the coating even more.
It is not necessary to purchase a concrete mixer for a small batch: the solution can be prepared in a bucket, mixing it with a drill with a mixer attachment.
Necessary tool
When making tiles, you will use the following tools, fixtures and equipment:
- a concrete mixer or shallow container for preparing the cement mixture by hand;
- shovel;
- molding table;
- molds for filling;
- tool for cutting metal wire;
- buckets;
- rack for drying finished products.
In addition, to make paving stones with your own hands, you need a room, and in its absence, at least a canopy, where you will place a table for molding and a rack for placing and drying the poured workpieces.
The rack for drying products should be located in a place inaccessible to the sun and precipitation. Drying should take place at temperatures above +10°C and below +30°C.
Mold making
There are two types of molds for the production of paving stones:
. This is a rectangular frame made of planed bars or metal profiles. It is advisable to make it detachable - then the risk of damaging the casting during removal will be less. There is no need to make a bottom: the mold is placed on a rubber mat covered with polyethylene. If you cut a pattern into the backing, it will be transferred to the surface of the tile. A wooden mold is easier to make and will cost less than a metal one, but it also has a much shorter lifespan. In order to prolong it, the wood is wrapped in polyethylene;
simple- curly _ In such forms, paving stones with curved outlines and patterns or relief of any complexity are cast. You need a sample: a finished tile of the desired shape or a template cut from wood or sculpted from plaster.
Procedure for making the mold:
- a rectangular frame is knocked together from the bars with internal dimensions that are 2 cm larger than the dimensions of the sample tile. This is formwork. In depth it also exceeds the thickness of the tile by 1 - 2 cm;
- the frame is laid on a rubber mat covered with polyethylene and a template tile is placed inside it in the center;
- coat the sample with lubricant;
- the free space of the frame is filled with the material from which the matrix is planned to be made.
Quantity calculation
To prepare a high-quality solution, you should adhere to the percentage of ingredients. Below is a table of components for making paving slabs 6 cm thick.
| Components of the solution | Quantity % | Number of kg per 1 sq. m slabs |
| Cement | 21 | 30 |
| Crushed stone | 23 | 32 |
| Sand | 56 | 75 |
| Plasticizer | 0.7 of the total mass | 0,05 |
| Pigment | 7 of the total mass | 0,7 |
| Water | 5.5 of the total mass | 8 l |
Compositions suitable for making molds
The matrix for casting tiles can be made of polymers or gypsum.
Varieties of forms for paving stones
Polyethylene
Secondary raw materials for subsequent melting are found at every step. These are plastic bottles, lighter housings, old cans, etc. The plastic hardens in about an hour. Sometimes sandpapering is required. Molds made from this material are relatively durable: each is enough for 250 castings.
Gypsum
This material hardens quickly, so it is prepared immediately before pouring. To extend the service life, plasticizer and cement are added.
Plaster repeats all the details, even the smallest ones, because this form reproduces patterns of any complexity found on the sample. The disadvantage is fragility: the shape is easy to damage when removing the module.
But it is not critical, since gypsum is cheap. Instead of wooden blocks, you can use a plastic food container as formwork.
Silicone
Forms made from this material are quite popular because they have a number of advantages:
- they most accurately repeat small details of the relief, therefore they allow you to reproduce tiles of the most complex configuration, almost one to one;
- due to its flexibility, it facilitates extraction;
- do not crack upon impact;
- During the cooking process, silicone does not emit harmful substances.
Silicone forms
The disadvantage of silicone molds is that they are a limited resource: no more than 100 modules can be cast in them with high quality. Silicone is prepared from 3 components: base, hardener and catalyst. It is important to adhere to the recipe (indicated on the package) and cook at the correct temperature - not lower than +200C.
The ingredients are mixed until smooth. It is important to ensure that there are no air bubbles in the mixture. When making a silicone mold, a thick, even layer of sculptural plasticine is placed on the bottom of the wooden formwork and only then the template is placed.
The thickness of the plasticine must be taken into account when selecting the depth of the formwork. The form is removed from the formwork after a day. Excess silicone is cut off with scissors.
Polyurethane
It is also a very fluid substance that follows the smallest details of the relief, but is much stronger than silicone.
Polyurethane emits toxic fumes and causes irritation if it comes into contact with the skin. Conditions of work:
- the room is well ventilated;
- For personal protection, gloves, goggles and a respirator are used.
Polyurethane is prepared from two components - a base and a hardener. It is important to avoid contact with wet surfaces: the substance reacts with water. The form is removed from the formwork after 24 hours, but it gains full hardness only after another two days.
It is recommended to make separate shapes for corner tiles. Otherwise, you will have to cut ordinary ordinary modules, and this will take much more time.
Popular brands of paving stones
"Notebek"
The product catalog includes paving stones of square, diamond-shaped, rectangular shapes, as well as tiles in the form of honeycombs, wavy, zigzag shapes, etc. The “highlight” of the collection can be considered LED tiles with different glow options: warm, cold or multi-colored.
Products of the Gothic factory
Paving stones are presented in several collections. The Premium collection is tiles with various decorative fillers and original surface treatments. The “Profi” collection includes classic paving stones of various shades and shapes. The “Natur” collection is distinguished by a delicate color palette, making it look especially natural.
"Rosser"
The paving stones include such original models as “Wave”, “Reel”, “Eco-Parking”, as well as traditional rectangular tiles of various sizes. All models are presented in gray, rich, light and pastel colors.
Preparation of the solution
The ingredients used are as follows:
- cement grade M500 or higher, preferably white - 1 part. It is desirable that the content of 3-calcium aluminate does not exceed 8% (preferably up to 5%);
- river sand, sifted, with a fineness module of 2-3 parts;
- drinking water - 0.5 mass fraction. No additional liquid purification is required;
- plasticizer - at the rate of 10 ml per 1 kg of cement. If necessary, the dose can be increased, up to 1% of the total mass of the solution is allowed. Along with purchased plasticizers, “folk” ones are used - chicken egg white, PVA glue, detergent, washing powder and slaked lime;
- dispersant: a component that gives the tile frost resistance. Apply in an amount of 90 g per 1 m2 of coating. This is an important component, since paving stones, unlike wall cladding or foundations, cannot be protected with a water repellent - it will quickly wear off. The use of a dispersant makes it possible to increase the frost resistance of the tiles to F300 (withstands 300 freeze-thaw cycles without destruction);
- coloring matter (pigment). Depending on the desired color, it is added in an amount from 0.5% to 10% by weight of the solution. The dye is dissolved in water in a separate container, and a dispersant is added there.
Volumetric coloring is used only when using white cement. In other cases, they paint superficially: rub the dye with a trowel into the solution that has not yet dried.
It is recommended to add glass fibers to the solution
Cement with sand and plasticizer are combined until homogeneous in a concrete mixer or bucket, then water is added little by little. The consistency is considered normal if the solution is fluid enough and does not crack, but does not slide off the trowel. Next, a dye with a dispersant is added.
In addition to sand, crushed stone with a fraction of 3-5 mm can be added to the paving stones. In this case, cement, sand and crushed stone are taken in two parts. To strengthen the final product, it is useful to add glass or polyamide fibers to the solution.
Laying out the tracks
Tools for laying paving stones
We have made the required amount of paving stones and are ready for further work.
The first stage is project preparation and site marking
Marking paths
We take a plan of our site and draw future paths right on it. We think through everything down to the smallest detail.
We transfer the plan from paper to the site. For marking we use any stable pegs and rope. We drive the pegs in meter increments and stretch the cord between them.
How to lay out a garden path
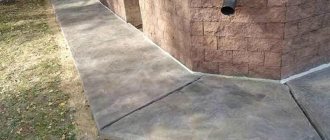
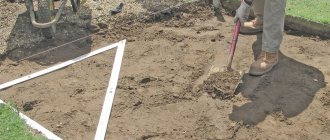
Stage two – excavation work
We begin digging a trench along the width and length of the future path. We select the depth of the pit so that after laying the paving stones, its upper surface is at the same level with the ground or rises slightly above it.
We select the depth of the hole so that after laying the paving stones, its upper surface is at the same level with the ground or rises slightly above it
Otherwise, water will stagnate in the recess. In addition to the calculated depth, add 10-15 cm for a layer of sand, about 10 cm for a gravel cushion and 4-5 cm for cement pouring (in areas with difficult terrain).
We remove debris and roots, level the walls and bottom of the hole, and thoroughly compact the soil. We cover the trench with geotextile so that weeds cannot grow into our paving stones and spoil it.
We fill in about 10 cm of gravel and 10-15 cm of sand. We compact each layer. Instead of gravel, you can use crushed stone - it’s even better.
Sand filling and leveling
Sand filling and leveling
Compacting sand with a vibrating plate
Fill the trench with a 4-5 cm layer of cement mortar (part cement, three parts sand, water). Carefully level the filling. We give the cement several days to gain strength.
Important! Cement must be poured only in areas with difficult terrain. If the area has normal relief, you can do without such filling.
The third stage - installing borders
Simple ribbon border
A simple ribbon border
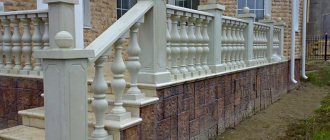
Curbs will make our paths more beautiful and neat. We can buy ready-made products or make them ourselves, for example, from the same paving stones, only a little thicker.
Laying the border
Or you can use a long concrete curb, pre-cast in narrow molds
To create a border, dig additional trenches along future paths. We install the formwork in the dug trench and tightly align the border elements, fastening them with cement mortar. The height of the edging is at your discretion. We give the border at least a day to dry and continue working.
The fourth stage - laying the main fabric
Laying paving stones
We stretch a cord along the curb - along it we will lay the first row of paving stones.
Expert opinion: Masalsky A.V.
Editor of the “construction” category on the Stroyday.ru portal. Specialist in engineering systems and drainage.
If you did not pour cement, soak the sand bed with water for additional compaction. Cement filling does not require pre-treatment.
For greater convenience, before starting work, we knock out boxes measuring 100 x 70 cm from boards. We install such a box on the base and begin to lay paving stones.
Laying paving stones in a mold measuring 100 x 70 cm
We lay out the tiles as closely as possible to each other, creating the desired pattern. At this point, focus solely on your preferences. The maximum width of seams is 1-2 mm. To make them the same, we install plastic crosses. To further consolidate the finishing elements, we use a wooden hammer.
Table 1. Material consumption (g/m²) for facing the path, depending on the size of the paving stones and the thickness of the seams.
| Tile dimensions (cm) | Seam width 2 mm | Seam width 4 mm | Seam width 6 mm | Seam width 8 mm |
| 2x2x0.3 | 750 | 1500 | — | — |
| 10x10x0.6 | 300 | 600 | 900 | 1210 |
| 15x15x0.7 | 240 | 470 | 710 | 950 |
| 20x20x0.7 | 180 | 360 | 540 | 720 |
| 30x30x0.8 | 140 | 280 | 410 | 550 |
| 40x40x0.8 | 100 | 210 | 320 | 420 |
| 50x50x0.8 | 90 | 170 | 260 | 340 |
Important! Be sure to check the evenness of laying each tile using a level. To eliminate deviations, remove the tiles and add more sand or remove excess sand from under it. If there is a cement screed, such problems will not arise.
We lay out the entire planned surface with paving stones. We use a grinder to cut tiles.
Laying paving stones
Laying paving stones
Fifth stage – surface finishing
In conclusion, all we have to do is apply a layer of wet sand to the laid path and rub it into the joints. It is convenient to use a hard-bristle mop for grouting.
In conclusion, all we have to do is apply a layer of wet sand to the laid path and rub it into the joints
Good luck!
Video - Making paving stones with your own hands
Filling the form
Fill out the form as follows:
- install the product on a vibration table leveled to the building level - factory or homemade;
- use a brush to coat the inside of the mold with lubricant;
- fill the solution halfway and turn on the vibrating table. The total duration of vibration laying is 5-10 minutes:
- after half the vibratory laying cycle has passed, a steel or polymer mesh (reinforcement) is placed on the solution and the solution is added to the top.
After this, the forms are removed from the vibrating table onto the rack.
It is not necessary to paint the entire tile. You can prepare two portions of the solution: tinted and regular gray. First, the mold is filled one third with colored solution, then with regular solution. By pouring two different colored layers, you can imitate marble.
Possible errors, tips
When manufacturing the matrix, if possible, a slight outward inclination of the walls should be maintained.
Important! The inclination of the walls inward, which wedges the casting, is unacceptable!
Too thin walls, especially when working with plastic, will lead to rapid failure of the mold. The thickness should be such as to allow the container with poured concrete to be lifted and carried without destruction.
Wooden and plaster should be periodically coated with paint and varnish, renewing the existing layer. This way the surface will be protected from moisture and warping.
Ready-made plastic containers, scraps of plastic pipes or other profile parts can be used as molds for tiles.
Freezing
The water in the solution reacts with the cement, so it is important to minimize its evaporation. For this purpose, the filled forms are placed under polyethylene, and in hot weather they are also periodically watered.
After two days, the castings are removed from the molds, but continue to be kept under polyethylene and moistened, if necessary, for another 10 days.
Full maturity occurs after 28 days . When the solution has hardened slightly, you can press a design into the tile using a stamp made of hard wire.
What can you save on?
If paving slabs are used to cover garden paths or alleys, they can be made thinner. Plus, you don’t have to use a mesh reinforcing frame in the design.
The strength of garden path tiles can also be reduced. This is achieved by reducing the amount of cement used. For example, by increasing the portions of crushed stone or sand. That is, the solution recipe will be: 1:2:4 or 1:3:3. You can avoid crushed stone altogether by using coarse sand as a filler. Although this is not the best option.