Press concrete
Stamped concrete belongs to the group of decorative mortars, which, in comparison with classical materials, make it possible to impart architectural expressiveness and artistic appeal to structural elements of buildings and structures (see video in this article). The use of color printed textures makes it possible to obtain not only a variety of color solutions, but also allows you to design various textures that imitate wood cladding, natural stone, etc.
Characteristics of the material and composition of mixtures
Stamped (printed) coatings are a comprehensive system for finishing monolithic surfaces, during which the following are used:
- concrete mixtures of strength class B20-B25;
- artistic stamps on concrete;
- coloring dry mixtures-hardeners;
- disconnecting reagents;
- strengthening protective impregnations.
Decorative coatings equipped with printing can be successfully used as elements of architectural decoration of the following objects:
- pedestrian paths;
- parking lots;
- gardening coverings;
- when installing floors both outside and indoors;
- for decorating retaining walls, plinths of residential and public buildings;
- blind area;
- steps of stairs.
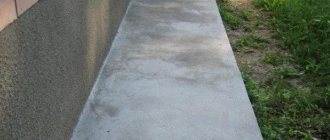
Decorative design of the basement of the building
In addition, using this technology it is possible to produce prefabricated wall panels, slabs for interior and exterior surface finishing, as well as reconstruct existing coatings.
Materials
Printed concrete is a separate type of building materials, consisting of the same components as traditional heavy mortars. White or gray Portland cement of a grade not lower than M400 can be used as binders.
Quartz sand and crushed stone of various rocks with a grain size of 0.25–10 mm are used as fine and coarse aggregates. Depending on the technological requirements and production conditions, various additives can be added to the mixtures - plasticizers, stabilizers, etc.
Colored dry mixture-hardener
Color hardener
Colored hardeners are ready-made dry mixtures for strengthening and coloring concrete printed coatings. The colored powder is applied by dry scattering onto a freshly laid and slightly hardened surface.
Purpose of the hardener:
- provides the most uniform and rich surface color;
- increases the density of the base;
- increases wear resistance;
- gives resistance to atmospheric factors;
- helps create a coating that is resistant to ultraviolet radiation, acids, alkalis, etc.
The hardener consumption is on average 2–4 kg/m2.
Disconnector compounds
Release agent for stamped concrete
A hydrophobic release agent is a dry mixture of various colors and shades, the main function of which is to prevent the printing matrix (stamp) from sticking to the wet concrete surface at the time of creating the relief.
The release mixture is applied in a thin layer using a wide brush with long, soft bristles. The solution binds firmly to the surface, creating a blackening effect on the coating.
The standard consumption of the disconnecting agent is 0.2 kg/m2 of surface.
Pros of use
The advantages of stamped concrete are represented by the following qualities:
- gradual spread of decorative concrete;
- Absolutely environmentally friendly process. The technology for producing printed concrete does not involve the use of harmful and toxic substances, and even during long-term operation, the decorative concrete coating is absolutely safe for humans and the environment;
- the surface of the coating, made of stamped concrete, is resistant to aggressive environments and is easy to clean with improvised means;
- decorative concrete coating is able to maintain its qualities in the temperature range from -50°C to +50°C, while maintaining the brightness of the colors and the internal structure of the concrete;
- Compared to natural materials, stamped concrete has a low cost and a longer service life;
- the main stages of production and installation are quite simple and do not require special skills and knowledge.
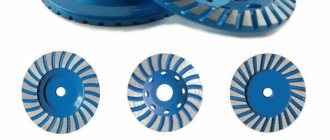
Matrices for printed concrete
In order to prepare stamped concrete with your own hands, you need to stock up on convenient and durable stamps (matrices). Matrices are the main equipment used to create artistic design for a printed surface (see photo).
Stamps for concrete
Therefore, in order to obtain a high-quality coating, a number of necessary requirements are imposed on the material from which the stamps are made:
- resistance to mechanical shock;
- tensile-compressive strength;
- wear resistance.
Polyurethane stamps for concrete
The most common materials for the manufacture of matrices are aluminum alloys and polyurethane, which have all of the above properties. Most often, polyurethane stamps for concrete are used for the manufacture of printed coatings, which allow the relief structure to be most accurately transferred to the surface of the coating.
In some cases, you can make stamps for concrete with your own hands, but for this you need to have professional skills - the ability to use a welding machine and cutting power tools.
DIY stamp
The price of such equipment will be significantly lower, since such matrices can be made from auxiliary materials.
The procedure for installing stamped concrete
Coating structure
The technology of stamped concrete allows you to produce mixtures both in the factory and directly on the construction site with your own hands. As an example, below is a table of the necessary materials for making 1 m3 of solution.
Approximate composition of the mixture
Work on installing a coating with a decorative surface must be carried out according to the following technological scheme:
- site marking and foundation preparation;
- installation of formwork panels;
- installation of beacons in accordance with the markings;
- if necessary, perform reinforcement;
- laying and compacting the mixture;
- concrete staining;
- stamping the design;
- finishing and coating protection.
Site preparation
Decorative coatings can be applied to both earthen and finished concrete surfaces. The choice of thickness and appearance of the future coating depends on the preferences and operational requirements of the developer.
Excavation work on the foundation, taking into account the coverage area, can be performed either manually or mechanized.
Prepared site
Site preparation consists of performing the following operations:
- removal of the top soil layer to the designed depth;
- marking the levels (heights) of the future foundation:
- filling with crushed stone, sand or cement-sand mixtures;
- surface compaction with manual or mechanized tampers.
Attention! It is prohibited to install an earthen foundation on wet or unthawed soil.
Panel formwork is installed on the prepared site, according to the marked level. The formwork is fastened with metal or wooden pegs driven into the earthen base.
To prevent dyes from getting on existing finished surfaces (house walls, terrace, gazebo, etc.), they are tightly covered with plastic film or other auxiliary material.
Laying the mixture
Before laying concrete, the prepared base is moistened. The formation of puddles on the surface of the site is not allowed.
Upon completion of pouring the mixture, it is leveled using a special rule and compacted with a vibrating screed. Then the surface must be smoothed with standard aluminum trowels.
Smoothing the surface
When laying concrete in hot weather, in order to avoid the appearance of shrinkage cracks on the surface of the coating, it is necessary to perform a number of the following procedures:
- Before placing concrete, thoroughly moisten the base and surface of the formwork.
- Lay the mixture in a continuous manner. If it is impossible to perform a one-stage filling, it is recommended to carry out work with the construction of technological seams.
- It is permissible to use water spray devices to create a wet mist over the base of a freshly laid coating.
- After pouring is complete, cover the surface with burlap or plastic wrap.
Caring for freshly laid pavement
When performing work in low temperature conditions (+5°C and below), a sharp cooling of the solution is possible, which affects the operational strength of the coating.
To solve this problem, the following measures are provided:
- Before laying the mixture, all adjacent surfaces must be cleared of ice;
- increase the volume of cement in the concrete mixture;
- add air-entraining additives;
- Upon completion of installation, cover the surface with heat-insulating materials.
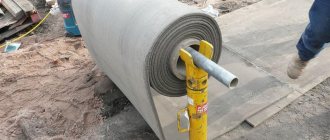
Roll stencil
It is a canvas with a pattern cut into it. The thickness depends on the relief of the applied ornament: from a millimeter and thicker. The manufacturing material must be strong and dense to avoid tearing during dismantling.
Purpose : used for decorative finishing of walls, floor cement screed and concrete paths. The basement and ebb of the cottage decorated in this way looks very good.
Preparation . It’s quite simple to do, but it will require some time and diligence:
- The canvas can be: cardboard, plastic, linoleum without insulation or any other material that does not stretch much. You need to put an image on it that will be reproduced on a wall or sidewalk.
- Imitation brick is a frequently used option. The contours of the side end of the brick are sequentially drawn one after another, as in masonry, leaving a distance of approximately 1 centimeter between them. To achieve greater realism, rectangles are depicted in an inaccurate geometric shape.
- Then the stencils are cut out. A stationery knife with replaceable blades will do this well.
You can also make any images: stars, flowers, animal silhouettes, letters, plant leaves. The main thing is that the elements do not fit closely.
Application work is carried out in several ways.
First way:
- A stencil is attached to the prepared wall or path, which is plastered flush with the canvas.
- After drying, the stencil is removed, leaving a convex ornament.
- Then painting is carried out: you can initially apply colored, decorative plaster or a small “fur coat”. For paths, it is better to use a mixture of tile adhesive and hard stone chips (marble or granite).
Second way:
- The concrete screed is poured.
- A stencil is placed on top and pressed in with a roller.
- It is removed, as in the first case, after drying: there is no need to wait 3 days until the concrete fully hardens.
- The surface is then brushed to remove nicks and washed. The surface is ready for treatment with hardener and varnish.
Coating coloring
Coloring of a monolithic coating is carried out by manually dispersing the dye-hardener.
Hints: movement on the treated surface is not allowed, therefore, at the time of spraying the dye, workers performing this type of work must move along the areas adjacent to the monolithic coating.
Dispersing the color hardener
Surface painting is carried out in several stages:
- First, 60–70% of a colored dye-hardener is applied to the surface to be treated. The powder is evenly rubbed with special smoothers.
- After this, the remaining dye dissipates. Using plaster trowels, the hardener is rubbed into the surface of the coating with the necessary force until the base acquires a dense, uniform color. The edges of the platform are processed with corner trowels.
- The technical break after applying the dye and before stamping the design must be at least one hour.
Coating relief printing
Once the concrete reaches initial strength (with a small force the base should be pressed to a depth of 6–8 mm), a release agent is dispersed onto the surface, preventing the solution from adhering to the base of the matrix.
The quantity and thickness of the separator layer is determined experimentally.
Tips: You need to know that a large amount of reagent can reduce the clarity of the print, and an insufficient amount will cause the stamps to become wet.
Immediately after applying the decoupling mixture, the surface is stamped with texture matrices.
Expanding the matrices
- The first stamps are laid along the near edge of the concrete pad. The edges of the matrices must be placed tightly against each other in order to obtain clear joining lines on the surface, eliminating manual modification of the design.
- After the entire set of dies has been distributed over the surface, using hand tampers, they begin to press the stamps into the base of the coating. Impacts with a tamper must be applied carefully and evenly over the entire plane of the mold.
We stamp concrete
- Stamping of the relief is continued until the outer edge of the matrix sits tightly, without gaps, on the base of the platform. The depth of the relief, depending on the stamps and the selected pattern, is 5–10 mm.
- After completing the first stage, the forms are transferred to another free area of the surface and continued in the same sequence.
- The pattern is printed at the edge of the pad using soft polyurethane matrices with the same structure as the main stamps.
- When removing the stamp, care must be taken to ensure that the hardener does not stick to the base of the matrix.
After stamping work is completed, the surface must be covered, and any movement within the boundaries of the site must be prohibited until finishing occurs.
Relief stamp
To make it, you need to purchase liquid polyurethane - this is the most convenient material. Initially, polyurethane has the consistency of thick kefir, thanks to which it flows into all the small parts of the matrix for casting the stamp. After hardening, this is a full-fledged rubber product, elastic: after squeezing, it takes on its original appearance.
Purpose : applying a convex ornament to a concrete surface or plaster walls.
Preparation . The most important thing is to make a mold for pouring, because it will represent the result of the imprint on the concrete. You need to decide on the variety:
- if scattered prints are made on the screed, then the edges can be of any shape;
- if in the future the surface to be treated is completely filled with a pattern, then the edges should match during subsequent application.
Production technology . The desired fragments for imprinting are laid out on a sheet of thick plywood: this could be your favorite paving slabs, stucco molding, or cut-out ornaments. Another option is textured wood (you can strengthen the convexity with your own hands by burning and using an iron brush, the main thing is to sand it after processing).
- Having laid out the parts, we outline the composition with a pencil along the perimeter and each element separately, taking into account the seam along the edge and between the fragments.
- We cut out the general outline, fix the parts in place with glue and edge the future stamp with a side: the side should be several centimeters higher than the composition laid out inside. If the depth of the seam between the parts is large, then fill it with plasticine (the convexity is determined individually).
- Before filling, lubricate the mold with grease or petroleum jelly to make it easy to remove the finished stamp from the matrix. According to the recipe specified in the instructions, we dilute polyurethane and fill it. Once cured, the stencil is ready for use. For convenience, it is better to make several positions.