Beton-House.com
Website about concrete: construction, characteristics, design. We combine the experience of professionals and private craftsmen in one place
Bench with concrete legs
In parks and squares, in squares and along pedestrian paths, in playgrounds and summer cottages, benches are installed that allow people to relax, spend time in the fresh air, enjoy nature, chat with friends, or just read a book. Among the variety of models available, benches with concrete legs occupy their niche and enjoy deserved popularity.
Concrete benches for garden
Most of the requirements for the characteristics of city benches do not apply to products manufactured for personal plots.
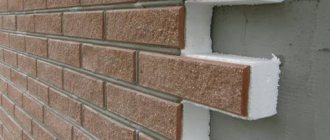
Garden benches can be made more openwork and lighter by combining concrete with metal and wood. In this case, it is advisable to make the base (legs) of the bench from high-quality concrete. This will improve its stability and increase durability.
Before painting, the wooden elements of the bench must be impregnated with an antiseptic, and the metal must be primed.
These simple operations will allow you to repair and update benches less frequently in the future and free up time for other necessary garden work.
Bench base made of concrete slabs
Often in gardens, after replacing the surface or areas, there are a lot of thin concrete slabs left. If they are not available, then such tiles can be easily cast yourself or purchased at the lowest prices. They can be smooth and without any pattern.
The presented photograph clearly shows the process of assembling such a bench base.
If ready-made tiles are used, then it is necessary to drill holes in them that correspond to the diameter of the metal pin that is used to tie the tiles and seat boards together.
If the tiles are cast independently, then in order to avoid drilling holes later, it is enough to place wooden or plastic plugs in the concrete. After the concrete hardens, they are easily knocked out.
Whether or not to make a backrest for a bench is a matter of taste and the intended location of the bench on the site.
An even simpler option for making a base is to glue the tiles with concrete glue or “liquid nails” as shown in the following photo.
This design of the bench makes it easy to disassemble it into parts and move it to a new place in the garden. The upper wooden part can be put under a shed or in a utility room for better storage in the winter.
Openwork concrete bench
It is the most beautiful and the most difficult to perform. First you need to make a polyurethane mold. A sample can be carved from wood, sculpted from clay, or cut from plywood.
There is a simpler option: make a thin casting and stick it on a pre-prepared concrete blank for the back and armrests.
Several options for “carved” concrete.
Concrete block bench
This is a very common option for making a bench. Hollow concrete blocks of various shapes and sizes can be made yourself or purchased.
Using them as design elements, you can change the shape and size of the bench at will.
For the seat and back, thick wooden blocks or beams are usually used, which are treated with an antiseptic and painted.
Concrete blocks can also be painted in a variety of ways. How to do this is outlined in the articles here and here.
Several examples of such block buildings.
Concrete benches in the shape of animals, wood and artificial stone
You can make such benches using a method similar to that used in the manufacture of concrete sculptures.
First, a skeleton is made from metal reinforcement, a metal mesh is stretched over it, and a cement mixture of varying structure is applied layer by layer.
This method is described in sufficient detail in the articles here and here.
Examples of benches are shown in the photo.
In conclusion, I would like to note that using and combining these methods, you can make unique, beautiful and comfortable garden benches. They will delight you and your loved ones for a long time.
Good luck to everyone in your creativity and see you again on the pages of the information resource STONE AND GARDEN WITH YOUR OWN HANDS.
Do you want to improve the area around your house and make a good and durable bench? The best solution would be to make a concrete structure. Concrete has excellent strength and durability. He is not afraid of weather conditions or other factors. It is also worth noting that concrete structures require virtually no maintenance.
Zoning the site
A bench will not only make the landscape spectacular and unique in its own way. She can easily cope with the functional task. For example, site zoning
To be fair, it is worth noting that correct zoning is important not only for large suburban plots. For gardens of modest size it is also necessary
A wooden arch with benches is an almost ready-made relaxation area
Thus, a bench will easily mark the boundaries of a recreation area or the “outline” of a garden room. This element looks stylish and practical at the beginning or end of the green corridor. In addition to the above-mentioned landscape components, the site may include a dining area, gazebos, a place for receiving guests, a terrace, a swimming pool, a place for children’s games and much more. It is customary to separate all these zones from each other, and often this is done purely symbolically with the help of small architectural forms, improvised hedges or benches.
A pergola with wooden benches is a fairly common option for a garden room.
Good performance in public places
Concrete benches can be purchased not only for installation near a private house. They are designed for use in public places, located near kindergartens, schools, organizations, hospitals. The products show a long service life and high reliability.
- Concrete benches are indifferent to rain and humidity changes.
- Street benches will withstand severe frost and extreme heat, and will not be damaged even with an extremely sharp drop in temperature.
- Concrete products do not change their characteristics when exposed to sunlight for a long time. Benches from BetKam, made with the addition of dyes, do not fade, maintaining their original shade for a long time.
- Concrete benches are vandal resistant. You won't be able to cut out letters on them or break out parts. The inscriptions applied with a spray can can be easily erased.
- Concrete benches are quite heavy. They are difficult to move, knock over, or put in one group for the entertainment of a group of teenagers.
Bench leg options
The classic option is a wooden bench with X-shaped or U-shaped legs made of timber. Even simpler is a bench, the seat of which is made of one board, and the legs are made of short sections of the same board, nailed or screwed closer to the edges of the seat. But you can make the legs for the bench yourself in other ways:
- weld or assemble with bolted joints from a profile steel pipe;
- to produce, using artistic forging, shaped metal elements that serve as seat supports, back supports, and armrests;
- use pieces of logs as a support for sitting, or assemble a “wall” from several tiers of timber with a chamfer on 4 sides, rounded timber, thin logs;
- cut curly legs from a thick board.
Legs can be made from a variety of building materials:
- made of concrete slabs, between which boards are inserted to form a seat;
- from hollow building blocks, into the cavities of which a seating beam is inserted;
- from boards folded in a “well”, stable and beautiful legs are obtained, which, despite their large size, do not look heavy;
- if there are balusters left after the renovation, or you have old furniture with carved wooden posts (bed, bookcase), they can be cut into pieces of the required length (height) to make legs and backrest supports for the bench;
- the frame of a lightweight mobile garden bench can be made from metal-plastic water pipes, connecting them with suitable fittings. The seat frame, made of pipes, is covered with durable, dense fabric, from which folding beds are made.
Making wooden legs
One option is to make straight legs from timber or boards 40-75 mm thick. Each leg consists of:
- 2 vertical elements, the height of which is equal to the desired height of the bench minus the thickness of the seat;
- 2 horizontal crossbars that hold the racks together.
Horizontal elements are mounted between vertical ones, one is flush with the top edge, the second is at a distance of approximately 2/3 of the height from the bottom edge. The seat will rest on the upper crossbars. It is advisable to connect the lower crossbars with a stiffener, and if the bench is long, another stiffener between the upper crossbars would be useful.
You can make strong legs from a 75 mm board, each consisting of 2 vertical rectangular elements and 2 trapezoidal ones, which serve to connect the supports to the seat. In rectangular and trapezoidal parts, grooves are selected, as shown in the drawing. All parts are glued together, and the groove connections are fixed with self-tapping screws. Furniture dowels are used to attach the seat to the supports; the hidden connection looks neat.
You can make a bench with X-shaped supports so that the extension of one of the legs serves as a support for the backrest. Each support consists of 3 parts:
- Short hind leg.
- A long front leg that turns into a back support.
- The horizontal bar is the seat support.
Parts 1 and 2 are cut from a 50 mm thick board, the top and bottom are cut at an angle of 45°. They are connected to each other crosswise “in half a tree”, that is, in each board a groove is selected for half the thickness, equal to the width of the other board. They fold and are connected with bolts. Part 3 of a trapezoidal shape is cut out of timber (the ends are also sawed off at an angle of 45°) and attached to the short support with self-tapping screws; it is more convenient to connect it to the long one with dowels. At the rear, the short supports are connected by a drawer, which plays the role of a stiffener.
Strong, massive legs are obtained from logs; different solutions are possible:
- on 2 cuttings of logs of the required height, placed on the butt, a seat made of boards is laid on top and fastened;
- A piece of log is sawed off, equal in length to the height of the bench and sawed lengthwise in half, you get 2 legs. They are installed by cutting inwards, with the round side facing outwards; from the side of the cut, a corner groove is selected to such a depth that the seat board can fit into it. For such a bench, a very thick board is used;
- a log of large diameter is sawed lengthwise in half, 2 short fragments are sawn off, which will serve as legs. The legs are placed with the cut down, and the seat with the cut up. For a more reliable connection, it is better to trim the top of the supports and the bottom of the seat at the points of contact with the supports a little to create flat areas.
Unedged boards are most harmoniously combined with log legs. To connect parts of considerable thickness, metal pins are used; holes are drilled for them with a slightly smaller diameter than the pin itself. The pin is inserted into the lower part, and the upper part is placed on it and nailed through a wooden spacer so as not to damage the wood.
Instructions for making a bench with a back (benches)
Regardless of the specific dimensions of the bench, the procedure for its manufacture remains the same. Let's look at it step by step.
Stage 1: preparing tools and materials
To make a bench for 3 people 150 cm long, 45 cm wide and 40 cm high, you need to prepare:
- wooden boards (150x14 cm, 4 cm thick) - 3 blanks for the seat and 2 for the back;
- 2 blanks that serve as supports and holders for the backrest (height 72 cm, width 14 cm, thickness 4 cm);
- 2 blanks for the front supports of the bench (length 36 cm, height 14 cm, thickness 4 cm);
- 5 beams to strengthen the structure of the bench (4 pieces - 7x4 cm, 55 cm long and 1 piece - 2x2 cm, 120 cm long);
- pencil, level with ruler, tape measure;
- electric jigsaw for cutting wood (or saw, grinder with a disk for wood);
- electric planer for sanding board surfaces, sandpaper;
- primer, varnish and brush.
An example of a drawing that contains all the listed elements and their dimensions is presented below:
Step 2: Select a connection method
The assembly of the structure depends on what fasteners are planned to be used for this:
- wood screws;
- furniture bolts, nuts, washers;
- nails;
- wooden dowels + wood glue.
When choosing a method for connecting elements of a wooden structure, you need to consider what load it will have to withstand.
When using bolts, you will also need to prepare a drill and a drill bit, the diameter of which is slightly larger than the cross-section of the selected bolts. Thanks to this, they can easily enter the holes prepared for them. If the diameter of the hole is larger than the diameter of the bolt head and nut, then you can use washers.
If you use dowels correctly and in sufficient quantities, the structure will be strong:
In our example, self-tapping screws will be used to connect the parts of the bench. Their caps need to be slightly recessed when screwing in:
The self-tapping screw must fit at right angles to the surface into which it is screwed.
Stage 3: assembly of bench elements
The structure is assembled in the following sequence:
- If there are no boards of the required size, cut the wood into blanks using a jigsaw or miter saw. Carefully process each resulting element, and sand the blanks for the back and seat. Go over the ends of the boards with an electric planer, ideally giving them a rounded shape.
- Take the necessary measurements on the received parts and mark with a pencil the places where the fasteners will be located. Drill holes in these places, focusing on the drawings of the bench.
- The long rear supports of the bench, which also act as a frame for the backrest, should be given the correct angle of inclination. To do this, apply markings on 2 pieces of wood 72 cm long. First of all, note the height of the bench - 36 cm. This section of the board does not need to be processed. On the rest of the segment you need to make a cut of 10-20°. Make the same cut on the second leg, otherwise the bench will turn out skewed.
- Assemble the legs of the structure, maintaining a 29 cm “window” between the front and rear elements. Connect them with a beam, which must be cut to the entire width of the bench (55 cm). If possible, it is worth making a double strapping - top and bottom:
- Connect the prepared 2 sidewalls together using boards intended for sitting. They can be screwed to the upper beams of the harness with self-tapping screws or other fasteners. If bolts are used, then for greater aesthetics of the bench they can be masked - before starting the connection, small recesses are drilled in the places where the bolts pass using a special crown. Due to this, when assembling the product, the washers will be immersed in the niches prepared for them, which must then be covered with a mixture of PVA glue and small wood shavings. An alternative option is to cut round elements from wood that can be used to cover the holes.
- To strengthen the structure with the help of beams, you can make a lower frame along the legs. 2 pieces 150 cm long should be screwed to the front and rear supports. If there is a shortage of lumber, you can attach 1 cross member to the lower beams of the harness.
- At the end, secure the back of the bench using self-tapping screws (to prevent the fasteners from rusting, “sink” its head into the wood):
Stage 4: finishing the bench
The assembled bench must be impregnated with a means to protect against rotting - an antiseptic with a penetrating effect. Most of these preparations contain resins and various additives. It is imperative to work with them wearing gloves and safety glasses.
After impregnation is complete, the bench remains to be coated with waterproof varnish in several layers or with regular oil paint.
How to make a similar wooden bench with a back for a summer house is shown in the following video:
Reinforced concrete as the most suitable material for landscaping
The benches for parks and cottages presented in the table of the company's price list are the simplest versions of such products. Our company can produce benches and benches according to individual customer designs. The plasticity of concrete and the ability to create any architectural forms on its basis allows you to create exclusive benches for landscape design ideas. But even the simplest solutions find their organic place in a park, garden, recreation area, in the courtyard of a house or on an alley near a public institution.
At the ZhBI-4 plant they will be able to offer you any elements of landscaping, both standard versions and the production of concrete goods according to customer sketches.
Our specialists will help you choose an individual solution for a specific project, for example, park benches for a historical palace, estate or park decorated in a certain style.
Designing a comfortable bench with a back
Let's start looking at the design with the support posts. They are often U- or X-shaped, and their stability has been tested by experience. The form can also be solid (wooden beams, stone slabs), cast (formed from cast iron or concrete, the back goes into supports), in the form of legs, curved from metal or forged elements.
Bench
The seat is a part of the bench that should be comfortable and resistant to stress. It is made continuous or with intervals (wooden blocks, metal pipes, rods). The solid seat is comfortable, however, it is necessary to ensure that water does not stagnate on it after precipitation. The edges of the seat should be rounded to avoid injuring your legs. The optimal length is 1500 mm, width 400–450 mm, length of one seat 480 mm (of course, all sizes are selected individually). There are designs where the seat and back are made in one line (the back smoothly transitions into the seat by means of a bend), such benches are comfortable, often found in city parks, their supports are cast from cast iron or concrete, you can repeat this shape from wood or bend it from a profile pipe .
Combination of wood and metal
A significant part in the convenience of the bench is given to the distance from the seat to the ground (floor) level; it should be 400–450 mm. It is necessary that the feet touch the base.
The backrest turns the bench into an object for long-term rest; it allows you to relax not only the leg muscles, but also the back muscles. An important role here is played by the angle of inclination relative to the seat and the height of the backrest. Based on human physiology, 10–20 degrees is considered the most comfortable. angle of deviation of the back from the perpendicular, height from 360 mm (since the human spine has an S-shaped bend, the height of the back is divided into two parts: 180–240 mm to the fulcrum - the place where the back does not fit and + another 180–240 mm - segment of contact with the back). The back should not be massive and outweigh the bottom of the structure.
There is too much clearance between the back and the seat
Stone and combined benches
A garden bench made of granite, concrete, marble is a heavy and complex stationary structure that is difficult to make yourself using one material. Processing the bench may take several months.
Bench made of stone and wood
Stationary options have high aesthetic value, where stands (columns) made of stone are the legs of the bench. This kind of work is easy to do; the upper elements of the bench are more difficult to manufacture. In the countryside, instead of stone, you can use concrete, from which it is easy to create an interesting shape of legs with cutouts for the seat.
It is not necessary to increase the support area of a stone bench with a back - the concrete is firmly connected to the ground.
A combined option that also deserves attention is a garden bench made of metal and wood.
Bench made of profile pipe
The legs of the bench are made using rectangles welded from the profile. Under the seat there are jumpers welded to the sides, adding rigidity to the structure.
You can improve the design by adapting armrests, a backrest, soft pillows on the seat - you will get something like a sofa. To complement this splendor, they make a table of a similar design - from a profile pipe, and you get a soft corner in the country.
To avoid injury, it makes sense to bend the profile pipe and get a smooth bend, and then cover it with wood. This option is especially relevant if small children are relaxing at the dacha.
Profile pipe blanks for the table are 40-60 cm longer and 40 cm higher than for the seat. Visually, they resemble the letter “P” smoothed at the corners. Holes are drilled in them for furniture bolts with round heads. Holes are made for the bolts in the boards with which the profiles are sheathed. The length of the boards is about 40 cm for a bench, and about 60 cm for a table, respectively.
Preparing the site for pouring
There is no point in leveling the area for pouring; it is even better if the surface of our artificial boulder repeats the unevenness of the base.
We install the formwork. For curved elements we use a 1.5-2 mm strip of sheet metal, and a board for smooth edges.
We line the inside of the formwork with plastic film, place a bas-relief mold on it (see Fig. 2) and wrap the film over the mold. Now we’ll throw crushed stones of different sizes around the mold to give the casting the uneven texture of raw stone. Spread the film again.
How to make a bench with your own hands from wood
The design of this bench is quite simple, so even an inexperienced craftsman, for whom this will be the first time, can make it. Below is a step-by-step description of how to make a wooden bench:
- First of all, you need to draw a diagram of the bench. This will help make the manufacturing process easier and faster, without unnecessary deviations and corrections;
- The side parts of the wooden bench are assembled. To do this, first drill the necessary holes in which all fasteners and additional elements will be connected;
- The sidewalls are secured with nuts and bolts. A sealed washer is placed under the nut, which should not be tightened too tightly right away. After all, during the work you will need to adjust its density;
- connecting the side parts of the future bench. They must be fixed and connected with large-diameter self-tapping screws. Also for this purpose, fasteners that have a turnkey head are used;
- fixing all details. To connect the sides and back of the bench, you should not attach the parts closely. There should be a hole of about 5 mm between them. Next, all elements are tightened and fastened;
- leveling the joints of self-tapping screws in wood using putty. At this stage, sandpaper is also used to clean out all the flaws and irregularities of the structure being created. Then this tree should be impregnated with an antiseptic and covered with paint;
After complete drying, the wooden bench is ready for use.
Casting according to the working mold model
We place the model on a flat table. You can lay a plastic film on it, or better yet, a sheet of glass. We enclose the model with formwork made of planks, strips of metal, plastic, glass, etc. We secure the formwork with weights and plasticine.
Carefully coat all planes of the model and the inside of the formwork with technical Vaseline or an emulsion of soap and oil melted in a small amount of water.
For filling the mold, gypsum grades from G7 to G14 are suitable (the number means strength).
Using a wide “jet”, pour the gypsum into the water, to which we add about 5% PVA emulsion. Let it sit for a minute, then mix well. The mixture should have the consistency of very thin sour cream, for which gypsum and water should be in a proportion of approximately 55/45. The resulting composition is poured into the formwork so that the most protruding parts of the model are closed by 3-4 cm (Fig. 1).
I recommend: How to build a pile foundation from concrete stepsons
Let the plaster harden, then carefully remove the finished form and let it dry well. Rub with technical Vaseline or oil-soap emulsion.
Principles for installing a concrete bench
The choice of one technology or another is determined by the type of surface where installation is planned. Based on this, the possibilities are:
- concreting or anchoring (the most reliable method - as they say, for centuries);
- placement on the ground: first, holes are dug approximately 10 cm deep,
- then they are covered with gravel (the layer thickness is usually 7-8 cm) and compacted;
installation on a flat, solid base (traditional method).
All work is carried out in compliance with safety requirements and taking into account the characteristics of the landscaped area. Each garden/park concrete bench must comply with GOST. In frequently visited public places, laconic models with a backrest, comfortable for most people, are most appropriate.
Today, MAFs have become an integral part of street space in both megacities and small towns. We are ready to offer our clients a wide range of these products and favorable terms of cooperation. You can buy a concrete bench from us with careful and prompt delivery to any destination, for which only specialized vehicles are used.
Making a bas-relief model
We will cast a flat plate from plaster, 2-3 cm thick and large enough for our drawing to fit on it. This will be the base of the bas-relief. The side edges need to be cut at a slight angle so that later the shape can easily move away from the model. Wet plaster is easily planed with a regular knife.
We draw or select a bas-relief design, scale it to the desired size and transfer it with carbon paper to a plaster plate.
We cover the plaster with several layers of deeply penetrating primer or alcohol varnish so that the contour does not wear off. Now, using plasticine, we form a relief pattern along the intended contour - a bas-relief, for example, like the one in the photo.
Bench made of metal pipe and timber
If you have a welding machine or someone you know can weld you a simple square, then you can make a bench from a profile pipe. To do this, you will need a profile pipe of any cross-section, wooden blocks or boards, as well as furniture bolts and nuts to hold the structure together.
Stages of work
We weld two identical squares with side dimensions of 500 mm - they will act as legs. In the middle of each square, at a distance of 400 mm from any edge, we weld a strip on which the bars (board) will be attached. Before welding the strip into it, it is advisable to drill holes for the mounting bolts. We apply bars (boards) of the required size to the legs and drill holes in the wood in place. We connect the structure using furniture bolts and nuts.
After the bench is ready, you should immediately paint all its elements. If this is a suburban area, try to use bright, rich oil paints and preferably at least three different colors. Near a private house, it is better to use calm, natural colors. For example, to paint metal legs, black paint or paint that imitates steel colors is suitable. To process wood, you can use various stains and varnish, but only for external use. Leave your tips and comments below. Subscribe to our newsletter. Good luck to you and good luck to your family!
Gnomes
Any sculpture can be made from concrete; special forms are sold for this. But if you want to make a unique product yourself, then we offer you a master class: a gnome made of cement mortar.
You will need:
- cement;
- metal rod (a small piece of any thick wire);
- rope;
- stocking.
Before pouring the solution into the stocking, insert a metal rod into it for strength and only then fill it with the cement mixture. To form the nose and legs of the gnome, take a rope, dip it in cement and twist it, then apply it to the desired location. Do the same with the beard. Take and cut out a triangle or something similar to a gnome's beard from the fabric.
Using a wire, hang the product from the top of its cap and leave to dry. After drying is complete, prepare a liquid cement solution with the addition of gypsum and polish your figurine.
The bottom line is: don't be afraid of cement mortar. This is an amazing and durable material from which it is easy and simple to make many good garden products with your own hands. We have provided only the best ideas for cement crafts along with step-by-step instructions and photos, and then everything depends on your desire and imagination.
If you are interested in cement crafts, we suggest you watch a few more ideas in the video below.
Practical tips for creating a garden bench
Making a garden bench with your own hands is also not difficult, because it has a fairly simple design. This bench is placed on four legs, which are all connected together. This ensures strength and secures the back well.
To create a classic garden bench, first of all, make a frame. To do this you need to prepare the following type of boards:
- 1.5 m boards (5 pieces);
- boards 0.36 m each (2 pieces);
- boards 0.52 m each (2 pieces). They are cut lengthwise into 4 bars, which are then used to fasten the seat and legs;
- boards 0.72 m each (2 pieces). In the future they will hold the back and legs together.
Having prepared the boards of the required size, they must be sanded and all defects and burrs on them must be eliminated.
Next comes the assembly of the frame itself. To begin, connect the legs together using self-tapping screws. Then a seat and back are attached to them. And so that the fasteners are not visible, they are placed on the reverse side. At the last stage of creating a garden bench, a lower bar is installed to secure the legs with the main structure.
When the entire bench is assembled, it is painted to protect it from temperature fluctuations and possible moisture. For painting, yacht varnish or special impregnation is recommended. But it is worth remembering that after using the varnish, such a bench will always be cold.
Wood bench on concrete base
Like metal, concrete has a long service life, so it can also be used in combination with wood to create an original, durable bench. Here is her drawing:
*dimensions are given in mm
To assemble such a structure, you will need a board with a section of 150x40 mm, as well as 12 concrete slabs with the following characteristics:
- thickness – 5 cm;
- length – 50 cm;
- width – 50 cm.
The stages of making a bench are as follows:
- Preparation of wooden parts. The board needs to be sawn so as to obtain the following segments:
- 5 pieces. 2 m each;
- 4 things. 65 cm each;
- 2 pcs. 17.5 cm each.
- Marking boards and preparing holes. Take a board 2 m long. Step back 10 cm and 40 cm from the end, and mark points in the middle of the board. Apply similar markings on the other side of the board. Carry out the described action for the remaining 4 boards that are intended for the seat. After this, using a drill with a diameter of 18 mm, drill holes at the indicated points.
- Marking concrete slabs and preparing holes. Also make holes in the slabs for fasteners. To do this, you first need to make a marking, stepping back 7.5 cm from the top edge, and 10 cm from the left and right ends. Draw lines, and drill holes at their intersection points using a drill designed for working with concrete surfaces.
- Preparing the back parts. Take 2 boards of 65 cm each. Place a 17.5 cm piece of board between them, having previously coated its ends with wood glue. To ensure good adhesion of the glue, the sections are clamped with clamps until the composition dries. For greater reliability, you can connect the structure using wooden dowels. Repeat the steps described above for the second part of the backrest.
- Back assembly. Take a two-meter board intended for the seat and, stepping back from the edge 50 cm (with a margin of a couple of millimeters), draw a vertical line. The edge of the concrete slabs will be located in this place. Attach the first part of the back to the drawn line and nail it with nails or self-tapping screws. Step back 5 cm and nail the second part of the back. The wooden parts of the bench need to be varnished.
- Installation of the frame part. To prevent distortions, start assembling the seat on both sides at the same time - alternately installing two-meter boards and concrete slabs. They need to be connected through the holes using 4 M16 threaded hoses (2 rods on each side). Their optimal length is 55 cm. To fasten the rods, you need to use nuts and washers, tightening them simultaneously on each side.
Types of concrete benches
Concrete benches are structures for sitting and relaxing of various shapes, consisting of several elements (side and intermediate supports, back, base, legs). Typically, such products are used for outdoor use, so they must withstand the effects of precipitation and temperature changes well.
Concrete block garden furniture
Depending on the configuration, all concrete benches can be divided into simple (benches in the form of two legs and a crossbar for sitting) and complex, with a back and armrests. The shape of the product is as follows:
- rectangular;
- corner;
- semicircular;
- curved;
- zigzag;
- wavy;
- combined, etc.
If the bench is made of blocks, then the model of the latter can also change and be rectangular, semicircular, curved, or non-standard. Some benches are additionally equipped with urns, others with concrete flower vases. To add aesthetics, the material is painted or decorated in another way, for example, by introducing stone chips into it when pouring.
To finish the backs and seats of benches, coniferous wood is often used, which must be treated with antiseptics and moisture-repellent impregnations before installation. It is also possible to manufacture additional parts from wood-polymer composite (WPC), metal, and reinforced concrete.
Benches with concrete legs
It is easiest to make such benches with your own hands, and their cost will be minimal. Concrete stands can be installed on asphalt, paving slabs, or concrete surfaces. Be sure to carry out appropriate markings on the ground in advance, and the lower part of the legs is carefully leveled. Afterwards, bars are attached to them, which will serve as a seat.
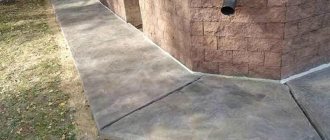
In addition, it is possible to install concrete benches directly on the ground. The top layer is cut off from the soil to a depth of 0.3 m and a width slightly greater than the thickness of the legs. After cleaning from plants and lumps, leveling and compacting, a layer of geotextile is laid and sand is poured. Next, you can install the supports for the bench and mount the bars.
Benches made of concrete slabs
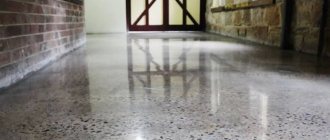
If there are slabs measuring 0.4*0.4 m or 0.4*0.8 m available, then they can also become the basis for making a bench. Concrete slabs are well suited for the side supports (legs) and backs of the product, as they are strong, stable and can easily withstand any load. You can also lay the slabs flat on top of each other and place them directly on the ground, eliminating all unevenness in advance. The concrete is joined together with cement mortar or reliable synthetic glue. The surface of the slabs is ground, polished, coated with a colored primer, and the cracks are covered with mastic.
Concrete block benches
This product can also be purchased ready-made or made independently. The blocks are sold in construction stores in different shapes and colors, but if desired, they can be cast from concrete yourself.
The main options for block benches are as follows:
- Solid. The elements are placed on the surface according to the design project (straight, at an angle or in another way). The blocks are connected with glue or cement; if the soil is unstable, they are drilled through and secured with metal fasteners.
- Hollow. Take U-shaped blocks, lay them on the edges or with the supports down. The concrete is topped with wood or wood-polymer panels.
- Divided. It is a bench on legs, where concrete blocks in the shape of a cube or parallelepiped are used as load-bearing supports.
Bench made of concrete blocks and wooden beams