Concrete sculptures have many advantages over products made from other types of finishes. This material is characterized by plasticity, which ensures ease of installation and manufacturing. Concrete decorative sculptures are resistant to mechanical damage and external irritants. Another advantage is the considerable weight of the product, which ensures its safety on your site.
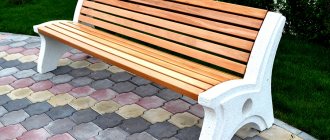
Sculptures for the garden
Required materials and tools
To make a concrete sculpture you will need a certain number of tools. First of all, you need to make sure you have a large container and a concrete mixer. If you don’t have a concrete mixer on your farm, you can use a special attachment for a drill. However, this attachment will not help if you need to mix a large amount of mixture.
To mix cement, you need to purchase distilled water, sand and a plasticizer. You also need to stock up on polyethylene, since such work is mainly carried out outdoors. It is necessary so that you do not have to remove mortar stains from tiles or soil in the garden, which are quite difficult to remove.
To create your own concrete sculptures, you will need the following tools:
- blades of various sizes;
- spatulas;
- primer;
- pliers;
- dye;
- Master OK.
You may need aluminum or steel wire if you plan to manufacture a large or voluminous product or a product with a frame.
Note! It is easier to work with concrete after it has completely dried, so if the production of a specific project involves working with a semi-dry mixture, then you need to prepare additional tools.
You may also need a special form (ball, basin, bowl) for DIY sculptures without a frame. This method of carrying out the work is the simplest, but sometimes it is difficult to choose the shape of the desired size.
example of sculpture
How to transfer model dimensions
To mark and transfer dimensions from the model to the original, we will make a simple device.
It represents two rectangular “gazebos” made of rods, with a roof in the form of a mesh, with stretched threads or thin wire, or welded mesh. This device is called a copy frame. A small one is placed above the model, and a proportionally enlarged one is placed at the place where the sculpture is made. Using a plumb line, measure the size on the model with a tape measure and transfer it. First on the frame, then on the sculpture. How to do this is clear from Fig. 2.
Using a plumb line, measure the size on the model using a tape measure and transfer it to the sculpture.
The main thing is not to move the marking machines during the marking process, and if necessary, return them to exactly the same place.
Composition of the solution
To sculpt concrete sculptures with your own hands, you will need a plastic mixture that will cling well to the frame and pre-laid layers. As a rule, decorative concrete with additives is used for such purposes. It differs from the usual material in its white color and the content of multi-colored granite chips.
The main additives include clay and lime. They are the ones who make sculptural concrete from ordinary concrete and allow you to create various products with your own hands. It is recommended to use kaolin clay. Because other types of clay give a gray tint.
You also need to purchase plasticizers that will reduce the mixture’s need for water. For these purposes, PVA emulsion or CMC is used. They also provide the solution with good adhesion. For the first balls, polypropylene fiber will be required, which will ensure greater adhesion of the first layers and provide the material with protection from cracks and resistance to low temperatures.
Note! The gypsum mixture will increase the setting. Its only drawback is a decrease in the resistance of concrete to temperature changes.
Let's look at the approximate composition of concrete for DIY garden sculptures:
- sand – 500 grams;
- cement – 250 grams;
- water – 110 milliliters;
- lime – 70 grams;
- crushed stone - 1 kilogram;
- clay – 110 grams;
- gypsum – 20 grams;
- fiber – 30 grams;
- PVA – 9 grams.
Attention! PVA emulsion must be pre-mixed with water and then added to the main solution. The remaining ingredients are used in dry form. The consistency of the finished solution should resemble thick sour cream.
Three steps to the sculpture
Concept
We will immediately decide where our future creation will be located. To decorate the park, it is better to have something relaxing: figures of people, animals, or abstract decorations. Characters from fairy tales or cartoons are suitable for the playground.
If a concrete sculpture can be used in a game, great!
Sketch
Drawing of the future sculpture. If you can do it accurately and in detail, good. If it’s also on a scale, it’s absolutely wonderful. If not, at least in the most general form, primitively, as long as it is clear to yourself. Or pick up a ready-made one on the Internet. The main thing is to decide on the dimensions (Fig. 1), at least the basic ones, this is mandatory.
Determining the size of the future sculpture
Scale model
The sketch has been made, but it’s too early to start work. The next step is a model of the future sculpture.
We make the model from clay or plasticine. In fine details, say the tail and paws of a cat from Fig. 1 insert a wire for rigidity.
If you don’t have sculpting skills and the desire to master them, we look for a suitable model in a toy store, at a flea market, or create it on a 3D printer.
Advice.
Sometimes an element looks great on a tiny model, but does not look enlarged. To avoid this, try to select the size of the model on a scale of about 1:5. Let's say, for a meter-long sculpture, a 20 cm model is just right.
What is the model for? Let's explain with an example.
To copy a finished drawing, there is one way: the original is drawn with a grid of identical cells, and then small simple “pieces” are transferred to the same or proportionally enlarged (reduced) grid (see photo).
Transferring a drawing across cells
A sculpture can be copied in a similar way. The only thing is that we will transfer not a plane, but a volume, so the original needs a volumetric one.
I recommend: How to make a topiary, green sculpture for a garden or cottage
Recommendations for making garden figures from concrete with your own hands
The set of devices primarily depends on the complexity of the statues; the majority of concrete sculptures do not require special knowledge and skills. But to successfully complete the case, preliminary preparation will still be required.
In order not to lose sight of important details, you must adhere to the following instructions:
- Decide on the design of the project. The sketch must be selected in relation to your capabilities, including your financial situation. You also need to take into account the features of the garden where the future decoration will be located.
- Make a sketch. To do this, draw quite accurately the concrete sculpture that you plan to make with your own hands. This diagram can be done by hand or created on a computer, the main thing is to do everything accurately enough. You can also use plasticine or a small piece of clay for these purposes.
- Select a scale. To do this, it is recommended to use a scale of one to five.
- Do the preparatory work. Prepare all the tools and materials you will need to create your cement sculpture. Everything should be at hand, it makes it easier to work.
Cutting from semi-dry solution
One of the ways to create a garden sculpture with your own hands is to carve it out of semi-dry mortar. Since it will not be possible to work with fresh solution, it is very liquid and viscous, the mixture must be given time to set. In this state, you can make small grooves on the concrete and cut off the excess.
To do this, you need to make an approximate shape of the future concrete sculpture from a thick mixture, put the completed sketch in film and tie it tightly. This solution is left in the film for twelve hours. The optimal temperature for drying is plus twenty degrees.
The garden product should be checked periodically to ensure it does not dry out completely. This is best done with your fingers - if the material is pressed through under pressure, it means the mixture is not ready yet. When the solution has hardened sufficiently, take a spatula and a knife and first cut off the excess parts. Next, roughness is eliminated, and the figure is given the desired shape and features.
Making cement figures with a base or frame
This option is the most difficult. To make a statue, you will need to make a special structure from wire, which plays the role of the base of the product. The frame for a sculpture in the garden does not have to follow all the curves of the product. Its main task is to make a mold that will make it possible to stick to the frame and give it shape.
For such work, not only wire is suitable, but also wood, a box, and rags. But the first option is still more reliable and less time-consuming. It will create a perfect shape that is easy to work with.
You can use aluminum wire to create fabulous medium-sized concrete garden sculptures. Steel wire is more suitable for large volumetric figures. The main part of the frame parts will need to be welded, the remaining small areas can be secured with pliers.
Experts recommend making hollow garden sculptures; this method has the following advantages:
- Saving - you won't need a large amount of cement to fill the figure.
- Lightness - this model is easier to carry and move, because the work will not be carried out exclusively at the installation site.
Hollow models are usually made using a construction mesh. Next, cement is applied to it using a spatula in layers. Each subsequent ball is made only after the previous one has completely dried. When performing the last layer, you do not need to wait for it to dry completely, this makes it easier to correct minor defects and unevenness.
Frameless technology drinker sheet made of concrete
You can make a sculpture with your own hands from cement without a frame; this option is the simplest. For this, plant leaves are used, for example, burdock or rhubarb. Take three parts sand and one part Portland cement and mix with water. The consistency of the solution should resemble cottage cheese.
The selected sheet is poured with cement and left to dry. Then the leaf is separated. As a result, you will have the perfect shape that can be painted and decorated. Such sheets are usually used as birdbaths in the garden.
Other ideas
If you have mastered the production of such figures, then you can also expand the range of materials and skills used to create:
- Frame sculptures. Using reinforcement (frame), you can make an angel, a dog or any object. In this case, cement is applied directly to the frame of the composition, and a construction mesh is used to ensure that the finished decorative element remains hollow.
- "Drowning" sculptures. Unusual and sometimes frightening figures, as if crawling out of the ground, are made from gypsum, which is diluted with water until a solution has the consistency of sour cream. The finished composition is poured into a clay mold and left to dry for a day at a temperature of about +15 degrees.
In your garden plot you can create very believable and creative figures from plaster
Mosaic figures. The finished cement turtle or mushroom can be decorated with colored mosaics, which are laid directly on the raw mixture.
In the same way, you can make creative trash cans for your summer cottage, decorate the sidewalk, and much more.
Decoration of garden figures made of concrete
Decoration of statues for the garden can be done the next day after production. The cement has not yet completely dried, so it is possible to correct the defects and apply the necessary lines to the figure.
After eliminating the shortcomings, they proceed to grinding the material. Then the figure needs to stand for seven days to allow the crushed stone to fully set. Large parts are sanded using a grinder, small figures are sanded using sandpaper.
Then the part is wiped with a wet cloth and allowed to dry. After all the above procedures, you can paint and varnish the figure.
Pouring into ready-made molds
The concrete mixture can be poured into a mold that will allow you to obtain a figure of a certain volume and configuration. You can buy ready-made forms or make them from some containers with your own hands. Most often, craftsmen do what they need themselves, since the assortment in stores is quite limited. As in the case of the frame, it is not at all necessary to pour any complex structures into the molds - it is enough to make the general shape, and then do the rest by hand.
So, small mushrooms are poured using an old basin or a plastic bottle. The cap is poured into a basin, the leg is made by pouring the mixture into a plastic bottle (after the material has hardened, just cut the bottle). By showing ingenuity and imagination, you can create a variety of interesting shapes from available materials, which can then be simply processed.
Preparation of concrete mixture for pouring into a mold:
- The sand is carefully sifted to eliminate the possibility of large fractions and debris getting into the solution.
- Sand and cement are mixed in a ratio of one to three; if it is possible to choose between gray/white cement, color wishes are taken into account. On a white base, all colors look brighter and more saturated, but gray cement costs less.
- Clean water is gradually added to the mixture of sand and binder; a plasticizer can be added (based on the proportion of 200 milliliters per 50 kilograms of cement).
- The solution is mixed very carefully and thoroughly; the consistency of the finished mixture should be similar to thick sour cream.
After the concrete is poured into the mold, it is covered with film and allowed to dry for 12 hours. It is advisable to protect from moisture and rain. Then the product can be removed from the mold, allowed to gain strength and painted.
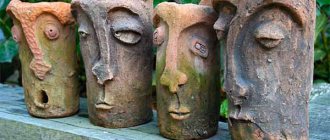
Photos of original craft ideas for beginners and more
Let's look at some of the simplest and most popular options for creating cement figures for the garden:
Example
Concrete figures for the garden are one of the most popular options for making garden decor. Such products do not require special skills and knowledge. The resulting figures are quite beautiful and do not involve a lot of expense. In order to end up with a high-quality and sustainable product, you must adhere to the instructions outlined above and follow the listed recommendations of experts. And then you will be able to please your family and friends with beautiful decorated sculptures in your garden.
How to make a sculpture frame
For a concrete sculpture, the frame is 80% of the work. It sets its general appearance and proportions, gives the sculpture strength, and holds the concrete in place during the sculpting process.
We start with the main frame. → We weld (the link tells about welding with an inverter) from durable elements - pipes, rolled steel, thick reinforcement. While the concrete hardens, this frame has to bear its weight, that is, practically the weight of the entire sculpture.
The “primary” skeleton serves as a support for the “secondary” frame, which:
- holds concrete during the molding process, transferring the load from its weight to the main frame;
- serves as the basis of a mesh holding concrete;
- defines the main elements of the sculpture, excluding the smallest details;
We bend the secondary frame from 6-8 mm smooth reinforcement and connect it by welding and twisting wire. A-II “corrugated tape” is also suitable; A-III. It is more difficult to bend, but for relatively straight parts it is even better.
Finally, we close the large gaps between the rods of the secondary frame with mesh or wrap it with wire, securing it with twists. Leave the distance between the turns or mesh cells at approximately 2.5-3 cm.
As a result, we get a wire sculpture, 2-6 cm in size “thinner” than the future concrete one.
The components of the frame are visible in the example of a sculpture of a dolphin for a fountain (Fig. 3).
Components of the sculpture frame
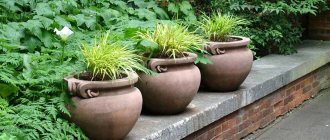
Flower box
Here we will need two wooden or metal boxes of different sizes. One should fit freely into the other. We do the work like this:
- We line a larger container evenly with oilcloth. It should completely cover the bottom and walls.
- Pour a small amount of cement mortar so that the bottom is covered by 5 cm. You can place a couple of metal rods here. Drown them. That is, make reinforcement.
- Now we put the smaller one inside the larger box without pressing. It is advisable to wrap its walls with oilcloth.
- We also place rods on its sides so that they penetrate 2 cm into the bottom layer of the solution and do not stick out from above when completely filled.
- We fill all the voids around the smaller box with concrete. Waiting for it to dry.
- After 1-2 days, you can remove the outer and inner boards of the box.
- Plants are planted in the finished flower garden.
Tip: you can make a nice inscription on a slightly hardened solution. If you wish, you can carefully remove one board of the outer box, free the wall from the oilcloth and write something funny.
Flower box