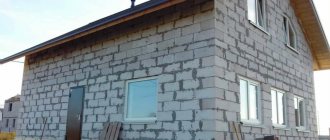
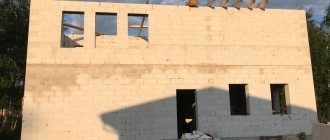
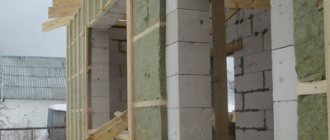
Aerated concrete is a modern building material, which is an artificial stone. The base contains natural raw materials. Insulation of aerated concrete is almost always carried out. Walls using these blocks have the qualities of vapor permeability and thermal conductivity. Before the process of insulating a house, it is important not only to select the material, but also to determine its thickness. Only then will it be possible to achieve a positive result, because if the thermal insulation is too thick, you risk overpaying, otherwise the barrier layer will not be enough to provide a sufficient level of thermal insulation inside the house.
One should not assume that it is better to abandon aerated concrete as a material for the construction of walls for the reason that it requires additional work to keep the house warm. Some believe that this causes additional expenses, because brick houses are often not thermally insulated at all. At first glance, this belief may seem true, but it is only partially true. After all, gas blocks have impressive dimensions, which means that the construction process can be carried out at a much higher speed, which allows you to save on the services of specialists and the cost of heavy equipment.
Insulation from the inside: advantages and disadvantages
Unfortunately, this method has more disadvantages than advantages and they are quite significant. The disadvantages include the fact that insulation from the inside is, in fact, a violation of the requirements of heating engineering, according to which the heat insulator must be attached on the cold air side. In this case, the dew point (the place where condensation will accumulate) moves into the thickness of the walls, which can lead to their destruction. The following points can also be considered as disadvantages:
- complexity of interior decoration;
- reducing the usable area of rooms;
- insecurity of supporting structures from exposure to cold air from outside.
Accumulation of condensate inside the wall
If you choose the method of insulating the walls from the inside with penoplex, then you need to be prepared for the negative consequences listed above. But there are cases when it is not possible to use other options. Such situations include the following.
Application in apartment buildings
Insulation of external walls from the inside with penoplex may be required for residents of the upper floors. Unfortunately, in the past there were rather lenient requirements for thermal protection of buildings. This has led to the creation of a huge amount of housing in the country, which is not comfortable for living in winter and requires enormous heating costs.
The only method of thermal insulation on the upper floors
Among such houses, it is worth highlighting panel houses, where the thickness of the concrete wall is 30-50 cm, although to comply with modern heating engineering requirements it would be necessary to build a concrete wall more than 4 meters thick. In this situation, only one option is possible - insulation from the inside.
Firstly, no one will give permission to make changes to the facade of a house on a small plot; it will be too conspicuous. Secondly, it is impossible to insulate the walls on the upper floors yourself; you will need to resort to the expensive services of industrial climbers.
Capital facade
If fairly expensive and durable materials were used in finishing the facade, it is irrational to dismantle them. It is better to insulate the walls from the inside. Only careful adherence to technology will allow you to get a fairly good result for a long time.
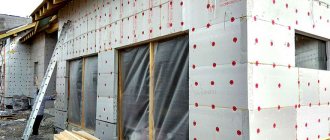
Expanded polystyrene
Insulation of external walls made of aerated concrete is often carried out with expanded polystyrene. Surface preparation in this case only involves removing irregularities that most often arise around the seams. If potholes appear during the construction of a house, they should be filled with cement mortar. If you still haven’t decided whether to use this particular material, then you should consider its positive characteristics, namely:
- affordable price;
- long service life;
- insignificant thermal conductivity.
After completing the work of insulating the walls with polystyrene foam, finishing materials, for example, plaster, can be applied to its surface.
Foam insulation technology
As soon as the walls have been freed from minor errors, they are coated with an antiseptic composition to prevent the occurrence of fungus and mold. This layer should dry well, a primer is applied on top of it to increase the adhesion of the materials. When externally insulating a gas block with polystyrene foam boards, an adhesive composition is applied to their back side. Ready-made powder mixtures are also suitable. Perhaps it is most convenient to work with liquid compounds or assembly adhesives, the latter of which are sold in aerosol packaging.
The outside air temperature must be suitable for the work. Typically this limit is in the range from - 10 to + 40 ˚С. There should be no wind, as the canvases have high windage and can break. You need to start working from the bottom, forming the first row. Then they begin gluing the remaining rows, moving along the perimeter. The plates should be pressed to the surface, placing them in a checkerboard pattern. Their position is checked using a level.
Adhesive for polystyrene foam
If you decide to insulate aerated concrete with polystyrene foam, you need to choose the right glue
When working with aerated concrete outside, it is important to take into account that the composition must be frost and moisture resistant. It should be able to withstand temperature changes well
For external work, adhesive foam, cement-polymer composition and bitumen mixture are suitable. The latter option contains a light solvent that is not capable of adversely affecting polystyrene foam. Such mixtures are very common; they are sold ready-made, which makes them easier to use.
Before use, the surface of the walls is dried and sanded. Then you need to apply a primer to the surface. The base must be freed from dirt and dust, as well as rust. It is convenient to use a comb spatula for application. With its help, an even layer of material is distributed over the back surface of the aerated concrete, and then the slab is attached to the wall of the house.
Mineral wool
External insulation of aerated concrete can be done with mineral wool. It is sold in slabs and, in addition to thermal insulation properties, also has sound insulation qualities. The material is ready to last for quite a long time, is fire resistant and environmentally friendly. The layer is resistant to rotting, microorganisms do not form in it. But the cotton wool itself will need to be additionally protected from moisture, since it allows water to pass through, which causes condensation to occur. If the layer gets wet, it will not only settle, which means it will open spaces for cold penetration, but will also create favorable conditions for the emergence of life in the walls, which often happens in private homes. Rodents will settle in the walls, and the cotton wool itself will no longer fulfill its role.
Acrylic plaster should be abandoned as a finishing layer, as it will also contribute to the formation of condensation.
Mineral wool insulation technology
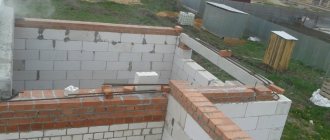
Thermal insulation of aerated concrete with mineral wool is carried out in a certain sequence. The surface must be freed from dirt and mechanical elements, seams and irregularities must be filled, and potholes must be covered with cement mortar. If you want to make your walls even more thermally insulating, it is recommended to use masonry adhesive with appropriate characteristics during the construction phase. With its help, you can form the thinnest seams that will not become cold bridges. The mixture is selected so that it is able to withstand difficult operating conditions, periods of freezing and thawing.
Before proceeding with insulation, aerated concrete must be covered with vapor-permeable plaster in the area of defects. Its application is carried out on a previously primed surface. And to fasten the mineral wool sheets, a frame structure should be formed in the area of the base.
Beacons are placed at the corners of the building. The insulation layer is fixed with glue, which must be applied to the slab at the central point and along the perimeter. In order to distribute the composition over the entire area as evenly as possible, you should use a steel notched trowel.
When insulating, mineral wool must be laid in such a way that the rows of slabs do not move relative to each other. This result can be achieved by forming cross-shaped joints. For additional fastening, a mechanical method should be used, which involves the use of dowel umbrellas. They should be located in the center and in the corners of each canvas.
The aerated concrete is covered from the outside with mineral wool as tightly as possible. In those places where the canvases are connected to each other, there should be no gaps, since they can also become cold bridges, reducing the thermal insulation characteristics of the insulation layer. It may seem to you that mineral wool has an insufficient level of rigidity. This is true, but if you plan not to form a ventilated façade, but to cover the surface with plaster, you should purchase material with a sufficient level of rigidity, for example, marked PZh-175. In this case, the products will have a rigidity even higher than that of foam sheets, while serving as a good basis for the liquid mixture.
When insulating walls made of aerated concrete from the outside, you need to apply an adhesive solution to the thermal insulation using a spatula, sinking the mesh into the composition. Next, another layer of glue is applied on top of it. Openings and corners should be secured using perforated corners. After drying, the surface is covered with plaster, but a primer must first be applied. It is sometimes replaced with putty. The finishing layer can also be paint.
Prices for mineral wool
If you plan to use mineral wool for insulation, you should inquire about its cost. So, PAROC WAS 35 can be bought for 1100 rubles. per package. The thickness of the material varies from 30 to 250 mm. Density is 71 kg/m3. The operating temperature may be less than or equal to 200 ˚С. Another offer is PAROC Linio 15, for which you will have to pay 1300 rubles. per package. The density in this case is 90 kg/m3. The thickness is 150 mm and the length is 1200 mm.
PENOPLEX® WALL for a house made of aerated concrete
The thickness of the thermal insulation is selected based on the results of thermal engineering calculations, depending on the region of construction. You can determine the thickness of the insulation using the calculator posted on the website. In addition, the calculator allows you to calculate the total number of slabs required for insulation in each specific case.
PENOPLEX WALL slabs are designed especially for insulation of enclosing structures - for walls finished with plaster.
Insulation PENOPLEX WALL
During the production process of extruded polystyrene foam, a closed fine-porous structure is formed, resulting in a very durable material. PENOPLEX WALL slabs are distinguished by high compressive strength at 10% linear deformation - no less than 0.13 MPa (15 t/m2).
The insulation has zero water absorption, which guarantees unchanged thermophysical properties. The thermal conductivity coefficient is 0.034 W/m∙°C, which ensures high heat-protective properties of the insulation.
Throughout their service life, the slabs do not change their geometric dimensions, and their durability is comparable to the life cycle of a private house and is estimated at more than 50 years.
The insulation is biologically resistant. This means that no harmful microorganisms, fungi or mold will appear in the wall structure.
Thermal insulation is produced using freon-free technology from high-quality extruded polystyrene foam. It is these environmentally friendly raw materials that are used for the manufacture of food packaging, children's toys, stationery and medical consumables.
Installation of thermal insulation boards
A wall made of aerated concrete blocks ready for installation of thermal insulation should have a humidity of 4-6%. Immediately after construction, aerated concrete masonry has a moisture content of about 35% by weight, so it must be dried before finishing and insulation. The exact drying time for masonry depends on many factors: time of year, brand of aerated concrete, wall thickness, etc. As a rule, one construction season is enough to dry unfinished masonry; it is also possible to use fan heaters that speed up the drying process.
Environmental safety PENOPLEX WALL allows you to work with thermal insulation without special protective measures: a respirator, glasses and gloves. Orange slabs are very easy to process: they are easy to cut and do not crumble. They are easy to install on any surface: they are light in weight and have a clear geometry. There is a special L-shaped edge around the perimeter, so that there are no cold bridges and the slabs fit comfortably together.
The slabs have a factory milled surface. The roughness of the slab improves the adhesion of plaster and adhesive compositions to the surface of the material and reduces the time required for plastering work.
And what is very important, PENOPLEX WALL during the operation of the house never settles in the wall structure, as is the case with mineral wool insulation
The slabs are mounted on vertical wall surfaces staggered, offset.
Insulation of a house made of PENOPLEX aerated concrete
Using polyurethane adhesive PENOPLEX FASTFIX, thermal insulation can be easily attached to aerated concrete bases. It is recommended to apply the glue in one strip along the slab in the middle and along its perimeter at a distance of 1-3 cm from the edge. With this method of application, one bottle of PENOPLEX FASTFIX glue is enough to glue up to 10 m2 of thermal insulation boards.
Additionally, each slab is fixed with façade dowels.
To ensure good thermal insulation ability, disc dowels made of synthetic materials with low thermal conductivity are used, which prevent the formation of cold bridges. Additionally, hammer-in or wrap-up spacers made of galvanized or stainless steel with a thermally insulating plastic head are used.
The slabs are produced in convenient sizes: factory packages with thermal insulation can be easily carried by one worker.
A high-quality applied decorative plaster or clinker brick will give the façade a finished look.
You can do home insulation yourself. You can learn more about external insulation of a house by visiting the website. The documentation posted on the site will be an excellent help for high-quality installation of insulation.
How to insulate a facade, popular technologies
To insulate a house, you can use the “wet facade” technology. It bears this name because during the work process liquid construction compounds are used that require drying.
How insulation is performed:
- Cleaning and surface preparation.
- Applying an adhesive layer (maximum 3 cm).
- Installation of thermal insulation.
- Applying a second adhesive layer.
- Installation of reinforcing mesh.
- Applying plaster.
- Padding.
- Painting.
Another popular technology is the ventilated facade. Its peculiarity is that work is carried out much faster than with previous technology. This is due to the fact that installation does not involve the use of so-called “wet” compounds, between the application of which a certain time must pass. When choosing a ventilated facade, you can begin subsequent installation stages immediately after completing the previous one.
For fastening, not glue is used, but disc-shaped dowels and anchors. This technology is durable and has good resistance to external influences. You can choose any materials for exterior finishing.
Insulation of aerated concrete house outside and inside
Insulation of the walls of a house made of aerated concrete can be carried out from the side of the premises or the facade. It is a mistake to carry out such work immediately after completion of construction. When the house was built during the cold season, moisture could freeze inside the material, which would remain there immediately after insulation, and eventually destroy the walls
Therefore, it is important to leave them for a period until the moisture has completely evaporated. This exposure can last at least 2 months
Once the walls are dry, you can begin to form the insulating layer. Insulation of aerated concrete is usually carried out:
- mineral wool;
- polyurethane foam;
- penoplex.
In order not to wait such a long time after completion of construction and begin insulation work immediately, you need to ensure that the blocks remain in a protective film at the construction site. It is better to store them in a closed, dry place.
External insulation
You cannot leave an aerated concrete house completely without insulation, which is especially true when you live in a cold climate. When you have already decided that such work will be carried out without fail, you should think about whether to place the layer inside or outside. In the latter case, you do not take away free space from the internal area.
After carrying out such work, it will be possible to line the walls with any desired material. This can be plaster, siding and even facade paint. Insulating aerated concrete on the external walls also allows you to increase the energy efficiency of the house, reducing the cost of heating. After such protection, aerated concrete will last much longer, because the walls will be protected from negative influences. The house turns out to be more soundproof, and the facade is more attractive.
Insulation from the inside
Aerated concrete is often also thermally insulated indoors. The advantage here is that the work is much easier to carry out. You don't need specialists working at heights or equipment for this. But it is better not to carry out such work separately from external insulation, since the material will not be protected from the outside, it will become saturated with moisture, which will subsequently cause it to freeze and expand.
Service life of insulation
The main insulation materials on the building materials market are wool and polystyrene foam. As you understand, insulation ages over time, losing its thermal insulation properties, that is, it needs to be replaced, which costs money and time.
The actual service life of mineral wool is about 15 years, provided that it is installed correctly. Polystyrene foam protected with plaster has a service life of about 50 years. If we consider that the service life of an aerated concrete building is 100 years, then during operation, the wool will have to be changed many times, which is not economically feasible.
Foam plastic, on the one hand, is a more interesting option, since it will last longer and its cost is much lower. But the problem is its poor vapor permeability, which requires good ventilation in the house, for example with recuperators. Also, to select the thickness of the foam, you need to make calculations for your climate zone so that the aerated concrete under the foam does not freeze, otherwise moisture will accumulate in the thickness of the aerated concrete, freeze near the insulation, and destroy the aerated concrete.
Polystyrene foam does not allow steam to pass through well, which is why aerated concrete cannot dry properly on the outside of the wall. As a result, water vapor gradually accumulates, and if there is too much water vapor at the dew point, and at the same time the aerated concrete freezes to it, then a slow destruction of the aerated concrete will occur.
To prevent this from happening, it is recommended to use foam plastic with a thickness of 100 mm or more, since such a thickness will prevent freezing of the aerated concrete. In most cases, 50 mm will not be enough, it is better to make calculations and find out for sure. When insulating with polystyrene foam, good ventilation of the house is necessary.
Another important tip for insulating aerated concrete. Fresh aerated concrete leaves the plant very wet, and it will take about 2-3 years to dry to equilibrium moisture content, which is about 5%. Before insulation and finishing, it is better to let the aerated concrete dry. Read more about drying aerated concrete in our article.
As a result of our article, we note that if you think long-term, it will be cheaper to immediately make single-layer walls from aerated concrete without using insulation. The optimal aerated concrete, which does not require insulation, is D400 with a thickness of 375 mm.
Required thickness parameter
To insulate the outside of the house with penoplex with your own hands, you need to choose the appropriate thickness of the product. Here you should pay attention to the climate zone. When purchasing penoplex, insulation is carried out taking into account the fact that the insulating cake must provide a total heat transfer resistance of no less than that established in building codes and regulations.
For the calculation, the thermal conductivity coefficient of the insulation is additionally required. To find out the thickness of penoplex , you can use the following formula: P (thickness, m) = R (heat transfer resistance, which can be taken from official SNiP sources) * k (thermal conductivity index).
Is it worth insulating?
Aerated concrete itself is an excellent material with low thermal conductivity, which is used as an alternative to classic brick or other blocks. The material is lightweight and, when installed correctly, can prevent heat dissipation. But it really needs additional finishing, because it can collapse under the influence of moisture. For the most part, this happens during the cold season, when moisture accumulates in the pores of aerated concrete and increases its thermal conductivity, which increases heat transfer and negates the insulating properties. In addition, frozen moisture expands and damages the internal structure of aerated concrete. Insulation allows you to increase the insulating properties and prevent moisture from entering the pores of aerated blocks.
Due to its porosity, aerated concrete has vapor permeability, which helps dissipate excess moisture that accumulates indoors during human activity. This means that the ideal insulation method for aerated concrete is a ventilated facade, which is necessary to remove the moisture released. The easiest way to implement it is with mineral wool, which also has vapor permeability. If you install foam plastic on top of aerated concrete, which is not vapor permeable, this can lead to moisture accumulation between the insulation and the block. The result of this may be the appearance of mold and destruction of aerated concrete. It is this factor that causes concern among many users as to whether it is worth insulating aerated concrete with foam plastic. If everything is done correctly, then polystyrene foam can still be used to insulate gas and foam blocks.
Afterword
Now you are probably wondering: is it necessary to insulate a house made of aerated concrete and what materials should be used? Of course you need it! After all, an insulated house built from aerated concrete has a number of advantages: the relative ease of performing the work, which does not require special skills, low cost and high thermal insulation of the walls provide residents of a private house with a fairly comfortable stay. But to eliminate possible troubles associated with climatic conditions and the manifestation of the vital activity of rodents, the best solution is to insulate aerated concrete with polystyrene foam, penoplex or mineral wool.
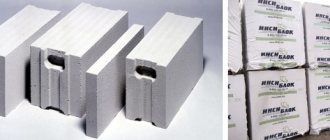
Pros and cons of gas blocks
Aerated blocks are an excellent building material. They are easy to process. You can saw them with a regular hand hacksaw for metal, they drill without problems. When using blocks of sufficient density, fasteners can be screwed into them normally. The material does not burn and does not support combustion. Lightweight, warm, durable, breathable.
Aerated concrete blocks are a building material with good thermal insulation properties
Advantages of gas blocks:
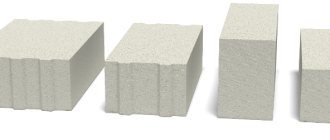
- High strength with low weight. Autoclaved aerated concrete has sufficient strength that it can be used to build a two- or three-story mansion. At the same time, it is light in weight. This means that there will be less load on the foundation, which reduces the cost of its arrangement.
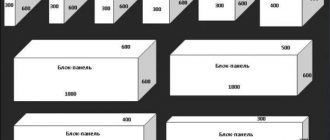
- Lightweight aerated concrete block. For the construction of walls, blocks with a width of 200 mm, strength grade D500 or D600 are usually used. Even gas blocks of this size - considerable width - weigh from 12 to 16 kilograms.
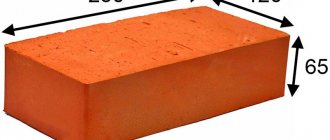
- Excellent thermal insulation properties. According to thermal engineering calculations, a wall made of gas blocks 200 mm thick has the same thermal resistance as a brick wall 60-70 cm thick. Despite the fact that it weighs several times less, the cost of building a house is much lower. There are also such names for this material as heat block, heat and gas block, etc.
- High geometry accuracy. If the blocks do not differ in size, masonry is easy. But this parameter very much depends on the manufacturer. Moisture resistance and frost resistance. Autoclaved gas blocks have good moisture resistance. These figures are much lower than those of brick, but they are more than enough to build a house.
For all its advantages, the gas block is not ideal. You should not leave the walls unfinished. But the finishing of a house made of aerated concrete must be correct. The material is breathable and hygroscopic. To prevent moisture from being trapped inside, it is necessary to correctly select the vapor permeability of finishing materials.
Disadvantages of aerated concrete blocks
The disadvantages of aerated concrete are a consequence of its advantages. For example, ease of processing. During construction, this is good. But you can also easily cut a passage in a wall made of aerated concrete with a chainsaw. Some attackers take advantage of this. The solution is to make a “burglary-resistant” finish, for example, covering the house with brick. There are other disadvantages of aerated concrete:
Aerated concrete is fragile and does not withstand bending loads well. The problem is solved by installing reinforcing belts
But it is important that there is no subsidence of the foundation. When laying gas blocks, a special glue is used, which costs a lot. The advantage is that with good block geometry, its consumption is very small - the seams are made 3 mm each.
If you build from blocks containing lime, it quickly corrodes the reinforcement
The problem is solved by using polymer rather than metal reinforcement. When using low-density gas blocks, special fasteners are needed.
The material is not bad, but you need to realistically evaluate the pros and cons of gas blocks. You can build a permanent home from them without much fear. Aerated concrete blocks are not suitable for building a bathhouse, as they are too hygroscopic. It is better not to use them to build a house in the country - the low frost resistance of the material will lead to it quickly deteriorating. Unless the house will maintain a positive temperature at all times, and the walls will be well insulated.
The principle of thermal insulation with penoplex
Sheathing a house with penoplex requires a special approach, taking into account the thickness of the slabs used. Therefore, first of all, it is necessary to understand the thickness of the thermal insulation layer.
Required thickness of Penoplex
So, it has already been indicated above what thickness this material is produced. This is a fairly wide range of sizes, which is not produced in vain. In order to determine this parameter specifically for your home, it is necessary to carry out a thermal engineering calculation. It is based on the requirements of SNiPs, which indicate that all layers separating the interior from the street must create a heat-protective barrier that would not let the outside temperature into the rooms. And this parameter should not be lower than that specified in SNiP.
The thickness of the insulation is selected based on the average winter temperature Source dovidkam.com
That is, each layer, and this is not only insulation, but also the wall itself, decoration, etc., are barriers that have some kind of protective properties. Some to a greater extent, some to a lesser extent, but each layer performs such a protective function. True, not everything is so simple here, so this calculation is carried out by specialists. In this case, there is no need to engage in amateur activities. The only thing we note is that the thickness of the insulation mainly depends on the region where the house is being built. The colder it is in the construction area, the thicker the thermal insulation layer should be.
On our website you can find contacts of construction companies that offer ]insulation and exterior finishing of private houses[/anchor]. You can communicate directly with representatives by visiting the “Low-Rise Country” exhibition of houses.
Facade insulation technologies
Today, there are two technological schemes for insulating facades: wet and ventilated. Let's look at each separately, but let's immediately note that the method of laying penoplex on the walls is identical. The technological schemes for installing the remaining building materials are simply different.
PPU foam
The thickness of the walls can be any, but aerated concrete buildings in any case need insulation. If you don’t want to thermally insulate the walls from the inside with polystyrene foam, you can apply polyurethane foam to the façade. It is suitable for siding and other finishing materials. It is better to choose a material with reduced density, which has open cells. This method requires good ventilation in the rooms, which distinguishes the material from traditional polystyrene foam boards. If this recommendation is ignored, then it will be impossible to use the house for permanent residence.
The formed layer will need to be protected from mechanical influences, since it has an insufficient level of strength. You can apply plaster or other decorative finishes.
The disadvantage of this approach is also the need to use special equipment. The foam components are combined with each other in a certain proportion and applied to the surface under pressure using a sprayer. Three seconds after the formation of the layer, the material begins to multiply in volume, as well as its polymerization. This makes it possible to form a thermal insulation coating that is completely monolithic. The result can be polyurethane foam with different densities, which are determined by the raw material system. A lower density will indicate a more impressive increase in thermal insulation in volume.
This layer does not take any load at all, so it should be used under solid cladding panels that will protect against various types of influences. It could be siding. Despite all the disadvantages, the economic feasibility of this method is not discussed. The material is convenient to work with, which is especially important if the processing area is quite impressive. If you purchase extruded polystyrene foam, then to carry out work on such an area you will need 20 cubic meters of material.
Features of the material
Many of the nuances of using polystyrene foam as an insulating material for aerated concrete can be understood from its positive and negative properties.
The list of the former is several times larger than the latter, so it is important to know about the pluses:
- ease of transportation;
- ease of giving the required shape to the material;
- elasticity of the material;
- environmental friendliness;
- ease of self-installation;
- minimal thermal conductivity of the material;
- reducing heating costs;
- absence of sudden temperature changes inside the house.
The ease of transporting polystyrene foam is due to its low weight. The latter can be achieved by a special method of material production, in which polystyrene granules are filled with gas, which subsequently makes up 98% of the total volume of insulation. The weight of one sheet of material is practically not felt, which means that during the installation process you can do without assistants, and lifting the foam to floors above the first will not require significant effort. In the process of laying insulation, it is necessary to trim the material; in some situations, the shape of the insulation can hardly be called standard, but this is not a problem with foam plastic, since it can be formed with almost any sharp object. In addition, the insulation has sufficient plasticity to give it curved shapes of acceptable radii.
During the sanitary research process, no harmful releases of material were identified that could cause various diseases during operation. This makes it possible to classify polystyrene foam as an environmentally friendly material. The thermal conductivity of polystyrene foam remains one of the lowest among insulation materials. It is only 0.038 watts divided by a meter multiplied by Kelvin. Thanks to this indicator, it is possible to reduce costs during the heating season, as well as on air conditioning in the summer. In most situations, it is possible to avoid the use of cooling equipment, since the coolness accumulated at night or in the early morning is well retained inside the room. Among the disadvantages of using polystyrene foam, you should know about:
- fragility;
- fire hazards;
- instability to UV rays;
- high material density;
- used by rodents as a place of residence.
The strength of the foam leaves much to be desired. It is not difficult to damage the material with a small blow, which requires additional processing. Facade insulation options contain special substances that reduce the flammability of the material, but this does not exclude the possibility that foam plastic can melt in a fire, releasing harmful substances. The material also does not tolerate proximity to all types of paints that are based on organic solvents. The insulation requires additional finishing to protect it from the sun's rays. If this is not done in time, the surface of the material will lose its strength and it will begin to crumble. Pests can settle inside sheets of foam plastic, which over time will negate its insulating properties.
Installation of foam plastic
Two types of glue can be used to glue foam. One of them is made on the basis of cement and is prepared by mixing. In this case, a significant part of the time is spent preparing the composition. Another material option is special compounds that are similar to polyurethane foam, but have a lower expansion coefficient. Such adhesives are applied using a gun, which is used for polyurethane foam. If the base is made with a small border that protrudes outward beyond the walls, then you can immediately begin installing the foam; if there is none, then you will need to first secure the starting strip.
The latter is a metal profile, the width of which is selected to match the thickness of the foam used. At a height of 15–20 cm from the blind area, a line is marked with a dye cord. A metal profile is placed along this line and fixed to the wall using dowels and self-tapping screws. It must be secured around the entire perimeter of the house. Next, glue is applied to the foam sheet with a snake, and it is tightly applied to the wall, supported by the mounted profile. Installation must begin from one of the corners of the building. Each subsequent row is laid offset by half a sheet to ensure interlacing of the insulation seams. In this case, it will be easier to eliminate cold bridges and also provide greater surface strength. Each seam is additionally filled with glue.
The material is laid right under the roof. In this case, glue alone for fixing the foam will not be enough, because as the plane grows, its weight increases. Plastic umbrellas are used as additional clamps for foam. To install them on a sheet of foam plastic, you need to drill five holes. One of them is in the middle of the foam sheet and the other four are drilled into the seam in order to secure two adjacent sheets of foam with one umbrella. The umbrellas are hammered so that their caps are flush with the foam, after which their position is fixed with a plastic nail.
After completing the installation of plastic fasteners for the foam, you can proceed to strengthening the insulated surface with fiberglass mesh. No screws are used to secure it. First of all, the entire surface of the foam is covered with a special cement-based material. The layer of material should be such that the mesh can be easily recessed into it. As soon as a layer of material is applied to the width of the mesh roll, the latter is applied to the surface and embedded in the glue using a wide spatula. Individual sheets of mesh are laid overlapping on the foam to create a monolithic plane. As soon as the glue layer dries, it is grouted with fine sandpaper. Next, another layer of glue is applied to the foam, which is also sanded with sandpaper. The process is repeated one more time to achieve the desired result. After the plaster has gained strength, you can begin finishing.