Drywall (gypsum plasterboard) is used when leveling partitions and when creating structures of complex shapes. The durability of the finish often depends on the correct installation and technical characteristics of the surfaces to which they are attached. Difficulties arise when installing to blocks with a porous structure. In this review we will analyze in detail the working methods.
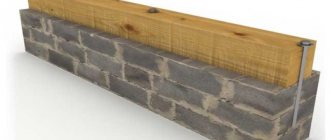
Structure of foam and gas blocks Source group-vertical.ru
How to properly attach drywall to foam block
Leveling the walls with plasterboard greatly facilitates interior finishing. Simple technology, a minimum of “wet” work, a perfectly flat surface - these advantages alone are enough to abandon classic plaster. But not all materials from which walls are made are the same. Even within the same room, they can differ in strength and ability to hold fasteners. If everything is relatively simple with brick or wood, then walls made of cellular concrete have their own characteristics. And in order to know how to attach drywall to a foam block, you need to take them into account.
Correct use of fasteners
To begin with, it is worth considering the above-mentioned disadvantages of the foam block:
- Hygroscopicity . This interesting property of the foam block can be considered both an advantage and a disadvantage when the material becomes saturated with moisture;
- Low density . There are also two opinions here: the advantage is that the weight on the foundation is reduced, and the disadvantage is that choosing a fastening for foam concrete becomes an exciting task.
Now let’s talk in more detail about the last point.
Profile mounting
Covering walls with plasterboard over sheathing, in addition to leveling the surface, solves different problems in each room:
The frame for covering can be provided with niches and shelves. For example, for TV and decorative accessories.
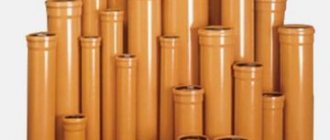
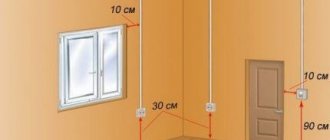
The easiest way is to lay electrical power and low-current cables in a foam concrete wall. But even in this case, you can not groove the channel, but lay the wiring behind the drywall - a corrugated pipe with a diameter of 25 mm is placed in the gap, which provides the height of the side of the standard profile.
Materials
To arrange the lathing for attaching plasterboard to the wall, use ceiling profiles CD (according to the Knauf standard) or PP (according to the Gyproc standard). They are absolutely identical in size - 60 mm shelf width, 27 mm wall height. They are supplied with UD or PPN guide profiles, which are attached to the floor and ceiling. They are the same in shelf width 28 mm, but differ in wall height. If the CD profile has both walls of the same height of 27 mm, then the PPN side for fastening drywall is slightly higher than the inner one - 33 mm versus 27 mm.
The profile thickness may vary. For branded products it is 0.6 mm. There are domestic analogues made of thinner sheet steel - 0.4-0.55 mm. These profiles are not as durable as branded ones. But for lathing fixed to the wall, the strength of such a profile is sufficient provided that the spacing of the attachment points is reduced by 20%.
To fix the profiles to the wall and level the plane of the sheathing, direct hangers are used. And the most difficult thing when interior finishing walls made of foam blocks with plasterboard is to attach the hangers to the wall.
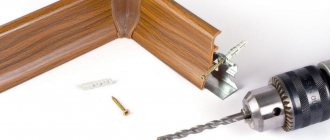
The usual plastic dowel-nail, which is available from the Knauf company, is not suitable for cellular concrete. You need special plastic dowels with enlarged external ribs. There are also screw and drive-in anchors, but they are more expensive and are used if you need to secure a heavy object to the wall.
To attach the suspension you need a 6x52 dowel for a screw with a diameter of 3.5-5.0 mm. Its wholesale price starts from 1.15, retail - about 1.5 rubles. For one suspension you need 3 dowels: one in . For a branded profile, the height of the mounting points is 80-100 cm (plus fixation in the guide profiles on the floor and ceiling). For a room with a standard ceiling height, 3 hangers are needed. For a profile made of “thin” metal - 4 hangers.
The type of drywall depends on the humidity conditions of the premises:
The standard sheet has a size of 250x120 cm, a thickness of 12.5 mm and a thin semicircular edge (PLUC).
The final list of materials for attaching drywall to a foam block looks like this:
Tools
In total you need three sets of tools.
For marking you need: tape measure, laser level (or plumb line and bubble level), construction angle, ruler, pencil, marking cord.
To install the frame, work with the profile and fasten the gypsum boards, use:
To work with drywall you need:
Execution of work
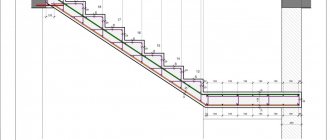
For installation, you need a drawing (sketch) of the frame with dimensions and details for each node.
Drawing and detailing are also necessary to calculate the amount of materials
Advantages of installing drywall without a profile
The frameless method of attaching gypsum boards to walls is justified under certain circumstances. The most compelling and mandatory use of a frameless fastening method is the curvature of the walls. The maximum permissible value of curvature is 5 cm over the entire plane of the wall, otherwise it is unlikely that you will be able to level it using adhesives and save money.
So, three reasons why installing drywall without profiles is beneficial:
- This method will allow you to save significantly. Thus, by purchasing all the necessary elements for a metal frame, you can spend five times more than on purchasing adhesive compositions. However, it is worth remembering that the greater the unevenness, the more glue will be required to level the walls.
- Gluing drywall will not reduce the total area of the room as much as installing gypsum board on the frame. For comparison: when installing lathing (depending on the unevenness), the length of each wall will take about 5–10 cm, while with the adhesive installation method it will be 2–3 times less, often no more than 1 cm.
- You can attach drywall directly to the wall in different ways and on different bases. It doesn’t matter whether they are permanent or partitions, brick, shell rock, foam concrete or aerated concrete, concrete panels or clay blocks. It also does not matter whether it is a wooden base made of boards, timber or shingles, covered with plaster or not.
Leveling walls with plasterboard without a profile is possible regardless of the technical condition of the base. This could be old brick or clay walls, old plaster, wallpaper or paint, partially crumbling plaster, etc. Naturally, there are certain restrictions:
- large rubble of walls;
- high room humidity or direct contact of plasterboard with water (even moisture-resistant drywall will collapse under constant exposure to moisture).
Preparation and marking
First, the surface is prepared for work. For new construction, you just need to clean the wall from any remaining mortar and dust. During repairs, the list of activities is wider:
Although the markings for the frame are done individually in each case, the algorithm for carrying out the work is general:
Installation without frame
If the walls do not have large irregularities, and the thickness is sufficient to lay wiring in the grooves and install mounting boxes, then you can fix the drywall to the foam block without a profile. For this purpose, adhesive solutions with mineral fillers are used.
There is even a technology for fixing drywall to mounting foam. But any of them (even with a small expansion coefficient) requires additional tightening of the sheet to the wall with self-tapping screws at several points. The method is labor-intensive, it is difficult to level several sheets, so it is used in small areas - for example, when arranging window slopes from plasterboard. It is not suitable for walls.
Materials
In addition to drywall, installation requires a mineral-based adhesive mixture and a Betonkontakt type primer.
The advantage of mixtures over ready-made contact adhesive is that, due to the increased layer thickness, they can compensate for minor surface unevenness (up to 20 mm).
There are two large classes of adhesive mortars: cement and gypsum.
Cement compositions are universal - for external and internal work. They can also be used for fastening sheets of drywall, but their main purpose is tiling the surface.
For interior work with drywall, dry adhesive mixtures based on gypsum are produced. The most famous is KNAUF-Perlfix. To improve adhesion, it contains polymer additives. And the manufacturer indicates concrete surfaces as one of the base materials.
Why come up with some ways to glue drywall to a foam block? For example, use putty or finishing gypsum plaster as glue. There is a proven technology for this, which is recommended by the Knauf company, a manufacturer of drywall and dry mixes.
Tools
To prepare the glue you need:
To prepare the surface you need a vacuum cleaner (preferably a construction one) and a primer brush.
Execution of work
Before gluing drywall to a foam block wall, to improve the adhesion of the glue to the surface, the following preparatory stage is carried out:
If the surface of the ceiling was leveled with a screed, then the bottom row of sheets is supported on the subfloor.
Fastening drywall is carried out in the following sequence:
If the solution has not been used within 30 minutes, then the container must be cleaned and a new portion prepared. Do not add water to unused solution.
In the process of aligning the sheets in the plane of the sheathing, the glue protruding beyond the edge is immediately removed. If time permits, it is returned back to the container or the joints are sealed with it.
Source
Features of frame assembly
Due to their simplicity, installation of profiles for plasterboard on walls can be done with your own hands. Vertical lines are corrected with a plumb line, and horizontal lines are corrected using a rule.
At the first stage, a guide profile is installed around the perimeter of the wall, which is attached to the surface using dowels and screws. Vertical and horizontal guide elements are installed overlapping, for which the sides at both ends are cut and bent outward. The structure is fixed around the entire perimeter, the distance between the screws is selected in the range of 20 – 40 cm.
When installing a drywall profile to a wall in an attic or other room, some features should be taken into account. When performing insulation, vertical elements are mounted at a distance of 50 mm from the window slopes. Horizontal crossbars are fixed with “crabs”. It is recommended that after fixing the wall frame in the room, draw up a drawing with the exact dimensions of the frame and the location of the guides, so that paintings and shelves can be placed on the wall after finishing.
Before attaching a plasterboard profile to a wall made of foam blocks, you need to understand the need to strengthen the structure. To obtain a reinforced structure, special metal profiles of increased thickness, having a width of 100 mm, are used. To strengthen the frame, you can use vertical racks of two products stacked together. The elements are connected using self-tapping screws in increments of 15-20 cm. The profile can be strengthened by inserting a wooden beam into it, connected to the metal with self-tapping screws.
Compliance with all the features and nuances will allow you to mount a strong and even frame for covering the walls with plasterboard. The evenness of the gypsum board sheathing depends on the accuracy and quality of fixation of the profile elements.
How to attach drywall to a foam block: installation options
We will send the material by email
Drywall (gypsum plasterboard) is used when leveling partitions and when creating structures of complex shapes. The durability of the finish often depends on the correct installation and technical characteristics of the surfaces to which they are attached. Difficulties arise when installing to blocks with a porous structure. In this review we will analyze in detail the working methods.
M4 screw
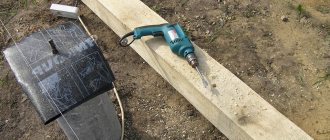
Along with other fasteners, screws combined with metal expansion elements can be used for fastening into a gas block. They are also suitable for dense gas and foam concrete. The installation process is simple. A hole is drilled. The fastener is inserted and tightened. At the moment of tightening, the metal part expands the material. This allows the hardware to be securely fixed in the wall.
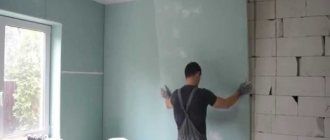
The essence of the problem
Foam and gas blocks in structure consist of many small cells filled with oxygen. Despite the low thermal conductivity, the building material has high moisture absorption. If the finishing is not done correctly, fungus and mold will appear in the walls. The liquid will penetrate through the pores into the internal structure, gradually destroying the raw material.
To prevent the problem, it is necessary to carry out waterproofing. Due to the many cells, gas and foam blocks have a low density. If you screw a self-tapping screw into the building material, the fasteners will not be securely fastened to the partition. The raw materials have poor strength characteristics, so the walls will not withstand the weight of the frames when attaching drywall.
Manufacturers of foam and gas blocks often promise that ordinary self-tapping screws will penetrate the surface like wood. Unlike wood, standard hardware does not adhere to a porous structure. When working with building materials, it is worth using special fasteners for cellular raw materials. A three-way spacer of long dowels holds the piece in place.
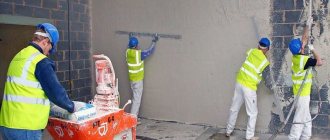
Gas and foam blocks contain foam additives that ensure an airy structure and a smooth surface. Because of this, partitions do not hold traditional plaster solutions well. When finishing interior decoration, reinforcement is required, otherwise the building material and putty will crack.
How to choose fasteners for foam blocks
When using any building material, it is necessary to use consumables that will correspond to its physical properties and qualities. This is determined by a simple definition: The consumable matches the material and enhances the fastening capabilities.
In accordance with this definition, a similar consumable element and fastening is available for the foam block. Taking into account the low density of the block, the fastening will not only easily fit into it, but will also create additional support, and this, in turn, makes it possible to count on increased loads.
Mounting features
Drywall is installed on the foam block using the frameless method. Sheet construction materials are fixed to the partition using a special adhesive. For reliability, several additional screws are screwed in. After the solution has dried, the surface is ready for finishing.
Advantages of the method
The frameless method is the most practical and effective option, which allows you to minimize the disadvantages of foam blocks. After polymerization, the glue grips both differently structured surfaces as tightly as possible. Even under load, the finishing sheets will not peel off from the problematic building material.
Drywall glued to a gas block takes up less space than a box. The metal profile structure hides 7-10 cm from each wall. If in a large room 15-20 cm is invisible, then in a tiny room cutting off will be critical. With frameless installation, the space is reduced by the thickness of the sheet (2-4 cm).
Fixing drywall to a foam block using the adhesive method is much more economical than working with lathing. The owner does not need to buy a durable profile and fasteners for the structure. High-quality composition is the main cost with the frameless method.
Disadvantages of technology
Before attaching drywall to the foam block, it is worth remembering the disadvantages of this method. Gluing gypsum boards is carried out on a flat surface. An error of 5 cm will not cause any difficulties for the performer. If the curvature is 6 centimeters or more, alignment is required. For small deviations, pieces of foam plastic are placed under the problem sheet; for large deviations, additional putty is applied.
Gas and foam blocks must be primed before fixing. The building material has a porous surface, so it absorbs more solution than other raw materials. The suspension is applied until the coating becomes smooth.
The frameless method requires work skills from the performer. Before the procedure, it is important to carefully measure the space and then cut the finishing material. If there is a lack of experience, the sheets are glued crookedly, which negatively affects the appearance of the room.
Suitable glue
Surfaces with a porous structure are difficult to glue with conventional solutions. The compositions must tightly connect the two materials and withstand significant loads. Let's look at 4 popular options for fixation.
Knauf Perlfix
A special alabaster-based mounting adhesive is used when working with drywall. The solution has excellent adhesion, so it is used without additional fasteners. Advantages of the material:
The disadvantages of the product include a long polymerization period - 7 days. In this case, the sheets of drywall can be moved for 15 minutes, then correction is prohibited. The finished solution loses its plasticity in half an hour. The ingredients are mixed in small portions and the work is carried out as quickly as possible.
Self-tapping screws
You may be surprised, but you can use a regular wood screw in a porous gas block. However, it is advisable to use them in denser versions. So, they will not stay in a porous foam block. But for fastening elements that will not create significant loads on the fasteners, they are quite suitable.
For example, if you need to hang a picture, frame or something similar, then such fasteners are quite suitable. For example, you can take a self-tapping screw measuring 3.5x55. However, it is worth estimating the load that will be placed on it. If in doubt, it is better to use a plastic dowel.
Video description
Ceresit SM 11
Super strong cement tile adhesive is modified with additives for use on porous surfaces. Before gluing drywall to a foam block wall, an elastomeric additive is added to the solution. The product reliably fixes unstable cellular materials.
Liquid Nails
The assembly adhesive must contain fine additives. The filler helps glue surfaces with a porous structure together. After applying the mass, the solvent evaporates, and the drywall and foam block are combined. After polymerization, both materials are firmly fixed.
Polyurethane foam
The building mass is used for the frameless installation method. In the open air, the substance increases in size and fills the smallest cracks. Additionally, polyurethane foam connects surfaces that come into contact with the polymer. The view is relevant for large irregularities on the walls. Do not use on ceilings.
Work algorithm
Drywall must be properly fixed to the foam blocks. The key to successful and quick installation is a well-thought-out sequence of actions. Let's consider a detailed algorithm, which for convenience is divided into 3 stages.
Preparatory work
Partitions made of foam blocks can be uneven. The edges of the bricks are protruding from the walls and there are dents in some areas. To maintain a uniform plane, the material is slightly leveled. The raw material lends itself well to sawing and grinding.
Before starting work, dust and cobwebs are removed from the foam blocks. Motes upon contact with the fixing composition reduce the stickiness of the mass. Small debris can be removed using a construction vacuum cleaner or wiped off with a damp cloth.
Foam blocks must be primed. A deep penetration suspension increases the adhesion of raw materials and clogs the top layer of cells. The material becomes less porous, so it will absorb less solution. The surface should acquire a light glossy sheen. Between each layer, a polymerization time is maintained (30-60 minutes).
The room is measured along the perimeter. The width and length of the room are multiplied by the height of the walls. The size of the window and door units is subtracted from the resulting number. If you are working with a ceiling, then the length is multiplied by the width. Raw materials are taken with a margin of 5-10%.
For the frameless method, 1.2 cm thick plasterboard is used for walls. For ceilings, sheet material up to 1 cm (90 mm) is suitable. When working in residential areas, gray raw materials are used, in humid areas - green. Areas around heating appliances or fireplaces are sheathed in red.
To reduce the load of drywall on porous foam blocks, it is better to cut the sheets into small pieces. It is much easier to glue individual pieces than whole canvases. In this case, no assistants are needed to hold the plasterboard.
Gluing
The dry mixture is diluted, like putty, in water. The solution is applied to the surface of the drywall pointwise - in large slides on the back side and in a solid line around the perimeter using a notched trowel. Be sure to leave an empty area 10 cm from the edge.
A sheet of plasterboard is pressed against a foam concrete wall. The second piece is glued after the first piece has stuck. Alignment follows it. Supports made from inclined boards will help secure the material.
If you are working with polyurethane foam, then before installation, holes for fasteners (8 pcs.) are pre-drilled in the mesh partition and sheets. On the reverse side of the gypsum board, a polymer mass is applied with a snake. The part is carefully pressed against the wall and the dowels are tightened.
If you are working with liquid nails, then the glue is distributed over the drywall in strips. The step between the lines is 15 cm. Pieces of canvas are pressed down in the desired area to dry. The material is fixed with supports made of boards. For reliability, 5 dowels are screwed into the raw material.
Pasting the walls begins from the inner corner. The part is placed with an overlap on the adjacent partition. The next element is placed so that it covers the end of the drywall. It is more convenient to align the cut parts using a laser level.
Grout
The final stage begins after the adhesive solution has dried. The joints between pieces of gypsum plasterboard must be reinforced. The surface of the finishing material is primed with a roller, and the lines between the sheets are primed with a brush. For high-quality adhesion, 2 layers are enough.
After polymerization, a special putty for joints is applied to the area of the cracks. If repairs are carried out in a damp room, it is better to use a moisture-resistant composition. A thin fiberglass reinforcing tape is glued on top, followed by another layer of mortar. The mass is used to plug the holes from the dowel heads.
After the putty has dried, the joint line is rubbed with sandpaper. Fine-grained paper helps remove excess particles of the substance and evens out the seams. Use gentle movements along the surface, trying not to apply force.
Advantages and disadvantages of frameless installation
Mounting gypsum boards on a wall without using profiles is recommended if the surface is fairly flat and the differences in plane are no more than 5 cm.
Frameless installation has some advantages:
However, this method also has its disadvantages. It will not be suitable at all if there are large irregularities on the wall. Lathing is also necessary when it is necessary to insulate or soundproof a room, hide communications, or place lighting elements under the sheets.
Advantages of using plasterboard
Plasterboard sheets are attached to the surface in two ways: using frame and frameless technology.
Fastening gypsum boards to a frame is more popular. In the case of interior finishing of a house made of foam blocks with plasterboard, this technology has some advantages:
- The working surface may have minor defects, which can often be observed when laying foam concrete blocks
- Finishing the walls made of foam blocks with plasterboard inside makes it possible to install additional insulation. This is very important for foam block walls
- Technological gaps, which are an integral part of the frame method, make it possible to create a vapor barrier, which is also of great importance for foam concrete walls
- When using a frame, you can easily hide all communications, including electrical wiring, behind the sheets
- Installation work is not particularly difficult, and the material itself is affordable
Features of fastening to various surfaces
The frameless method of attaching plasterboard to the wall allows it to be mounted on various types of surfaces:
Each case has its own nuances that must be taken into account. The correct installation method is also important.
To the brick wall
Brick surfaces have several disadvantages that may prevent you from attaching drywall with glue or self-tapping screws. These include the fragility of the material and pronounced unevenness of the masonry.
Installation of drywall must be carried out using spot application of polyurethane foam. In this case, the substance is applied in small quantities to the wall, taking into account expansion.
The method of applying polyurethane foam directly to the sheet is more preferable, since it allows you to control the process.
If the brick wall is fairly flat, then gluing gypsum plasterboard to it will not be difficult. To do this you need:
To attach gypsum boards to a brick wall, it is recommended to use foam intended for mounting polystyrene foam. It doesn't expand too much and has a good level of grip.
To the concrete base
Such walls are quite smooth, so it is advisable to attach gypsum boards to them using glue. But before this, you need to clean the surface from dust and grease, and also make notches on the concrete with a jigsaw or an ax.
It is necessary to evaluate the curvature of the walls using a level and noting any depressions or bulges. Gluing begins precisely from the convex areas. If the difference is too noticeable, then it is pre-plastered.
Plasterboard sheets are attached to the concrete wall with a gap of 5–7 mm between them. To do this, it is convenient to use wooden wedges.
To the wooden wall
If wooden partitions do not have significant flaws or differences, then the drywall is attached with self-tapping screws. Otherwise, the surface is leveled with a plane or wooden pads. (the photo does not correspond; the article describes installation methods without a frame, but in the photo there is a wooden frame, replace it)
After this, using a level, you need to estimate the depth of the remaining irregularities and select screws of the appropriate size.
Before attaching drywall, the wooden surface needs to be treated with an antiseptic and fire retardant. This is necessary to prevent the formation of mold and mildew.
The installation process consists of the following steps:
To surfaces made of aerated concrete and foam blocks
Such partitions have a porous structure, so moisture can accumulate in them over time and mold can form. Before installing the gypsum board, it is necessary to treat the interblock seams twice with a water-repellent primer.
There are two ways to attach sheets to porous surfaces:
What is the best way to install?
Each technology solution has its own advantages and disadvantages that must be considered. This will allow you to choose the best option and save you from additional costs.
For self-tapping screws
This method of fastening is very convenient and inexpensive, but it is not suitable for hard brick or porous aerated concrete surfaces. For wooden walls it will be the best option .
The advantages include the following:
But there is also a significant drawback. Drywall can only be attached to very smooth walls using self-tapping screws; even the slightest flaws can prevent the sheets from properly adhering to the surface.
Using special glue
To attach drywall to the wall, it is advisable to use various adhesives, for example, liquid nails.
There are also the following significant disadvantages:
Using building mixtures
This method is ideal if it is not possible to level the wall surface well. Plaster or gypsum glue are not as strong as special adhesives, but they have advantages: you do not need to fill small voids with putty and you can adjust the seams between sheets in height with great accuracy.
On polyurethane foam or mastic
This method will be a suitable solution if the partitions in the room have unevenness, the elimination of which is impossible for one reason or another.
In this case, there is no need for thorough preparation of the surface; all recesses and crevices are filled with foam, and rapid hardening speeds up the pace of work. Over time, it expands unevenly, begins to put pressure on the sheets of drywall and penetrates between them, so the excess will have to be cut off .
The process of fastening using polyurethane mastic is not much different. But it should be applied to the plasterboard sheet with more frequent strokes and always along the entire perimeter.
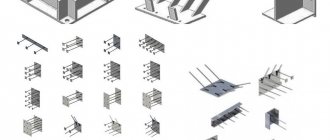
Fasteners
Before attaching a plasterboard profile to a wall made of aerated concrete, brick or other building material, you must purchase special additional and fastening elements:
- Special couplings for connecting individual parts to increase the length of the profile when installing in the attic and other rooms.
- Crabs, which, thanks to their cross-shaped shape, are used for fixing at the intersection of profiles in order to increase the strength of the frame.
- A straight element that has the ability to bend at a certain level, forming a U-shaped opening for installation and reliable fastening of profile products.
- Anchor suspensions ensuring reliable placement of structural elements.
Fastening elements (hardware), which are intended for fixing profiled products, are selected depending on the type of surface used:
- To attach the profile to a concrete or brick wall, it is advisable to purchase dowels of the required sizes, depending on the quality of the surface.
- When installing the profile on a wooden wall, self-tapping screws are used.
- To connect drywall profiles to each other or to additional parts, screws with a pointed end are required.
- The plasterboard sheet is attached to the profile using galvanized steel self-tapping screws with fine threads.
How to finish a gypsum board wall without using a profile: step-by-step instructions
Required tools and materials
Before proceeding directly to the installation of drywall, it is necessary to take measurements, calculate the amount of material required and make the cutting correctly.
The material is calculated based on the total area of the room’s walls, window and door openings. In this case, a reserve of 15% is made.
You can calculate the material using the following formula:
Number of sheets of drywall = (area to be finished in sq. m / area of one unit of drywall in sq. m) x correction factor.
The value of the coefficient varies depending on the area of the room:
Preparatory work
For a good fit of the gypsum board to the wall, the surface must be carefully prepared. To do this, you need to remove the old plaster in places of peeling, partially or completely.
Enlarge the resulting cracks, clean them from sand with a brush, prime them and seal them with a suitable repair compound, sealant or polyurethane foam. Knock down or clean off protruding protrusions to a level.
Prime the surface with a deep penetration antiseptic. The primer should be applied in two layers. But it is important that the first layer dries completely.
It is necessary to make control lines that take into account deformation gaps. They are 3–5 mm between the plasterboard and the ceiling, 8–10 mm between the sheet and the floor.
Installation
On the wrong side of the sheet along the perimeter, glue is applied in dotted lines or in solid lines to at least 10% of the surface of the total area. In the center it is placed with points with a diameter of 12–15 cm in increments of 20–30 cm.
Between the floor and the lower control line, stands made of old ceramic tiles or plywood with a height of 8–10 mm are placed. Place a sheet on them and press it against the wall.
Check the level and make adjustments if necessary.
Wait for the glue to dry and additionally secure it with butterfly dowels.
Using this technology, entire panels are installed, and then the remaining parts are fastened. If a narrow piece of drywall is attached to the top of a large sheet, then the edges of both elements at the junction must be cut with a knife or plane at an angle and the gap filled with putty.
Rough and finishing
Seams between glued sheets can only be sealed after the glue has completely dried. The joints between them are primed and leveled with putty.
While the layer has not hardened, a sickle mesh or sealing tape is glued to the seams.
Primer and finishing putty are applied.
Masters advise following the instructions. At optimal temperature and humidity in the room, a properly installed gypsum plasterboard structure will last at least 10–15 years.
Source
Choosing a profile for drywall
Before attaching the drywall profile to the wall, you need to make markings and determine their number in the frame. Profiles are supplied in standard lengths of 3 or 4 meters. For their manufacture, metal with a thickness of 0.4-0.8 mm is used. Profiles with a thickness of 0.55 mm are optimal for ease of installation on the wall and strength characteristics.
Depending on the purpose, profiles are:
- PN guides (UD). They have a U-shape with a base of 50, 75 or 100 mm, while the width of the sidewalls is 40 mm. The main purpose of the products is to assemble a wall frame in order to obtain a durable frame.
- Rack-mounted PNP (CD) – can be used for wall mounting as vertical and horizontal elements.
- Corner (PU) are designed to strengthen and level the corners of the room and come in widths of 25 or 31 mm.