It is impossible to organize the correct operation of the local sewer system of a country cottage without installing a drain tank. One of the cheapest ways to drain sewage is a cesspool - you can build a sewer structure yourself, using inexpensive materials.
We suggest familiarizing yourself with the most popular and budget options for waste tanks. The article describes in detail the technologies for their construction, and also outlines the features of the operation of cesspools.
Classification of waste tanks
The classification of cesspools is carried out according to two main criteria: design and type of material used to construct the walls.
Design options
The cesspool can be arranged in the form of an absorption well or a sealed storage tank. In the first case, the bottom of the tank is simply covered with a layer of fine gravel or crushed stone, which will be responsible for filtering the wastewater.
Absorption wells are installed mainly for collecting and purifying “gray” sewage from washing machines, dishwashers, showers, etc. On rocky, semi-rocky rocks and clayey soils (clays, loams, sandy loams) it is impossible to build cesspools without a bottom.
To organize a filter well, soils with filtration capabilities are required.
Partially sealed structures are convenient because they do not require regular pumping. At the first stage of operation, water seeps into the ground quite quickly.
However, over time, when installed on soil with layers of loam, silt may accumulate at the bottom of the tank, making filtration difficult. This leads to the need for more frequent well cleaning.
Passing through the drainage bottom, the wastewater will be consistently cleaned and penetrate into the underlying layers. There must be at least 1 m between the roof of the water-saturated formation and the conditional bottom of the filter well
Giving preference to partially sealed structures, experienced owners recommend separating wastewater by constructing separate cesspools:
- the first is for waste water;
- the second is for the toilet.
In this case, the toilet pit will fill more slowly, and therefore less likely to need pumping with special equipment. And drains from the kitchen and bathroom, which contain a tiny amount of insoluble inclusions, will almost completely seep through the filter into the ground.
Leaky structures are allowed to be installed only if the drain does not exceed 1 cubic meter. m/day. In structures of this type, to accelerate the decomposition of impurities and improve the quality of cleaning, it is recommended to use specialized products for cesspools.
If we compare these two types of structures, then closed, sealed tanks are preferable in the sense that they are safer for the environment (+)
When constructing a sealed, closed cesspool, the bottom of the tank is completely concreted. To arrange the bottom of tanks, special slabs, cement fill or brickwork are used.
The walls of the storage tanks are also made of building materials: monolithic concrete, reinforced concrete rings, baked bricks, foam blocks. The walls and bottom of the sewer structure are completely covered with waterproofing.
Types of materials used
Depending on the dimensions of the structure, as well as the accumulating or filtering principle of operation, a wastewater collection structure can be:
- tire pit;
- Plastic container;
- tank made of concrete rings;
- building with brick walls.
The choice of the appropriate option depends on the terrain conditions and the capabilities of the owner of the site. The main requirement for the material used to construct a storage tank is to prevent the seepage of wastewater into the soil in contact with it.
The material must have excellent resistance to soil pressure, and also be resistant to aggressive environments, which include sewage. For this reason, the use of metal or wood, which quickly deteriorates under the influence of moisture, is unjustified.
How to put a septic tank into operation
In order for the system to begin to function effectively, the constructed septic tank must be saturated with anaerobic microflora. The natural accumulation process takes several months, so it is accelerated by saturating the septic tank with imported microflora. You can do this in two ways:
- The new septic tank is filled with wastewater and left for 10-14 days. Then sludge sludge from an existing anaerobic septic tank is loaded into it (2 buckets per cubic meter).
- You can purchase ready-made bioactivators (bacterial strains) in the store (the main thing here is not to confuse them with aerobes, which are intended for other treatment systems).
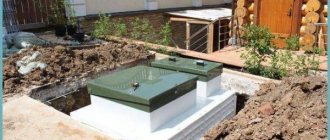
Ready-to-start septic tank made of ringsSource remont-book.com
Arrangement of the tank: taking into account sanitary standards
Despite the fact that the process of constructing a cesspool is simpler than constructing the same septic tank, a number of certain nuances should be taken into account when constructing a structure. After all, the efficiency of the sewer system and the ease of use directly depend on them.
The location for constructing the pit is chosen away from the house and sources of drinking water so that the runoff seeping into the ground does not cause harm. It is necessary to provide for the possibility of access of a sewage truck to clean the pit.
Regardless of the type of design chosen, in order to properly make a cesspool, you need to correctly approach the place where it will be installed.
When deciding on the location, it is important to take into account the level of groundwater. If there is a possibility of infiltration of treated wastewater into the water intake horizon, the installation of an absorption structure will have to be abandoned.
Image gallery
Photo from
Taking into account the location of neighboring residential buildings and plots
Recommended distance to the foundation of the house
Layout of the sewer route
Possibility of access for sewage disposal equipment
In addition, in regions with characteristic flood phenomena, it is impossible to build wells with filtration holes in the walls. Because there is a high probability of groundwater contamination when a sewerage structure is flooded during its seasonal increase.
The organization of the storage tank is also carried out according to special rules. The buried storage facility must be provided with free access for sewage disposal equipment, which in most cases has impressive dimensions.
The rules for placing cesspools are strictly regulated by SNiP. Failure to comply with the prescribed requirements is punishable by fines.
The cesspool is located at a distance of 4 meters from residential buildings, 30 meters from the water source, 5 meters from the road and 3 meters from garden beds and plantings (+)
When determining the dimensions of the structure, keep in mind that the maximum depth of the pit should not exceed three meters. Exceeding the depth significantly complicates the process of pumping out wastewater.
In addition, the walls of the structure must be insulated to the depth of seasonal freezing of the soil, and a small protrusion must be provided in the upper part of the pit for installing a cover.
Permits
To begin with, it is worth saying a few words about the legal issues associated with the construction of a cesspool, septic tank, and other local treatment facilities on the site. The fact is that you cannot create such objects without regard to anything.
In order not to cause problems for yourself, and the autonomous sewer system has been legalized, before starting work, it is necessary to obtain a SES permit for construction. This is due to the fact that any waste entering sewer containers is almost always a favorable environment for the development of a large number of harmful microorganisms. Therefore, sanitary and epidemiological supervision monitors the construction and operation of such structures in order to protect groundwater from biological or chemical contamination that can lead to the spread of various diseases.
In order to obtain permission to build a local sewer system, you will have to collect a package of documents. The list of necessities includes the following:
- Documents confirming ownership of the site and the main building located on it.
- A technical passport with a site plan showing all buildings without exception.
- A copy of the plan on which it is necessary to determine the probable location of the drainage pit or septic tank.
- Design of a septic tank or pit. They will help you develop it in the design organization.
- Project (plan) of a residential building with the location of the bathroom in it.
Example of topographic survey of a site
- Topographic survey of the site, which is carried out by specialists from geodetic organizations. The survey plan displays not only all the buildings and boundaries of the site, its topography, hydrological resources, the presence of vegetation, soil type, and other necessary data.
- Agreement with organizations involved in the removal of various household waste.
The collected documents and application are submitted to the regional SES or to the organization carrying out environmental protection activities. You will have to wait about a month for a building permit. The organization issuing the permit has the right to monitor the correct operation of the local sewage system, timely cleaning, and compliance with environmental standards.
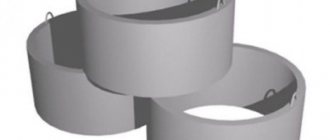
Concrete ring construction: step-by-step instructions
A standard sewer storage tank consists of 2-3 rings. Each ring measuring 1x1.5 meters can accommodate up to one and a half cubes.
The construction of a cesspool from concrete rings is a multi-stage process that requires adherence to a certain sequence.
Step #1. Digging a pit and arranging the bottom
Having decided on the dimensions of the future “well”, they dig a pit, the dimensions of which are 80-90 cm larger than the diameter of the rings being installed. The walls of the pit are cleaned and leveled. The bottom of the pit is carefully compacted.
When constructing a filter structure, the bottom of the pit is lined with a 25-centimeter layer of fine gravel or broken brick
To create a sealed pit bottom, cement is poured or bricks are laid on pre-built formwork, the dimensions of which correspond to the shape of the future tank.
The bottom with the formwork installed is laid out with several layers of bricks or filled with cement mortar. It takes 5 to 7 days for concrete to harden. To simplify your task, use ready-made concrete rings already equipped with a bottom.
Step #2. Construction of the walls of the structure
After the poured bottom has acquired the desired strength, the installation of concrete rings begins. The rings are sequentially lowered into the prepared shaft well using a winch or crane. If during immersion the ring becomes warped and gets stuck in the ground, the hole should be slightly expanded.
When installing and adjusting the rings, in order to avoid distortions, the vertical and horizontal planes should be checked using a building level
To soften the blow and avoid the appearance of cracks in the concrete, boards are temporarily laid on the upper edge of each ring. Concrete rings, if necessary, are tied with reinforcement and fastened together with steel plates or brackets. A more reliable grip can be achieved by using rings with a “lock”.
The joints are covered with cement mortar with the addition of liquid glass and waterproofed using old rubber seals.
To ensure waterproofing properties, the outer surface of the installed rings is covered with bitumen mastic and wrapped with roofing felt.
After completing the installation of the tank barrel, the voids between the outer walls of the constructed tank and the pit are strengthened:
- stones;
- broken bricks;
- soil dumped when digging a pit;
- construction waste.
In regions where the depth of soil freezing exceeds one meter, it is advisable to insulate the tank walls.
The pipeline to the cesspool is laid below the freezing point of the soil. To achieve the required slope, the pipes are laid in a trench using brick supports.
Step #3. Installation of hatch and ventilation pipe
The upper ring is covered with a slab made of reinforced concrete. At the final stage, ventilation is installed that will remove methane and explosive sulfur gas formed as a result of rotting.
To construct an outlet pipe, take a meter-long section with a diameter of 100 mm and deepen it into the cavity of the well so that the upper end rises half a meter above the ground.
To prevent the spread of unpleasant odors, the cesspool is covered with a plastic waterproof hatch. It is installed on a neck with a height of 300-500 mm.
The inspection hatch must be equipped with two hermetically sealed covers: the first is placed at the ceiling level, and the second at ground level
The double lid will prevent the spread of unpleasant odors in the summer and freezing of the contents in the winter. To increase the insulating properties of the structure, the space between the covers is laid with pieces of mineral wool or pieces of foam plastic.
A layer of clay is laid on top of the ceiling, on top of which decorative soil is poured at the level of the installed lid.
Features of operation
To use an autonomous sewer system calmly and without problems, it is not enough to know how to make a drainage hole in a private house. You need to use it correctly. Simply pumping it out as it fills is not enough, since over time the bottom and walls of the structure become silted and covered with fatty deposits. This is especially undesirable for filter-type storage tanks, since water from them stops seeping into the ground. And the likelihood of an unpleasant odor in this situation greatly increases.
This problem is solved with the help of special preparations with live bacteria that process sewage. These are powders or liquid compositions that are added to the pit according to the instructions. As a rule, they are poured through the toilet.
Note! Carefully study the instructions for compatibility of the drug with household chemicals. Some washing powders and other chemicals have a detrimental effect on bacteria.
Preparations with bacteria for cesspools and septic tanks Source i.ytimg.com
Old deposits in a pit can only be removed mechanically, scraping them from the bottom and walls or knocking them down with a powerful pressure of water.
Construction of a brick cesspool
A significant advantage of a brick cesspool is durability. The structure can last more than half a century. In addition, such a tank is repairable.
Step #1. Calculation of the volume of materials
To properly build a brick cesspool, you need to make a construction plan and carry out preliminary calculations. It is necessary to calculate the number of pieces of material and determine the number of rows. To do this, the estimated height of the walls is divided by the height of the brick row, not forgetting to add 6 mm to the seams.
Knowing approximately the number of bricks in each row, it will not be difficult to find out the required volume. To determine the number of bricks for staggered laying, you need to multiply the number of bricks in one row by 0.6.
To build a pit, you can even use used red solid bricks that have chips and small cracks
When constructing a brick wall, the masonry is done using a cement-sand mortar prepared in a ratio of 1:4.
Step #2. Excavation and wall laying
You can dig a pit yourself, armed with a bayonet shovel, or using small-scale mechanization tools. The shape of the pit can be any: round, square, rectangular. At the same stage, a trench 55 cm deep is dug for laying sewer pipes.
To construct an absorbent structure, the bottom of the pit is covered with a drainage layer at least 100 cm thick; when constructing a sealed storage tank, it is filled with a cement screed.
The walls are laid in a checkerboard pattern so that the vertical seams between the rows do not form a single line; the thickness of the solid section can be one brick or half a brick
Brick walls must be plastered with cement mortar. To achieve complete tightness, the surface is covered with bitumen mastic, and to extend the service life of the plaster, ironing is carried out.
Reinforced concrete screed is best suited as a floor. The sides of the pit should overlap by 25-30 cm.
To create the ceiling, formwork is assembled from wooden boards. Concrete is poured inside it in two layers. To do this, first pour out a solution 7-8 cm thick.
A reinforcement grid is laid on top of the first layer, maintaining a spacing of 10 cm between the rods, and the lined sheathing is filled with a second layer of mortar.
An inspection hole with a diameter of 700 mm is made in the ceiling cavity.
After the concrete has set, the floor is covered with roofing felt, plastic film or any other waterproofing material. The finished structure is sprinkled with soft clay and soil.
After completing the organization of the sewerage system with a cesspool, all you have to do is monitor the filling of the tank and, as necessary, use sewerage equipment for pumping.
What rules must be followed when servicing a septic tank?
There are simple rules that support the high-quality operation of the system.
- Cleaning. Twice a year, in addition to cleaning the drains, the septic tank must be inspected and the pipelines cleaned. Once every 5 years (or better yet, every 2-3 years) the bottom heavy fats are removed. The volume of sludge should not exceed 25% of the tank volume. When cleaning, part of the sludge is left to restore the microflora.
- Quality of work. The wastewater leaving the system must be 70% purified. Analysis of wastewater in the laboratory will determine the acidity indicator, which will allow you to find out the quality of the drainage system.
- Security measures:
- Work inside the septic tank is allowed only after intensive ventilation and using a safety belt (gases formed inside can be dangerous to human life).
- Increased safety measures are required when working with power tools (humid environments).
A septic tank made of concrete rings makes private housing more autonomous and, despite its shortcomings, it is one of the most reliable and durable options for treatment facilities for suburban real estate.
Calculation rules
Preparing a cesspool pit before pouring concrete
To calculate, we use the following formula:
V pits = V days/person x number. people x number of days,
where V pit is the volume of the cesspool,
V days/person – water consumption per person per day (about 150-200l),
number of people - the number of people permanently residing in the house,
number of days – frequency of pumping out the pit in days (recommended 2 times a month, 15 days).
Calculation of a cesspool for a private house in which 4 people live will look like this: 150x4x15 = 9 cubic liters.
Advice!
There is a preliminary calculation, but we need to add a little for unforeseen expenses, we get 10 m3, this is the volume we need to make a cesspool.
But first contact the organization that will service your building.
You need to find out how much the machine can pump out at a time and agree on the frequency of removal.
We found out how to calculate the volume. Based on this figure, you need to calculate the size of the hole. Approximately we get the following dimensions: length – 3 m, width – 1.8 m, depth – 2 m.
Speaking about depth, I would like to say that it depends on the proximity of groundwater.
If the water is above 2m, it is not recommended to build a hole or you should use plastic containers or tanks of the required volume.
But the best option in such a situation would be not an underground, but a surface treatment or storage facility. Now let's figure out how to build.
Local sewerage system with wastewater treatment
In this case, ready-made septic tanks are used. They are installed in prepared pits. The main function of such structures is to collect and purify contaminated water.
Septic tanks can be one-, two- and three-chamber. Each of the compartments solves different problems.
The wastewater passing through them is first purified naturally (sediment sinks to the bottom), then goes through the stage of biological treatment, then ends up in a drainage well or filtration fields (equipped according to the principle of drainage). Here the water is purified to 90-97% and can be reused.
Septic tank without pumping (circuit diagram)
Like any construction work, the creation of an autonomous sewer system must begin with drawing up a project. The diagram should show, in fact, the septic tank container, made with your own hands from brick or concrete rings. It can be two or three chamber. The latter option, as practice shows, is more effective.
An example of the completed project is shown in the figure.
Plan diagram (drawing) of an autonomous sewerage system
Designations on the project:
- a – a pipe to which the toilet and other drains from the house are connected;
- b – capacity of a two-chamber septic tank;
- c – a lid covering the hatch through which the containers are cleaned;
- d – overflow pipe (made long from two meters or more);
- e – depth of the filtration field (from 1.5 to 2 m);
- f – thickness of the filter pad (biofilter) from 0.5 m;
- g- ventilation pipes;
- h – drain filtration fields (surface drainage) from 5 to 20 m long;
- j – bottom with accumulated sediment.
Consider the construction of a reinforced concrete septic tank
The base of a concrete septic tank is made of monolithic concrete or a ready-made reinforced concrete slab, laid on a layer of well-compacted crushed stone. Two reinforced concrete rings with a diameter of 1 m are laid on the base in the form of a well. In the upper ring there are inlet and outlet holes into which tees are mounted, with a diameter of 10 cm. The inlet hole is located above the outlet by about 5 - 10 cm.
The top of the septic tank well is covered with a reinforced concrete floor slab with a hatch on which a wooden cover is provided. Another reinforced concrete ring is installed above the hatch, but with a diameter of 0.7 m, onto which, at ground level, the last support ring is mounted. The reinforced concrete septic tank is covered on top with a cast iron or wooden hatch. From the lower well, mounted strictly above the tee, there is a ventilation riser, which is a pipe with a diameter of 8 cm.
The total depth of the reinforced concrete septic tank is approximately 2.7 - 3 m. Walking brackets are mounted on the inner surface of the well, allowing a person to go down for cleaning. Around the top hatch, at a distance of at least 1 m in circumference, the area is cemented.
During the installation of reinforced concrete septic tanks, tight sealing of the joints is provided. If the area has a high groundwater level, the outside rings and slabs are additionally coated with hot bitumen. All external sinuses around the rings are carefully filled and compacted during the installation of structures.
Construction of monolithic septic tanks
As a rule, such structures have a rectangular or square cross-section. First, the soil is excavated to the required depth, the walls are thoroughly cleaned and the earthen base is compacted. Then the prepared surface is backfilled with gravel to a thickness of about 20 cm, which also needs to be compacted well. A concrete screed with a thickness of at least 10 cm is placed on the gravel bed.
To carry out further pouring work, formwork is installed from wooden, well-polished panels. It is advisable to cover them with plastic, tin or waterproof plywood (you can read more about plywood here https://usadba.guru/fanera/). To avoid concrete sticking to the formwork, the panels should be lubricated with machine or vegetable oil, grease or any other similar material.
The construction of a monolithic septic tank is a much longer process than installation from ready-made reinforced concrete products, since before pouring the next volume, you have to wait several days for the previous one to harden. Some advantage of monolithic structures is that filling the sinuses with soil is not required.
For monolithic work, only high-quality building materials are used: cement not lower than M400 or Portland cement. Gravel and sand should not contain organic or clay impurities. The concrete mass should be made of the same composition and plasticity throughout the entire scope of work.
Advantages
The decision to build an autonomous sewer system from concrete is advisable for many reasons. First of all, the material is distinguished by excellent strength, resistance to various influences, and durability.
The most important advantages of a concrete septic tank:
- Concrete does not rot, does not corrode, does not melt, is not affected by high and low temperatures, and is resistant to rodents and insects.
- The material does not require maintenance, regular treatments or repairs
- A monolithic septic tank made of concrete, unlike a similar plastic one, is heavy, so it does not float under the influence of groundwater, and is not afraid of being squeezed out by soil heaving forces during frosts
- If we are talking about a monolithic septic tank in comparison with a structure made of reinforced concrete rings, then the advantage is the absence of joints and seams, which guarantees complete sealing
- Relatively low cost of materials and work
- Long service life of the septic tank
Drainage sewer complex
Distribution wells are being installed. Their height does not exceed 400 mm, the diameter varies from 400 to 700 mm depending on the type of material used to construct the walls. To protect the structure from water, the same techniques are used: coating insulation of external surfaces, plaster inside, as well as the ironing method.
The wells are covered with concrete slabs or wooden panels and thermal insulation is provided. It is recommended to equip them with bends. A concrete tray is created at the bottom of the wells; its height corresponds to the diameter of the pipes. Such wells are located away from the septic tank. Communications are diverted from them.
What to consider: preparation of materials
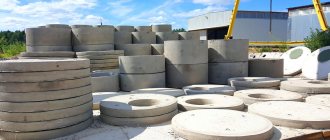
Simultaneously with the selection and purchase of rings for the drainage pit, the following materials are prepared:
- If construction is carried out without the use of equipment, shovels and a lifting device for excavating soil (manual or electric winch) will be required.
- Crushed stone, gravel, sand. Materials are needed to make a bottom filter or leveling screed. In the latter case, you will need cement to fill the screed.
- Metal brackets for mounting rings.
- To seal joints: bitumen mastic, waterproof sealant (for example, cement-based), silicone or other materials.
You also need to consider the following points:
- To deliver large reinforced concrete products, you cannot do without renting a truck.
- If you don’t have a winch, order a car with a manipulator - a standard ring weighs 600 kg, and moving it manually is very difficult.
- The construction of a cesspool requires the efforts of two or three people. You can arrange for installers with experience in installing reinforced concrete structures in a specialized company (often one that sells rings for wells).
Tools for manually digging a pit Source blogremonta.com