Before finishing a concrete staircase in a house with wood, preparatory work is carried out with your own hands. Their composition can vary significantly depending on the characteristics of the room and decoration. In addition, the features of the staircase cladding will depend not only on the layout, but also on the specific design. But, in any case, you will need to clean the structure from dirt, remove lumps of frozen mortar from the concrete surfaces, and finally, collect the dust with a vacuum cleaner. In addition, during the preparatory work you will need to stock up on everything you need.
Cladding a concrete staircase with wood in a country house with your own hands involves purchasing materials yourself. Therefore, in order to stock up on everything you need without buying too much, it is better to consult with an experienced craftsman who will take the necessary measurements. He will recommend how to carry out the cladding so that the concrete staircase is covered with wood according to all the rules and what railings and balusters are needed for this.
To protect concrete steps, waterproofing will be required to prevent the wood from absorbing moisture. Plywood is used as a waterproofing material. A material with a thickness of 15-20 mm is suitable for this purpose. In addition to plywood, you will need polyurethane glue. In some situations it can replace plywood. It is worth saying that today manufacturers produce glue for laying solid wood and parquet on concrete bases.
And since wooden steps on a concrete staircase need to be attached with something, you cannot do without purchasing fasteners. To do this you will need screws, dowels, bolts and studs. How many of them to buy depends on how many steps of the concrete staircase are to be sheathed with wood and on its design features. To perform fastening work, you need to prepare power tools.
Choosing the type of wood for finishing - what are the options?
You can decorate a concrete staircase with different types of wood. The cheapest option is solid pine. Such products are easy to process with your own hands, they are light in weight, which facilitates the process of installing steps. But you need to understand that pine boards are not ideal in terms of strength properties. With intensive use of stairs, they quickly fail and lose their attractive appearance. The durability of pine structures is also negatively affected by the variable indoor microclimate. Boards dry out and become loose with temperature changes, and also lose their initial properties under the influence of moisture.
Wood for arranging steps
For these reasons, steps are most often made of walnut, oak, maple, larch, beech and birch. If your budget for finishing the stairs is unlimited, you can choose more expensive types of wood - iroko, lapacha, merbau, wenge, teak. Their exotic appearance is complemented by excellent performance characteristics. The most durable products are made from beech. Steps made from this wood are installed to last for centuries. But processing beech wood is very difficult. It is almost impossible to cope with this material on your own. You may have a lot of problems when installing steps from it.
It's easier to work with oak boards. In terms of strength, they are not much inferior to beech wood, but they are much easier to process.
There is also a problem here - the high cost of solid oak. Not everyone can afford to purchase such material for finishing concrete stairs. There is an exit! Instead of oak products, you can use those made from larch. They are cheaper in price, and in most respects they are identical to solid oak. Choose the material for cladding structures taking into account your financial capabilities and personal preferences, and then you can get a staircase in your home that is impeccable in all respects. It will decorate the interior of your home and give you a feeling of comfort.
Advantages and disadvantages of wooden cladding
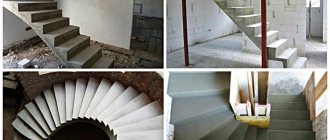
Before attaching wooden steps to a concrete staircase, you need to carefully study and think through everything. For external stairs made of concrete, ceramic tiles and artificial/natural stone panels are used as finishing, but for structures inside the house, wood is perfect.
The main advantages of using wood to finish concrete stairs:
- Environmental cleanliness and safety for people
– wood does not emit toxins or other harmful substances, creates an optimal microclimate in the room, and is distinguished by “warmth”.
- Easy and simple processing
, the ability to give any shape.
- Light weight
– the tree will definitely not cause the entire structure to become heavier.
- Durability
- subject to proper processing and manufacturing technology.
- Beautiful structure without processing
– natural wood will decorate the interior.
Among the disadvantages of steps made of wood, it is worth noting such as the inability to cope with impact point impacts, relatively high cost, deterioration of properties in conditions of high humidity, if improperly dried, the possibility of cracks, deformations, etc.
Thus, if the wood has undergone the correct multi-stage processing before installation (well dried and coated with special compounds), and the staircase is created according to the drawings, then nothing will threaten the steps and they will last for decades.
In an attempt to save money, many craftsmen choose various cheaper analogues instead of natural wood - MDF panels, moisture-resistant plywood, laminate. But all this does not cost much less, but the loss of properties and the likelihood of harmful additives in the composition (all sorts of impregnations, adhesives, binding resins, etc. are used) are not worth such savings. A good option is to create risers from plywood covered with steps made of natural wood.
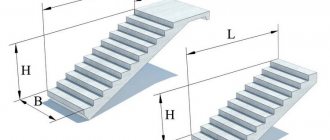
Dimensions of wooden steps
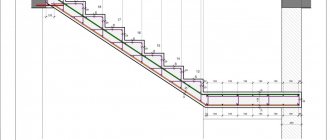
The staircase should not only be beautiful and functional, but also ensure the safety of people. Therefore, the instructions for the manufacture of wooden elements contain a standard set of step dimensions, compliance with which will allow you to move along the flight of stairs freely and comfortably.
Let's first look at what elements the step itself consists of - these are the tread and the riser.
Riser (step up)
- It is determined by the height of the step and is installed vertically under the tread, adjacent to the long side of the concrete staircase.
- If the depth of the step is less than standard, then the riser is not installed, and the step itself on the visible side is plastered, painted or finished with thin decorative tiles.
- Calculate the lifting step by dividing the floor height into equal parts. According to SNiP, the resulting size should fall within the range of 15 to 22 cm. Deviation to one side or the other will make climbing the stairs inconvenient.
- If in a wooden structure the riser primarily performs a load-bearing function (the tread is laid on it), then on a concrete staircase it serves more as a decorative element. Therefore it may be present or not.
- Since in our case the riser does not bear much load, its thickness can be made much smaller than that of the tread. Experts recommend using 18–25 mm boards. This parameter can be varied to increase or decrease the depth of the step.
- When calculating the height of the riser, it is necessary to subtract the thickness of the tread, which lies on top, from the design size of the step.
Tread (step depth)
This parameter is determined by the length of a person’s foot. SNiP requires that the foot rest fully on the step; partial drooping is not allowed. The left drawing shows the correct support, the right one shows the unacceptable support.
- The optimal tread depth is 25–30 cm, but in some cases, for other types of stairs or in accordance with the project, a depth of 20 to 40 cm is allowed.
- If the length and angle of inclination of a flight of stairs do not allow making the tread deep enough for a comfortable climb, then changing this parameter upward will allow the slightly overhanging edge of the tread.
- But it is not recommended to release it above the riser by more than 4–5 cm in order to avoid chips and breaks when moving.
Important! The thicker the tread, the further it can be extended beyond the edge of the step. The same applies to the length of the steps: the greater the width of the march, the thicker the tread should be. Although, a concrete staircase with wooden steps does not fit the latter statement. Rather, this is important for wooden stairs.
- Another option for increasing the depth of the tread can be a beveled riser.
Saving rules
Wood is expensive, so many are looking for various ways to save money and reduce the final cost of repair work. However, some solutions will not allow you to make the stairs high-quality and durable. To ensure that the desire to save does not subsequently become the cause of damage or destruction of the structure, it is necessary to take into account some points:
- To extend the life of the tree, it must be laid on a substrate. Thanks to it, you can also save money, since the board can be thinner.
- Before laying a sheet of wood on the surface, it must first be leveled. If this is not done, the material may become deformed and quickly deteriorate. Therefore, after a while the element will have to be replaced with a new one.
- If the choice fell on a simple (not elite) type of wood, then it is recommended to choose a board whose thickness is at least 30 mm.
- Wood has a special texture that looks attractive in the interior. This allows you to save on painting the surface. It is enough to simply open it with colorless varnish. To extend the service life, you need to cover it in 3 layers. Before applying a new one, you must wait until the previous one has completely dried.
- Having decided to save money and buy a cheap wood option, people often find that after a short period of time, the finishing surface becomes unusable or takes on an unpresentable appearance. This entails the need to replace individual or all elements. Therefore, it will be more profitable to immediately buy high-quality material at a higher cost.
- Fasteners are those elements on which you absolutely cannot skimp. Despite the use of special glue, the wood must be additionally secured with a dowel.
Wooden railings for stairs Source vseolestnicah.ru
Installation
After casting the structure, at least 2-3 months must pass (depending on temperature and air humidity) before the installation of wooden steps on a concrete base can begin. Ideally, you need to withstand the entire heating season.
This is due to the fact that even hardened concrete releases excess moisture into the environment for a long time and continues to dry. If you finish the staircase before this time has elapsed, the moisture will destroy the base itself, and the wooden elements will begin to absorb it, swell and deform.
Also, remaining water in the concrete can lead to the formation of mold under the finished coating, which will grow.
Preparing the base
Before attaching wooden steps to a concrete staircase, it must be prepared for installation by carefully leveling the horizontal surfaces. They bear the maximum load. Vertical planes (risers) without obvious defects can be left untouched.
There are two alignment options:
- If there are no serious flaws or differences in level on the surface, and all steps are approximately the same height (differences within a few millimeters are allowed), then the planes are leveled with special self-leveling mixtures.
- If there are noticeable differences, plywood formwork is attached to each step, the upper edge of which should set the required level. The same mixture or concrete solution is poured into it. If the layer is thick, it can be reinforced with metal mesh.
Advice. Before leveling, be sure to clean the stairs from dust and prime them to improve the adhesion of the surface to the solution.
Again, the laying of wooden steps on a concrete staircase is delayed until this layer has dried. But not 2-3 months, but several days. This depends on the thickness of the screed and the air temperature.
Substrate device
Plywood is used as a waterproofing and shock-absorbing layer between concrete and wood. It absorbs moisture much worse than solid wood. Also, plywood finally smoothes out all the unevenness of the base.
For reference. You can do without a substrate, but then the concrete must be treated with liquid rubber or another waterproofing agent. And make the steps at least 4-5 cm thick.
There are also certain requirements for plywood:
- It should be dry;
- It should not have holes, cracks, knots, dark spots or other defects;
- The thickness of the substrate for treads should be at least 10-15 mm. Risers that do not experience serious loads can be lined with thinner material.
The following are instructions for installing plywood pads on stairs.
Wood cladding
Installation of wooden steps on concrete begins from the bottom and gradually rises upward. But first you need to prepare and try on all the details. They must be sanded and varnished twice, drying between coats. The entire staircase is varnished for the third time after installation is completed.
Installation and fastening of clothes for stairs: we do it together
Fastening wood to a concrete staircase can be done in several ways, which differ in labor intensity, time and financial costs.
We start with a concrete base and substrate
Everything is simple here - first you need to prepare the concrete base: eliminate defects, level the surface. The backing is made of plywood; it can even out minor defects and protect against mechanical damage.
Wooden steps are installed on plywood sheets 1-1.5 centimeters thick, cut to the shape of the steps. A primer is applied to the concrete, then the pieces of plywood are covered with glue, mounted in place, and secured with dowels. This is in short, the process is described in more detail below.
Finishing with pre-sheathing of steps with plywood
This technology is considered ideal - moisture-resistant plywood is used as a layer, increases the cost of finishing and the complexity of the process, but significantly improves the quality and extends the life of the staircase.
How to cover steps with plywood:
- Performing markings by marking a horizontal line along a laser level (the height of the step and the thickness of the plywood are taken into account). You can simply glue on the wall with pieces of masking tape the places of the level to which the surfaces of the steps will extend upon completion of the leveling.
- Leveling the concrete surface - it is better to use tile adhesive, which dries quickly and ensures high-quality adhesion.
- Measuring the dimensions of plywood blanks, marking, cutting them out of sheets (treads and risers).
- The parts are attached to glue (preferably rubber glue with organic solvents, especially for parquet and plywood), applied in a thin layer with a notched trowel with teeth 2 millimeters in size, then to dowels (the fasteners must enter the concrete layer at least 3 centimeters). The plywood cladding should be exactly along the previously marked lines.
- The steps are fastened together with self-tapping screws, which are screwed into the end of the riser through the tread panel in increments of 20 centimeters.
- The entire staircase is made in the same way, then they wait a certain time (so that the glue dries) and install the wooden steps on glue (especially for wood, often polyurethane is used). Place a load on the tread, wait for it to dry and continue installation.
Simplified installation options
In addition to the method described above, there are others that are simpler and less labor-intensive. Each master independently determines which method to choose and what will be most appropriate for a particular design.
On metal fasteners and glue without using plywood
A plywood backing is considered the most reliable and high-quality option for attaching wooden steps, but there are others.
How to attach to metal and glue without plywood:
- Leveling the surface of a concrete staircase.
- Installation of the upper tread with fixation, installation and wedging of the riser until it rests along the line of contact. Checking the horizontality and perpendicularity of parts.
- Laying the next step, fixing it exactly in place, carefully marking all the elements.
- Marking fastening points - steel corners are often chosen for these purposes: one part at the bottom of the top step and the second at the place of the riser (then it will cover the fastening).
- Removing the step and riser, assembling them with self-tapping screws into a single structure, screwing the corner to the step.
- Covering concrete steps and risers with glue, polyurethane foam, installing the structure in place (the riser must be carefully placed under the ledge of the top step, then rested against the concrete), checking the evenness of all elements.
- Fixing the structure with corners, securing the riser with plastic dowel nails.
- Continue installing all stages in the same way.
Using chemical anchors
Chemical anchors can be used as fasteners - two-component compounds that fill drilled holes in a concrete monolith. Fasteners are installed into this channel, the glue hardens, fills all the pores and voids of the monolith, securely fixed in the material.
Most often, this option is used where wooden steps are mounted without a plywood backing and risers are not provided. In this case, the entire installation consists of carefully marking the elements and their installation locations, drilling holes in the concrete, and fixing the steps with a chemical anchor.
Dimensions of wooden steps
Before attaching wooden steps to a concrete staircase, it is necessary to perform the correct calculations. After all, the design must be functional, beautiful and certainly comfortable, completely safe for people. Here the dimensions of the elements that make up the staircase are of primary importance.
Riser (step up)
The riser is an integral part of the step, determined by its height and mounted vertically under the tread, adjacent to the long side of the staircase. If the depth of the step is less than the standard value, the riser may not be installed, and the step itself is simply plastered, painted or finished with thin tiles.
- The lifting step is calculated by dividing the height of the floor into equal parts. SNiP indicates that the value should be in the range of 15-22 centimeters for ease of ascent and descent.
- In a concrete staircase, the riser is more of a decorative element and is therefore not necessary.
- Since there is no load-bearing load on the element, boards of 18-25 millimeters can be used to create a riser.
- To calculate the height of the riser, you need to subtract the thickness of the tread that lies on top from the design size of the step.
Tread (step depth)
This element depends on the length of a person’s foot - SNiP indicates that the foot should rest entirely on the step, without drooping.
- The standard figure is 25-30 centimeters, sometimes according to the project it can be 20-40 centimeters.
- If the angle and length of the slope of the march do not allow making a deep tread, then make the edge slightly overhanging - a maximum of 4-5 centimeters, no more. The thicker the tread, the further it is allowed to extend it beyond the edge of the step.
- It is allowed to make beveled risers to increase the depth of the tread.
Winder steps
Such steps are mounted where the stairs smoothly turn. The elements differ from ordinary ones in the different depths of the tread: wide at the edge, narrower towards the center of the curve. Spiral staircases are created entirely from winder steps.
- On a straight turn (90 degrees) there should be 2-3 steps (maximum 4).
- The riser height should be similar to straight steps.
- The dimensions of winder steps are always calculated individually, but so that the step in the narrowest place is at least 10 centimeters, and in the widest place – a maximum of 40 centimeters.
- The width of a winder-type step along the line of movement should always be equal to the depth of the straight step (in the case of a standard staircase width of up to 100 centimeters, the line is the middle of the flight).
Wood-look porcelain tiles
This modern material is often used instead of wood - the tiles exactly imitate wood, they are just as rough, strong, reliable, durable, and beautiful. The only difference is that the surface of the material always remains cold (while you can walk on wood barefoot without experiencing discomfort).
Natural wood, nevertheless, is considered a more preferable choice for finishing stairs inside houses and apartments, since the material breathes, is lightweight, and creates an optimal microclimate in the room.
What kind of wood to make steps from?
You can decorate the stairs with different types of wood. Its choice is influenced by price, appearance, and quality characteristics.
Advice. In case of self-finishing, pay attention to the density and hardness of the wood. Some varieties are very difficult, almost impossible to process without special tools.
The most popular types of wood used to make steps are shown in the table.
| Type of wood | Characteristics |
| Solid pine is the most budget option. In addition, pine lends itself very well to DIY processing, it is light and pleasant to work with. And its light shade visually makes the heavy concrete staircase lighter. But soft pine wood quickly wears out, losing its attractiveness and strength. Such a finish cannot be called durable. |
| Oak steps are considered the best for stairs in terms of price-quality ratio. They are durable, do not lose their appearance for a long time, and have a pleasant color and pattern. The availability of the material is also important. |
| It is cheaper than oak, but in most respects it is identical to it. Except that the grain of the wood is not so pronounced. |
| Beech is even stronger than oak, and its cost is slightly lower. But to process it you need a special tool and experience working with hard wood. Many appreciate it for its uniform structure and even color. |
| Wooden steps for concrete stairs made of ash are the most durable. An additional plus is a large selection of shades of wood, which can be light or dark, with a very beautiful pattern. |
| Exotic types of wood are expensive and belong to elite finishing materials. Steps can be made from species such as wenge, merbau, teak, iroko, lapacha and others, characterized by high strength characteristics. |
It is important! When choosing a material, first of all pay attention to its quality and the strength requirements for the staircase and the conditions of its operation.
You can order the production of steps from a specialized company, and then simply install them. But a wooden staircase on a concrete base will cost less if you buy an array and cut out all the parts yourself.
In any case, you will have to make some measurements and calculations to determine the amount of material needed, or transfer the necessary data to the manufacturer. This amount depends on the design of the staircase. After all, even an ordinary straight span can be designed in different ways.
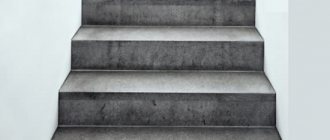
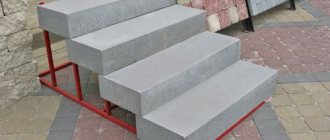
Concrete staircase with wooden steps - different finishing options
You will need the following information:
- Number of treads and risers;
- Tread dimensions (thickness, depth, width);
- Same riser sizes.
Note. If the staircase is spiral, with winder steps or different tread depths, to determine the required amount of material, dimensions are taken along the larger side of the step.
Calculations
In order to determine how much material you will need, you need to make calculations. At this stage, indicators such as the thickness of the step, its width and depth, as well as the dimensions of the risers are determined.
In order to determine what thickness of wooden steps will be optimal for the stairs, it is important to rely on basic calculations. Of course, during the installation of the overlays, the steps will not change their position relative to each other, but this may affect their relationship with the platforms. It is better to use wood up to 15 mm thick, and compensate for the protrusions due to roundings and overhangs. As for the risers, thinner material can be used for them, since they are not subject to special loads.
After laying the tree, the optimal ratio of indicators for movement should be maintained. The step width should be in the range of 60–65 cm. The width of the tread can be increased by extending the step with a slight overhang. The same applies to the overall width of the stairs. Mounting on a metal frame will allow you to increase the area of the structure without compromising its stability.
Fasteners
Actually, fastening can be done not only with mechanical fasteners, although they are the main ones. You also have spikes and glue at your disposal as aids.
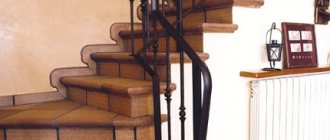
A turning staircase is the highlight of your home
But the conversation about fastening the stairs can be transferred to another plane - you rarely have to rack your brains over this question, how to fasten the steps on the stairs, or how to fasten them to a support. After all, any staircase is a ready-made constructor in which everything is already provided - both the elements themselves and their fasteners. You just need to remember to carry with you, along with a complete set of all parts, instructions for installation and fastening.
The matter is further aggravated by the fact that there are a huge number of staircase designs, and there are even more types and methods of fastening. Therefore, as an example, let’s look at the nuances of the most common option – attaching wooden stairs.
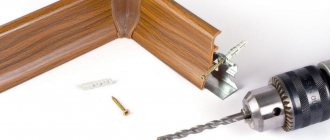
Fasteners for wooden stairs
A special feature of fastening such ladders is the almost complete absence of such a universal means of connection as welding. Hence the large range of fasteners (see photo above), depending on the type of joint (we also indicate the fastener number according to GOST).
Each type of connection has its own type of fastening (see the text for the designations in the photo)
- A – reinforced screw tie with gearbox for fastening pillars of wooden stairs (14.100);
- B – tie for connecting furniture parts at the ends at an angle of 90 degrees (12.600);
- C – elbow coupler with a foot for connecting wooden parts with a mating angle from 90 to 180 degrees (11.720);
- D – tie for attaching steps to stringers, balusters to platforms and steps (13.500);
- E – fastening element for fixing drawers and other furniture parts made of soft wood (12.720);
- F – straight tie-screw for splicing handrails and bent ends (13.600);
- G – cranked screw tie for attaching railings to posts with a mating angle from 90 to 180 degrees (11.550);
- H – crank coupler with two gearboxes for splicing handrails at an angle, as well as for angular connection of furniture panels (11.600).
The range of fasteners for stairs is quite diverse, but for the most part they are not interchangeable - each design has its own set of fasteners.
In addition to the use of specialized fasteners, the following can be used:
- nails,
- screws,
- capercaillie,
- bolts,
- pins,
- squares,
- Overlays, in general, the range is endless, and the use of each type has its own characteristics.
So, if nails are used for fastening:
- it is fundamentally important to choose the right length and thickness of the nail depending on the size of the parts to be connected and the type of wood of the staircase;
- the main thing is that the thickness of the nail should not exceed 10% of the thickness of the part;
- the nail entry point should be no closer than 15 nail diameters from the edge of the part, this is to avoid splitting the part.
- if the wood contains tannins, then the nails should be galvanized, this is to avoid corrosion;
- It is preferable to use square nails instead of the usual round ones.
Such an original solution to the question of how to fix a path on the stairs obviously has many advantages - at least, you are freed from the laboriousness of working with the entire structure and gain greater freedom of decision-making. If you are not bothered by the reliability of the design, feel free to adopt these options.
Helpful advice! The use of ordinary nails for fastening stair structures can be said to be a thing of yesterday. Perhaps such a “secret weapon” of all masters as “liquid nails” will not work here, but screws will be much more reliable. We recommend using them instead of nails wherever possible. To attach handrails to racks it is very convenient to use dowels - wooden nails - only here it is important to choose the right thickness of the dowel. We strongly recommend using locking washers on all threaded connections. Always tighten with the required torque.
Helpful advice! We strongly recommend using self-locking washers on all threaded connections. Always tighten with the required torque. To accurately control the tightening torque, you cannot do without an appropriate wrench, which is not a bad thing to take care of if there are a lot of threads in the structure.
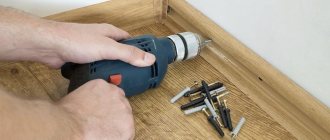
How to attach steps to stringers?
Let us first consider the situation when it is necessary to attach steps to a wooden staircase on stringers. The most obvious way to do this is to use self-tapping screws. Of course, you will need to select sufficiently long self-tapping screws of rather large diameter. In addition, at the attachment points you will have to drill through the steps with a drill.
The main advantage of this approach is its simplicity and accessibility. But after attaching the step you will have to take care of the appearance and disguise the hole formed in the step. For this purpose, special decorative plugs are used. Most often these plugs are made of plastic. If you choose the right plugs in color and size, they can even decorate the stairs.
Content
- Introduction
- Wood grain direction
- Wall stringers
- External stringers
- Attaching the stringer to the ceiling
- Connecting stringers to each other
- Attaching steps to a string - methods
- Methods of fastening balusters
- Installing railings on stairs
- Attaching the handrail to the pole
Standard veneering procedure
Typically, fastening the steps yourself proceeds according to the following algorithm:
- Three bolts with a diameter of 6 mm are screwed into the bottom end of the riser. This must be done so that the ends of the bolts protrude at a distance of 6 cm. They will be a kind of anchors;
- The bolt heads are cut off;
- Next, you need to place a riser on the first step and mark on the floor the place where the bolts and the riser come into contact;
- Then holes are drilled in the floor and filled with epoxy resin. The plywood is smeared with glue and a riser is installed on it, while inserting screwed bolts into the floor holes;
- To install a tread, a groove is created in the element at the place where it meets the end of the riser;
- The second riser is secured with self-tapping screws from the other end of the first tread;
- The plywood is again lubricated with glue and the first stage is mounted. For better fixation, after installing the element, a weight should be placed on it.
Instructions for cladding concrete stairs with wood
Before doing wood cladding, you should measure each step of the staircase, find the highest one, and align all the others to it. This is done by applying a thin layer of concrete to the steps.
After it hardens, a special primer is applied on top of the concrete to prevent the absorption of adhesives.
Afterwards, you can proceed directly to cladding the stairs with wood:
After everything is ready, the steps and risers of the stairs can be painted with stain, varnish and other finishing materials. This rather complicated, at first glance, cladding of the stairs with wood is necessary so that the steps of the stairs do not become loose or creak during operation.
You can decorate the staircase and make it interesting by finishing the steps with wood. Read about this in the material on our website: https://homeli.ru/remont-i-otdelka/lestnitsy/otdelka-lestnitsy-derevom.
It is more convenient to start finishing from the top step, gradually moving down.
Video
Video about how the process of cladding concrete steps with wood occurs.
“How to cover a concrete staircase with wood?” - it is impossible to answer this question: “Simple!” This is a task for professionals. Independent installation of a flight of stairs is possible only if a builder, an amateur or a leisurely expert in the intricacies of working with wood, measurements, and installation takes up the task.
In all other cases, feel free to call a surveyor to your home, he will help you determine the exact price for such work. A construction company is a guarantee of beautiful work, done technologically correctly, which also guarantees your safety.
Maybe,
How to fix the stairs to the second floor with your own hands
Installation of stairs is part of the arrangement of a house that has two or more floors, equipped with a basement or attic space. Structures are made from different materials and are designed taking into account their purpose.
- Types of stairs
- Marching
- Screw
- Complex designs
- Options for fastening staircase structures
- To the floor
- To the slab or beam of the upper floor
- To inter-march sites
- To the walls
- Requirements for interfloor stairs
- Selecting material for making stairs
- Tree
- Metal
- Concrete
- Required tools and materials
- DIY installation features
- Made of metal
- Made of wood
- Made from concrete
Material
Wood or metal is most often used as a building material for the string of stairs.
Reinforced concrete will also work, but it will be difficult to make such a bowstring at home.
The best option is probably wood. Such a staircase looks great, and there is no need to work with welding, which can spoil the appearance due to the presence of seams.
When choosing wood, you should pay attention to the following species
- Conifers. The disadvantage of spruce, pine, fir and cedar is the release of resin. This can affect how smoothly the paint lays down. Although such breeds look great in natural colors. In addition, they have good technical characteristics.
- Deciduous. This type of wood is most often chosen due to its ease of processing and painting. Among them are oak, maple, cherry and beech.
When choosing lumber for a future bowstring, it is necessary to calculate its dimensions so that the beam turns out to be solid, without splices. The length and width should be in accordance with the design guidelines.
Attaching support posts to the floor
Support pillars are vertically located load-bearing elements that form the basis of the frame of the lower part of the staircase. They provide support for the winder steps (landing) and the stringer (string).
There are no special requirements for the wood of the part - the main thing is that it is uniform, without cross-layers and large knots. Typically made from the same type of wood as the rest of the staircase.
In order for the future structure to be strong and reliable, the pillars must be firmly secured. This can be done using steel angles, studs, zip bolts, wood glue and other devices - there are a lot of options.
Finally, it is recommended to connect the columns with supporting stiffening beams.
Of course, by this time, all the technological holes and grooves for other elements of the staircase should already be made in the pillar structure.
Useful tips for installing wood cladding
- Don’t save time on double-checking calculations, adjusting parts, or additional markings - it’s very easy to ruin expensive material
- maximum deviation in step height is 0.5 cm - this guarantees ease of use
- do not skimp on the varnish coating of the cladding - cover with no less than three layers of varnish
We complete the covering of the stairs by varnishing and sanding; if desired, you can use stain to change the color of the coating.
Choosing the type of staircase
All monolithic structures can be divided into several types. A straight staircase is considered the simplest, but its installation is difficult in small rooms. In these cases, a screw one with a platform, or a multi-flight one, which is equipped with winder steps, is installed instead.
A straight staircase with one flight is most often found in houses with low ceilings. If the distance from the floor to the second floor is large, it is better to make a rotating structure - it is low cost and easy to install, even a novice builder can do it.