There are various situations when it becomes necessary to make a connection between the old and new layers of concrete (repairing the foundation, arranging additional slopes for drains, the need to increase the thickness of the screed, etc.). How to do this correctly?
Connection between old and new concrete layer
Layers of concrete laid at intervals of even several hours do not adhere well to each other. When the surface of the poured concrete mixture hardens, a loose cement film is formed, which impairs water resistance and frost resistance. This is the so-called “cold seam”. When laying a new layer of concrete, the problem has to be solved.
There are two main methods of connecting concrete surfaces: using acrylic glue and a bunch of reinforcement cages. Both options involve carrying out repair work at positive air temperatures.
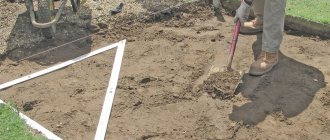
When choosing any method, the work begins with preparing the surface of the old concrete for connection with the new. Having determined the junction, you need to clean the old layer of debris and dirt. Pay special attention to damaged areas of surfaces.
For manual cleaning, use a metal brush to remove the cement film. An angle grinder or similar tool can be used when preparing a large area to be poured.
Connecting concrete surfaces using acrylic glue
The first option using glue is already quite widespread. We sell a large selection of acrylic adhesives for strengthening, restoring and repairing concrete structures. Install the formwork for the new concrete layer, prepare the adhesive according to the instructions on the package and apply it to the surface of the old concrete.
Everything is ready for work on laying new concrete. The best option is to fill it in one go. This option of combining layers of concrete is often used to improve screed surfaces or create additional drainage slopes.
Connecting concrete surfaces with a bunch of reinforcement cages
The second, more classic, method consists of connecting the surfaces with a metal frame.
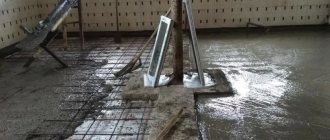
If there is a reinforcing frame in the old concrete, it is exposed in several places and a new reinforced belt is welded to it.
You can drill holes and install anchor bolts. After pouring the concrete, they will be partly in the old layer, partly in the new one.
They also use the option of drilling holes in old concrete at different angles in different directions. Lengths of reinforcement are inserted into these holes, which are then welded to the reinforcing frame of the new concrete layer.
Next, clean the surface, install the formwork, wet the concrete joint with water and pour new concrete. This method is most often used when pouring a thick layer of concrete. But in any case, to avoid deformations and cracks in the base, the thickness of the new layer should not exceed the thickness of the old one.
Experienced builders recommend not combining the described methods. Depending on the situation, having chosen a specific method, try to complete the concrete work as completely as possible at one time. A minimum of concrete layers will ensure the strength and reliability of the structure.
The floor covering, be it linoleum, laminate or tile, should not be made directly onto poured concrete, since even the most leveled floor is far from level, due to which the finishing laid on such a base will also lie unevenly.
That is why, before completing the final work with concrete, it is necessary to carry out a whole range of measures; only after this can one begin the process of decorating gray concrete, that is, laying the selected floor covering.
Before you begin laying concrete on concrete, you must first carry out a series of preparatory work, which should begin by clearing the work surface of debris, for this purpose brushes made of wire are used.
If you plan to lay concrete on concrete over a large area, then the base is cleaned using grinding machines, and the top layer is removed from the main surface.
At the preliminary stage, you also need to pay attention to differences in the floor, so if they reach up to three centimeters, you need to level the horizontal surface as much as possible, this is done with the help of a concrete footing. Only after this work has been completed can the main process begin, that is, laying concrete on concrete.
How to put concrete on old concrete?
When carrying out repairs, even in a not newly built room, a procedure for laying concrete on concrete may be necessary, since only by updating the screed, that is, by leveling it as much as possible, can you achieve ideal evenness of the floors.
So, when laying concrete on old concrete, the following work must be carried out in stages:
- Using a grinding machine, the first thing you need to do is remove the loose top layer, that is, remove the top part of the old concrete.
- Using wire brushes, clean the work surface from accumulated dust and dirt.
- After completing this cleaning work, you need to treat the surface with a deep penetrating primer.
- After the previously applied primer has dried, you can begin the main process, that is, directly to the floor screed itself.
- To prevent the newly laid concrete from cracking, you need to use a reinforcing mesh.
- Now you can start laying the concrete itself. This process, however, is no different from traditional concrete laying: beacons are installed along the edges and concrete mortar is poured.
Materials and tools
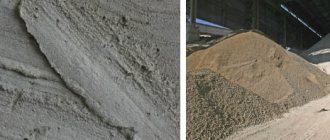
To make a batch of concrete, crushed stone, sand and cement are used.
To lay concrete you will need to prepare the following materials:
- cement;
- sand;
- crushed stone;
- plasticizer;
- water-repellent liquid;
- propylene film;
- foam sheets;
- reinforcing mesh;
- primer.
You will also need the following tool:
- wooden or steel beacons;
- screwdriver;
- nail puller;
- level, rule;
- Master OK;
- container for mixing concrete.
Creating and filling expansion joints
During operation, the building is exposed to many external factors, due to which shrinkage and other changes in the building occur, so that as a result of these processes the destruction of the building and its screed itself does not occur, at the stage of repair work, that is, when pouring concrete, expansion joints are created .
They come in the following types:
These cuts are designed to take the load from the external environment. To achieve greater strength, expansion joints are strengthened with specialized mastics and sealants.
Is it possible to do without dismantling?
The destruction of the blind area is explained by various technological violations during construction, as well as the influence of external factors. All of these factors must be addressed or the home may eventually become completely uninhabitable.
The old blind area can be completely removed and a new one created in its place, but it is more effective and economical to use it as the basis for a new one.
To do this, you need to carefully examine the condition of the old coating:
Overall it looks good, some small cracks are noticeable. You can just seal them up. This is done quickly and without great expense.- The integrity of the blind area has been compromised; due to frost heaving, the surface has been turned back towards the house. It is recommended to pour a 10 cm layer of concrete over the existing one, always with reinforcement.
- The surface is destroyed, covered with deep, wide cracks. Due to frost heaving, the tape is turned back towards the house or has completely moved away from the wall. It is cheaper and easier to completely dismantle the old one and make a new one instead.
Blind areas can be hard and soft. On top of the old one, a hard one is usually made, for which concrete, different types of stone and paving slabs, and asphalt are suitable. When choosing, it is advisable to take into account what the old coating is.
It can be made from the following materials:
- Asphalt concrete. Such a surface must be cleaned and covered with liquefied bitumen. A new layer of asphalt is laid on top and compacted with a roller. Asphalt can only be laid over heavily damaged areas.
- Paving slabs, sometimes paving stones . The old surface needs to be removed, crushed stone and sand filled in to create a new high-quality pillow. Lay tiles or paving stones on top in accordance with the standard rules for laying them.
- Cobblestone. You will need to remove the old mortar and remove the stones. After cleaning, crushed stone is poured, with cement mortar on top. Prepared cobblestones are placed in it. The cracks must be filled with a liquid solution of cement and water.
The blind area can be soft, made of crushed stone or gravel. However, making it over the old one is labor-intensive and expensive. Concrete is considered the most optimal and reliable material for a blind area.
Compaction of concrete mixture
The task of builders is not to build a structure that is strong and durable. The process of compacting the concrete mixture also serves this purpose. It is well known that concrete is quite plastic, and is capable of hardening and compacting without any additional forces after a short period of time. However, such concrete does not have much strength.
To solve this problem, when screeding floors in our country, since the thirties of the last century, the vibration method has been used to compact the concrete mixture. When using this method, concrete becomes more mobile not due to the addition of more water, but due to the effect of oscillatory actions on it.
Another positive aspect of this method of work is the reduction in cement costs.
The process of reinforcing concrete screed
The structure can be strengthened using reinforcing mesh or a specially created frame. The mesh reinforcement is placed overlapping, and its ends are fixed with wire. Sometimes a strong steel fiber is inserted into the freshly mixed solution. Experts consider strengthening the structure using combined reinforcement to be the best option. If a thin concrete layer of mortar is applied, then it is advisable to use special mounting supports to prevent the appearance of cracks on the surface of the screed. Don't forget to order concrete from a trusted company.
Cutting and filling expansion joints
It was mentioned above that to increase the stability of the floor screed, expansion joints are cut into them.
To complete this job you will need the following tools:
- Joint cutters.
- Rope.
- Chalk (ordinary).
- Ruler (wide).
- Grinding device or brush (mechanical).
These cuts are made so that there is not such a strong connection between the walls, floor and screed. Otherwise, the slightest fluctuation or influence of the external environment will lead to damage to the very foundation of the building - its screed.
Insulating material is installed into the prepared groove, which is then filled with sealant. In order for the thread to fulfill its function of protecting the building from destruction, the laid insulating material must not come into contact with the screed, that is, it must be below this level.
How to avoid mistakes?
A blind area made with high quality will last a long time, regardless of the type of construction. When it quickly becomes unusable, it means that technological errors were made during its creation.
Most often, expansion joints were not made between the foundation and the blind area, which is why the material does not expand or contract when the soil moves or changes in temperature. The seams must run in the longitudinal and transverse directions, which is not always taken into account.
Other errors:
- When pouring, cushions of sand and gravel were not made; the concrete was laid directly into the ground, so the blind area is exposed to the force of soil heaving.
- The level of the blind area is below the ground level around the house.
- The pillow is laid in too thin a layer and not compacted tightly.
- The blind area along the edge has a smaller thickness. Because of this, under the influence of water flowing from the roof, it collapses faster.
- Waterproofing, gutters and drainage pipes are not installed.
- There is no reinforcement of the concrete strip in areas with heavy traffic.
A very common mistake is a narrow blind area. Its width must coincide with the roof overhang or be at least 20 cm larger than it.
To fully protect the base, the tape must completely surround the house. If there is no tilt, the building also begins to collapse.
Acceleration of the hardening process
The laid screed hardens for a long time, almost a month, that is, the construction site will need to be left for exactly this period, but this is not always possible, since the deadlines may be tight and the temperature regime is not constant.
Meanwhile, for concrete to harden, it is necessary to constantly maintain warm weather outside the window, namely twenty to twenty-five degrees Celsius.
It was precisely in order not to depend on natural conditions and not waste time that engineers developed special accelerators. In addition, today the construction market presents not only substances that accelerate long-term processes, but compositions that can also improve the properties of concrete.
The most common types of accelerators are:
- Salts of nitric acid.
- Sodium sulfate.
- Calcium chloride.
But you need to remember one important point: these substances should make up no more than two percent of the total mass of the concrete solution, only in this case their effect on concrete will be positive.
The process of laying concrete is a very complex process, therefore, before starting it, you need to take into account all the nuances and only then can you begin the process itself, but to successfully complete the task you must strictly comply with all standards and rules. In this case, the foundation of the future building will be strong!
Preparatory stage of pouring over old concrete
Let's pay attention to pouring additional coating on flat concrete areas. We are talking about platforms, paths, blind areas, floors, etc. You should start by inspecting the base in order to make a list of further manipulations.
It is better to get rid of chips, small pieces and crushed parts. If parts of the existing pavement have sagged or collapsed in some areas, all concrete in the problem area should be removed, breaking it up if necessary. The subsidence areas must be filled with sand and compacted thoroughly. Preparing a clean, homogeneous base is the key to the strength of the entire structure.
When the cleaning of the base is completed, before pouring new concrete, the old one should be moistened with cement laitance after washing the entire working surface with water. These procedures will ensure better adhesion of the concrete layers. After this, you need to wait for the milk to dry.
How to pour a new concrete base if there is an old one?
First, the surface is prepared for work. There is no need to completely break the blind area; it is enough to remove the fallen parts of the old one with your hands and using a hard broom. Some places will need to be pryed from below, and the cracks will need to be cleaned and widened with a spatula.
Further processing is carried out according to the following scheme:
- Surface strengthening . The old blind area is covered with a deep penetration primer, it is applied evenly with a brush, including inside the cracks.
- Removing delamination . To do this, prepare a composition: cement is diluted with water, liquid glass is added. All parts are taken in the same volume.
- Installing a curb . According to the rules, the old blind area is higher than the ground; after laying the new one, the level will be even higher. When installing tiles and paving stones, a border is required so that the tiles do not diverge.
- Screed. The surface is leveled using a plastic solution. More often, a special repair mixture is used with the addition of diluted PVA glue (1:10).
- Waterproofing. Roofing felt and sometimes ordinary polyethylene are used. We should not forget about the overlap on the base with a width of 6-8 cm.
- Reinforcement. Wire mesh is used (5 cm mesh is recommended).
- Pouring concrete . The required thickness is 6-8 cm, a slope is made from the wall of the building (per 1 meter of width 3-5 cm). After drying, the surface is smoothed, ironed, and the next day it is polished using a polyurethane or wood grater.
For a large house (15 meters, for example), you will need to make transverse seams. This is necessary to prevent deformations arising from temperature changes or shrinkage.
Seams at intervals of 2 meters are made from boards (they are pre-treated with an antiseptic). You can use rigid foam 1 cm wide.
The edges of the blind area from the outside are sometimes made smooth, for which formwork is used. After removing the formwork, you will need to add soil to the level of the blind area. If concrete is poured in a layer of less than 5 centimeters, a thickening is sometimes made along its edge (it is called a “tooth”). Its thickness is 10 cm, you can install bricks or a curb. In this case, no formwork is needed. Next, drainage is made from asbestos-cement pipes cut in half.
The filling solution consists of the following ingredients:
- cement grades 400, 500 (1 part);
- high-quality sand (2.5 parts);
- crushed stone (4.5 parts);
- plasticizers, additives;
- water (120 liters per cubic meter of solution).
If the new blind area is made of tiles, stone, brick, preparatory work is carried out according to the same scheme as when pouring concrete. The tile or stone is laid on a primed surface using conventional technology.
How to pour concrete over existing pavement
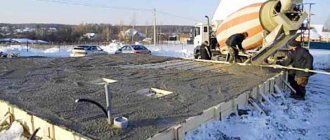
To achieve the highest quality pouring, it is recommended to continuously carry out the concreting process until completion, if the volume allows. When working on large areas, it is worth cutting them with so-called expansion joints to ensure the durability of the entire concrete base. The parts into which the coating is divided must have a size of 6 by 4 meters, no more. The further list of works depends on the size of the new concreting.
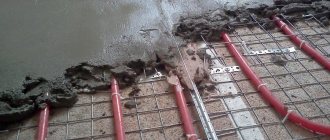
If the thickness of the coating is small, ranging from 8 to 10 centimeters, reinforcement with special meshes is used to ensure its strength. The mesh does not fit on the old base; it should be positioned so that it is approximately in the middle of the future covering.
Next, 10-12 mm reinforcing bars are installed vertically into the old coating with preliminary preparation of holes for them. The rods are arranged in a checkerboard pattern and at a distance of 0.4-0.5 m from each other. It is convenient to connect the reinforcing layer with vertical elements. If the coating thickness exceeds 0.1 m, reinforcement is not required.
Before laying a new layer, guides should be provided in the form of timber, boards, etc. After the entire mass has been laid, it is necessary to level it and screed it using the rule.
Next, the solution is compacted. Ideally, this procedure should be performed with a vibrator, but when pouring with your own hands, this is often done with a shovel or its handle. High-quality compaction will ensure the absence of sinkholes, which guarantees higher strength of the poured concrete.
Preparatory work
First of all, before you start laying linoleum on a concrete floor, you need to check the horizontalness and curvature of the floor using a two-meter level.
If you want to check the floor for unevenness, then the best test option is to check with a large level; such results will be more accurate.
If the differences in surface heights exceed 20 mm, it will not be possible to do without a leveling screed. Work begins with the installation of lighthouse metal slats at a level at a distance that is 17-20 cm less than the length of the applied rule. The length of the rule is selected depending on how many craftsmen will lay the screed. It is quite difficult for one person to work with a rule longer than a meter. Installation of lighthouse slats is carried out on cakes of gypsum quick-setting glue, located 27-30 cm along the slats. After this, using a level, you need to achieve horizontality in all directions of the plane in which the slats will be located. When the gypsum glue has set, you can begin to pour the cement-sand mortar onto the floor between the previously installed lighthouse slats. Using the rule, using zigzag movements along the slats, excess mortar is pulled towards the exit to create a flat surface. The floor must be left to dry for a long time. Linoleum is placed on a concrete floor only after it has completely dried, because this type of surface is characterized by very low vapor permeability, and if the concrete base does not dry completely, the linoleum will simply begin to rot.
The use of a toothed roller when laying polymer-cement mortars significantly increases the quality of the future floor.
If measurements of the horizontal surface show normal results, then instead of a traditional screed, special polymer-cement mortars, known collectively as self-leveling floors, are usually installed. Before laying linoleum on a concrete floor, it is necessary to place the calculated amount of self-leveling mortar on the surface and quickly roll it out using a long-handled toothed roller (you may have to use special waterproof shoes for this). You can also lay a traditional screed on a self-leveling floor if, for some reason, it was not possible to achieve a perfectly flat surface. When applying a rule two meters long, the gap between it and the surface, according to building codes, should be no more than 2 mm. Before laying linoleum on a concrete floor, it is better to lay down an intermediate layer of particle board, gypsum fiber sheets or fiberboard sheets. It is also recommended to glue these sheets onto bitumen mastic. If you use uninsulated linoleum, you can put an insulating polystyrene foam layer under the sheet material. This will be the best option for how to properly lay linoleum on concrete.
How does the hardening time of concrete affect the method of laying it?
To partially pour concrete when arranging foundations, you can go in several ways; their choice depends on many nuances, the main one of which is the time that is planned to be spent on the work process. If work is suspended for a period not exceeding 12 hours, then installation can be continued in several parts. This method is called “hot seam”.
In this case, laying concrete in two layers in winter takes no more than 8 hours; in the off-season you will have to limit yourself to 4 hours, and in summer 3. When laying part of the mixture is completed, its surface is covered with polyethylene to slow down the drying of the concrete. Immediately before starting to pour a new portion of the mixture, the exposed concrete milk is removed from the previous layer.
However, if the time period between laying layers is too long, you will have to wait until the first layer has completely hardened. The next portion should be poured onto a dry, clean surface. The first layer has to be ready for at least three days, and it is not recommended to touch the concrete during this time period, as it may crack. This method of laying concrete in parts is called “cold joint”.
The seams between the parts of the poured mixture can be both horizontal and vertical. The first ones are laid at half the height of the formwork. It is important to remember to control the seam, the presence of which in the locations of the reinforcement is unacceptable. In the version with vertical pouring, it is necessary to ensure demarcation of the formwork using additional partitions.
Concreting in layers - recommendations
- The filling stages must be thought out in advance.
- The entire filling area must be divided into sectors.
- The volume of concrete mixture delivered to the construction site must also be optimally distributed in advance according to the plan.
- Concrete should be poured evenly over the area.
- When pouring with a hot seam, in the intervals between pouring, it is necessary to cover the surface of the concrete with roofing felt or film.
- When pouring with a cold joint, the surface of the previously poured layer must be cleaned of concrete laitance.
Rules for laying concrete in layers and in parts
Let's summarize and formulate the basic rules, following which you can ensure a strong and reliable foundation without chips and cracks:
- work should begin with careful planning of the work;
- calculation of the volume of mixture required for work is carried out at the planning stage;
- the entire area where work is carried out must be divided into separate sections;
- during the pouring process, the coincidence of the seams with the reinforcement should be avoided;
- the laid layers in the selected area should be evenly distributed over the surface;
- In order to prevent the formation of seams, as well as to create a durable structure, it is recommended to observe time limits when performing work.
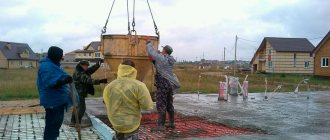
The following video shows an interesting example of pouring a foundation in parts.