Foam concrete has found quite wide application in construction. Both residential buildings, bathhouses, sheds and much more are successfully erected from it. The main advantage of such blocks is their low weight. In addition, foam concrete is inexpensive, easy to cut, and fire-resistant. The blocks are quite large, so laying is carried out much faster than in the case of brick. You also do not need to have special builder skills to install lightweight blocks.
This is all great, but what if we are talking about a basement? Should I use foam blocks for this part of the house?
bik ton
A house without a cellar is like a car without a trunk.
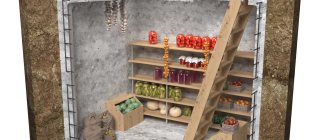
It’s so nice to go down the wooden stairs in winter for pickles and sauerkraut, it’s so convenient to store vegetables and fruits collected in your own garden and stored for a long time without preservation. It is also very wise to organize a garage under the house in order to save space. If the house will be heated using solid fuel, then it is best to organize a boiler room under the house. There are a huge number of options for using the basement, as long as there is room for imagination. If you are just planning to build your own house, then you definitely need to design it to have a cellar. But what material to build it from is an ambiguous question. Very often, cellars and basements are made from the same building material as the house - this is economical and reasonable. At the moment, foam block is very popular, so today we will discuss how good or bad a cellar made from this type of cellular concrete will be.
In order to understand whether it is possible to make a cellar from a foam block or not, you need to weigh the pros and cons. Let's take a closer look at all the options and decide how and where to use foam blocks.
Foam block is an excellent modern building material that is relatively cheap, lightweight, and fireproof. Houses and bathhouses, garages and gazebos are built from it. But how relevant is the construction of an underground space?
First, you need to decide for yourself what exactly you want - a separate cellar (a separate room, which, for example, will be located on the territory of a garden plot) or a basement cellar (located under the house). The construction of each has its own nuances and differences.
Design principles
Diagram of a pit for a cellar. The problem of ensuring high mechanical strength of basements requires a special solution taking into account the snow load, which sometimes necessitates the construction of a strong vault. For centuries, so-called monastic cellars were made, where an arched vault was used, the strength of which is very high. In free-standing buildings, a domed vault can be installed for this purpose. Naturally, such structures are quite complex to manufacture and have a high cost. The most common option is the installation of slab and concrete. In addition, bulk structures are used.
The strength characteristics of basement walls are ensured by the use of appropriate material. The most common construction of walls is concrete and brickwork.
Building a basement or cellar made of brick has one important advantage: the brick walls of the cellar provide high thermal insulation, which allows you to maintain optimal temperature indoors at different times of the year. It should, however, be noted that in the presence of shallow groundwater and poor flood conditions, preference should be given to concrete, which provides better protection from ground melt water
Which brick to choose? If you are building a subfloor, you should remember that a cellar made of sand-lime brick is unacceptable, since sand-lime brick has low resistance to moisture. The most successful option is ceramic material, but ordinary red baked brick is also quite suitable. It is best to use solid material.
House with basement
Before you make a cellar in your basement, you must understand that most often the cellar itself will act as the foundation of the building if the dimensions of the cellar coincide with the dimensions of the house. And for this reason, the walls of such a room must be very strong and withstand the load of the house.
- Large-cellular blocks are practically unsuitable for this role. They serve more as thermal insulation materials.
- The walls of the cellar can be made in a monolithic way. But most often, ceramic bricks or blocks of coarse filler are used for this.
- You can make a prefabricated foundation. In this case, the foundation itself is poured with heavy concrete, and the walls are made of hollow blocks.
- If the choice is on walls made of lightweight concrete, then you need to pay special attention to the solid structure. The form, in this case, will not play an important role. Use the one that suits you best.
- Universal blocks with through voids are very suitable for the basement. Their through voids can be filled with concrete and reinforcement. This method of laying out the walls will be practically a monolith. The strength of the walls in this version increases a couple of times. It is well suited for areas where seismic problems exist.
- Prefabricated monolithic walls are also not inferior in strength and can withstand very heavy loads. But making such a cellar without specialists and specialized machines will be very difficult.
All of the listed methods for laying out walls for a cellar most apply to the situation when the cellar will be almost the same size as the house and will take on the function of a foundation. But if you want to make a small basement and don't need large areas underground, the strength of block walls is practically irrelevant. And if the walls of the cellar serve the function of a simple fence, then they can be made from foam blocks. It is only necessary to build such a room in compliance with all the rules.
Block cellar
If you nevertheless decide to make a small room under the house, you should remember that working with foam blocks has its own nuances.
- You must understand that a cellar made of such material should not be heavily loaded and not serve as a foundation.
- The ceiling for such a cellar should be exclusively beam.
- Pay special attention to the soil. If the cellar will be located very close to groundwater, you should replace the foam blocks with something more resistant to water and moisture, or pay special attention to waterproofing the floor and walls.
- Masonry made from cellular blocks will not be very strong. It is best suited for filling walls. You can make a frame on each wall, thereby improving the strength of the building.
- The brand of foam blocks must be at least D 600. Such a block will be less porous and structural.
- The basement will be warm enough and will not need additional thermal insulation.
- It is necessary to take into account all the nuances to ensure that the basement remains dry.
If everything is done correctly, then such a basement will not freeze and will not be wet. It will be able to stand for a very long time and serve several generations. And if the execution technique is violated, then you are guaranteed a wet cellar. This may apply not only to foam blocks, but also to other types of wall construction. Let's take a closer look at what you need to do to keep your basement dry.
- The very first thing you must do is find out exactly where the groundwater is located and its level. This needs to be done in the spring. At this time of year, water levels will be at their highest. It is better to use the services of specialists for this, since even at a distance of one meter the water level can be different, you will start digging at one point and everything will be fine, but when you dig around the entire perimeter, you will encounter water.
- Check the level of soil freezing. If the water is close, then the ground will freeze well. And this will lead to the destruction of the foam block. In this case, the foam block will need to be abandoned.
- If the groundwater is at a deep distance (at least 0.5 m) from the cellar, then you can get down to business. But before you pour the foundation and remove the walls, you need to make drainage layers. Sand - 10 cm, crushed stone - 15 cm. If such drainage is not done, the water will stagnate and thereby destroy the structure.
- Before pouring a concrete foundation, it is necessary to place a waterproofing material on the drainage layer. It will not allow water to penetrate the foundation, and the cement milk will not be absorbed by the soil.
- To better preserve the walls, it is necessary to completely waterproof them. This can be plaster, coating, impregnation, paint, roofing felt and much more.
- If the walls are only made of foam blocks, you need to use a factory mixture with modifying additives for masonry. It will protect the seams between the blocks from moisture.
- When working with light and heavy concrete, it is necessary to use sand-cement mortars.
- Even if you decide to work with expanded clay concrete or any other type of concrete, you need to use plasticizing additives. They will protect the concrete from moisture and make it more resistant to temperature changes.
From all of the above, we can conclude that it is quite possible to build a cellar from foam blocks if a number of conditions are met that ensure dryness and protection from freezing. In this case, your winter supplies, car or whatever it may be, will be completely safe and secure.
Source
Simple solution to complex problems
The use of materials such as aerated concrete and foam concrete in construction allows solving many problems. But most importantly, it speeds up and reduces the cost of the construction process itself. Why, if you use aerated concrete, does the construction process proceed faster than when using conventional bricks? The fact is that aerated concrete is a fairly light material that does not lead to the squeezing out of the adhesive solution. The same cannot be said about brick. It is for this reason that walls can be erected from aerated concrete or gas silicate blocks almost without pause.
Aerated concrete blocks retain heat well, which significantly reduces heating costs in the winter months.
The next question arises. Is it possible, in addition to the walls of the house, to build a foundation and plinth from aerated concrete blocks? For the general case there is no clear opinion. On the one hand, it is believed that a foundation built from aerated concrete blocks is an excellent and time-stable solution. This opinion has a right to exist, provided that this foundation is not erected on weak-bearing soil.
If in the area where construction is planned, winters are quite severe and severe frosts exceeding -10°C are not uncommon, you need to think about a foundation that is more resistant to temperature changes. If the entire construction of the building is planned from aerated concrete, then it is necessary to take into account its increased sensitivity to any deformations. In this case, you need to build a very stable and. This will require additional costs for the foundation itself, which must be strip and is not the cheapest type of supporting structure.
In addition to the special requirements for the foundation for buildings made of aerated concrete blocks, it is hygroscopic. This means that aerated concrete readily absorbs moisture during stagnant water. This phenomenon can be combated by carrying out serious waterproofing of all blocks.
Is it possible to lay a cellar with aerated concrete blocks?
The choice of material for construction is influenced by the following parameters:
- Cellar size.
- Groundwater level at the construction site.
- Location: detached or basement cellar.
A short distance from home is allowed
build it from aerated concrete. Thanks to its good thermal insulation characteristics, it will maintain the optimal temperature without insulation.
If the cellar needs to be built under a residential building, then difficulties
. Due to their structure, aerated concrete blocks cannot withstand a large load-bearing load.
If you need to make a small basement where the walls will only enclose the room, then an aerated block is quite suitable
.
If the groundwater level is close or level with the future cellar, then you should choose a more durable material. The ideal option would then be monolithic structures or reinforced concrete structures. The voids in them can be filled with aerated concrete to insulate the room. Blocks of the D600-D800 brand are suitable. The entire load is borne by the frame of the building.
Aerated concrete blocks will require very careful waterproofing treatment.
Types of structures
The foundation with a basement is made of two main types - monolithic or strip. The monolithic option will be more expensive because it requires a large consumption of reinforced concrete.
The condition of the soil determines the choice of design. Recommendations should be made by experienced design geologists based on the results of a soil study at the construction site. To conduct research and produce a project, it is recommended to contact specialized design organizations. Experts will give an opinion on this or that type of house foundation applicable to your site.
Foundations also differ in the material from which the foundation of the house is constructed. Below are the most common types of structures.
Made from monolithic reinforced concrete
The foundation walls are constructed from concrete mortar reinforced with metal structures. The monolithic type is very reliable, suitable for most types of soil, but with significant depth it requires good waterproofing.
The strip foundation is built from concrete. It should be poured into formwork, which must be prepared to the full height of the walls of the structure. Their width should exceed the thickness of the house wall by 0.2-0.3 m.
A frame made of reinforcement is installed in the formwork, after which it is filled with mortar. It is recommended to use cement grade M500. All this can be done with your own hands if you carefully follow the project and building regulations.
Tips for constructing a monolithic concrete basement
Made from concrete blocks
It is not easy to build such a structure on your own, since it is very problematic to lift concrete blocks even with two people. The use of equipment will be required, at least a hoist or winch. But the speed of construction is much higher. The blocks are laid in accordance with the design and secured with mortar.
For reliability, they must be tied together with wire. The disadvantages include the need for increased waterproofing, especially if the basement is deep enough and the groundwater level is high.
How to build a foundation from FBS blocks
Brick and block
For the construction of foundations, special bricks are used that do not allow moisture to pass through. When erecting walls, in increments of 0.4 m, it is necessary to make a strip belt of concrete with reinforcement, which will strengthen the structure. The upper part of such a base is also constructed of concrete.
A foundation from foam concrete blocks is built in approximately the same way, but faster, and, unlike the use of concrete blocks, does not require the use of machinery. The most economical of the described designs. Quite suitable for the DIY construction method.
What to consider to build a cellar from aerated concrete blocks?
- For ceilings you need to use lightweight materials. The best option is beam structures.
- The structure must have a minimum load on the walls, since the cellar has no other support.
- You need to know the depth of soil freezing. If the indicator exceeds the norm, you can additionally insulate the walls.
- Before pouring the base, it is important to carry out waterproofing work. Some people pour crushed stone and sand under the roofing felt for drainage. This way, water does not stagnate at the base of the cellar.
- The walls also need to be protected from excess moisture. For these purposes, the walls are carefully plastered and coated with bitumen mastic. A layer of roofing material is laid on top.
- It is enough to plaster the inside of the wall. Sawdust is poured onto the bottom. To prevent excess moisture formation indoors, you can place containers with salt.
- To prevent the formation of fungus, you can add a little potassium permanganate to the wall treatment composition. It gives a disinfecting effect.
Aerated concrete blocks are a popular material in low-rise construction. Therefore, the business of producing aerated blocks is in demand and profitable. offers ready-made lines for the production of aerated concrete of various capacities.
You might be interested in:
Thank you for reading our article! Subscribe
to our channel
and like it
to always be aware of our updates!
Source
Construction of a cellar from foam blocks - quickly and reliably!
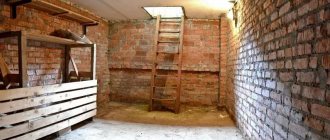
Almost every person who purchases a country plot with a house thinks about building a cellar. It is in the cellar that you can store food, drinks and preserves. Moreover, provisions can be there throughout the year. Various materials are used for the construction of storage facilities: wood, brick, concrete. Roofing felt, bitumen and various types of insulation are often used as hydro- and thermal insulation. A fairly reliable and quickly erected structure is a cellar, the walls of which are lined with foam blocks.
Before you start building a cellar with your own hands, you should decide on its design. As a rule, preference is given to completely buried cellars, which are a traditional option for storing vegetables. In recent years, many have also chosen semi-buried cellars, which also have many advantages.
If you choose a recessed cellar, then its construction must be carried out in an elevated part of your site (if there is one), because there is a real risk of flooding of the room, despite high-quality insulation. In this regard, a semi-buried cellar looks more preferable, because its floor does not reach the groundwater level, so the risk of flooding is reduced to almost zero.
Regardless of what type of cellar you choose, many experts recommend using the previously mentioned foam concrete blocks for construction. Cellars made from foam concrete blocks can be made entirely with your own hands, so there is no need to contact specialists or hire equipment. The construction of such a virtually concrete cellar means reliability and durability.
Calculation of approximate costs
Building a bathhouse from expanded clay blocks is much cheaper than any similar projects made from other materials, including a more durable bathhouse made from timber. But there is also a noticeable difference when choosing a construction method.
When turning to specialists, there is an option to save on construction time and a rational approach to the purpose of premises and the choice of materials. The cost of a bath in this case starts from 15,000 rubles/sq.m. Read about projects of one-story houses with a pitched roof in this material.
When you build a bathhouse yourself, you can bring to life ideas that go beyond standard solutions. With this option, the construction period, of course, increases significantly, but it provides the opportunity to gradually invest funds according to financial capabilities.
What materials will be needed?
So, you chose foam blocks as the main material for constructing a cellar with your own hands. This material is easy to install, reliable, durable and has many other positive characteristics. In addition, from an economic point of view, this is also a fairly affordable option (at least cheaper than brick).
To build a cellar from foam concrete blocks, you will need the following materials:
- A certain number of foam concrete or expanded clay concrete blocks (the volume of material will depend on the size of the future cellar).
- Bars and slats for ceiling beams and doors.
- Waterproofing and thermal insulation materials.
- Level and construction tools (hammer, screws, screws, etc.).
- Plaster and cement mortar.
If you are not familiar with the technology of building a cellar, then, of course, it is best to seek help from specialists.
Premises maintenance
In a concrete cellar, which can be built from any type of block, a certain level of cleanliness must be maintained as much as possible. This is a very important point in maintaining a constructed cellar. For example, even with slight dampness in the cellar, fungus and microorganisms will begin to develop, which will provoke biological processes responsible for food spoilage.
Copper sulfate and lime.
To disinfect the cellar with your own hands, immediately after construction you need to cover all surfaces of the room with whitewash, to which copper or iron sulfate was previously added (you can also use potassium permanganate). In addition to this, cellars are very often fumigated with tobacco or sulfur. Practice clearly demonstrates that spraying and fumigation should be carried out periodically, and not once immediately after construction. The optimal frequency is once every 6-12 months (depending on the size of the cellar and the number of stored products).
Preparatory work
First of all, it is necessary to determine the place where the cellar will be built. If there is such a possibility, then it is best to do it near the house (this is convenient and does not cause any harm to the building).
Even with a small depth of the structure, the pit turns out to be impressive.
It is important that the groundwater level in the area is below 150 cm, otherwise building a cellar with your own hands will cause certain difficulties. Construction work is recommended to be carried out in summer, in dry weather. By the way, you can pour soil into the cellar construction site in advance to artificially create a small hill. This approach will subsequently allow you to significantly save on waterproofing materials.
When choosing a semi-buried cellar, you will still have to dig a large pit, because its depth should be approximately ½ the height of the cellar wall. Also, to this value you need to add 20–25 cm, which will go to installing the floor. The pit can be of any size - everything will depend on the requirements and capabilities of the owner, so in this case there are no restrictions.
As soon as the pit is ready, it is necessary to compact the earthen floor thoroughly, and it is best to level it with special devices. If the soil is wet enough, then a small waterproofing layer must be laid. Then the bottom of the pit is filled with clay, which also needs to be compacted well.
If practice shows that the soil on the site is dry, then the use of waterproofing at this stage is not necessary. You can immediately pour in the clay and compact it. Tamping is best done with a regular wooden block.
Then we prepare the cement mortar according to all the rules and fill it with the prepared foundation of the pit.
During the pouring process, the solution must be leveled and carefully ensure that it is distributed as evenly as possible over the surface. If there are any distortions, it will be problematic to correct them in the future. After the screed has completely dried, you can begin building the walls.
Possible mistakes
It is easy to avoid difficulties and mistakes during the work process if you strictly follow the technology for constructing the foundation and walls and follow the construction plan. Factors that can lead to difficulties in the construction of basements and cellars are:
- Purchasing low-quality consumables and blocks that do not meet quality standards.
This is especially true for expanded clay blocks, the poor quality of which can be easily determined by their appearance. A yellowish appearance, the presence of white and dark spots indicate that the artificial stone is of poor quality, it contains a lot of sand and unknown additives. A manufacturer who monitors quality will always provide good products, a guarantee and a certificate for them. - Error in calculations and project drawings. Can lead to geometric deformations of the walls, incorrectly made pie of wall layers, etc. Therefore, it is best to order the project from professionals.
- Incorrectly laid foundation caused by irregularities in earthworks, refusal to settle (within 1 year) and to use reinforcement to create a concrete foundation.
It can lead to deformations and cracks in the walls, which will have to be repaired every year at great expense. - Carrying out work in weather that is unsuitable by construction standards. The norm for all construction processes, according to technological rules, is +5 °C, dry and warm weather.
- Violation of masonry technology. It will lead to cracks and distortions, so it is necessary to carry out the laying in a checkerboard pattern, focusing on the tension of the construction cord, adhering to the type of brick dressing, and not forgetting about the reinforcement every 3-4 layers.
- Refusal of ventilation and waterproofing. The basement and cellar will be damp and humid (walls, floor), due to the condensation formed. Therefore, during construction, roofing felt is covered not only with the floor (2 layers), but also with the walls outside and inside. They think about ventilation during the process of laying a wall. To do this, use special ready-made devices with pipes going outside.
There will never be any difficulties when constructing underground structures yourself if you strictly follow GOST technology.
Construction of walls
As noted above, the walls of the cellar will be made of foam concrete or expanded clay concrete blocks. This material is very durable and has precise geometry, so the creation of any additional waterproofing layer is not required. Even if groundwater touches the walls of the cellar, you don’t have to worry about their destruction, because it won’t happen.
Laying the walls is quick and relatively easy.
- For laying foam concrete or expanded clay concrete blocks, traditional cement mortar is used. Mix it in accordance with the specified proportions. You can also use special adhesive compositions for this work, which are specialized specifically for laying foam concrete blocks.
- We lay the first row, checking the horizontal laying with a level. If necessary, you can hit the blocks with a mallet. Then we make the same row on the adjacent wall. The laying technology should be circular - laying the first row against one wall, then against the second, etc. strictly along the perimeter. After laying the next row, a check for evenness must be carried out. It's best to fix everything while it's possible.
- Building walls from foam concrete or expanded clay concrete blocks is not difficult, so you can do all the work yourself. As soon as the walls are erected to the required height, you need to wait for the solution to harden. Only after this can plastering begin.
At the stage of wall construction, it is necessary to consider the location of the door. Foam blocks are very easy to process, so there will be no problems with sawing them. It is recommended to make the door in a semi-buried cellar wooden.
In this case, the entrance is planned to be made from above.
Finishing the wall in a cellar from foam concrete or expanded clay concrete blocks can be done in any way, however, preliminary application of plaster is mandatory.
Ground storage facility
How to build a bulk cellar made of brick? Just! There is a version that indicates that the warehouse was first designed by St. Petersburg residents. This structure is perfect for storing food in such a difficult climate.
Tool
- level;
- scissors;
- hammer;
- shovel;
- bucket;
- roulette;
- nails;
- axe.
During the construction of an above-ground cellar, the need for various additional tools may arise.
The structure is perfect if the site is located in a lowland. You can use this option if the climate is very humid. You will spend very little time on the construction of such a room, about ten days.
A storage shed is slightly different from a regular above-ground cellar. The very first thing that attracts us is that it does not need an insulated ceiling, which means you can easily save on such a structure.
Stages of construction of a warehouse
- First, you need to bury one end of the logs to a depth of 0.5 m. Wooden longitudinal shoulder straps will unite the ends of the logs that are on top. This way you create a complete and holistic design. True, before all this work it is necessary to sand the logs.
- In order to make the frames, you will need pillars with a diameter of 12-18 cm. Logs with a diameter of 18-22 cm are also suitable. Experienced builders recommend filling the base of the logs that are adjacent to the ground with hot bitumen. This way they can be burned.
- Then the materials used for construction will serve you for a long time. Professional craftsmen indicate that if you use this recommendation, the underground will last one and a half times longer.
- The roof is mounted from boards, and to create the sheathing you will need a hewn board. After completing the roof work, you will need roofing felt.
- Now it is necessary to make an embankment of the earthen layer. Its thickness is 30 cm. Peat soil is suitable for such purposes.
- In order to insulate the roof naturally, the roof must be turf (overgrown grass or cereal crop).
- The building will look like a hut. Don’t forget to also sew up one side of the end with several rows of boards at once (and place roofing felt between them). This will create good thermal insulation.
- Now we begin construction of the entrance. You need to insert the door and be sure to insulate it.
- Once you have made the storage, take care to protect it from rain, water and snow. To do this you will need to make a ditch around it. In this case, the hole should not be too deep.
- Now - installation of the ventilation system. Boxes are used as hoods, and valves are installed in them for control. All this must be placed near the ridge of the roof.
So, you have a ground oblong storage shed. Now two pipes are needed for high-quality ventilation. You can preserve vegetables for a long time at a temperature of about 3 degrees.
The optimal parameters for such a storage facility are as follows: Width – 8 m. Height – 4 m. Such a storage shed will last more than eight years.
Laying the floor
Once the plaster has dried, construction of the vault ceiling can begin. Building a ceiling is not as difficult as, for example, in a completely buried cellar. The ceiling is made on traditional logs, so the technology here is the same as in the construction of a residential building.
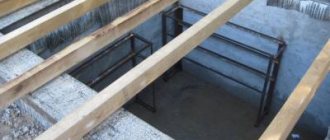
Taking into account that the walls are located 50% above ground level, there will be no problems with installing the ceiling. Ceiling joists are attached with screws and anchors. This is a reliable fastening method. The anchors fit easily into the blocks, but the metal elements will hold tightly to them. For greater reliability, you can additionally secure them with metal corners. Next, on top of the ceiling joists it is necessary to install transverse joists, which are fixed with self-tapping screws.
Reinforcement frame for the ceiling. You can also use wooden or metal beams.
The entire structure must be covered with roofing felt, a layer of waterproofing and again with roofing felt. Materials can be fixed to the joists using nails. Then any suitable material can be laid on the roof. As a rule, either tiles (of any type) or slate are chosen. It is recommended to choose the same roofing that is used for the main building (house). With this approach, the roof of the cellar will look harmonious against the background of the house.
Semi-buried cellars usually have a flat, pitched roof, so you don’t have to think about installing a ridge. At the same time, you need to make sure that the roof along the entire perimeter is slightly larger than the dimensions of the cellar room. This will protect the storage from snow and rain.
Internal organization
You need to take care of the internal structure of a semi-buried cellar no less than the walls and ceiling. It is very important to make a proper ventilation system. Building a cellar without quality ventilation is a waste of time, effort and money. To organize ventilation in any food storage, two pipes must be installed. One will be responsible for the flow of air into the cellar, and the second will be responsible for its removal.
The lower part of the supply pipe should reach almost to the floor, while the lower part of the exhaust pipe is usually located directly under the ceiling. Ideally, both pipes will be equipped with valves. This approach will allow you to independently ventilate the premises when necessary.
Despite the simplicity of such a ventilation device, the system will fully provide clean air to the room, eliminating the possibility of condensation. In addition, the temperature and humidity will be maintained at an optimal level for food storage.
Concrete
To find out the volume of the required amount of concrete, you need to add the volume of the base to the volume of the walls, then to the volume of the stairs and the volume of the ceiling. For example:
- the thickness of the walls and the base are equal, which means that the heights 3 0.4 = 3.4 m are connected;
- volume of the walls (5.7 * 2 3.4 * 2 1) * 3.4 * 0.3 = 20.6, that is, approximately 21 m3;
- floor volume 4.7*3.4 15%=24.3m3;
- area of the extension cover (3.4 0.5)*(2.2 0.4) 20%=12.15 m2;
- total floor area 24.3 12.15 = 36.45 m2;
- the required volume of concrete mortar for covering is 36.45*0.2=7.29 m3;
- volume of solution per staircase 0.37 0.3 = 0.67 m3;
- the volume of floor mortar in the extension is 0.2 m3.