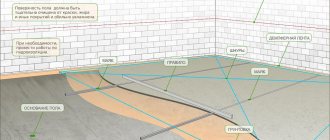
Necessity, not whim
For those who have already screeded the floor and are now surprised by its unsightly condition, we note that over time, even a perfectly executed screed will in any case become unusable, since it bears the heaviest load. Over time, it is necessary to repair the floor screed, even if it was done by a diligent craftsman, in compliance with all the technology. If the surface intended for the floor is not brought into ideal condition, this can lead to unpredictable consequences. Money invested in the visible part of the repair may be wasted if the screed, “offended” by inattention, makes itself known. An urgent need, not a stupid whim - feel the difference between these two concepts.
Basic ways to strengthen a concrete floor
Strengthening concrete floors prevents their further destruction and returns them to their previous performance properties. There are different technologies for strengthening concrete. The specific method is chosen depending on the condition and age of the floor.
Currently, to strengthen a concrete floor, the following are most often used:
- grinding;
- topping;
- special impregnations.
If the concrete screed is made with the addition of granite or marble chips, then after grinding the floor will also acquire a beautiful, textured pattern.
Topping is a relatively simple and economical technology that allows you to obtain high-strength, dust-free floors. After applying the topping, the concrete surface becomes 5 times more wear-resistant and 2-4 times more impact-resistant. Floors with topping are recommended for use in production shops where heavy loading equipment operates, in shopping malls, garages and parking lots. But such floors are not suitable for rooms where chemical spills are possible.
For rooms with high humidity, special impregnations that compact the structure of concrete are more suitable. They penetrate deep into the concrete, creating the effect of sealing and densifying the material. Impregnations are widely used to strengthen old and weak screeds, as they can increase their strength and resistance to abrasive loads several times.
Types of damage - mastering the first subtleties
Professionalism begins with assessing the nature of the damage and the amount of work to be done. The nature of damage can be of various types:
- visible cracks of various sizes, potholes, pits;
- concrete peeling off in places;
- poor coverage of the entire floor surface.
Replacing the finishing floor covering or completely removing it will provide an opportunity to see the unsightly condition of the screed in all its glory. Weakening of the material, complete or partial peeling of the screed will indicate that poor quality cement was used during the work or the technology for preparing the required solution was generally violated. The increased formation of cement dust speaks eloquently about all this. Such signs of poor quality concrete work cannot be ignored. At this stage of damage, you can still get by with a small monetary investment.
Strengthening concrete with impregnations
Concrete impregnations are one of the most common ways to strengthen concrete floors. They are a liquid composition on an organic or inorganic basis. Inorganic impregnations are called fluates. After application, they enter into a chemical reaction with the components of concrete. As a result of this reaction, a durable protective film of chemically inactive compounds is formed on the concrete surface.
Organic (polymer) impregnations are considered a more effective material for strengthening concrete. When using them, the pores of the top layer of concrete are filled with polymer, so it is modified into a concrete polymer with improved strength characteristics. Moreover, the degree of strength obtained will largely depend on how deeply the polymer composition has penetrated into the concrete thickness.
Unlike topping, impregnations should be applied to concrete no earlier than 10-15 days after it is poured. Before applying the impregnation, the floor surface must be thoroughly cleaned and sanded to remove the layer of cement laitance.
Repair of floor screed when a weak coating is identified
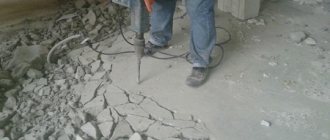
Connoisseurs of ideal quality in everything will begin to remove the concrete layer to the very base. If such a voluminous scope of work is not at all pleasing, then the necessary repairs to the floor screed can be made by strengthening the weak screed. So, you will need powerful hammer drills designed for professional work. Making holes with a diameter of 20 millimeters, repeated every 25 centimeters using drills with a small angle of inclination of the working groove, will help to carry out repairs using holes drilled to the very base.
You should end up with holes with a widened top and a depth equal to the thickness of the coating. The resulting holes will need to be cleaned to a state corresponding to minimal contamination.
Now you need to stock up on rods from scraps of reinforcement with a diameter of 12 millimeters. We degrease our blanks and make them to a length corresponding to the depth of the hole.
Next, we will need a special epoxy for working with concrete, called Rizopox 3500. This brand is ideal for this type of work. Pour the solution into the holes made, insert a metal rod and fill the upper bowl again. The role of the filler, which brings this composition closer in consistency to concrete, will be played by quartz sand, which must be added to the diluted solution. The result of the work done will be a screed surface reinforced with metal reinforcement, resulting from an epoxy composition consisting of two components.
Types of impregnations
Currently, the most popular are impregnations made using polyurethane materials. Modern technologies make it possible to produce them for concrete pavement located in any room or outdoors.
If the basis of the future surface is soil, then screeding of concrete and floors can be carried out using impregnation for concrete grade M150-M350. This composition allows you to saturate a layer 3 mm deep. In this case, the concrete itself in the upper layer becomes similar in strength to grade M600. The surface will be more resistant to dust formation, and the base will be more airtight.
Scheme for repairing concrete defects with exposed reinforcement: a – concrete defect with exposed reinforcement; b – removal of destroyed concrete, application of a protective layer to the reinforcement; c – restored section of the structure. 1 – building structure; 2 - fittings; 3 – material “KTtron-primer”; 4 – thixotropic repair material “KTtron” (depending on the project).
The biggest benefit of using polyurethane hardeners is their ability to increase the chemical resistance of the concrete pavement. For example, a floor with such impregnation lasts for many decades and does not require additional effort when cleaning. They are easy to clean with regular detergents.
There is another impregnation option with deeper penetration. It is intended for concrete grade M300. The composition used penetrates the floor to a depth of 5 mm. When applying this mixture, it is necessary that the ambient temperature be at least +5 degrees. Deep penetration strengthening mixture is usually used for floors with a weak layer of M150 concrete. When working with this composition, for maximum hardening, the floor with already applied impregnation should be covered with a polyethylene film. In this case, the impregnation will penetrate the floors much deeper. The deep penetration impregnation technology allows it to be used for high-strength concrete bases and wet bases.
In addition to polymer impregnations, there are other varieties that are more modest in cost. This is fluate impregnation. Despite the low cost of the material, its qualities are no different from its polymer analogues. The strength of the concrete coating increases up to 50%, and the appearance of the floor does not change and is pleasing to the eye. In addition, after applying this impregnation, a film does not form on the surface of the floors. All types of strengthening mixtures can reduce dust formation in the room.
Peeled concrete - our actions in this case
The cause of concrete peeling may be uneven loads, as a result of which only some places are especially affected. It is possible to determine the affected areas that need injections only by ear. In this matter, the main thing is not to overdo it, so as not to add more work to yourself. We take a hammer in our hands and gently tap the entire surface. We are only interested in places that produce a dull sound. A sign of delamination is also cracks from which fountains of dust are visible. Particular attention should be paid to the edges, which traditionally receive heavy loads. All places that cause you suspicion must be circled with chalk or a colored marker. If the area of the damaged surface is large, then it will be necessary to make holes with a diameter of 20 millimeters in the screed every 25 centimeters.
As in the first case, an epoxy solution will help us. The only difference is that now its consistency will be more liquid, and there is no need to use quartz filler. A construction syringe will help us pour the solution into the holes. It may be necessary to repeat this procedure if it is not immediately possible to completely displace the air from the cavity or if most of the mixture is absorbed into the concrete. This method most quickly revives the surface of the screed, so that the next day you can begin work on laying the final floor covering.
If at the tapping stage you find that more than a third of the area has peeled off, you will have to completely dismantle the screed and being lazy in this case is very unwise.
Strengthening weak screeds with primer, liquid glass and silicate impregnations.
The reasons why the screed will turn out to be weak are different:
But if this happens, then something needs to be done about it - because with further finishing, difficulties are possible.
It is also impossible to leave it unchanged. Dust constantly forms on such a floor. The weak layer is easily destroyed by feet.
First way. Strengthening with primer.
The first thing most people come to is to strengthen it with a primer. The option is real, affordable and on everyone’s lips. But it rarely gives results:
A short comment on the video.
Judging by the nail test, the screed is quite suitable for tiling indoors. There are examples of a more deplorable state of the foundation, which they tried to strengthen with a primer:
For what reason did the tile bounce off the screed?
They tried to strengthen the loose screed with a primer. But primer, primer is different. Judging by the color and the resulting film, a concentrate primer was used in shock proportions. Or primed several times, allowing each layer to dry completely (as written on the canister). This gave a film on the surface. A tile with glue was attached to it. But under the film the same weak layer remained. The tile came off along it.
Alternatively, you need a deeply penetrating primer and pour it in buckets at a time. To consolidate a weak layer to a greater depth. Deep penetration primer (according to the manufacturers) has smaller particles and therefore can penetrate deeper without creating a film on the surface.
Strengthening the screed with a primer is difficult to come across as a recommended technology. This is the creativity of the masses. There is also a similar solution - strengthening with liquid glass.
Strengthening cement screed with silicates (liquid glass).
The idea of using liquid glass to repair weak surfaces did not come out of nowhere. Liquid glass has been used in construction for a long time:
There are three main types (depending on composition) of liquid glass: potassium, sodium and lithium. They have different properties, which provide different benefits and different prices.
Sodium is more common. They use it to strengthen screeds in garages and basements:
You can experiment with this method. It’s useful to have at least some other people’s experience.
Below are the most interesting details of the use of liquid glass. It’s hard to call this quality material for drawing conclusions. But still:
One could call all this fuss with liquid glass a collective farm and forget about it, if not for such a detail as recommendations for strengthening loose screeds with silicates from many manufacturers of mixtures. One of them from “MAPEY”:
Important points in the video:
It is clear that the Prosfas strengthening primer does not consist of silicate alone. Therefore, its price differs from the price of liquid glass. If we compare the cost of strengthening a loose screed with silicate from “MAPEY” and ordinary liquid glass, taking into account its consumption and the similar consumption of liquid glass, the discrepancy will be significant:
Prosfas and liquid glass.
But Mapei is not the only company that prepares impregnations for concrete and screeds.
An entire industry has been created around this problem. Million dollar businesses have been built on a simple chemical reaction (Ca(OH)2 converts to CSH) between silicate in the impregnation and calcium hydroxide in concrete. The composition of the impregnation is not disclosed, except for the name of one of the silicates on the basis of which it was created.
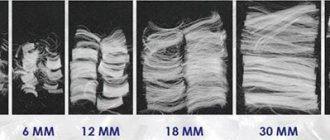
Similar to different types of liquid glass, various strengthening impregnations based on potassium, sodium, magnesium and lithium have been created. An important difference between them is the size of the molecule. This determines how deeply the silicate can penetrate the screed:
Impregnations based on sodium silicates.
Here are selected examples of sodium impregnations. That's not all. New ones may appear that are cheaper and more efficient. Some are cutting production and leaving the market:
All impregnations are similar in the method of application:
Apply so that the entire surface remains wet for 30-60 minutes. No puddles or drying out in certain areas. This is achieved using a soft whisk, redistributing the liquid throughout the screed. The excess is moved to adjacent areas and removed with a water vacuum cleaner.
Some impregnations are diluted with water (Lithurin I). Some have features - Ashford Formula is not effective on concrete grades below M 300 and on cement-sand screeds:
Strengthening impregnations based on lithium.
According to the American Concrete Institute (ACI Concrete Institute), lithium-based impregnations have a number of advantages:
Lithium based impregnations.
ULTRALIT HARD (1)
The production of three varieties Ultralit Hard Standard, Ultralit Hard Premium, Ultralit Hard Extra has been launched.
Mapecrete LI Hardener (2)
Lithium-based liquid for new and old concrete floors from MAPEI.
"Concria Super Hard" and "Concria Hard" (5)
In addition to these two impregnations, others are produced for strengthening, for coloring, adding gloss....
removing tiles from a wall video
The first impregnations appeared on the American market about 50 years ago. The search for new compositions does not stop. Competition is growing. Without experience, it is difficult to understand the features of each and the veracity of the declared properties. The instruction in some of those maps of strengthening impregnations is alarming: “Do not apply to dusty, crumbling and fragile substrates.” Marketing wars lead to even greater confusion:
A good warning was placed before purchasing one of the impregnations:
As a solution, you need a test area 1.5m x 1.5m. If there are different surfaces, then for each type of surface there is a separate platform. After doing everything according to the instructions, let it dry for 3-7 days. Then draw a conclusion based on consumption, costs, obtained and expected surface strength.
Add a comment Cancel reply
This site uses Akismet to reduce spam. Find out how your comment data is processed.
Source
How to deal with potholes - expert opinion
If you are removing the finishing coating, then you are, of course, legitimately interested in the question: how did a depression or large pothole form under the protected surface? Several conditions lead to such damage to the screed. Firstly, the appearance of an air bubble at the time of pouring. And, secondly, increased use of this place, for example, vibration from a washing machine. Covering the pothole with a solution over the surface will not give the desired result. Only fully opening the base around the pothole will make it possible to ensure that there is no air bubble.
The technology for eliminating potholes is as follows:
we make cuts around the perimeter of the potholes using an angle grinder or a hammer drill with a stone disc, to the entire depth of the screed;- the sawn piece is completely cleaned of dirt, vacuumed and coated with a primer;
- with a sufficiently large thickness of the screed, it is possible to apply several layers of coating after the previous layers have completely dried;
- We wait for the solution to completely set for at least a day, at high above-zero air temperatures. In cooler weather, the curing process will take much longer;
- We grind the top layer of the repair compound with a special tool.
There are three types of concrete screed:
Screed on a “rough” foundation made of reinforced concrete or earth
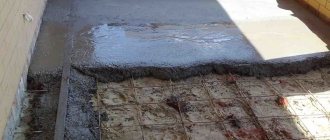
The screed is poured onto reinforced concrete floor slabs after cleaning and priming the surface. Layer thickness 50 – 100 mm. Typically, such flooring is installed in new apartments or houses. On the ground, concrete screed is laid on the floors in the basements. First of all, the soil base is compacted, a layer of sand of 100 - 150 mm is poured onto it and compacted. Then a footing with a thickness of 40 - 50 mm is poured. After gaining the required strength (about 7 days under normal conditions), a layer of rolled vapor barrier and insulation is placed on it. Then a metal mesh frame is mounted. After this, a layer of waterproofing is rolled out and a finishing concrete screed 50 mm thick is poured.
Screed on the separating layer of waterproofing
Suitable for repairing floors in garages, workshops and other premises with floors contaminated with grease and oil. A layer of rolled waterproofing is laid on the surface. A concrete screed with a thickness of 50 - 70 mm is poured over it.
Floating concrete screed
Suitable for repairing floors above unheated rooms. A layer of insulation (mineral wool, polystyrene foam) is laid. A layer of waterproofing is laid on it. Then a metal mesh frame is mounted and a concrete base 50–70 mm thick is poured.
Cracks in the screed are the most unpleasant type of damage
Uneven loads lead to the appearance of cracks, which have the unfortunate property of increasing. Repairing cracks in floor screeds is carried out as follows:
- we widen the crack and deepen it;
- clean from debris and dust;
- along the crack we make perpendicular grooves 150-200 millimeters wide and 20 millimeters deep;
- fill the crack halfway with a mixture of mortar and quartz sand, install metal brackets in it;
- after the bracket hardens in a vertical position, fill the crack completely with epoxy;
- The hardened surface is polished.
Eliminating the listed screed defects using technologies recommended by professionals in their field will help you reduce costs during repairs and significantly save time. Good luck to you in your endeavors!
Benefits of strengthening with topping
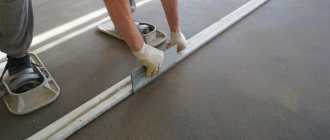
The technology of strengthening concrete floors with the help of special dry mixtures (toppings) has proven itself when used at various facilities, and therefore is now very popular. Topping can be used to strengthen a concrete surface, which will be used independently in the future, or to strengthen the base for any other floor covering. This technology involves applying a special dry mixture to freshly poured concrete and then grouting it using a trowel. The smoothing blades of this machine press the topping into the hardening concrete. In this case, a hardened surface layer is formed.
Concrete floors, after strengthening with topping, acquire the following advantages:
- high strength. After topping, concrete grade M400 acquires strength equal to grade M800;
- the strengthened surface acquires better performance characteristics , and its maintenance becomes easier;
- concrete floors with topping stop generating dust and become highly resistant to abrasives;
- treated concrete acquires antistatic properties;
- With the help of topping, you can improve the decorative effect of a concrete floor , giving it a variety of textures: grainy, smooth, mirror-like.
The main technical parameters of floors with topping are determined by the components of the rubbed mixture. This mixture contains cement, mineral pigments and fillers.
The size of the filler fractions is selected depending on the type of concrete used to fill the floor. When choosing, you must remember that any fine filler has the least adhesion to the concrete base, so the likelihood of such topping peeling off is much higher.
The use of a larger fraction gives the floor increased strength, but greatly reduces the ductility of the mixture.
Depending on the type of filler, mixtures are divided into:
- quartz;
- corundum;
- metallized.
Quartz mixtures
The operational and technical properties of quartz hardeners allow them to be used for floors subject to moderate wear loads. Quartz toppings are used to strengthen floors in shops, administrative buildings, warehouses and garages with low loads.
Concrete floors at various facilities are described in the articles below.
Concrete floors in stores and shopping centers
Polished floors for warehouse
Polished concrete floors in parking lots and garages
The use of quartz sand as a filler can increase the strength of a concrete floor by one and a half times. The main advantage of quartz topping is its affordable price.
Corundum topping
Corundum hardeners are used when it is necessary to create a particularly stable concrete floor subject to high loads. Floors reinforced with a corundum mixture can be subjected to increased abrasive and impact loads every day, but cracks and other damage will still not appear on them.
Corundum chips, used as one of the components of the strengthening mixture, give the floors special strength. With the help of corundum topping, the strength of a concrete floor can be increased by 1.7 times. But compared to a quartz mixture, corundum is more expensive. The price difference is approximately 20-30%.
Metallized topping
Metal shavings are used as a filler for this topping, which gives it special strength. Metallized topping is recommended for use on floors that experience increased loads. These can be floors in the workshops of those industrial enterprises that use heavy loaders or in garages designed for heavy equipment.
But it should be borne in mind that metallized mixtures cannot be used in rooms with high humidity, since a floor with such a topping will quickly become unusable due to the rusted metal component. The floor screed for metal topping must be cast from concrete of a grade not lower than M300. Otherwise, the concrete base will quickly crack.
More details about the technology of applying topping are described in the article Technology of applying topping
sand screed - what to do
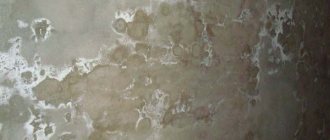
Good afternoon. I need your advice. The builders made a screed, which after drying turned out to be sandy. On the recommendation of other builders, I primed it with concrete contact, so the top thin layer was saturated, and the sand underneath it. The screed is smooth and does not buckle, there are no dips, no cracks, but if you break through the primer there is sand underneath. screed thickness from 6 to 16 cm due to the slope of the house, area 80 sq.m. Will plywood flooring plus a parquet board save the situation? Go make a 10mm self-leveling screed plus a cork backing, and then put a parquet board on it. Thank you.
LOADING UP TO 20MM DESIRED)
The situation, plywood is of course not bad, but why attach it? It seems to me that this option will be a fiasco, it would be better to pour a screed, and then a final coating. This is, as they say, at least somehow getting out of this situation.
Betokontakt was advised to you incorrectly. This is an adhesive primer for pre-treatment of dense, non-moisture-absorbing bases: monolithic concrete, massive concrete ceilings, concrete blocks. Betokontakt improves the structural properties of smooth bases and creates favorable conditions for increasing adhesion. Where is your smooth and non-absorbent? Such a screed must be impregnated a couple of times with a deep-penetrating acrylic primer (duf, ceresit, or prospectors at worst.) then pour a 15-20 mm self-leveling floor, lay 12 mm plywood on glue and a dowel-nail. and lay parquet boards on the plywood. You can use either cork or non-cork backing, as you wish.
Dear Anatoly. There are technologies and there is practice. So, from practice, I’ll say, self-leveling floor “Prospectors” on a gypsum base, fill in 3-5 mm, it will hold the base together, and calmly lay the underlay and parquet board. CHECKED.
There really is nothing to attach the plywood to. A self-leveling floor will help. Moreover, you will have a parquet board. Due to its area, the pressure on the screed will be less.
I recommend self-leveling flooring, just not gypsum based, as it is susceptible to moisture.
Dear Agnatoly! It’s faster and more durable to put GVL sheets on your screed; they are fastened together with glued PVA grooves and 35mm self-tapping screws, prime them with an acrylic primer and you can lay any topcoat. Good luck.
I agree. But if you mean KNAUF flooring elements, then this is a little expensive. Below I described a similar option in a regular large-format GVLV.
In this case, we can say that you do not have a screed as such. That is, it cannot perform the function that the finishing screed should perform. Therefore, it can be used as preparation for finishing. Concrete contact would not provide any bonding effect. The finishing screed - as you correctly noted, it is better to construct it from a self-leveling floor. (quickly and without much hassle). The thickness for parquet is 10 mm, I think it’s enough.
What reasons lead to dust formation?
When thinking about how to treat a concrete floor to avoid dust, first of all, it is advisable to study the dust formation process itself and evaluate the screed. Quite often, large amounts of dust appear not only due to natural processes occurring in concrete, but also for other reasons. The top layer is always dusty, which absorbs mechanical, chemical influences, loads, and gradually collapses with the release of small particles.
Possible reasons for the appearance of a large amount of dust from a concrete screed:
- Violation of concrete screed pouring technology
– if air cavities remain, work is carried out in frost or heat, appropriate care of freshly poured concrete is not organized, etc.
- Errors in preparing the mixture
– non-compliance with the recipe and proportions, large or too small volume of water, exceeding the permissible volume of plasticizers, etc. also lead to rapid destruction of the surface and subsequent layers of the screed.
- Adding low-quality components to the mixture
– if the cement is not fresh and was stored in unsuitable conditions, sand with impurities, additives are incorrectly selected or not produced according to technology, etc.
It is worth noting here that even a properly prepared and poured concrete solution, dried according to technology and demonstrating high performance, also begins to gather dust over time. Perhaps the volume of dust that appears is smaller compared to a low-quality screed, but the problem still cannot be avoided, especially when the layer is exposed to abrasive substances, high loads, and active use.
Dust appears due to erosion of the top layer of concrete. The frozen monolith has a porous structure, which, due to the difference in the components of the frozen solution, begins to collapse under the influence of even minimal loads.
If the erosion process is not left in time, then over time it will affect not only the surface, but also the deep layers of concrete, which leads to partial and then complete destruction of the floor screed. The service life of the concrete screed is significantly reduced.
Dust that appears during the operation of an untreated concrete floor has a bad effect on the operation of equipment and human health. Small particles of cement and chemical compounds get on the skin and eyes, cause itching, can settle in the lungs and provoke allergic reactions.
As for mechanisms, a concrete floor that is not dusted in time can cause rapid wear of units and tools with subsequent failure. Dust settles in crevices and on parts like fine sand and is a common cause of equipment malfunctioning. It is also important that a constantly dusty floor requires regular cleaning, effort and time.
Is crack repair always necessary?
Even experienced craftsmen cannot always guarantee that the cement screed will retain its solidity and integrity, since, despite its hardness and strength, it is a fragile material that is completely unable to adapt to environmental changes and withstand excessive loads.
In addition, having an impressive weight, the poured concrete slab under the final coating will not go anywhere, even if it cracks. It is not necessary to repair it if:
- the cracks are small and rare, not prone to expansion;
- when tapping with a mallet or walking along the edges of cracks, dust does not rise from them;
- the base does not vibrate under the weight of a walking person;
- Laminate, linoleum or other covering will be laid on the screed without rigid adhesion to it.
But in the case of finishing the floor with ceramic tiles, the diverging edges of the cracks can transfer stress to the tile adhesive and to the tile itself, hopelessly ruining the expensive coating.
A weak screed is the reason for cracking of tiles Source agromat.ua
First steps. Slab countertops
Sano published a blog entry in Furniture made from slabs, solids, and various differences, October 6, 2022, blog entry
The first attempts to make something from the brought slabs. Although there may be some attempts, the material costs money and the right to make mistakes is as much as there is money in your pocket. Train at your own expense, as they say.
Therefore, each board is carefully inspected and tried on; the proverb about measure seven times is in action.
The work itself is not tricky, creative, there are several boards and they need to be selected so that they look beautiful and there is no overspending. All sizing and trimming is done with the minimum possible removal of material, simply sawed off a little here, cut a little there with a chisel.
Concrete ironing technology
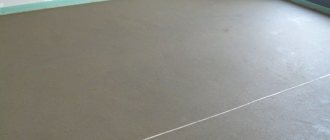
Imagine a cement surface that could be finished so smoothly that no other finishing coating would be required! This advantage is especially relevant in relation to the finishing of public buildings, where the area of the premises is enormous and thus there is a unique opportunity to save money and time.
Fundamentally important: A properly polished cement floor is easy to clean and wash with plain water without the need to use special detergents.
The ironing instructions are as follows:
- After the cement screed is poured, expect 3 to 6 hours; in most cases, this time is enough for the concrete to gain primary strength.
- After this, the surface is sprinkled with topping (in our case, a mixture of cement and lime).
- Once the backfill is saturated with moisture from the solution and begins to set, we begin processing with a trowel. The first time we walk through the disc and pause for half an hour.
- Then we pass with the blades until a characteristic shine appears.
- At the end of the grouting, the screed is covered with film and kept in this form for a week.