Tactile paving slabs have long been used in many well-equipped rehabilitation, sanatorium and medical institutions where disabled people are treated and restored. There, the installation of such coverings is used as information strips indicating the direction of movement.
Blind paving tiles are made in the same way as regular paving materials, but the surface has small spherical, conical or linear projections that rise above the main plane. They can be easily felt with a stick, thereby obtaining information about the desired direction of movement.
Longitudinal lines indicate that the path is open, and a transverse arrangement means a turn to the right or left. But spherical or conical protrusions indicate approaching a dangerous zone.
To ensure that people with normal vision do not occupy the passage provided for the disabled, tactile slabs are made colored and different from the rest of the sidewalk covering. A bright stripe attracts the attention of other pedestrians, concentrates it on the moving blind person and offers to give way.
Types and features
types of tactile tiles
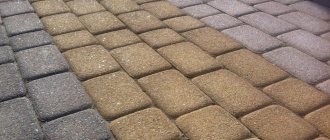
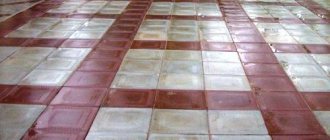
Tactile tile products have the same appearance as standard tiles. However, it contains on its surface a relief pattern of a cone-shaped or linear shape.
Using a stick, a blind person can easily determine the direction of the stripes. For example, if they are across, it means you need to turn left or right, and straight lines allow passage. Cone-shaped symbols (reefs) serve as a warning that there is a dangerous area along the way (car route, descent or ascent).
There are 4 types of corrugation:
- longitudinal - shows the direction in which you need to move;
- square - indicates an obstacle on the way;
- diagonal - indicates the need to make a turn;
- cone-shaped - means there are steps ahead.
table of corrugation shapes and purpose of tactile tiles
In addition, such tiles have brighter colors, which make them stand out from other road surfaces. This feature is intended for people with low vision and the ability to distinguish shades.
This type of tile can be made from various materials. For example, in courtyard areas and in administrative buildings, polyurethane or rubberized products are most often laid, which are fixed to the floor using a special adhesive. Concrete products are being laid on city streets.
Paths and curbs for the blind also attract the attention of able-bodied people. In an intense stream of people walking, it is difficult to immediately notice a visually impaired person, but on paving stones for the blind, you can avoid a collision with a disabled person.
A noticeable strip made of tactile tiles allows you to notice a walking person in time. In winter, such coverings are cleaned especially carefully so that disabled people have the opportunity to determine the relief.
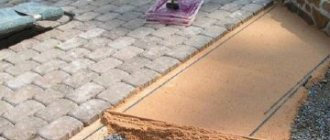
Laying technology
The main feature of the technology for laying tactile tiles is the correct location of longitudinal protrusions on the surface and the location of slabs with point corrugation. The information content of the coverage and the possibility of its use by blind people directly depend on this.
On street sidewalks, the corrugated strip should have a width of 1000-1500 mm. The location of the linear protrusions must correspond to the direction of movement. Transverse lines indicate a turning point, transition or other change. The presence of dotted corrugations should indicate the approach to a dangerous zone or the end of directional movement.
The underground passage is indicated by a continuous strip of width (at least 500 mm), laid across the entire width of the descent with protruding lines arranged transversely. The part of the sidewalk in front of the pedestrian crossing across the roadway is laid out in the same way, but the edge of the road is also marked with an additional strip of covering. This is done so that the disabled person can find out about the end of the crossing of the roadway.
Advantages and disadvantages of concrete tactile tiles
designations for concrete tactile tiles
The main advantages of the tactile variety of tiles:
- affordability;
- ease of installation;
- long service life;
- environmental friendliness;
- safety for the body;
- small sizes;
- high level of strength;
- wide choice of configurations and shapes;
- water permeability;
- Possibility of assembly/disassembly.
types of corrugations of concrete tactile tiles
Among the shortcomings, experts highlight the following:
- surface slipping in winter;
- frequent mismatch of joints in which debris and dirt can accumulate;
- risk of subsidence;
- The porous structure of the coating causes the moisture accumulated in it to freeze in the cold.
Tactile markings in the room
Internal markings are required in industries where disabled people work, in public buildings, at airports and train stations, in the subway, theaters, etc. It is also installed in shopping centers and even in residential premises. The rules remain the same as for the street. Here are some examples of using internal tactile markings:
- guide indicator - tiles with three longitudinal reefs, 130-150 mm wide;
- in front of the stairs, landing - tiles with cones arranged linearly. The width of the zone corresponds to the width of the stairs, the depth is 500-600 mm. The distance from the stairs is 300 mm. If the staircase is multi-flight, then the signs are placed in front of the first step of the first flight and the last step of the last flight; you can navigate on the staircase itself using a railing;
- in front of the door - the same as in front of the stairs. If the door is swinging, then the pointer is set to the width of the open door;
- in front of an insurmountable obstacle and a closed area - tiles with cones arranged in a checkerboard pattern. The width of the zone corresponds to the width of the obstacle, the depth is 500-600 mm. Distance from obstacle – 300 mm;
- “field of attention” for the places where the path begins and ends, branches – tiles with cones in a linear order, size – 600*600 mm;
- in places of service provision - tiles with nine longitudinal reefs, depth - 420-510 mm, at a distance of 300 mm from the place of service provision.
Criterias of choice
The choice of material for installing tactile pavement is made taking into account the architectural features and design of installation sites, the availability of existing paving surfaces, the financial budget and the planned corrugation characteristics.
To lay this type of coating, a special project is first developed, which indicates the type and direction of corrugation in accordance with the road situation, as well as the required volume of materials. Then the following criteria are taken into account:
- appearance;
- resistance to external influences;
- strength;
- price.
Preparation of glue
FIXVERT adhesive is a special composition of two liquid components A and B, packaged in separate containers. When mixed, these components form a homogeneous viscous mass. The quality of the connection formed by FIXVERT glue was tested by conducting an experiment, which proved that an attempt to tear off a glued tile from a porcelain tile with a force of 500 kg resulted in part of the floor being separated along with the product.
Preparation of FIXVERT glue
FIXVERT adhesive is used for laying tiles and indicators made of polyurethane (PU). The adhesive kit, along with the two-component FIXVERT adhesive, includes a two-component primer FIXVERT-23, which is supplied in the kit. Tactile tiles and indicators are mounted only on a previously cleaned and then primed surface.
Preparation of FIXVERT-S glue
FIXVERT-S adhesive is used for laying tiles and indicators made of PVC, aluminum and stainless steel. The FIXVERT-S two-component adhesive does not contain a two-component primer. Since strong and durable installation of products using this type of glue is carried out without preliminary priming, but only on a previously cleaned surface.
How to glue corners during installation and repairs
For additional fixation of the edges of tactile products, as well as when carrying out repair work on gluing bulging corners, you should use the KN-1 adhesive kit. The set consists of 2 components that are completely ready for use, and convenient dispensers ensure easy use of the bottles and quick spraying.
Regulations
The size and use of tactile-contrast signs are regulated by several regulatory documents.
- SP 59.13330.2016 “Accessibility of buildings and structures for people with limited mobility”
- SP 59.13330.2012 “Accessibility of buildings and structures for people with limited mobility”
- SP 136.13330.2012 “Buildings and structures. General provisions for design taking into account accessibility for people with limited mobility"
- GOST R 52875-2018 “Technical requirements for tactile ground-based signs for the visually impaired”
Induction systems
In order to better understand the features and intricacies of sound reinforcement systems purchased from Tiflo, we suggest using our instructions for their use. This will help increase the service life of products and increase the level of knowledge on their installation and operation.
Instructions for using the induction system VERT-1 MP3
The VERT-1 MP3 induction system helps people with hearing impairments receive the information they need without external interference. The portable device must be installed in public places where services are provided to the public
Specifications
The main technical indicators of concrete TUPP are:
- Geometric dimensions (excluding protruding tactile elements): length/width/thickness. GOST provides two standard sizes for this category of concrete products: 300×300×30 and 500×500×50 mm.
- Height of reefs protruding above a smooth surface (for both warning and TUPP guides): 4 mm – for rooms with exceptionally smooth floor surfaces; 5 mm – for other indoor coatings; 7 mm – for external use.
Mnemonic diagrams
In order to better understand the features and intricacies of tactile products purchased from Tiflo, we suggest using our instructions for use. This will help increase the service life of products and increase the level of knowledge regarding their installation and maintenance.
Instructions for using the tactile mnemonic diagram
The product provides complete information about the facility, the services provided and the areas where they are located. Being a tactile navigation scheme, all relief-graphic information of the mnemonic diagram is provided in direct proportion to the actual location of objects in space.
Instructions for using the tactile-sound mnemonic diagram
All information on the device is spoken and turned on when you press a button located on the case. This sensory-acoustic device can be configured into several foreign languages at once.
Brief historical background
The use of tactile tiles to help visually impaired people navigate was proposed by the independent Japanese inventor Miyake Seiichi back in 1965. This innovation was first used on the streets of his hometown Okayama (and at his own expense) in 1967. Subsequently, this innovative idea was supported by the governments of many countries. Currently (and especially after the adoption of the UN Convention on the Rights of Persons with Disabilities on December 13, 2006), thanks to this tile, the movement of visually impaired and blind people around the world has become safer.
For information! The Russian Federation signed (in 2008) and ratified (in 2012) this international document.
Basic principles for installing tactile signs
In order for tactile concrete tiles to “convey” the necessary information to a visually impaired person, it must be laid in compliance with the rules set out in GOST. For example, a warning sign must have a minimum size of 500 x 500 mm. Moreover, an irresistible source of danger (for example, a road sign or billboard) must be surrounded by tactile elements along the entire perimeter with a distance of 300 mm from the obstacle itself. Research has shown that it is precisely this arrangement of the TUPP that allows a blind pedestrian to slow down the pace of movement and make an adequate decision to safely bypass the obstacle.
The effective width (i.e. the distance between the outer ridges of the tactile elements) of the directional indicators (to indicate the path of movement) must be at least 250 mm. The dimensions of the turning zone, for the arrangement of which tiles with parallel ridges located at an angle of 45ᵒ to the direction of movement are used, must be at least 500 × 500 mm.
Important! If tactile elements are laid on a pedestrian surface without following strict rules, this leads to misinformation for visually impaired people and only complicates their safe movement in space, as evidenced by the video below.
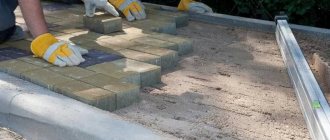
Pasting
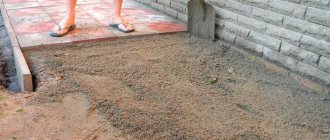
Tactile tiles are laid with glue. It is usually a two-component composition that is mixed until smooth for 5 minutes. The ambient temperature should not be lower than +10 °C.
The surface must be dry. The composition is applied and distributed using a spatula. To distribute the mixture evenly, use a special tool. The glue consumption will depend on the underlying material. Within half an hour, tactile tiles for the disabled must be laid on the surface.
Manufacturing methods and materials used
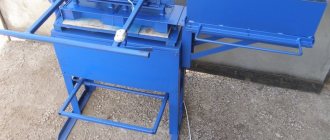
In factory conditions, two methods are used to produce concrete tactile tiles:
- Vibration pressing.
- Vibrocasting.
In both cases, a solution based on high-strength cement (grade M500), sifted sand, special synthetic polymer additives, dye and fine granite gravel is used as a building material. To increase the strength characteristics, polypropylene fiber is added as reinforcing elements to the composition for the manufacture of tactile tiles.
Tactile dirt protection
The use of tactile dirt protection makes it possible to abandon the use of tactile tiles on entrance areas, while this type of coating will preserve the accessibility of the facility. It is recommended to use such coatings both outside and inside premises - on steps, entrance areas, in vestibules. With the help of 3 types of fastenings - on the corners of steps, in a niche or on a straight floor - the problem of safety and convenience of blind and visually impaired people is solved.
Installation on a flat surface
Installation of tactile dirt protection on a flat surface is carried out in 2 ways: by assembling the component coating modules directly at the site of direct installation, or by rolling out the finished product “in the carpet” and cutting off the excess components of the product to the actual size of the room.
Pit installation
Installation of tactile dirt protection in the pit is carried out by removing the connecting elements that are located at the edges of the product. It is important to press the dirt-protective coating against the floor surface as firmly as possible so that it completely enters the pit and is clearly fixed in it.
Installation on steps
Installation of tactile dirt protection on steps is carried out by cutting off the connecting elements that are located at the edges of the product. When the dirt-proof coating is pressed as strongly as possible against the surface of the step, the product completely fits into the profile and is clearly fixed in it, creating conditions for safe movement along the stairs.
Installation on a ramp
Installing tactile mud protection on a ramp is convenient if the institution where it is installed is located in the middle or northern zone and can slide when snow hits the surface of the product. Tactile mud protection will simultaneously perform an anti-slip function and show a blind or visually impaired person a safe path.