Cement is the most popular material used to make sidewalk walkways. This is due to greater convenience, reliability and a more pleasant appearance compared to other options, for example, with asphalt pavement.
However, cement mortar can be different, and you need to carefully consider the choice of composition. Let's figure out which cement is best suited for paving slabs, and how to make them at home, using generally accepted proportions.
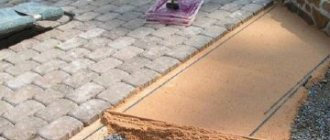
Tile making process Source ytimg.com
Removing the top layer of soil
From the surfaces planned for laying tiles, remove the top layer of soil 25-30 cm thick, this is approximately one bayonet of a shovel.
If the areas are large, this operation is performed using a bulldozer. The new foundation is then leveled and leveled by hand. If the soil is sandy or sandy loam, then it needs to be compacted. Compaction is carried out using a tamper made by hand from a piece of log 1 meter long with a transverse handle-crossbar nailed to the end. Better compaction is performed by a movable vibrating plate with an electric drive, the use of which, in addition, will save effort and time.
The type of geotextile used in this technology does not matter.
Calculation of the weight of building materials
Before you start collecting materials, you need to make the correct calculations. Sand and crushed stone can last until the next repair, but cement is not suitable for long-term storage. Therefore, it is first recommended to calculate how much building materials will be needed for the work.
Depending on the type of soil, the thickness of the concrete layer is calculated:
| Swampy soil | Clay soil | Loam |
| Concrete - 7-8 cm Gravel - 5 cm | Concrete - 5-7 cm | Concrete - 10 cm |
In addition to concrete masonry, it is also necessary to take into account the sand base, the layer height of which is from 10 to 15 cm.
The weight of building materials is calculated using the formula LxWxH, where L is the length of the track, W and H are the width and height, respectively.
For example, you need a path with a width of 1 m, a length of 5 m and a height of 0.1 m. The height of the sand cushion will be 10 cm.
Then, according to the formula, you can get the following:
- with a volume of sand (building material is accepted according to GOST) 1x5x0.1 = 0.5 m³ - the weight of the sand from the reference book will be equal to 775 kg;
- with a concrete volume of 0.5 m³, the average weight ratio will be 1075 kg.
Based on the calculation of the proportions “cement-sand-crushed stone” in parts 1:3:1 and the total weight of a cubic meter of concrete, equal to 1075 kg according to the reference book (the total weight is divided into 5 equal parts), the following values can be obtained:
- cement - 215 kg;
- sand - 645 kg;
- crushed stone - 215 kg.
This means that to construct a simple concrete path 1 m wide, 5 m long and a layer height of 10 cm, you will need 215 kg of road cement and crushed stone and 645 kg of construction sand. All calculations are carried out without taking into account the addition of water and various pigment dyes.
Books on the topic:
Building materials and products - Isaac Nanazashvili - 200 rubles - link to review of the book Handbook of a modern designer - Gennady Verzhbovsky - 280 rubles - link to review of the book Universal Builder's Handbook - Viktor Alekseev - 300 rubles - link to review of the book
Products and materials for individual construction. Reference manual - Mikhail Chernov - 100 rubles - link to book review
Finishing work and materials - Alexander Gorbov - 59 rubles - link to book review
Algorithm for preparing the base
The base for the tiles is prepared in the following order:
- Sand and cement are mixed.
- Add plasticizer.
- Pour crushed stone into the resulting mixture.
- Gradually add water until the solution takes the form of a thick mass.
- Next, when you are sure that the solution is ready, you can pour it into the molds.
- Place the molds on the vibrating table. Grease the molds with oil and a special brush. Excess can be removed with a sponge or paper.
- Drying can take up to two days at a temperature of 15 to 25 degrees.
If everything is done correctly, you will get a good example of decorative tiles, which in its properties and appearance is not inferior to those prepared in a factory.
What types of prancing mixture are there?
Depending on the area of application, the prancing device may consist of two or more components. The simplest composition, cement with sand, is a mixture you can prepare yourself, which is what you do when laying tiles. If you need to plaster walls or ceilings, you can use a two-component composition of lime and dolomite, or expanded clay flour and gypsum.
If you need to fasten a masonry of bricks, cobblestones or other large-sized material, you will need to increase the adhesive strength of the adhesive base. In this case, it is necessary to use a complex composition, including cement, sand, expanded clay, and lime.
Brand of construction mixture
Manufacturers offer 4 brands of building mixture: M1, M2, M3, M4. Numbers from 1 to 4 indicate the number of parts of filler in relation to the binding element.
For example, the brand of mixture M3 means that the grout consists of 1 part cement and 3 parts sand (or other element).
Formulation differences
Formulations may vary based on the type of components used. Possible options for ready-made mixtures are presented in Table 1.
Table 1. Types of prancing mixture
By number of components:
- simple - The composition contains only 2 components (filler - sand, expanded clay, calcium and marble flour or dolomite; binder - gypsum, lime or cement).
- complex - from 3 to 5 components are mixed (in addition to the main filler and binder (sand and cement), new binders are added: clay, gypsum, lime).
By fraction size:
- light – consists of components of small fractions (the size of granules reaches 1.25 mm).
- heavy – Includes components of medium fractions (the size of granules ranges from 2 to 2.55 mm).
Each type of prancing mixture is used to work with different types of masonry material. If you are laying paving slabs, then a simple two-component mixture is suitable for this (a simple option is sand and cement). If you plan to pave paths with paving stones or large stones, it is recommended to use a complex dry mixture.
Proportions for vibration casting
The proportions of the solution for vibration casting take into account the following ratio of additives:
- M250/B20 - a bucket of cement, 2 buckets of sand and 3.5 buckets of crushed stone.
- M300/B22.5 - a bucket of cement mixture, 1.7 buckets of sand and 3.2 buckets of crushed stone.
- M400/I30 - a bucket of cement mixture, a similar amount of sand and 2.5 buckets of crushed stone.
In addition to factory-made cements, home-made sand concrete can also be used for vibratory casting. The concrete recipe calls for a combination of 1/3 cement and sand. The volumes of liquid and dry mixture are determined by the weight of the final product.
For gray tiles
If a solution is being prepared for laying gray tiles in Moscow, the following factors must be taken into account:
- Region of use. The resistance of figured products to negative temperatures depends on this nuance.
- Soil and climate conditions. If the region has high groundwater levels, frequent precipitation or high humidity, you will need to reduce the W/C and add additives to the paving mortar that improve water resistance.
- Production technology. If the vibration casting method is used, the surface of the paving stones will be even and smooth. To impart roughness, coarse sand is used.
If a special deep vibrator is used when constructing monolithic buildings, then when laying tiles in a country house or near a private house, you can use the bayonet method inside the formwork using a vibrating table.
Such equipment solves two problems:
- Ensures uniform filling of rigid mixture molds with a minimum water-cement ratio.
- Removes air from concrete, reducing porosity and providing a strong, fine-grained structure with low hydrophobic properties.
For color
The surface of the tile is painted in layers when mixed or in a mass. The first option is more accessible, but requires some skills and effort:
- For the tiles, 2 portions of concrete mixture are created - 2/3 of the volume of gray consistency and 1/3 colored with pigment additives.
- Colored concrete is placed inside the blank.
- The vibration equipment is turned on for 20 seconds.
- After this, the form is filled with plain concrete and processed with a vibrating table for another 40 seconds.
- At the last stage, the mixture is wrapped in polyethylene and moved to a drying area.
During the painting process, the color is added to the concrete mixer. The shade of the tile becomes pale, but even with intense abrasion of some elements, the design of the path does not change.
Components
When studying the recipe for paving slab mortar and proportions, you need to take care of the following components:
- Cement mixture.
- Sand.
- Crushed stone.
- Plasticizer additives.
- Liquid.
Since in self-production there is no need to prepare large volumes of the mixture, the master does not need to use special equipment for stirring. An electric mixer does this job well.
When mixing the concrete mixture, it is important to comply with the following requirements:
- Correct calculation of the ratio of additives.
- Taking into account the quality of raw materials when choosing.
- Maintaining a water-cement ratio within 0.4.
- Using a vibrating table for forming pouring.
- Surface painting.
Cement
In order to improve the performance properties and quality indicators of the composition of paving slabs, it is necessary to prepare high-quality cement. To implement such a project, you cannot use material with additives.
This must be pure Portland cement corresponding to the M400 grade with the following characteristics:
- The astringent properties of the mixture should be 15-22 when the raw material reacts with water.
- Plastic parameters should decrease after 45 hours from the beginning of hardening.
- Complete hardening should take no more than 7-12 hours, and a 70% increase in strength properties should take no more than a week at normal temperatures.
Water
The composition of the mixture for paving slabs provides for the introduction of a large volume of water for mixing concrete in buckets or other containers. The quality of the final product is determined by the water-cement ratio, which affects the following parameters of concrete consistency:
- Degree of resistance to frost and moisture.
- Porosity and delamination.
- Formation of cracks and duration of hydration.
If you mix the solution yourself, the optimal W/C values should be 0.4.
This composition has high rigidity and low workability, so it is additionally diluted with plasticizers. These can be store-bought additives or folk remedies in the form of a tablespoon of detergent per batch of a concrete mixer.
Sand and crushed stone (gravel)
The mixture for laying paving slabs involves the introduction of sand and crushed stone. These components solve the following tasks:
- Reduce the cost of the final product.
- Increases the strength properties and wear resistance of tiles.
- Improves water resistance and resistance to negative temperatures.
When adding sand and crushed stone of the appropriate rock, the concrete mixture acquires the properties of granite, gravel or dolomite, giving the product the desired configuration and dimensions. When choosing fillers, you must be guided by the following requirements:
- Do not use crushed stone and sand containing large amounts of clay.
- Preference should be given to fine crushed stone and coarse sand.
- Granotsev has the highest strength and frost-resistant properties.
- Torn particles of quarry sand are characterized by high adhesion.
- To reduce the intensity of segregation, it is recommended to use a continuous aggregate containing pebbles of different sizes.
- Due to the compact dimensions of the tiles, it is better to choose crushed stone 5/10.
Seals
The composition of concrete for paving slabs includes sealing components that give the product improved strength properties and resistance to the following weather influences:
- Hail.
- Rain.
- Snow.
- Freezing.
Seals also eliminate the problem of abrasion of the decorative layer of tiles. The role of such additives is performed by granite crushed stone or gravel screenings. The density indicators of both components are almost the same, while crushed stone is in great demand because it is characterized by a geometrically broken shape and enhances density. However, sea or river gravel is rounded, so the coverage area of the binder is reduced.
Some dubious suppliers replace crushed stone with cheap clay expanded clay. Such additives worsen the parameters of future tiles and make them vulnerable to negative influences.
It is better to dilute the composition with coarse crushed stone (20-40 mm). When using gravel, it is recommended to use screenings or a fine-grained component, which is pre-screened through a mesh.
Additives
When figuring out how to make a solution for paving slabs, it is important to consider the presence of additives.
These include:
- Plasticizers. They are intended to improve the strength and properties of the final product.
- Hardeners. Helps speed up the hardening process of concrete.
- Dyes.
Plasticizer
There are a large number of plasticizers that differ in properties and advantages.
Among the most popular varieties are:
- Dry mixtures from foreign brands. They are used for small production volumes and ambient temperatures not lower than -2°C.
- Liquid plasticizers. They differ in different modifications: there are options for hot conditions of use or for products resistant to severe frosts.
When creating cement for paving slabs, you can use 2 types of plasticizers, since they enhance the strength properties of the solution by 15-20%. Water resistance and frost resistance are also improved, and the overall costs of the cement mixture are reduced by 18-20%.
Hardener
The use of hardeners is justified in the cold season, but such additives are also effective in the hot season. The use of such reagents allows the tile to harden faster, which reduces the likelihood of its deformation when drying. Additives also speed up the tile production process.
When using hardeners, you need to be careful and prepare small portions.
Color pigment
When figuring out how to prepare a solution for paving stones, you need to take care of the coloring pigment. In most cases, dry powder paint is used, which is characterized by a neutral reaction and does not affect the quality of the product.
Selection of materials
To create paving slabs with high strength, frost resistance and water resistance, it is important to select materials of appropriate quality
Cement
The main element of any concrete is cement. For the manufacture of paving elements, you should choose medium-aluminate cements with a mineral additive content of no more than 5%, as well as with a strength class of 42.5. The packaging of such a binder indicates the grade CEM I 42.5 N or B. Medium aluminate cements include binders with a C3A content of 5 to 8%. You can find out the aluminate content from the seller by asking for the cement passport.
Fine aggregate
As a fine aggregate, it is best to use washed quarry sand with a particle size modulus of 2 - 2.5.
This material belongs to construction sands of the first class; when used, the concrete composition is characterized by lower consumption of binder and low cost with higher quality indicators.
Coarse aggregate
When using coarse aggregate, it is best to purchase granite crushed stone with a grain size of 3 – 10 mm. Such material will provide increased strength and durability with high mobility of the mixture. But its cost is high, so you can purchase a standard mixture of grains with a diameter of 5 - 20 mm and adjust the recipe, reducing the content of coarse aggregate.
This approach will ensure high mobility and uniformity during the formation of the stone frame in the body of the composite.
Advantages and disadvantages
The attractiveness of a tile covering depends not only on the type of product, but also on the correct arrangement of elements on the surface. An important stage of the work is preparing the base for the paving stones. When choosing a laying method, it is recommended to take into account the landscape features and soil properties. Sandy material is used for groundwater drainage. Moisture that comes with precipitation or during hydraulic cleaning of the surface penetrates through the seams of the laying elements. The canvas is made up of separate fragments that move relative to each other, so the coating retains its shape. The tiles, located on a sand base, ensure ease of maintenance of the canvas. If a piece of installation is damaged, it can be easily removed and replaced with a new one. It is recommended to purchase materials for landscaping in reserve so that they can be replaced at any time. Such structures have their drawbacks, which can be caused by violations of the preparatory work technology. In the absence of a well-equipped drainage system, the sandy base is destroyed. Arrangement of a water drainage system is an important stage in the design and execution of work
The laying surface is designed for maximum permissible loads, so when arranging it, it is important to take into account the purpose of the coating. The quality of installation depends on the professional skills of the master. Therefore, it is recommended to contact companies that provide coating installation services.
If you carry out the work yourself, you need to carefully read the recommendations, choose high-quality material and arrange the foundation, taking into account the water level and climatic conditions of the area.
Removing products from containers
After about a couple of days, the finished product can be removed from the casting mold. The tile at this stage of production is not yet hard enough, so it must be removed very carefully, by slowly turning the mold over on a soft surface.
If a sufficient amount of lubricant is used, the product separates without any problems.
Final drying and strengthening is carried out in the shade. It is recommended to periodically moisten the dried material.
Once dried and completely ready for use, the tile product can be laid in a permanent place in about three to four weeks.
It should be remembered that you can only make vibro-cast paving slabs yourself, which is ideal for decorating paths in your backyard and garden paths. Homemade tile covering is not intended for laying on roads intensively used for vehicle traffic.
Advantages and disadvantages
Prance mixture is valued for the following indicators:
- Strength. When installed dry, the coating is fixed just as firmly as when using a solution.
- Durability. The coating laid on the girdle lasts as long as that laid on the cement-sand mortar.
- Good maintainability. If the adhesive base is damaged, the paving covering is easily removed and the adhesive layer is replaced.
- Availability. The initial components (standard: sand, lime, cement) have a relatively low cost, and they are also easy to buy.
- Excellent adhesive properties. Gartsovka is indispensable for dry installation, when adding water during installation is undesirable.
- Environmental friendliness. The constituent substances do not contain chemical components.
- Ease of manufacture. The standard mixture has only 2 constituent elements that you can mix yourself.
- Cooking in any quantity. The mixture does not harden over time, unlike a solution, so it can be prepared in any quantity.
However, along with the advantages, the prance also has disadvantages:
some inconvenience when mixing; increased attention when dosing components.
It is advisable to prepare the mixture for work on your own on a flat surface - experienced builders claim that this method of mixing the components will be of better quality than in a container. However, mixing components directly on the construction site is not always convenient.
Preparatory excavation work
Further actions depend on what type of base is chosen:
- sand coating;
- sand-cement;
- concrete.
In the first case, the sand is compacted without the use of auxiliary materials. Sand-cement mixture is a more durable coating. After connecting the main components, the trench is backfilled.
Cement mortar is not prepared in this case, but a dry mixture is used. Filling with water is carried out after laying the base. To create a concrete coating, cement mortar is mixed. In this case, formwork is created; the sequence of actions in preparation for excavation work will be different.
The general stage for the formation of any foundation is the excavation of soil in the area where it is planned to lay the tiles. The work is done with your own hands, because in this case there is no need to dig a deep pit, like for a foundation.
The main criteria that should be taken into account when excavating soil are:
- the platform formed from tiles must be flush with the surface of the ground, and so many materials are used so that after shrinkage this requirement is met;
- if the top layer of soil is loose, it is permissible to arrange the covering so that it is 2-4 cm below the ground surface.
In both cases, it is important to take into account the shrinkage of the bulk materials and soil used. When garden paths and sidewalks are laid out, in most cases the thickness of the soil layer that is removed is 20 cm
To make the covering of the area allocated for parking more durable, another 8-10 cm is removed. As a result, the depth of a small pit reaches 30 cm. Material consumption will increase, because in this case it is necessary to create a reliable foundation that can support cars and trucks cars.
Construction of a sand and gravel cushion.
At the stage of removing the soil layer, debris, stones, and weeds are removed. If the surface layer of soil is fertile, it is not recommended to scatter it along the site where construction work is being carried out. Weeds will grow here. This soil is best used for arranging beds and flower beds.
After removing debris and stones, a slope is formed in the direction away from the buildings (no more than 3%). The bottom of the trench is compacted. This will make the future coating more durable, since the risk of soil shrinkage under the weight of the materials used is reduced. Installed.
Existing manufacturing technologies
The tiles and paving stones that you might have seen among your neighbors are made using only three technologies: pouring into formwork, vibration casting and vibration pressing.
Driveway with imitation paving slabs using stamping method
There is also a technique for simulating paving slabs, when the texture is created with stamps on a wet concrete surface. At first glance, the path may look like it is paved, but in fact it is a monolithic concrete slab with all its shortcomings. Taking a closer look at the seams, it is easy to notice that they are inseparable from the slabs and are not capable of draining water into the ground. Therefore, if you liked the imitation version you saw in the photo, we recommend reproducing it using classical technology, from separate slabs. In this case, your copy will last 3-4 times longer than the original.
Pouring into removable formwork
Production of paving slabs by pouring into formwork
The technology of pouring into formwork is the simplest and least labor-intensive method of producing paving slabs. The products are cast directly at the site of use on top of compacted soil, so there is no need to spend any effort on drying and moving the slabs. Since the form is removed while the concrete has not completely hardened, you can use only one form and prepare small portions of the solution in a bucket with a construction mixer (without a concrete mixer). The form can also be filled in part, forming neat curves of the garden path.
But there are also disadvantages:
- the texture of the front surface of the slabs is always the same, since the shape is open and defines only the edge along the perimeter of each fragment;
- the concrete mixture cannot be compacted by vibration, so more plasticizer should be added to ensure strength;
- Despite the addition of binders, the service life of such tiles is several times less than that of vibrocast tiles.
It is quite easy to distinguish a path from such tiles. As a rule, it imitates the layout of a wild stone with irregularly shaped fragments, but the repetition of the pattern is easy to notice. Grass often grows in the seams of such tiles, since they are installed directly on the ground without a sand and gravel cushion and often without backfilling the seams.
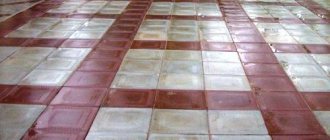
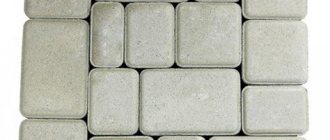
Vibrocasting
Vibro-cast paving slabs are the most common option
Vibro-cast slabs are the most common option for paving private areas. The easiest way to distinguish a product of this technology is by design. Neither pouring nor vibration pressing creates a complex tile shape or a fine textured pattern on its surface. The front side of vibro-cast tiles is usually more glossy and the color is brighter than that of vibro-pressed tiles.
Other advantages of this finishing material include:
- the service life of the tile is several times longer, since vibration during casting expels air bubbles and increases the water and frost resistance of the product;
- lower consumption of plasticizer (compared to pouring into formwork);
- the ability to produce durable, high-quality tiles at home with minimal equipment;
- a wide variety of ready-made forms from different price categories.
The only disadvantage we can highlight is the small thickness of the slab, which does not allow the finish to withstand high mechanical loads. Smooth tiles also increase the risk of slipping, so we recommend that you select textured shapes for manufacturing.
Vibration pressing
The paving stones in the parking area are vibropressed paving slabs
Vibrocompression is a complex technological process. Its main difference from vibration casting is that the solution in the mold is subjected to powerful impacts from a special press. As a result, the density of the concrete-cement mixture increases by an order of magnitude; in its properties, the material is analogous to artificial stone. Therefore, it is used for paving city sidewalks, paths in parks and parking areas in private areas. Due to its high density, the tiles are very frost-resistant; they can withstand up to 300 freeze/thaw cycles.
The method is most often used to produce paving stones rather than tiles. It is easy to distinguish by its increased thickness and small size (it looks more like a brick than a tile). In addition, such material is usually rougher and its color is paler. Since it is impossible to make a pattern on a separate fragment, to enhance the decorative effect, the paving stones are laid in beautiful patterns (you can use a cross-stitch pattern at home).
Among the disadvantages of vibration-pressed tiles, one can highlight only the high price and considerable weight, which complicates transportation and installation.
What you need to do to lay tiles correctly
Laying paving slabs requires the implementation of certain points that will ensure long-term operation of garden paths, eliminating the occurrence of unevenness. We carry out laying paving slabs on sand step by step. Read about the composition of the seal for laying paving slabs here.
Selection of tools and materials
There are two criteria for choosing tiles:
- Performance characteristics;
- Color solutions and product shape.
If in the second case you decide on a purchase based on taste preferences, then in the first you will need qualified help from a specialist.
The questions that he must answer for you should be as follows:
- What is the maximum load the product can withstand?
- What is the surface of the tile - smooth or rough?
- Will the tiles need to be trimmed?
- Will it require drawing selection?
When the tile is selected, we proceed to choosing a tool for the work.
You should always have at hand:
- Master OK;
- Mallet made of rubber or wood;
- Tamping;
- Pegs;
- Cord;
- Construction level;
- Pipe of any diameter;
- Watering can;
- Rake;
- Broom;
- Cement;
- Sand.
To get started, you also need to carefully calculate the number of tiles, taking into account the location and area of the paths.
Base arrangement: thickness
The most important step when laying paving slabs on sand is creating a base surface. The service life of the path or site and the success of the construction itself directly depend on its quality.
First, limit the path along the edges, driving pegs about 7 cm high into the ground, and pull the cord at the level. Then the top layer of soil with vegetation and debris is removed. If the surface is uneven, then a larger layer of soil is removed at higher elevations, and in places where there are depressions, it is added.
The entire area is leveled with a rake and carefully compacted to avoid unevenness during laying.
Video: technology, how to lay on sand
The video shows the technology and arrangement of the base for laying paving slabs on sand:
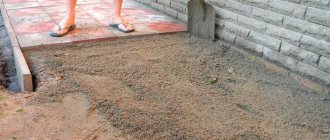
Creating a "pillow"
We cover the prepared soil - the base for paving slabs - with a layer of sand, which will increase the stability of the sidewalk and serve as a drainage system. What kind of sand is it laid on? It is better to take medium-grained or coarse sand for the base. Read about paving slab laying schemes here.
It is best to level the sand with a rake, then water it until puddles appear on its surface. After 3 hours, level the sand layer with a profile or pipe. The coating can be given special strength using a base made of crushed stone or mortar.
In the video: creating a cushion for laying paving slabs and rules for laying tiles on sand:
We spread the finished mixture on the sand. Tip: at each stage it should be taken into account that the future path must have a slope for water drainage. This will prevent the formation of puddles on its surface during heavy rains.
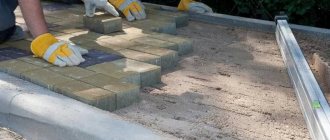
Laying and correct laying of paving slabs
To ensure even rows when laying paving slabs, you should start by installing the ordering cord along the chamfer, and laying should begin from the curb. We do the laying ourselves, strictly adhering to the cord. About plastic garden paving slabs at this link.
It is quite easy to achieve equal spacing between the tiles; it is enough to use crosses when laying them. Sometimes the tiles may not lie very smoothly. In such cases, you can remove a layer of sand with a trowel or add it, and then compact it thoroughly. As for the designs of paving slabs, find out about the options in the article.
A perfectly flat coating surface can be achieved using a building level or a mallet. When the installation work is completed, we begin to refine the joints by filling them with a cement-sand mixture. The sand for filling joints should be very fine. To ensure that the mixture fills the seam tightly, pour water over the seams.
In places where paving slabs adjoin parts of landscape design or buildings, the edges of the tiles can be trimmed with a grinder. Installing a curb will help avoid loosening of the tiles, and subsequently the spreading of the path. Read about installing a curb for paving slabs in this material.
During the operation of the path, the sand in the seams may be washed out and will have to be renewed from time to time. Of all the methods of laying paving slabs, the method of laying on sand is the easiest to carry out the work yourself. We also recommend an article about the technology of installing a wet facade.
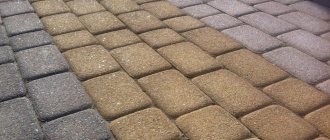
Basic installation schemes
Owners of dachas and country houses want to see their properties landscaped and impressive. Therefore, it is very important for them to know how to lay paving slabs on concrete beautifully. It should be noted that rectangular tiles (paving stones) allow you to create many patterns and beautiful installation options .
The most common installation schemes:
- "column";
- "herringbone";
- "brickwork".
These designs are quite simple and look great when used in multiple colors. They are usually used for paving paths, playgrounds and parking lots.
Waterproofing the base
After the drainage has been installed, it is waterproofed. This event is intended to create protection for subsequent levels from ground moisture. It is advisable to use one continuous piece of material, since over time the joints diverge and begin to let water through. If the base for the platform is being prepared, the strips are sewn together on a sewing machine and covered with aluminum tape on both sides.
The best choice for waterproofing is thick cellophane, sold in rolls. The material is durable, flexible and elastic. It is not subject to rotting and decomposition. At the same time, the polymer does not release harmful substances into the environment.
To increase strength, it is advisable to fold it in half. The edges are brought out to ensure a complete seal. Immediately after laying the polyethylene, it should be sprinkled with sand to prevent it from being blown away by the wind and damaged by sharp objects.
Composition of tile mortar
Required qualities for tile composition:
- Abrasion resistance, wear resistance.
- Fine-porous structure.
- Low water absorption.
- Frost resistance.
Table of proportions of concrete components when using M500 cement (cement, sand, crushed stone)
More details about the components:
- Cement for paving slabs. To prepare concrete you need cement; Portland cement grade 500 and higher is used for paving slabs. Lower quality cements will not be able to provide the required quality.
- Sand. Performs the functions of fine aggregate. The medium group of sand is used, with a fineness modulus of about 2 (according to GOST 8736-93), raw materials from river quarries must be used. The sand must be sifted, without unnecessary impurities and debris.
- Crushed stone. Granite chips are used as a coarse aggregate, which improves the strength of the tiles and their frost resistance. The fractions range in size from 5 to 10 mm, and the needle and plate additions are less than a quarter of the volume of granular crushed stone. This material should only be used in a washed state. Crushed stone from igneous rocks, for example, granite, GOST 8267-82, is suitable. The required compressive strength grade is 1000 and above, and frost resistance is above 200.
- Additives and plasticizers - impart plasticity to the wet mass of concrete, prevent delamination and cracking both during drying and use, add water-repellent properties to the concrete mixture, and the product becomes less fragile. When using plasticizers, they should first be diluted in warm water, which will be added to the concrete solution. In this case, the addition occurs with constant stirring of the water and gradual addition of the plasticizer. Plasticizers are added in proportions from 0.5 to 1% by weight of cement.
The plasticizer imparts plasticity to the mass
To achieve greater strength characteristics, alkali-resistant polypropylene, polyamide and glass fibers can be added to the concrete composition in a mass of about one kilogram per cubic meter of solution.
- Dyes. The variety of color palette of tiles is achieved by adding dyes and pigments to the concrete mixture. The requirements for dyes are high resistance to ultraviolet radiation and alkalis, since the paving surface will have to experience heavy solar loads, and cement has alkaline properties. Pigments, like plasticizers, are first mixed in water, and then the mixture is added to cement. It should be added in a proportion of 3 to 15 percent to the volume of cement, depending on the desired color saturation. It is not recommended to add too little or, conversely, too much dye, since a small amount gives a bad color, and a large amount reduces the strength characteristics of concrete and increases the solution’s water requirements. The proportions are indicated in the instructions for the pigment from the manufacturer.
- Water. Here you should strictly follow the recipe, since an excess amount of water will increase the drying time of the finished tile and reduce its quality. Water should be taken purified from dirt and impurities.
Properties of plasticizers why they are needed
Plasticizers are used for the following purposes:
- Elimination of pores in the concrete surface. Water penetrates into the recesses, which disrupts the chemical composition of the mixture. When frozen, ice crystals break the stone, leading to a reduction in the life of the product. Additives give concrete solidity and tightness.
- Increased plasticity and mobility of the solution. Thanks to better mobility, the liquid penetrates into all cavities, holes, cracks and other hard-to-reach places. The formation of voids that weaken the structure is prevented.
- The consumption of expensive materials (cement and crushed granite) is reduced. Construction costs are reduced.
- Less water is required to dilute the mixture. The density of concrete increases, crystallization occurs faster, which speeds up the process of constructing buildings and making blocks. Heavy fractions do not settle to the bottom of the formwork.
- The quality of finished products increases. The likelihood of their deformation, breakage and chipping at the edges and corners is minimized.
- Preservation of concrete color after drying. Additives contain pigment, which is used to make the finished product more attractive and presentable.
- Acquiring hydrophobicity and water resistance. The substances included in the additives repel water.
- Easy to remove from mold. The castings do not stick to the walls of the formwork and easily slide out of it.
- The surfaces of frozen products do not require additional processing. The mixture has the property of self-leveling, without the formation of pits and protrusions.
One of the advantages of plasticizers is that there is no need to use a vibrating table in the manufacture of tiles and blocks.
Step-by-step preparation of the solution
Now we will look at several options for properly preparing a solution for the production of paving slabs. Let's start with the simplest methods and gradually move on to more complex ones. Recent Entries
Chainsaw or electric saw - what to choose for the garden? 4 mistakes when growing tomatoes in pots that almost all housewives make Secrets of growing seedlings from the Japanese, who are very sensitive to the soil
When you are preparing a solution for the production of paving slabs at home, it is not necessary to follow the standards that are recommended for enterprises. If you try really hard, you can use any recipe for a concrete mixture to produce this material. Below are some of the most common ones.
Preparation of dry cement-sand mortar in a ratio of 1:1.5. Gradually add water to the sand and cement and bring the mixture to the consistency of thick sour cream. For better mixing, you must use a hammer drill or drill equipped with a “mixer” attachment. When the desired consistency is obtained, pour it into prepared forms.
Another way to prepare a mixture for paving slabs. You need to take two buckets of sand and fill it with six liters of water, and then mix everything thoroughly. After this, you need to add two buckets of cement to the mixture.
When the mixture is ready, you need to fill in five more buckets of sand, carefully fill everything with water, which will require about six liters. The result should be a solution with a thick consistency that should not stick to the trowel. The finished mixture must be mixed for several minutes and then loaded into the mold.
If a plasticizer is added to the finished solution as an additive, the properties of the composition are significantly expanded. The composition acquires elasticity and becomes more resistant to low temperatures.
When adding plasticizers, care must be taken to ensure that the composition remains thick. When the mixture is ready, it is distributed into molds, and then tiles are formed by vibration.
To increase the strength of the solution, crushed stone, screenings or microsilica must be added to the composition. In this case, there is no need for a hammer drill. If you use a mixer for stirring, then breakage cannot be avoided. It is best to use a shovel. To make the task of preparing the mixture easier, you can use a concrete mixer.
If paving slabs are planned to be produced on a production scale, then it is necessary to take a more responsible approach to the preparation of concrete. You need to familiarize yourself with the state standards in advance and adhere to these parameters when preparing the mixture. It is necessary to approach the selection of material with special care.
It is also important to consider the grade of cement, which must be at least M500 and not contain additives. Crushed stone for preparing the mixture must be granite, fraction 5–10 mm
Additives must be used sparingly.
For coloring, it is best to use imported colors made in Germany or the Czech Republic. If the choice fell in favor of a domestically produced dye, then the filling should be increased by 80%. The dosage of cement and dyes cannot be changed, otherwise it will affect the quality characteristics of the paving slabs and their color will be inconsistent.
Features of preparing plasticizer
It should be remembered that the preparation of the plasticizer must be taken care of in advance. This is done as follows. Plasticizer S-3 is poured into water heated to 40 degrees. Here it is necessary to adhere to the proportion 1:2. Then it is mixed for 15 minutes with a hammer drill with a “mixer” attachment. When mixing is complete, the solution must be left for some time.
It is best to prepare the solution in the evening. In the morning, when the preparation of the concrete mixture begins, it will be enough to stir the mixture for 15 minutes, after which it can be used.
All materials that will be used to prepare the concrete mixture must be located within walking distance. It is advisable to decide in advance how many measuring containers will be used for each component of the mixture.
The workplace should be equipped as follows: cement, sand and crushed stone are poured onto sheets of metal, which are laid around the concrete mixer at swing distance. Nearby there is a container that needs to be filled with water in advance.
Important nuances in production, error prevention
If at some points the paving slab production technology has not been followed, various errors may appear.
- Paint is unevenly distributed. Most likely, it was poorly diluted or the product was overexposed on a vibrating table.
- It is impossible to pull the tile out of the mold. The walls were not lubricated enough.
- Bubbles or holes have formed. The tile was little vibrated and all the air did not escape from the mixture.
- The tiles began to crumble. Indicates that the proportions are not respected or the material is of poor quality.
In this video you will learn how to make paving slabs at home - a simple DIY technology: