Laying paving slabs - a modern analogue of paving stones - on sand is advisable only if paths are made in the courtyard of a private house or cottage, because this technology is designed for objects with low loads.
Tiles look much more attractive than concrete or asphalt. The variety of shapes and the ability to paint this building material in different colors make it possible to create surfaces that not only fit organically into the design of any site, but also serve as its decoration.
How to lay paving slabs on sand correctly and what material will you need for laying? We will answer these and many other questions in our article.
Advantages and disadvantages
First of all, let's figure out whether it is possible to lay paving slabs on sand and how advisable it is.
In a short time, paths made of modern paving stones laid on sand have gained great popularity. Here are the main points that give this technology an advantage:
- the sand cushion provides effective drainage - when it rains, moisture goes into the seams between the paving stones, so there are no puddles on such paths;
- since the surface of the path and its internal structure are not monoliths, when the soil moves, it does not crack due to the fact that its elements are mobile relative to each other
- Since the paving stones are not attached to the base, the path is very easy to maintain - a deformed slab can be easily removed and replaced (provided that a product of the same shape and size is in stock).
Such structures are also not without their drawbacks:
- if high-quality drainage is not provided, water flows poorly and accumulates; over time, a structure with a sand base may collapse, because water can wash away anything;
- the surface does not tolerate exceeding permissible loads - if you drive along a pedestrian path in a car, the result can be very disastrous;
- Owners of garden plots often complain that ants drag away sand in significant quantities from under the paving stones.
sand cushion
The layer of sand in the described laying technology plays the role of a fixative, so the choice of material should be approached with special care.
The best option may be fine sand purified from impurities.
Such material will be able to optimally fill all the cracks and gaps, ensuring reliable fixation of the tiles in their place.
After laying and leveling the layer of sand, the area must be moistened with water and wait until it dries completely. Next, the top working layer is laid, consisting of sand and dry cement. This layer also needs to be carefully leveled, not forgetting a slight slope.
Consumables and tools
Before laying paving slabs on the sand, you need to collect the necessary equipment. To avoid downtime and to ensure that all work is carried out easily and efficiently, you will need to stock up on the following tools and materials in advance:
- pegs and durable cord for marking the boundaries of a path or area;
- building level;
- tamping (automatic or manual);
- Master OK;
- rubber mallet;
- plastic crosses or thin wooden wedges;
- irrigation hose with shower nozzle or watering can;
- broom;
- rake;
- sand of different fractions;
- cement M500.
Read on our website about how to choose paving slabs. We'll tell you what to look for when purchasing.
You can learn about the technology of laying wild stone on the ground from our next material!
Do you know the difference between vibro-cast tiles and vibro-pressed tiles? The main differences and rules for laying both are described here: .
Finishing
At the final stage of laying the tiles, it is necessary to process the seams between the individual elements of the canvas. This will keep the flooring from moving tiles. The seams between the paving stones are sealed with sand, evenly distributing the material with a brush with synthetic fiber or a broom.
To compact sand, the distance between the tiles is filled with water. The best effect can be achieved by repeating watering 2 or 3 times.
In some cases, for better adhesion, the gaps are filled with a mixture of sand and cement, and then also filled with water so that the cement “sets.” This method is not advisable to use in adjacent areas, since the density of the seams impairs the outflow of moisture.
Pressed rubber crumb
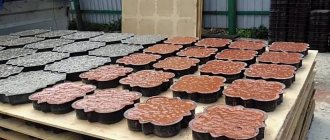
Lightweight and durable tiles made from concrete mixtures and available in a variety of patterns can be a great addition to your landscape. But this is not the only option for facing soil that can be laid without cement.
Decorative tiles made from rubber crumbs have an attractive appearance. Imitation of any natural materials is possible: natural wood, wild stone, paving stones. It has high performance characteristics and is easy to care for. The product can be laid on a sand cushion or directly on the ground. The technology does not affect the quality of the coating, but on a foundation made of sand and crushed stone, as practice shows, the tiles will last longer.
To do this, you must first compact the bottom of the trench with a hand roller, and then use the same technology to roll each layer of the base. To ensure that the tiles fit tightly, they are tapped with a mallet and the seams are rubbed with sand.
Polymer sand coating
A universal option for improving the area around the house is tiles consisting of 80% sand, polymer additives and paint pigments. Paving stones are not exposed to ultraviolet rays, do not absorb water, and practically do not wear out.
Laying of the covering is carried out according to standard principles: marking, excavation of soil, compaction (compaction), bottom of the pit, backfilling with crushed stone (from 3 to 5 cm), compaction with sand up to 5 centimeters high.
The sand fraction is watered with water from a hose and compacted in stages, and then covered with geotextiles (material made from synthetic polyester or polypropylene fibers, woven or non-woven).
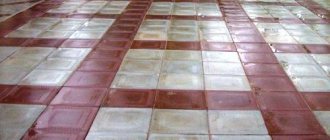
Floor tiles
A coating made of vinyl, ceramics or stone plays a more decorative role, since due to its structure it cannot withstand heavy loads. It is advisable to anoint it in gazebos or front gardens. That is, in areas where a large load on the flooring is not expected (low traffic, lack of vehicle traffic).
Performance characteristics can be improved by using a foundation (concrete screed, plaster, plywood). Installation only on a sand substrate is excluded; the tiles will sag.
Calculation of the quantity of materials
Calculations begin with measuring the perimeters of future paths and calculating their surface area. If shaped elements are provided that are located around flower beds and other objects on the site, they need to be divided into simple parts and the surface area must also be calculated.
All subsequent calculations are made on the basis of the resulting figures, which are converted into meters.
- The amount of curb stone is the length of all perimeters minus the length of the areas where the surface abuts the foundation of the building and other structures. In this part, the foundation itself will be the border.
- The area of the required paving slab is the area of all planned areas and paths plus 5% for undercuts. But this percentage can only be used by using simple laying schemes and hoping that all the delivered paving stones will be intact. In addition, during the work process, unaccounted for points may be discovered that increase its consumption. Taking into account such nuances, 10% should be added to the calculated area. Such a volume will not lead to excessive overpayment, but the purchased slabs will definitely be enough and there will be some left over in case of repairs in the future.
- How much sand is needed to lay paving slabs? The components of the sand cushion are calculated taking into account the expected thickness of the sand under the paving slabs. For example, to calculate the volume of crushed stone that will be laid in a layer of 5 cm, we multiply the area of all paths and platforms by 0.05 (this is 5 cm converted to meters). The resulting value will indicate how many cubic meters of crushed stone should be purchased. The amount of sand is calculated in the same way.
The volume of waste when laying paving stones greatly depends on the laying pattern (with the diagonal method, the amount of waste increases) and the size of the laid surface (the wider it is, the less there is).
Removing the top layer of soil
From the surfaces planned for laying tiles, remove the top layer of soil 25-30 cm thick, this is approximately one bayonet of a shovel. If the areas are large, this operation is carried out using a bulldozer. The new foundation is then leveled and leveled by hand. If the soil is sandy or sandy loam, then it needs to be compacted.
Compaction is carried out using a tamper made by hand from a piece of log 1 meter long with a transverse handle-crossbar nailed to the end. Better compaction is performed by a movable vibrating plate with an electric drive, the use of which, in addition, will save effort and time.
Then, on the compacted base, it is necessary to lay geotextiles in one layer with an overlap on the roadsides in order to isolate the soil from the crushed stone preparation being developed and to prevent future subsidence of the paving slabs.
The type of geotextile used in this technology does not matter.
Preparing for work
Preparing the work area is an important stage. A high-quality foundation is the key to the success of all other work, so first you need to carry out work to prepare the soil:
- Remove the top layer and make a trench 20 cm deep in the soil. This indicator is conditional - there are no universal solutions and there never will be. The depth of the trench depends on many characteristics: soil composition and freezing depth, groundwater level, and terrain. For hard soil, 20 cm is enough; for loose soils, increase the depth. The average for paths is 20 cm, and for a car area or driveway the trench needs to be deepened another 7–10 cm.
- From the bottom of the trench, carefully remove the roots of grass and plants , stones, wet the soil with a watering can or hose and walk along it with a tamper, which will allow you to avoid subsidence of the soil in the future.
- Line the bottom of the trench with geotextile or agrofabric. They will not retain water, but they will also not allow the roots and seeds remaining in the soil to germinate and spoil the path. In addition, geotextiles will prevent the interpenetration of continental soil and sand.
Tile design and layout
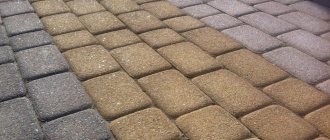
The base color of concrete pavers is cement gray. During manufacturing, pigments are added to the raw materials and a colored material is obtained. When choosing such products, you need to take into account the strength of the dye. The most durable are considered red or black tones obtained by adding iron oxides or soot. They do not fade in the sun for many years. Blue and green shades discolor in 2-3 years, and yellow, lemon or orange shades often turn out to be impractical and quickly get dirty.
To diversify the simple laying of paving stones, use combinations of colored elements, laying out geometric shapes from them:
- rectangles;
- diamonds;
- stripes;
- honeycomb;
- snakes;
- Christmas tree;
- double T.
Types of paving slab layouts.
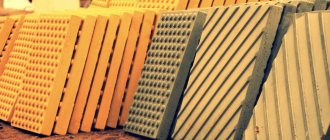
The shape of the tile is varied - square, rectangular, diamond-shaped, hexagonal, complex configurations (“Petal”, “Butterfly”, “Racket”, “Coil”), with smooth or grooved edges. Thickness - 40-100 mm. Dimensions range from 100x100 mm to 400x400 mm. The surface is decorated with textured patterns - “Parquet”, “Cobweb”, “Sandstone”, “Chess”, “Herringbone”. To design the perimeter of the paths, curbs and gutters are made.
Step-by-step instruction
All subsequent work consists of several stages, each of which should be carried out with the utmost care, because the quality and durability of the structure depends on this. Even if it was decided to save money on the slab, this should not be done on installation.
A high-quality base will not sag or deform, will allow moisture to pass through well and withstand expected loads.
Installation of curbs
Curbs are limiters that prevent the future sidewalk from moving away. To install them, grooves are dug along the prepared trench, the bottom of which is reinforced with crushed stone.
The voids in the crushed stone are filled with sand. Curbs are placed level on the crushed stone and secured with cement-sand mortar. You should not fill all the curbs with ready-made mortar at once - each one is reinforced individually with a concrete lock.
At the end of the work, the height of the curbs to ensure good drainage should be level or 10–20 mm below the top edge of the paving stones. The height is primarily regulated by the depth of the dug grooves. The concrete locks are given about a day to dry , then the grooves with curbs are filled with soil to the general level of the bottom of the trench.
A gutter is laid along the inside of one of the curbs, towards which the path will need to be sloped.
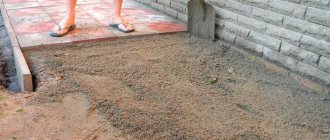
Making a pillow
Coarse sand is poured onto the geotextile in a layer of 5 cm . Its surface is leveled with a rake and abundantly moistened with water. Before the next stage of work, in cloudy weather you need to wait a day; in sunny weather, 2–4 hours is enough.
Then the surface is leveled with a profile or pipe and a layer of crushed stone 10 cm thick is poured onto it. The crushed stone is compacted. You cannot lay crushed stone directly on geotextiles to avoid damaging the latter.
Another 5 cm of sand is poured on top of the crushed stone , which is distributed so as to fill all the voids. This layer is needed to loosen the crushed stone and bring the base to zero. The surface is again compacted, spilled with water (as a result of which the sand will partially go into the spaces between the gravel) and leveled.
The result will be a perfectly flat cushion on which the slabs will be laid.
On the pages of our website you will learn what types of paving slabs there are. Find descriptions and characteristics in our review.
Read in the following material about the advantages of ceramic tiles and how to properly work with this material.
What adhesive is better to choose for paving slabs? We will help you make a choice in this article: https://trotuar.biz/vybor-kleya-dlya-keramicheskoj-plitki-keramogranita-i-polimerbetona/.
DIY styling technique
So how to properly lay paving slabs on sand?
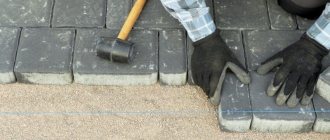
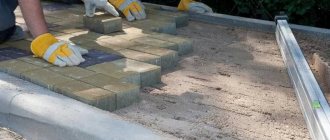
To avoid trampling on compacted sand, the products are laid in a direction away from you . The master, being on the already laid surface, lays the paving stones in front of him, slightly pressing them into the sandy base, and moves forward along it.
A gap of 1–2 mm is left between the plates . For convenience, use matches, thin wooden pegs or crosses for ceramic products. Some manufacturers produce products with stops on the sides that allow you to maintain the required distance.
The horizontalness of each row is checked with a building level ; using a rubber mallet, sand and a trowel, the surface is adjusted:
- if the slab protrudes above the others, you can deepen it by knocking with a mallet or removing a layer of sand underneath it;
- if the slab is recessed compared to the others, it should be raised and the layer of the cushion increased.
The pavers may need to be trimmed. To do this, apply it to the desired place in the track, make a mark, and only then cut off the excess part.
A grinder is used to cut tiles, but if you cut through the tiles completely, cracks may appear in the future. Therefore, only an incision is made with a “grinder”, and then the product is carefully split.
Sealing seams
To prevent the tiles from moving relative to each other, they are fixed by sprinkling the surface with sand so that all the gaps are filled. The sand is distributed evenly with a brush or broom, and then the surface is spilled with water - this will compact the backfill. The procedure may have to be repeated 2-3 times, and subsequently carried out after heavy rainfall.
Sometimes the gaps are sealed using a mixture of sand and cement, which is then spilled with water so that the cement “sets” and the tiles adhere better to each other.
But such a technique impairs the penetration of moisture into the drainage , and therefore it is not practical to use it in private areas and paths with low traffic.
Installation of curbs
These elements are by no means mandatory, but without their installation, the sidewalk will eventually begin to creep apart and lose its attractiveness.
Installation of borders should be done before laying the tiles themselves.
The following stages of installation of curbs are provided:
- Using pegs and twine, the approximate shape of the site is outlined, taking into account all the turns and bends.
- Next, even trenches are dug to such a depth that the height of the curbs before final installation exceeds the height of the sidewalk by several centimeters.
- A concrete solution is placed at the bottom of the trench, on top of which the curb elements are installed.
- Using a mallet, the curb is recessed to the required depth, after which its verticality and the tightness of the joining of adjacent elements are checked.
- On turns and bends, excess corners of the curbs are corrected using a grinder.
- After installing all the elements and hardening the concrete solution, the voids remaining on the outside of the curb are filled with sand and compacted.
If the path runs along a flat, beautiful lawn, it is quite possible to refuse to install borders. In this case, the sidewalk should be either flush with the lawn or 1-2 cm above its surface.
You can additionally install a water drain. The drain is laid along the edge of the inside of the path, next to the curb. If a drain is installed, a slight slope should be directed in its direction.
Important nuances and measures to prevent errors
The quality of work is affected by the shape and size of the tile . If you have to make frames around objects already located on the ground or the paths are winding, small paving stones will do, but using large tiles will result in too much waste.
Ideally, you should choose a material that contains elements to create curves. For a platform under a car, the paving stones must be wide and thick (at least 6 cm), then the wheels will not push through the coating. The thickness of the sand cushion is made at least 30 cm.
Since the technology of laying paving slabs on sand involves the use of water as one of the sealing agents, it is better to carry out work only in the warm or hot season , when wetted building materials dry quickly. When it rains, work is stopped because it disrupts production technology.
How to lay paving slabs on sand, watch this video:
Do-it-yourself technology for laying paving stones on sand and cement
The stages of laying paving slabs on a sand base with cement are approximately the same, but there are differences in the technology of work itself. They are described in detail below.
Site preparation
First you need to mark a trench and remove the surface layer to a depth of 30-35 cm. A thin layer of sand is poured onto the bottom, after which it is tamped. Lay geotextile on top with your own hands - it will prevent the growth of weeds and allow water to drain away. In this case, the canvas should overlap each other by 20 cm.
Drainage arrangement
After the bottom is compacted, crushed stone is laid - the layer should be 15-18 cm high. It is compacted and sand is laid again. The layer should be thin - just fill the voids and sprinkle a little on top. Geotextiles are again laid on top of this layer. It will not allow water to pass from top to bottom.
Installation of curbs
Now you need to install enclosing curbs made of stone, concrete, brick or other materials. It is placed on a base of cement-sand mixture, as in the previous case. Can also be placed on a base made of concrete or compacted sand.
Pouring a base of sand and cement
Next, you need to prepare a mixture of M500 cement and coarse sand in a ratio of 1:5. The thickness of the layer will be from 12 to 15 cm. To ensure a flat surface of the required height, sand is poured under the layer and tamped.
Laying paving slabs
It is recommended to pre-treat the tiles with a hydrophobic composition - thanks to this, they will last much longer and will look more attractive. Laying it yourself is done so that the solution fills the seams to the maximum, while leaving gaps of no more than 3 mm.
Level using a rubber hammer, work is controlled by level, observing the rules described above. The surface must be watered several times and allowed to dry. Then the path will be reliable and will last for many years.
You need to work in the direction away from you
Safety precautions when working
The basic requirements for safety measures remain the same as for general construction work. As for laying tiles directly, general measures should be supplemented with the following requirements :
- It is prohibited to cut and trim tiles on your knees;
- when using a grinder or sandpaper, you should wear safety glasses and a respirator;
- work that does not require contact with water is carried out wearing protective cloth gloves.
Laying paving slabs on a sand bed yourself is not at all difficult, especially considering that there is no need to bring specialized equipment.
The main thing is not to neglect the little things in the process of work, because it is from them that the overall quality is formed, which will allow the product to serve for many years.
Types of paving slabs
Before you start laying paving slabs, you need to decide on its choice - which option is better to use:
- Gzhel is a tile on which a figured pattern of various sizes is applied;
- Clover can be rough or smooth, which creates an unusual appearance. It can also be embossed and smooth. Embossed clover has a square shape with cut corners. Smooth – more complex in structure;
- Honeycomb - the name speaks for itself: it is a hexagon;
- Wave - has a surface similar to slate;
- Parquet is a tile that has an uneven surface and has an external resemblance to a “toffee” candy;
- Scales – you can use them to add volume to a sidewalk or site. Resembles fish scales.
Krakow clover tiles, or otherwise called Krakow paving stones, have become widespread.
Clover is produced in Russia, so it is created taking into account operation in all weather conditions.
The color range of this tile is wide: gray, burgundy, dark green, yellow, etc. Any pattern, design and design can be brought to life.
Its popularity is due to its strength, reliability, it resists chemical attack, and is easy to install.