When erecting concrete fences with your own hands, you cannot do without mechanized assistance. Sections of these structures are too heavy, and quite powerful special equipment will be required to construct such a fence. Of course, installing such fences is not practiced for ordinary garden plots - usually such fences are needed where major construction is underway or an object has been erected that requires reliable protection.
Do-it-yourself concrete fences are installed quite often. The simplest option is self-supporting fencing. They are installed on special supports, which are an integral part of the slabs themselves. In this case, there is no need to carry out preparatory earthworks; the fence can be assembled in a few hours - heavy panels are simply unloaded by crane, lining them up in a line.
No more installation work is needed - the weight of one slab can reach 1600 kg, so without special equipment it will not be possible to break it or steal it.
The installation of a concrete fence on “glasses” is carried out in a similar way. The design of this type of concrete modular fences includes special hollow pedestals - those same “glasses”. The cabinets are placed on a flat surface, after which a concrete panel with legs is inserted into their holes.
The same “glasses” can also be used to insert pillars between which panels are attached. But more often, concrete slabs are attached to pillars buried at least 0.5 m into the soil. This design is much more reliable than the previous ones. Using pillars, so-called Eurofences and fences are erected from all kinds of openwork concrete slabs.
In this article you will learn how to install a concrete fence with your own hands from panels and decorative blocks.
Advantages and disadvantages of installing concrete euro fences (with photos)
Standard fences made of gray reinforced concrete slabs, of course, cannot be called a particularly good option for owners of private houses. They are, of course, reliable, cheaper than brick ones, but they will not decorate either the site or the street. Of course, they can be painted with graffiti, but how many can do it so that the drawing really looks beautiful? In addition, for a small garden plot such a permanent fence is not the best solution. You can cause air stagnation, which will negatively affect not only the vegetation, but also the well-being of the inhabitants of the estate.
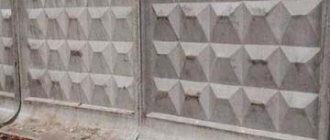
New generation concrete panels, so-called Eurofences, look more attractive. They are made by vibration casting from fine granite crushed stone, sand and cement using steel reinforcement.
As you can see in the photo, the surface of a concrete eurofence can imitate brick, natural untreated stone, wickerwork, or wooden boards:
The manufacturing technology of such panels allows them to be painted in bulk. There are also openwork panels that allow air to freely penetrate beyond the fence. Therefore, the so-called Eurofences have become popular not only among summer residents, but also among owners of urban estates.
The advantages of installing concrete Euro fences include low cost, a variety of shapes and design solutions, the ability to create a wall of any height (from 50 cm to 3 m), fire safety, reliability and durability (up to 50 years), speed and ease of installation, and on any soil, without a foundation and even on a site that has a rather steep slope. Since the dimensions and weight of standard panels are small (no more than 50-70 kg with dimensions of 2000 x 500 x 45 mm), installation is done manually very quickly and without the involvement of a truck crane, reminiscent of assembling a children's construction set. A team of 3-4 people can install up to 20 linear meters of 2 m high fencing per day.
The disadvantages of do-it-yourself Euro fences are also quite significant: poor ventilation of the area, bulky design compared to wooden and metal fences, susceptibility to temperature changes and displacement of unstable soil. If you do not follow the basic rules of technology during installation, then after wintering the fence may fall apart and sections may split. In addition, the back side of the eurofence is not attractive; it does not have a textured shape. However, it can be painted or covered with decorative plaster.
For concreting support pillars, cement with hydrophobic additives should be used to prevent the accumulation of moisture in the concrete.
Structurally, reinforced concrete fence panels look like this: steel reinforcement, filled with high-quality concrete of a grade not lower than M300. A more durable option is fences made of concrete M500 and higher. Products from the M1000 brand are extremely rare, and they look like real works of art, more reminiscent of filigree cast iron than a concrete structure. Please note that we are talking specifically about the grades of concrete, and not about the grade of cement from which it is made. The fact is that manufacturers most often indicate the brand of cement, for example M500, from which the concrete is made. Then everything depends on the proportions of sand, crushed stone, water and special additives. The output may be M350 concrete. True, special additives can significantly improve its quality, and, on the contrary, reduce non-compliance with the recipe.
Before installing a concrete fence, carefully inspect the panels and, if you find reinforcement that has broken through or significant cracks, it is better to stop using them: over time, the reinforcement will corrode and the fence will collapse. The canvas should be even and smooth, without visible damage, only minor surface imperfections that can be easily filled with putty are possible.
The following describes how to make a European fence with your own hands.
Concrete fencing. Main technical characteristics
Concrete fences differ in terms of their main dimensions. Thus, ready-made concrete structures are no higher than two meters, and block fencing can have any height required by the owner of the site.
The section sizes are almost always standard and are:
- width – 2 meters;
- intersection column height – 0.65-2.60 meters;
- the height of one set slab is 0.5 meters;
- thickness – 4-8 centimeters.
Self-standing fence standard:
- height – up to 3 meters;
- section weight – up to 2.5 tons.
Modules are produced using vibration casting technology. The solution for its manufacture consists of:
- purified river sand;
- high strength cement (M500);
- fine gravel or granite:
- water.
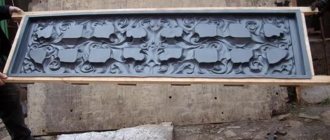
The listed ingredients are poured into a concrete mixer and mixed. Water is added as needed. The period of mixing the substance is on average 5-7 minutes. The finished composition is poured into molds made of fiberglass based on a metal-reinforced frame. The mold should be placed on a vibrating table so that the poured composition is evenly distributed. At the same time, reinforcement of the future slab is carried out. After completing the described actions, the concrete should be allowed to harden. As a rule, two days are enough for this.
Concrete panels from fence sections can be:
- monolithic;
- hollow;
- one-sided;
- double-sided;
- large-sized;
- relieved.
Thanks to high-tech production and excellent quality of raw materials, concrete fence sections have the following characteristics and performance indicators:
- high grade of strength;
- almost absolute moisture resistance;
- high frost resistance - up to 350 cycles;
- long service life - up to twenty-five years.
Preparing to install poles for a concrete fence with your own hands (with video)
There are two main types of posts for installing a concrete fence: solid reinforced concrete posts with grooves and stacked “post stones”. Reinforced concrete pillars with grooves have the following groove sizes: 0.5 m; 1.0 m; 1.5 m; 2.0 m; 2.5 m, corresponding to the height of the fence. The lower part of the pillar without grooves is concreted into the ground and has a length of 0.8 m or 1.3 m.
Stacked pillars consisting of concrete elements have a height that is a multiple of the height of one panel - 0.5 m, while the total height of the fence can be more than 2.5 m. To install a fence with stacked pillars made of stones, a base (reinforcement, pipe) is required. which is concreted into the ground. Hollow stones are piled onto the base, then the inside of the stacked pillar is filled with concrete mortar. The top of the stacked post is covered with a concrete headband. Stones for pillars are made with 2 grooves, with 1 groove and without grooves (gate pillars). In corner posts, the grooves can be located at an angle of 90° relative to each other. The stacked elements of pillars can have either the texture of natural stone or a smooth surface.
Before making a concrete fence, you need to mark the installation locations of the posts at intervals equal to the length of the fence panel. The euro fence slab is exactly 2 m long, but due to the thickness of the post lintel and due to tolerances and gaps, the distance between the centers of the posts of each section is assumed to be 2.06 m. Most likely, the total length of a particular fence is unlikely to be an exact multiple of this distance, therefore Some slabs will have to be cut.
Before you build a concrete fence, plan in advance where the gate will be. If there is already a gate and it is metal, then it is best to vertically weld 30 x 30 mm corners to the support posts so that a 50 mm wide groove is formed for installing a concrete slab. Of course, you can dig concrete pillars next to the gate. This option is preferable when a new gate and wicket are simultaneously installed along with the European fence.
To install a concrete fence correctly, as professional builders advise, when planning you need to take into account that the Euro fence post has a cross-sectional size of 150 x 150 mm. This means that another 150 mm must be added to the total length of the sections due to the fact that the first and last pillars protrude to the sides from the center of the pit. For example, if you install 10 sections, the total length of the fence will not be 2.06 x 10 = 20.6 m, but 20.75 m.
Places for installing pillars for a concrete fence built by yourself are fixed with pegs, then a cord is pulled, marking the horizontal zero level.
The video “Do it yourself Eurofence” shows how the preparatory work is carried out:
The next section of the article is devoted to how to install pillars for a concrete fence.
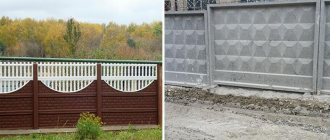
Variety of fences in the photo
Beautiful fence in soft creamy white shades
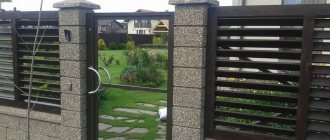
Fence “under the stone” Another option for concrete fencing
Combined concrete fence
Concrete fencing made as if from stone
How to install concrete fence posts with your own hands
In the place of the corner post, you need to drill a hole with a diameter of 300 mm to a depth of 800 mm. The installation depth of the pillar is 700 mm, the remaining 100 mm is allocated to the bedding layer. If the soil in the area is heaving, the pillar is buried at least 1200 mm. In addition, it is recommended to provide a ventilation gap of 30-40 mm between the ground and the lower panel slab of the fence.
The soil is compacted and backfilled with sand and crushed stone. A pillar is installed on top of the crushed stone cushion. Carefully measure the evenness of the post, its height and angle of inclination. Then the post needs to be fixed in the well using rubble bricks or construction waste. The rubble is compacted and covered with coarse sand, which is thoroughly watered to compact it. High pillars are additionally supported with temporary wooden struts.
When a self-built concrete fence post is perfectly aligned, pour concrete mortar into the well and wait until it sets. At normal temperatures this will take at least 6 hours, but it is better to wait at least a day. A lot depends on the correct installation of the first pillar, and haste is inappropriate here, since it can later cost too much.
Now they measure exactly 2060 mm from the installed pole and drill a hole for the second pole, always following the cord. The base is compacted in the same way and backfill is performed.
Take one lower section of the eurofence and install it with one of the ends into the groove of an already fixed post. Typically the groove depth is 40 mm, the slab should fit into the groove to a depth of 30 mm. The panel is supported with boards or reinforcing rods, approximately aligned horizontally1. Then a post is inserted into the second hole and pushed onto the section so that it fits 30 mm into the groove of the post. The location of the concrete section is precisely aligned along the cord, the second pillar is aligned strictly vertically and fixed in this position by performing a spacer with rubble bricks. If necessary, the pole can be supported with spacers from above.
After this, the procedure for installing a post and a section of a fence made of concrete panels is repeated: 2060 mm is measured from the post and a hole is drilled again, backfill is performed, the concrete section is installed in the groove of the previous post, a new post is installed and pushed onto the section, after which the post is fixed with rubble.
How to install euro fence posts is shown in the photo:
In the corners and turns of the fence, dig two posts into one hole at the turning point, orienting each post along its installation line. If the angle of rotation is small (up to about 25°), then you can get by with one pillar - the width of the groove will allow you to insert the slabs at an angle. It’s even better to use a stacked post with corner grooves to rotate the fence.
When all the posts and lower sections are installed, you should once again check the evenness of all parts of the fence.
Watch the video “Do it yourself concrete fence posts” to better understand how this work is done:
How to make a fence from concrete panels with your own hands
The next stage of installing a concrete fence with your own hands is the installation of all other sections. This will require 2-3 people. The slabs are lifted to the height of the fence and inserted into the grooves of the pillars, making sure that the sections are not skewed and that they are located exactly one above the other. It was, of course, possible to install all the typesetting sections at once in one span. But in this case, distortions are possible due to uneven pressure on the pillars - by the time it comes time to load the next span, the first one will already have taken full or almost full settlement.
If the fence is located on very uneven terrain, the problem of slopes is solved by using posts of different lengths or installing steps. The installation height of each pillar in such cases is calculated individually. On an uneven area, the pillars will be taller. In this case, the height difference between adjacent spans should not exceed a tenth of the panel length.
In order for the concrete section to be positioned strictly horizontally in the grooves of the pillars, it is necessary to insert a wooden block into the groove of the pillar that is located below the slope, which will act as a support under the slab.
The length of the bar must be calculated very accurately. If its height is not enough, wooden chips and wedges are placed between the spacer and the slab. An alternative method is to trim the slab from the side of the higher ground level.
After all sections of the concrete fence have been installed to their full height, the verticals and horizontals are checked again. If the test results are satisfactory, all pillars are filled with concrete. The pillars cannot be filled with concrete until all sections are installed. When performing work using the described method, it is possible to correct the position of the pillars and the fence as a whole: move, tilt, etc. If the pillars are fixed with concrete, then it is no longer possible to correct the mistakes.
To make a concrete fence with your own hands as strong as possible, after the concrete has hardened, you need to fix the sections in the grooves of the pillars, otherwise they may sway from the wind and hit the fences or grind unpleasantly. To do this, spacers - wooden wedges - must be driven in from the back between the section and the post. Concrete sections in pillars should not be fixed using concrete mortar. As a result of fluctuations in temperature and humidity, concrete will expand or contract. If the slab is not able to move freely along the groove of the post, it will split it or split itself. Possible ground movement should also be taken into account. Somewhere it may sag or, conversely, swell, while the plate that is not firmly fixed will simply change its position, moving inside the groove. Wooden wedges will not firmly hold the slab between the pillars.
Professional teams usually install all the pillars first, and then insert concrete sections into the grooves, but this method has a lot of disadvantages: if you miss the markings, all the work will go down the drain. Too small a gap between the section and the post when installing a fence made of concrete panels does not give room for error. It is much easier to install the pillars, strictly focusing on the dimensions of the already inserted slab.
Installation methods
The following fences are installed:
- Truck crane. Suitable for self-standing, monolithic concrete sections. For installation work, 3–4 people are enough. With preliminary arrangement of the foundation, the total construction time will be from 2 to 3 weeks.
- On your own. In this way it will be possible to install a European or type-built fence. The weight of one slab does not exceed 70 kg, so 2-3 people can handle all the work. With the exception of pouring the base, the prefabricated structure is assembled quickly and easily, since all the necessary parts are supplied included.
Regardless of the method, sections should be installed separately, strictly observing the level.
Painting a concrete fence with your own hands (with photo)
The mounted eurofence can be easily painted in any color. If it was made very recently, let it sit for several months to allow the excess moisture to evaporate. This process is invisible to the eye, but the primer and paint may become cracked.
Plastering work is not required before painting a concrete fence with your own hands, but it is necessary to prime the surface. Make sure that the concrete surface is dry and clean, and fill (if necessary) minor defects. Use materials designed for outdoor use. It is best to paint with façade paint.
How to paint a concrete fence is shown in the photo:
Weather conditions for painting a concrete fence with your own hands are also important: work should be carried out at temperatures above 5 ° C and air humidity no more than 80%. You should not work with paint on a very hot day, since the paint needs to dry for a certain time, and high-speed drying under the scorching sun can lead to cracking. Putty also does not like heat: it needs water to gain strength, and if it evaporates at lightning speed, you will get a poor-quality surface with a network of cracks.
The video of installing a concrete fence with your own hands shows all the stages of work:
Decoration and finishing of finished structures
Precast concrete fences undoubtedly need finishing. This is necessary not only to give an aesthetic appearance, but also to protect products from external factors. A fairly common finishing option is painting.
With its help, you can effortlessly transform a gray, nondescript fence into a uniquely decorated fence. Any facade paint is suitable for this. You can choose the color and possibly the pattern or ornament yourself. Here everything depends solely on imagination.
Painting should be done observing the following rules:
- The surface must be cleaned of dirt and dust;
- You must first coat the entire surface with a primer;
- If there are chips or other damage, it is recommended to prime them and cover them with putty;
- If the concrete fence has already been painted, then using a wire brush or other suitable tool, it is necessary to remove the old layer.
Painting a concrete fence with a spray gun
Painted concrete fence
Another finishing method is tiling. A variety of materials can be used, it can be: porcelain stoneware, glass, ceramic, stone or concrete tiles. Sometimes materials are combined when facing. For example, slabs can be plastered or painted, and pillars can be tiled.
Fence lined with porcelain stoneware
An equally popular option is to cover the surface of products with textured and other plasters: bark beetle, rain, lamb, fur coat, pebble. At the same time, the fence takes on a truly attractive appearance. In addition, plaster mixtures will protect it from climatic influences.
Concrete fences, colored, finished with bark beetle texture
In addition to the above, there are other finishing options in the form of artificial and natural stone, as well as various combinations of materials.
Fence lined with natural stone
Construction of concrete fences from decorative blocks
Through-hole decorative concrete blocks can be used to build a decorative wall or garden fence that allows light and air to pass through. When constructing walls, they are used both as independent elements and as decorative elements in combination with other wall materials.
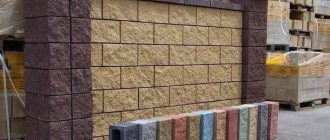
An openwork block for the construction of concrete fences is a square with a side of 300 mm and a thickness of 100 mm, made of white cement in forms that provide through holes on their surface. Each block can have its own pattern, or several blocks together can form a single pattern.
They also produce solid blocks (without through holes) with a pattern applied to the surface. Due to the absence of holes, they are stronger and are designed to create a contrast with the openwork blocks.
The kit usually includes tips for posts and tiles to protect the wall from precipitation. They are laid on the mortar along the crest of the wall.
As you can see in the photo, decorative blocks for a fence differ significantly from other wall elements in their square shape:
Therefore, when laying between them there is no horizontal bandaging. The blocks are simply stacked to form vertical columns. When building a fence from these blocks, it is necessary to provide them with reliable support.
For vertical support, blocks can be laid between stone or brick pillars, but it is better to use special pillars with grooves. In any case, the distance between the pillars should be no more than 3 m.
Fence posts made of decorative concrete blocks are also assembled from individual blocks, which have the shape of a cube with a side of 200 mm, a through hole in the center and grooves on one or more sides. The end blocks have one groove each, the corner and intermediate blocks have two, and the T-posts have three grooves. For walls with a height of more than 600 mm, reinforcing bars, a metal corner or a pipe must be sealed into the central hollow part of the pillars using a solution. In addition, if the wall is more than two blocks high, horizontal masonry reinforcement should be used. To do this, in each horizontal mortar joint, starting from the third row of masonry, a wire mesh is included along the entire length of the span.
A decorative block wall can be built on top of a low stone wall. You can also build a wall from only blocks alone, installing them on top of covering slabs (for very low walls) or on a shallow strip foundation with a concrete plinth. In any case, the blocks should not be below ground level.