The market offers a large number of materials that allow you to create raised beds with your own hands in the country. Various vegetable crops are grown annually using this method, obtaining abundant harvests. For example, the advantages of high pallet fences are convenience and order. Plastic beds also have certain advantages. At the same time, tall structures take up a lot of space, which is considered their disadvantage.
Beautiful tall vegetable gardens
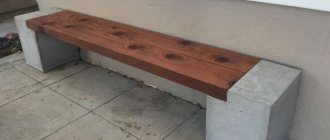
Concrete beds
The phrase “concrete beds” may cause surprise among ignorant people. In fact, fencing beds with concrete blocks, panels and slabs can be a very good solution. You just need to carefully study the pros and cons of this and figure out how to properly install concrete curbs with your own hands.
DIY raised beds
Most often, questions arise not when laying layers in high beds, but when making the box. Since women are often involved in gardening, including making fences for garden beds, many aspects may not be clear to them. To clarify the most difficult ones, we present photo reports of making boxes from boards and slate - the most common fencing.
From boards
Several options for how to make high beds from boards were in the photo above. The main problem is usually the connection in the corners. The easiest way is to make them overlap: just put one to the other at 90° and nail them all the way through. But there are aesthetes who strive to do everything right. The correct way is to cut two boards at an angle of 45° and connect them that way. This is the option that will be demonstrated in the photo.
Planed boards treated with impregnation to slow down rotting
To make it convenient to fix the fence on the ground, vertical bars or pieces of board are nailed in increments of 1.2-1.5 m, the length of which is approximately 20 cm greater than the selected height of the bed.
We nail vertical bars so that the box is strong and can be dug in
The lower end of the block or board needs to be sharpened - this will make it easier to hammer the fence into the ground. Then take a miter box or circular saw and cut the edges at an angle of 45°. By placing two boards together we get a perfect 90° angle.
Correctly made angle
For a strong connection, we install a block on the inside of the corner, to which we nail the boards.
This is what happened. It just lies with its “burdens” up. They are driven into the ground
It doesn’t take long to make a fence for high beds made of wood, but it’s even easier to join the boards end-to-end and nail metal corners for strength (pictured below).
The simplest option
From logs
It is no more difficult to make a similar box from hewn logs. For example, this option: two long sides are made of logs, and short sides are made of pieces of boards.
The advantage of logs is that they are heavy, and due to their weight they will hold the ground well
Whitewash the finished fence: both protection from pests and a more attractive appearance.
Let's start setting up
From slate
When making beds from flat or wave slate, questions also arise about how to secure it. The easiest way is to dig it in. But this is not economical: you will have to make the stripes at least 10 cm wider and there is still no guarantee that the slate will not “float” in the spring. In the muddy ground it will simply be squeezed out en masse. It can be fixed, but it will take extra time and effort.
Therefore, most often, corners or pipes are driven in on one or both sides of the sheet, which clamp the slate and prevent it from deviating much. In the photo, the corners are driven in only from the outside: from the inside there will be pressure from the mass of layers of the high bed, so that the fence will not fall inward.
Fencing beds with slate
The junction of two sheets is secured with a special welded plate. For reliability, they can be bolted to a wooden block attached to that side.
A piece of reinforcement with a welded plate - to insure the joint of two sheets of flat slate
Another option is to make a frame. Attach a beam or corner to similar racks with welded plates - whichever is cheaper. And attach slate cut into strips to this frame (it holds well with nails, but it’s easier with self-tapping screws).
Frame made of timber in a fence for a high bed
Using the same principle - with guides - beds are made from plastic panels and other similar materials. As you understand, there is no need for particularly virtuoso skill here. The main thing is that it holds up well.
Peculiarities
The key role of garden borders is not only aesthetic - they also solve a number of important practical problems. But here it should be noted that concrete fences are divided into 2 types: collapsible and permanent. To obtain disassembled garden structures, ready-made reinforced concrete blocks are most often used. These can be used:
- panels for the construction of fences;
- sidewalk curbs;
- reinforced concrete tiles;
- capital window sills.
All these fences when used in the construction of beds:
- allow you to rationalize watering;
- provide rational application of fertilizing;
- become a reliable obstacle to weeds and many pests;
- facilitate the formation of a fertile soil layer.
Concrete beds and flower beds on a concrete base are used mainly on uneven areas. It is on a slope that the high strength of this material is most justified. It is practiced to use slabs, blocks, and poured mortar.
To make the structure more beautiful, you can always use decorative tiles. This option does not have any other special features.
When is the best time to do it and what to plant?
It is better to fill a high bed in the fall. During this period, there will be enough “material” and over the winter the processes inside will gain momentum. In this case, you can plant plants in the spring and hope for a high harvest. It can be done in the spring, but there are unlikely to be any significant differences in yield: the processes have just begun and will not have a noticeable effect on the fertility of the backfill. Although you will definitely feel the difference in the amount of water for irrigation: much less water is required.
One of the options for a high bed: metal mesh and reinforced polyethylene film
Plant rotation
In the year a high bed is installed, plants that require high fertility can be planted on it: cucumbers, zucchini, zucchini, pumpkin, any type of cabbage, eggplant, tomatoes, sweet peppers. The next year you can plant greens - spicy-aromatic and leafy. Root vegetables feel good in the second year.
After the second harvest, fertility must be restored. If the contents of the bed have sagged, in the fall they add good soil mixed with mature compost. If there is nowhere to add more, remove part of the top layer (to a compost heap or into another box as part of the backfill) and replace it with fresh soil with fertilizers.
High bed for strawberries
It differs only in that covering material is spread over the finished “pie”. Holes are made in it into which plants are planted. This option leads to the fact that moisture evaporates in minimal quantities, and weeds do not grow in the aisles. The second option - mulching the soil also works well, but evaporation is more intense.
Strawberries are doing well
The peculiarity of strawberries is that their roots are located mainly on the surface. Therefore, the fertile layer may be small. But this same feature leads to the fact that in severe frosts it can die. Although a decomposition process is taking place inside the high bed, warming the soil, if the bed is without snow and not covered for the winter, the root system may freeze.
High bed for cucumbers and tomatoes
In terms of its structure, it is no different. Is it just because poles and crossbars or stretched wire are needed at the edges so that you can tie up tomato bushes or cucumber vines.
For cucumbers and tomatoes, you need to take care of the garter
You can read about organizing automatic watering for your garden or plot here.
Advantages and disadvantages
A concrete bed looks quite impressive if attached to any structure. This solution is clearly supported by the strength, reliability and long service life of a capital building. But you need to understand that a garden bed with a concrete fence will be expensive. But building it with your own hands will not be easy. Other important properties of concrete beds are:
- almost complete elimination of shedding of side walls;
- increased seepage of water, bypassing wetting the soil of the bed (that is, you will have to water more often);
- the possibility of using any type of soil, including imported black soil;
- the need to constantly import soil to replace the worn-out layer;
- maintaining an optimal microclimate (which is especially effective in the case of a high ridge);
- due to the lack of contact with the underlying soil layers and the natural migration of substances in the ground, it is necessary to intensively use fertilizers;
- the period for growing crops and obtaining fruits is shifted to earlier dates;
- the initial organization of a high concrete ridge is not only expensive, but also labor-intensive;
- ease of organizing greenhouses or mini-greenhouses;
- the ability to get by with deep digging once every 3-4 years (the rest of the time, regular loosening is carried out);
- it becomes more convenient to work with low plants, which is very attractive for the elderly, sick and tall people;
- site planning is simplified;
- you can make a completely original ridge in appearance.
Advantages and disadvantages
In addition to solving problems with waterlogging, high beds in the garden allow you to sow or plant plants 2-3 weeks earlier: raised above the ground, they warm up more actively due to the fact that the sun warms the walls. This is also facilitated by the decomposition processes occurring in plant waste, which constitute a significant part of the backfill. That is why such beds are also called warm. If you place arcs on such a bed and cover them with spunbond or other similar material, then the harvest can be harvested even earlier.
The device is more problematic in regions with hot climates. The task in this case is not to better heat the earth, but to keep it from overheating. But this can also be solved: use materials with poor thermal conductivity, for example, wood, to fence high beds. For a better effect, you can make double walls, between which you can fill, for example, sawdust, lay polystyrene foam, or you can leave an air gap - better thermal insulation. In hot climates, it is better to paint the outer wall with white paint or whitewash it. It is known that light-colored surfaces heat up less. In this case, it will be possible to keep the root system from overheating: in the south the earth sometimes gets very hot and the higher the plant is, the cooler it will be. You can also stretch the same covering material over the beds. It not only retains heat, but also protects against overheating.
Beet harvest in a high bed
Raised beds can also be a good option on infertile lands. It is more convenient to lay out the imported soil in beds rather than distribute it over the entire site. The compost layer, which is located under the soil layer, contributes to maintaining fertility.
The problem of arid regions is also being solved. In this case, the inside of the fence for a high bed is coated with bitumen mastic or covered with film, and a roll of waterproofing material is placed on the bottom (on the mesh) (roofing felt will quickly rot, so it’s better to use one of the modern types of waterproofing). It will not be possible to achieve complete waterproofing, but it will be possible to retain moisture inside in sufficient quantities - yes.
Carrots - one to one. The best one is in a high bed, although the same variety was planted in a regular bed
As you can see, with a balanced approach, almost any problem can be solved. Raised beds have few disadvantages, but they are not without them:
- In most cases, you have to make a fence, and this costs money.
- The complexity of the process. Again, it takes time to make fences, and there is also a fair amount of earth and plant debris to move around, which is hard work.
- Mole crickets and other similar animals thrive in rotting leaves, branches, and bark. We have to fight them.
- Fertility has to be maintained by updating or completely replacing the “filling”.
That's all the shortcomings. If you decide to arrange raised beds, be prepared for a considerable amount of work. But the harvest will be many times greater. You can make one or two beds for testing. And then decide whether you need them or not.
Required tools and materials
Particular attention should be paid to preparing building materials and tools for constructing a concrete bed on your own. Most often, a standard construction cement-sand mixture is used. In addition to this, you will need:
- reinforcement based on wire with a cross-section of 6 mm or welded mesh with cells 45x45 or 50x50 mm;
- electric drill with a special attachment for mixing the solution;
- a trough or other container suitable for mixing the solution;
- trowel and shovel for mixing the solution and laying it out manually;
- clean water of technical quality;
- formwork made on the basis of boards or bars;
- nails for hammering together formwork.
Asbestos cement strips for edging beds
This is the option that I ultimately chose. Manufacturers offer ready-made beds from this material in rectangular and round shapes, but you can make almost any design with corners. The advantages of asbestos cement include a very low price compared to other options while maintaining the aesthetics and durability of the material. Asbestos cement sheets are not subject to corrosion, rotting, are fireproof and can be painted. The cutting of the sheet can also be any and will depend on the agreement with the manufacturer.
According to the manufacturer, the frost resistance of such a fence is 25 winters. The sheets are light enough, so the design is mobile and assembly is accessible to women and teenagers. You can also make paths between the rows from the same sheets.
The only disadvantages include the fact that due to the negative impact of asbestos-cement dust on humans when inhaled and the fragility of the sheet under directed influence, cutting into strips of the required width and height should be carried out in production, and ready-made sides of the future bed should be delivered to the site. Practice has also shown that if you buy a ready-made set of sheets and fasteners, then the four connecting profiles included in the standard package for beds 2 m long and six for beds over 3 m long are not enough. you need to further strengthen the structure with metal or wooden stakes in the middle of each sheet.
Advantages of concrete beds
Among the advantages of the designs it is worth highlighting:
- improved drainage (if you organize the bed correctly, there will be no stagnation of moisture);
- absence of sudden temperature changes in the soil;
- smaller area of land that will need to be dug up;
- no need to bend over when watering, fertilizing or removing weeds;
- appearance of the bed (if you show your imagination, you can create a structure of a more complex shape);
- the ability to install a garden bed anywhere (for example, on a concrete plot).
Optimal height
You can choose the size and shape of the structure yourself, based on your personal capabilities and preferences. However, it is worth knowing what height is considered the most optimal for obtaining an excellent harvest.
If you plan to fill the bed on fertile soil, then fifteen to twenty centimeters will be enough. Otherwise, you will have to raise the height to thirty centimeters. If the bed is compost, then its height can reach half a meter.
There are cases when the walls of the structure are raised very high. This is done for convenience - so that you don’t have to bend over when cultivating the soil and other work with plants. However, because of this, you have to spend more material and time creating beds. And in some cases (for example, when the width of the frame is large), it is completely inconvenient to till the soil.
Comparison with other materials
To decide whether it is worth building beds from concrete, let’s compare this material with other possible options:
- Slate. Previously, this was a fairly common option, since slate is cheap. In addition, it was always possible to use old sheets of asbestos cement for the beds, which were left after the renovation of the roof of the house. The slate was simply dug into the ground, meaning the structure could be created very quickly. But it is not safe to use such material, since asbestos, which is part of slate, is a carcinogen. Therefore, only whole pieces can be used for such structures. If you start sawing sheets of asbestos cement, asbestos dust can get into the soil. In addition, such sheets are short-lived and very fragile. In this regard, concrete wins noticeably on all fronts.
- Profiled sheeting. Galvanized steel sheets coated with polymer are quite durable. For beds, use wall corrugated sheeting and place it horizontally. Otherwise, the sheets will begin to bend under the weight of the soil. But, if you buy an inexpensive profiled sheet, it will not last long and will quickly become covered with rust due to constant contact with wet soil. Due to the fertilizers used and the acidity of the soil itself, the zinc layer will quickly deplete, so such beds last no more than 5-7 years. Concrete beds will last for decades.
- Tree. It is no secret that wood quickly rots from contact with moisture. Therefore, you will have to spend additional money on wood processing. In this case, you need to ensure that the coating used is not toxic. This means you will have to limit yourself to copper sulfate or the least aggressive antifungal impregnations. After this, you will need to cover the wood with 2-3 layers of oil paint. The final cost of such beds is too impressive. The same goes for boards. In addition, it will be difficult to join wooden elements without gaps (if, for example, an unedged board or slab is used).
- Tires. This is the cheapest option, but is more suitable for flower beds. In addition, the tires are quite thick, so they take up a lot of space. And finding the required number of such tires of the same size is extremely difficult.
Concrete beds can be permanent (the most popular option) or collapsible (consist of ready-made reinforced concrete elements, but very heavy). Fences of this type are safe, durable, and have no gaps. Concrete does not need to be coated with protective materials. If you wish, you don’t even have to paint it. But to ensure that the finished structure does not crumble or crack, it must be manufactured in accordance with all the rules for creating concrete elements.
general information
The sides raise the soil level, which makes it possible to grow plants in swampy and flooded areas. On depleted soils, this method allows you to economically use fertile soil and fertilizers by pouring the composition into boxes. At the same time, the passages remain unfertilized, so weed growth is inhibited.
Paths can be covered with gravel, bark, or covered with old linoleum to prevent weeds from growing.
It is not difficult to install such a structure if you use ready-made artificial beds, which can be purchased at garden stores. These are lightweight prefabricated boxes made of plastic, galvanized sheet steel or WPC (wood-polymer composite).
Often, summer residents decide for themselves how to strengthen the garden beds at their dacha, using available materials. As a rule, this is slate or boards, and not new, but used material is used. It turns out to be practical, but it doesn’t always look beautiful.
How to make a concrete bed
The work is divided into several stages.
Calculations and preparation
First, let's decide on the size of the future building by studying several recommendations:
- The minimum height of the bed on a mixed type of soil should be 25 cm. More is possible (preferably no more than 70 cm), but you should not build it below the structure. If the site is dominated by rocky, poor, too wet or poorly drained soil, then it is better to make the edge no lower than 30-35 cm. The height of the compost bed usually reaches 50 cm.
- The width of the bed should be from 40 to 80 cm. If you plan to grow large vegetables such as cabbage or eggplants in two rows, then it is better to increase the width to 100-120 cm. For one row, the optimal width is 50-60 cm. If the bed is one side borders the building (for example, it rests against the wall of a house or barn), then its width should correspond to the length of the arm.
- It is recommended to make the bed from 1 to 5 m in length. If desired, you can create a T-shaped, W-shaped and other complex structures. But we must remember that it should be convenient for the gardener to process the plants.
- It is not recommended to make the edge of the bed too wide (some people do this so that they can sit down). This will take up too much space, and the fence itself will look too bulky and will begin to attract attention.
Layers of raised beds
Framing is only a small part of the job. The resulting box still needs to be filled. It must be said right away that the thickness of the layers depends on the height of the bed that you have chosen, so if any values are given, then they are purely approximate. In addition to the size of the bed, the thickness of the layer, for example, fertile, is influenced by the choice of plants: for some, 5 cm is enough, but for others, much more is needed.
Approximate layers for a raised bed
So, what to pour into a high bed - layers from bottom to top:
- A metal mesh with a fine mesh or a layer of geotextile is laid at the bottom. You can put cardboard. Mesh and geotextiles - protection against rodents and moles. Cardboard plays approximately the same role, but it is less effective.
- Large woody debris: thick branches, twigs, even logs and bars. This layer serves, firstly, for drainage, and secondly, moisture accumulates in the wood. The drier the climate in your region, the more wood you need. Moreover, the following wood layers too.
- Chopped small branches, bark. Other coarse plant debris will work: corn stalks, straw. Their task is also twofold. They store water and, when decomposed, release heat and nutrients. But when using corn trunks and straw, keep in mind that the bed will soon sink: these remains will rot quickly, but the yield will be high, and you can sprinkle fertile soil on top.
- Paper, thin cardboard. It is usually lined with a thin layer. Packaging cardboard is used more often, because glossy paper is not suitable, just like newspapers: lead paint is not at all what you need to fertilize plants with. If you have old unnecessary burlap (natural), you can lay it down.
- Layer of plant residues: foliage, grass, semi-decomposed sawdust. Be careful with sawdust: they strongly acidify the soil. So sprinkle them under plants that like acidic soil, or neutralize the acidity by covering them with a good layer of ash.
- Fertile land.
You can add a good portion of mature compost to the last two layers, as well as sprinkle it into the deeper layers. This will speed up the “readiness” of the raised bed for planting.
Read about how to make a pond at your dacha with your own hands here, and this article describes how to turn it into a fountain.
Why are fences and barriers needed?
As already mentioned, the functionality of barriers and fencing is extremely diverse: from ordinary aesthetic beauty to significant advantages and conveniences:
1) First of all, barriers were invented, of course, in order to fence off the beds: to visually separate them. However, in addition, they help maintain the shape of the beds. You've probably encountered the fact that after rain or simply over time, the beds “spread away” and lose their shape. Fences will help you forget about this problem forever.
2) Due to the fact that the fences go to a considerable depth underground, the root system of all kinds of weeds simply cannot break through this underground wall. In addition, if weeds still appear in some garden bed, they will not be able to go far. The boundaries of the garden bed will be a trap for them.
3) Barriers are also useful when covering plants with film or agrofibre. Fences greatly simplify this process: securing the arches by digging into the ground is much easier to do if they have support.
4) There is no need to form beds at the beginning of each spring season: fences will do this for you.
5) Fences contribute to the creation of so-called “warm” beds. To do this, you will need to make a really tall fence into which you will fill with soil or fertilizer in the form of compost. This is done in order to create a convenient “island” for the plants, where they will feel comfortable, their roots will not freeze, and they will produce a harvest right up until the fall.
6) And, of course, the last, but not least, function of fencing is decorative. A carefully placed border will help not only to separate one bed from another, but also to separate the vegetable garden and garden on your site.
What are the benefits of fencing garden beds?
Fences for flower beds, flowerbeds and beds perform several functions simultaneously:
- prevent soil from washing out and sliding onto garden paths and lawns;
- prevent the spread of climbing flowerbed plants, weeds with creeping rhizomes and insect pests;
- protect plantings from mechanical damage, small children and animals;
- visually divide the dacha plot into zones;
- facilitate gardening work;
- prevent water from leaking out;
- serve as the basis for installing greenhouses or creating warm beds.
Borders, fences and fences bring not only practical benefits, but also give the local area an attractive, well-groomed appearance. With the help of homemade or purchased structures, you can create a unique, colorful landscape that will be the subject of admiration for neighbors and passers-by.
Construction of brick fences
Yes, wood is convenient and cheap, but it is a simple and short-lived option. If you want your property to remain thriving for many years to come, you will need to resort to one of the best materials for fencing - brick. And even if you can’t afford to buy enough bricks to fence the entire area, you can always use old material.
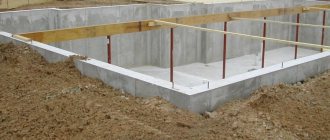
The construction of a reliable, high brick barrier takes place on a foundation, so you will have to prepare for two stages:
Creating a foundation
The foundation is often extremely important for a fence if you want it to be high, secure and not crack from the slightest movement of the soil underneath it. First you need to mark the outline along which you will build the foundation. A fairly deep trench should be dug along this contour. In some cases, its depth can reach a meter. After this, the trench is covered with sand. The thickness of the sand layer must be at least 150 mm. In addition, the sand must be well compacted. After all these stages are completed, the bottom of the trench, covered with sand, is covered with roofing felt. Two to three pieces of reinforcement are additionally placed on it. Now the trench is completely ready and you can fill it with concrete.
Laying the fence itself
In order to lay a brick fence, you must first insert pegs at its corners and tighten the construction rope. It is needed so that at one moment you do not accidentally go over the edge and make the walls crooked. If this is done, you can start laying. The corners are laid first, in order to better imagine the shape of the future bed, and only after that the walls are laid. After laying the first layer, you need to wait a little before starting the second.
If the barrier promises to be really high, the brick walls can be reinforced. It is especially important to resort to this method if you are building a fence on not the most dense and stable soil, when there is a high risk that the walls and foundation will subsequently deform. To strengthen the masonry, use a 6mm thick metal mesh or wire, which is placed in the mortar between the rows of bricks to increase the strength of the structure.
If you want to make a low wall, you don’t have to use a foundation at all. Just follow these simple instructions:
1) First of all, you need to clean the work area: mow all the grass and remove the weeds.
2) After this, we drive stakes along the edges of the future bed. We stretch the construction cord through them.
3) The ground must be thoroughly leveled, otherwise without a foundation the walls will soon fall apart.
4) We protect the bed in the ways we are already familiar with: we cover it with a special fabric, after which we supplement the protection with a steel mesh.
5) Let's start laying. We begin laying the first row, like all subsequent ones, from the corners, and only after that we move on to the walls.
Garden bed care
When the plants sprout, the plantings should be well watered and mulched. Weeds that break through the mulch layer are immediately removed. After harvesting, the surface is loosened and sown with green manure. Before the onset of cold weather, all vegetation is mowed down, leveled on the bed, covered with a layer of earth on top and covered with black film for the winter. Periodically it is necessary to inspect the walls of the frame, replace or repair individual sections.
The soil between the beds is most often covered with fine crushed stone, gravel, straw, and sometimes sown with lawn grass. In such conditions, the garden always remains well-groomed, weeds do not grow, and dirt does not stick to shoes. If desired, you can lay out paths of tiles and bricks, or pour concrete ones.