Coating for concrete outdoors: methods, methods and materials
When constructing and constructing work surfaces, concrete is used in half of the cases. This popularity of the material is due to its strength characteristics. But in order to extend the life of external concrete surfaces, some methods should be used to protect it from the effects of the environment.
Such protection of structures must be carried out in order to reduce the financial costs of repair work in the future. In this article we will tell you which coating for outdoor concrete is best to choose, which method of protection will be optimal in various conditions, and how to strengthen the cement mortar with your own hands.
Conclusion
By watching the video in this article, you can learn more about how to make a concrete screed yourself. Also based on the text presented above, it is worth concluding that this installation method is very labor-intensive and requires precision when performing.
At the same time, concrete screed is actively used by many professional craftsmen even in our time, when modern materials with higher characteristics began to appear. This method will be considered one of the most optimal for a long time.
Forms and methods of protection
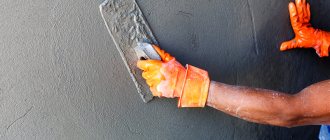
After setting, the concrete solution acquires a porous structure. The degree of presence of air inclusions in concrete can be reduced in various ways, but cannot be reduced to zero. Therefore, even concrete with the addition of various additives requires additional protection.
Destructive factors
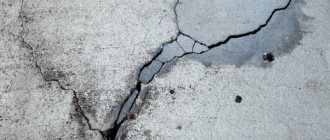
The condition of the concrete surface is influenced by several factors. Before choosing a method and material of protection, it is necessary to determine the main destructive forces in each specific case.
Most often, street concrete requires protection from the following negative influences:
The effect of the negative impact is enhanced if concrete is exposed to several factors at once. The action of high humidity in conditions of low temperatures will lead to cracking and further destruction of the surface.
Operating principle
The outer protective layer creates a barrier that prevents the direct influence of the negative environment on the concrete surface. In addition, in reinforced structures it is necessary to reduce the risk of moisture penetration deep into the structure in order to avoid corrosion.
Thus, according to the principle of influence, defense mechanisms can be divided into internal and external. To obtain the most effective result, the concrete surface on the street should be treated in two ways simultaneously.
Protection options
To determine the protection materials, it is necessary to specify the goals that need to be achieved.
Speaking about the outer protective layer, we will divide the methods regarding the type of destruction that must be avoided:
As can be seen from the table, water is the most common factor that destroys concrete. Freezing of moisture in internal pores is especially dangerous for concrete structures. Therefore, under any conditions, a waterproofing layer should be installed, or the concrete should be impregnated with a deep penetration primer.
Strengthening the screed with repair mixture
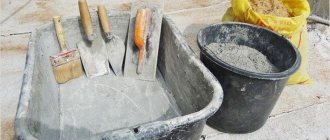
In most cases, it will be reasonable to use repair mixtures. How to do the job correctly:
- using a hammer drill, holes with a diameter of 20 mm are made in the concrete base. The distance between the holes is 20-25 cm;
- the hole is drilled to the full depth of the screed, the drill must reach the base;
- further, the top of the holes that were created are expanded using a drill with a diameter of 30 mm, the depth is within 3-4 cm;
- Now, it is necessary to clean the pits from dust; for this, it is best to use a construction vacuum cleaner;
- an expansion anchor bolt is placed in the hole and clamped;
- then, the expansion is allowed to be filled with repair mixture.
Main! In case of severe damage, it is much more rational to dismantle the outdated concrete and pour new one than to try to resurrect the old surface.
In the same way, it turns out to significantly strengthen the screed. Additionally, you can open the surface with an epoxy-based resin mixture.
Epoxy based adhesive
Materials
To prevent moisture from affecting the concrete surface, several different waterproofing materials can be selected.
First of all, they should be distinguished by composition and method of application:
| Impregnating (coating) | Mastics (bitumen, polymer) | It is applied to the surface using a roller, brush or fusing method. |
| Liquid rubber | When applying, a two-torch sprayer is used. | |
| Penetrating primer | Applied with a roller or brush, it penetrates into the concrete structure and crystallizes. | |
| Sheet (roll) | EPDM membranes | Installed using adhesive method. |
| PVC membrane | They are mounted mechanically, the joining seams are soldered. | |
| Sheet |
bitumen
Each of the materials is effective; the type of application of the material to the surface is not of fundamental importance. When processing, you should pay attention to the convenience of laying out the layer, depending on the location of the surface: it is easier to apply impregnation and liquid material to vertical walls; for horizontal planes, roll or sheet waterproofing materials are suitable.
The material selected for waterproofing must meet certain requirements:
When choosing a waterproofing material that will serve as a finishing coating, you need to pay attention to the degree of resistance to aggressive chemicals.
Important! Any material intended to be installed on the outside of the concrete pavement must meet certain requirements. First of all, the waterproofing composition must have a quality certificate and comply with GOST standards.
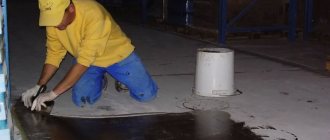
Liquid waterproofing agents
Liquid waterproofing includes mastics and primers of all types. The main advantage of this type of treatment is that they can be applied to the surface of any relief.
Liquid street coating for concrete has no joints, forming a monolithic surface protection. In addition, the liquids are very easy to apply, which allows you to create this type of waterproofing yourself.
Important! Before using the material, be sure to familiarize yourself with the conditions necessary for high-quality work. The instructions prescribed by the manufacturers on the packaging include all the necessary information.
Mastics
In the process of waterproofing concrete, two types of mastic are used: bitumen and polymer. They are rarely arranged as independent material. Typically, mastics bond concrete to rolled material, such as roofing felt.
Bitumen mastics are applied hot or cold. In the first case, to obtain a liquid state, solid pieces of material are heated, in the second, the mastic is diluted with a solvent until the desired consistency is obtained.
Polymer mastic is very similar in its properties to bitumen, but has slightly improved performance characteristics. At the same time, the polymer composition is resistant to temperature changes, has a short readiness time, and is absolutely impermeable to water. Among the disadvantages, the main one is the high price of the material.
Rubber
Liquid rubber is a two-component composition. Due to the complexity of preparation, it is often used by professionals. Can be applied by spraying, painting or pouring.
Penetrating waterproofing
For penetrating waterproofing, deep penetration primers are used. The variety of types of primers is quite extensive. There are polyurethane, epoxy and water-dispersion compositions.
It is quite conditional to call primers full-fledged waterproofing. The use of such material will require a finishing device. In this case, polymer or epoxy primers can replace mastics; they are recommended for the use of external waterproofing.
Epoxy primer is difficult to formulate because it usually requires mixing two components.
Polyurethane solution has the following qualities:
Sheet and roll materials
This type of protective materials has good elasticity, which makes the process of laying on the surface of various reliefs simple. Leaf protection should be preferred if the average annual temperature difference is very significant.
Sheet or roll insulation does not change its physical characteristics under the influence of high or low temperatures, and additionally serves as a thermal insulation layer. Some types of sheet protection can be used as a finishing coating for certain types of concrete surfaces.
Membranes
There are PVC (polyvinyl chloride) and EPDM (ethylene propylene diene monomer) membranes. PVC membranes consist of a reinforcement mesh and a filler based on plasticizers.
Bitumen sheets
Bitumen sheets or rolls can be based on 2 types of material:
In addition, the material can be with or without sprinkles. Sheets with sprinkles are suitable for creating a finishing layer.
Ruberoid
One of the most budget-friendly options for protecting street concrete. The material is laid in several layers. Installation of each next layer is carried out offset from the center of the previous one. The layers are glued together using bitumen, resulting in a durable and inexpensive protective coating.
What to consider when designing
The covering must connect the house with other buildings on the site.
It is important to choose the right width depending on the purpose. For main roads that carry the most important communication load - from the house to the main objects on the site, the width is taken to be at least two meters
This is done so that two people can easily separate on it.
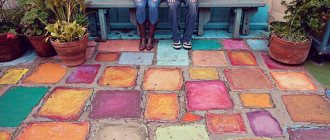
Wide coverage
A path of secondary importance - walking or decorative, can be narrow and even have an interrupted canvas, which looks very decorative and does not visually burden the area.
Decorative version
Before making such a covering at the dacha, you need to make a sketch on paper. The sketch should indicate the location of the house and main objects.
The main ones are placed on communication routes that run along the route from the house to the main objects - to the gate, gazebo, pool and others.
Layout sketch
They can be straight - they provide the shortest path from one functional area on the site to another. The coverings around the house also have a straight configuration.
Surface around the building
As you can see in the photo above, the path is made of a block with a rough surface. This was done for safety purposes during the winter. A drainage system has been installed for the drainage system.
Types of concrete paths
They are:
- Monolithic;
Monolithic view
Such paths are constructed using the formwork method.
Work progress
- From decorative tiles of different shapes and textures;
Tile option
Tiles can have different shapes and installation methods.
Tiles for products
Block tiles
- Molded.
Molded look
Such coatings are made using molds into which the solution is poured.
Device principle
What to consider when installing tracks
Regardless of which installation method is chosen, it is necessary to take into account several rules, the observance of which will allow you to create a high-quality coating.
The most important rules for installation:
- To install a rigid base of the structure, it is imperative to backfill it with crushed stone or sand;
Sand and gravel backfill
- For natural drainage, it must have a one-sided slope or a central convexity;
- If in the spring, when the snow mass melts, or in the summer after rain, there are places where puddles form on the site, this indicates that groundwater lies nearby. Installation in this place should take place above the ground surface, thanks to the high crushed stone backfill. Or, a drainage system should be installed along it, thanks to which the liquid will be removed into the rainwater collector.
Drainage system
Fur coat on concrete walls
Sometimes the protective layer should not only be waterproofing, but also perform a decorative function.
By applying a fur coat to the walls, you can perform several tasks, the main ones of which are:
A wide choice of options, or how to cover the concrete blind area around the house
A freshly poured concrete base looks beautiful and neat.
But several years will pass, and not a trace will remain of its former beauty. Under the influence of temperatures and mechanical loads, the concrete will crack, break off at the corners, and the surface itself will not be perfectly smooth. Such a picture will not decorate the landscape around the house, but, on the contrary, will ruin it.
Therefore, a concrete blind area should be regarded not as a finished covering, but as a reliable basis for the subsequent finishing of paths and areas around the building. And here the home owner has a wide choice of finishing options.
We’ll talk about how to cover a concrete blind area in this article.
What to consider when designing
When arranging paths in the country, take into account:
- the width of the paths, depending on the purpose - for the main ones it is recommended to allocate 150-210 cm, for decorative, walking paths - 80-110 cm, located between the beds - 40-70 cm. The width of the latter can be intermittent;
- the main roads connect the main “points” of the site - a house, a gate, a garage, a bathhouse, a swimming pool, etc., therefore it is advisable to make them straight;
- it is advisable to equip paths, especially those located near the house, with drainage systems;
- All paths are made textured - this will allow you to navigate them safely even in rain and ice.
When drawing up a project, it is necessary to draw a diagram of the site to scale, indicate where the house, main outbuildings, garden, vegetable garden, swimming pool, large flower beds, etc. are located. The house and other areas are connected by straight lines, but the paths are made smooth only along the beds, others are made smoothly curved .
When the site has a slope, the process of creating paths becomes a little more complicated. If the angle of inclination does not exceed 10-20 degrees, the surface is easy to level. If the slope is greater, it is better to avoid roads - their presence is dangerous, since on a smooth place (unlike a lawn) it is easy to slip during rain or ice. In the latter case, the paths are made at several levels, connected by steps.
How to finish and how to refine the structure?
The choice of finishing method for the house path depends on the climatic conditions of the area, the financial situation of the home owner, the reasons why he decided on additional decoration and on his working skills (if the finishing will be done independently).
To begin with, it is worth considering that SNiP requirements regulate the width of the blind area. It should be at least 20 cm larger than the overhang of the roof deck, so that rainwater flowing from the roof of the building does not fall on the walls and does not flow under the base.
The most common track width is 1 m . This distance is quite enough for comfortable movement of people along the blind area and good drainage of water from the walls.
Given these parameters, the owners may not have enough money for expensive finishing options for such a wide blind area around the entire perimeter of the building. Therefore, perhaps they will decide to resort to cheaper methods.
The choice of the desired decor can be made among the options that are described in the table:
| Applied by fusing method, requires pre-treatment with impregnation. | |
| Ruberoid | Installation is carried out using the adhesive method on bitumen resin or mastic. |
| Way | Description | Note |
| Painting | Not every paint is suitable for painting concrete. It is necessary to take into account the type of soil in a particular area, as well as the climate. A properly selected paint composition will minimize the impact of moisture on the base of the house. You can purchase enamel, polyurethane or polymer paints that protect against moisture, ultraviolet radiation, and chemicals (Betil, Aquaconcrete, Polimerdecor, Elakor). | The plus is that this is an inexpensive finishing option, but it lasts for a maximum of 5 years with proper use (although the packaging says from 5 to 10 years), and this is a minus. Another plus is that there is no need to prime the surface before painting. |
| Ironing | It can be dry and wet. In the first case, immediately after the fresh concrete has set, cement (about 2 mm thick) is poured onto it and rubbed into the base. Excess solution is swept away with a brush after hardening (after 2-3 days). The second method involves applying the solution to concrete for a 2-week pour. Mixture composition: cement and sand (1:1) + lime paste (10% by weight of cement and sand). The surface of the path is moistened with water, and then using a spatula, the prepared solution is applied to it (maximum 5 mm thick) and leveled over the entire area. | This is an inexpensive and simple option that gives the base additional strength. The downside is the not very aesthetic appearance, which does not always fit into the exterior of the building. |
| Tile covering | After the concrete blind area has hardened, it is necessary to install curbs along the entire edge of the path (5 cm below the future tiles). It is important to prime the concrete if the tiles (clinker, ceramic) will be laid with a special adhesive. You cannot move on the tiles for 24 hours, but after 24 hours you can fill the seams with cement-sand mortar. If the products (paving slabs) are mounted on a surface, then there is no need to prime them. You can fill the seams on the day of installation, and the next day repeat the procedure until the cracks are completely filled. | Plus: a large selection of tile materials, colors and product shapes. Dirt and puddles do not accumulate on such a surface. Disadvantage: with incorrect installation technology, water can flow under the bottom of the elements, and then expand during frosts and tear out individual tiles. Also, clinker and ceramic products can have a sliding surface. |
| Stamped concrete | The features of this option will be discussed in a separate subheading below. | |
| Water repellent | You can prepare it at home using liquid glass, cement and water (all components in equal quantities). You can purchase a ready-made industrial water repellent. The mixture is applied and leveled over the entire area. | Plus: you can prepare the solution yourself. Disadvantage: an industrial mixture can cost from 4,000 rubles. per capacity. |
| Waterproofing | The cracks, voids and recesses present in the concrete base are filled (with a roller, brush, brush) with a special waterproofing impregnation. On top you can make a flooring from a roll covering or cover the surface with crushed stone, gravel, or sand. | Plus: filling the cracks with a waterproof mixture is done only once, because the crystals of the mixture penetrate deep into the concrete and do not collapse over time. Disadvantage: the waterproofing mixture is not cheap. |
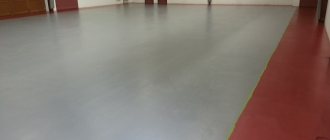
Grinding
Polishing is chosen for industrial facilities, in buildings of shopping or office centers, where reinforced concrete blocks are used as the floor. If they are well sanded, they become resistant to chemicals, withstand heavy loads and do not generate dust. It is easy to care for and can be washed.
Grinding is used as an independent method of stabilization or as an intermediate option. It is needed if there are roughnesses and heterogeneity. Required if done manually.
All work is done in stages:
- Preparation. Construction debris and dust are removed. If there is floor covering, it is completely removed. Cracks and chips are repaired with mortars.
- First treatment with a diamond grinding machine with a small grit attachment – 80 grit.
- Application of impregnation to enhance strength followed by drying.
- Finish grinding with fine-grain sandpaper – selectable from 150 to 400 grit.
- Polishing takes place with even greater care, the nozzle is 100-3000 grit.
- Cleaning from dust, wet cleaning and applying a polishing agent - polyurethane varnish.
After these procedures, reinforced concrete increases its adhesion to any further construction mixtures that will be applied to it. There are several restrictions in this case - you cannot polish fresh works or very old ones. In the first case, it will not be possible to polish it well, and in the second, it will crumble even more from the impact of the equipment.
The first treatment is possible within a week after installation. Finishing work is done after a month so that the concrete is completely hardened.
Workers first examine the external condition and, if deep damage, peeling and a large amount of crumbs are detected, they bypass such areas. If the screed concrete is loose, weak and shows signs of destruction, it is first treated with liquid glass.
The method of correcting defects with epoxy mastic is effective only if no more than 30% of the entire area is destroyed, otherwise dismantling and laying of a new solution will be required.
Creating stamped concrete
A concrete base can not only be a perfectly smooth surface, but also take the form of paving stones, slabs, or imitate different materials.
And all thanks to the use of special metal or polyurethane stamps. Such concrete, after a decorative imprint, becomes stamped or printed .
Ready-made embossing of various shapes is sold in construction stores. The thicker the stamp, the easier it is to work with and the more accurate the pattern will be. The thinner it is, the softer the embossing becomes and the more difficult it becomes to work with.
You need to finish the blind area with stamped concrete at a fast pace, because the material sets quickly. In addition, to obtain a clear imprint of the design, you need to make an effort by pressing the stamp to the desired depth. And uneven lines or extra notches are difficult to correct. Therefore, this type of decor requires concentration, accuracy and dexterity.
Blind area for a house made of printed concrete, video instructions:
To veneer or not to?
Additional finishing of the blind area will never damage the coating. Rather, on the contrary, it will protect him from:
Each type of decoration has its own advantages and will only improve the performance of concrete. But such decor requires funds. Therefore, the question is no longer whether finishing the blind area is advisable, but whether there is enough money for it.
You will find a lot of important and useful information about the construction of concrete blind areas in this section.
Proper painting of concrete walls: how and with what to paint indoors and outdoors
Painting concrete walls is a simple, affordable, effective and aesthetic option for finishing this type of surface. Despite the fact that the process is relatively simple and all stages of the work can be completed independently, to get the best result it is advisable to prepare - stock up on the necessary tools, understand the composition of the paint, and learn about the features of wall preparation.
Before painting concrete walls, you need to think carefully about everything - the composition is selected taking into account the operating conditions and functions of the room, the location of the wall (inside/outside the building), and personal wishes. The concrete monolith is prepared for painting - the old layers of finishing are removed, putty and primer are applied. Only after this can you begin to apply paint with a special tool.
The most popular and suitable compositions for painting concrete are discussed below, and the order of tasks is determined. If you have a minimum of knowledge and skills, doing everything quickly and efficiently will not be difficult.
Material selection
When deciding what paint to paint concrete walls, you need to consider a lot of factors. First of all, they consider the main varieties, their advantages and disadvantages, compliance with the functions of the room, and cost.
When deciding how to paint a concrete wall outdoors, they give preference to synthetic and durable compounds that are not afraid of moisture, sudden temperature changes, and sunlight. But for an apartment, it is better to choose environmentally friendly paint based on natural oils or water - here external negative factors will not affect the surface, but it is very important to choose an option that is safe for health.
The purpose of the room where painting is carried out is also important. So, for the kitchen and bathroom, moisture-resistant compounds are chosen, but for the bedroom or living room, acrylic-based interior paint is also quite suitable. Moscow and the regions today offer a fairly large selection of materials on the market, so choosing the right one will not be difficult.
Oil paints
This type of composition is usually used when deciding what to paint a concrete wall on a balcony or on the street. This is the best option for outdoor work, since the paint is quite toxic and has an unpleasant odor, which then takes a long time to dissipate.
Among the disadvantages of oil compositions, it is worth mentioning the long drying time (at least a day), low level of elasticity and the risk of cracks, color instability (due to drying oil turning yellow over time).
Water based
Aqueous dispersions and emulsions are ideal for painting concrete walls in an apartment. The materials do not contain toxic elements and are often used for finishing interior surfaces. Only some types are designed specifically for covering facades, which must be indicated on the label and instructions.
The cost of the paint is relatively low - the price is an order of magnitude higher compared to oil-based compositions, but within reason.
Acrylic
This type of material is relevant for performing different types of work - paint for concrete walls is used both outside and inside. The packaging must have a mark indicating the operating conditions of the composition - covering the internal wall, facade, ceiling, etc. (Be sure to specify when choosing). Acrylic paints are often used even for European fences and for artistic wall painting.
The paints are not cheap, but they offer an ideal ratio of quality and price, which is why they are popular in the market for repair and construction materials.
Silicate
This concrete paint is made on the basis of liquid glass. The resulting coating is very durable and reliable, so the composition is often used for finishing facades.
Rubber paints are often chosen for exterior finishing. Epoxy paints are relevant for concrete floors, as they are not afraid of external influences. If you need to protect a building from destruction and fire, choose fire-resistant compounds. But textured or textured concrete paint for interior walls will be an excellent decor.
Impregnation for concrete
Before painting, it is advisable to coat the wall with a special product. A protective layer of impregnation will protect the surface from dust, moisture, and various aggressive environments. Impregnation penetrates into the very structure of the material, strengthening it. Impregnations are produced based on epoxy resins, polyurethane, acrylic, and other substances.
Paint color
When choosing a color for painting concrete, we are guided by the classical rules of design: light colors make the space visually larger and wider, dark colors make it narrower and smaller. All colors are divided into shades of the warm and cold spectrum.
There are a huge variety of options for any color - only white is presented in dozens, or even hundreds. The choice is made on the object, applying palettes to the surface and assessing the play of light, imagining the space in the imagination or modeling the room using special programs.
Toppings
To strengthen the base screeds for further installation of the finishing, topping is often used - these are dry substances that are applied on top of the areas. This method is suitable for strengthening only the prepared screed before it hardens. The toppings are mashed and pressed into the hardening base using a machine.
There are the following advantages of topping technology:
- Increases the wear resistance of screed concrete - grade 400 becomes equal to 800;
- Improved performance characteristics and ease of further maintenance;
- Obtaining an antistatic effect;
- The ability to change the texture - grainy, smooth or mirror-like using grouting equipment.
The rubbed topping mixture may include cement, color pigments, and various fillers; the quality of the technique and the result obtained depend on this. They come in quartz (concrete floors in shops, garages, parking lots and warehouses), metallized (in workshops) and corundum (also increased strength, but moisture resistant). Fractions vary in size. The value is selected in accordance with the type of base concrete. The large fraction is not plastic and the technique becomes more complicated, but as a result it is more durable.
Working with the surface
Many craftsmen advise paying serious attention to the question of how to prepare a concrete wall for painting. New surfaces may only require the application of impregnations and primers; old surfaces may only require the removal of layers of paint and varnish compositions, repairs, leveling, putty, etc.
If you just prime the new surface and paint it right away, it will turn out a little rough (which, by the way, is an advantage for many, acting as a kind of interior solution). New walls are painted at least a month after the construction of the structure.
Preparatory stage
Before you paint a concrete wall (with or without putty), you need to study everything carefully. If the wall requires cleaning and repair, there are chips/cracks, or other deformations, the work must be done correctly.
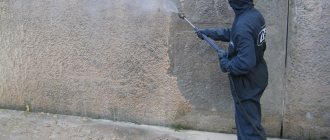
Cleansing
It’s worth going into a little more detail about removing old finishes from the wall, as this often causes difficulties. Small surfaces are cleaned with a chisel, scraper, or spatula. When a large surface is processed, electrical appliances are used. You can take a grinder/drill with a hard metal brush or an abrasive wheel, a chain, or a bit and remove the entire old layer of finish.
Removing paint with a construction hairdryer can also be done, but it will take a lot of time, since heating the concrete is difficult. Craftsmen often use special paint removers - organic solvents remove alkyd, oil, nitrocellulose compounds, while an alkaline composition can cope with an aqueous dispersion or emulsion.
After cleaning the surface of paint, it is inspected for the presence of efflorescence, mold, and grease stains. All these problems are eliminated by antiseptics for concrete (or soda ash, hot soapy water, 15% copper sulfate). The wall is processed as carefully as possible and then dried.
Primer and leveling
Before preparing concrete walls for painting, make sure they are completely dry. Then a solution of acids and salts (fluate) is applied to strengthen the material. If necessary, the surface is leveled using starting putty, using a construction float and a spatula.
The primer must be applied to a perfectly smooth and clean wall. It is best to choose a solution with antiseptic properties, among other things. When selecting a primer, be sure to take into account the type of paint that you plan to use. It is advisable to buy products from one manufacturer.
The primer is applied with a wide brush or paint roller, preferably in 2-3 layers, allowing each layer to dry.