Beton-House.com
Website about concrete: construction, characteristics, design. We combine the experience of professionals and private craftsmen in one place
Modern heating systems - heated floors
A concrete base for a heated floor in the form of a screed is made for almost any type of horizontal heating. The main requirement for installing a heated floor is to lay the system on a flat surface.
The most common leveling method is to fill the floors with concrete. Let's consider the structure of the screed for heated floors, the need for such a base and the pouring process.
- Compound
- At the bottom
- Preparation
Necessary concepts
In order to understand how concrete can be used for heated floors, let’s define some concepts. It is important for us to distinguish between the types of floor heating systems, the levels and purposes of the screed, and the methods of its installation.
Classification of TP (warm floors)
At the moment, the market offers several different systems mounted in the horizontal plane of the floor. Some are used as the main heating, some only increase the level of comfortable stay in the room.
Heating systems can be water or electric. The latter are distinguished by the heating element used.
The device offers electric horizontal heating systems based on the following elements:
- cable;
- film;
- thermomat;
- rods.
Classification of electric heated floors
Stages of work on pouring screeds
Due to the design of the horizontal heating system, the screed is done several times.
To understand the process, we divide the filling into 3 stages:
- Rough screed . Apply to the intended base for leveling. Performed when necessary.
- Leveling screed , which is poured over the thermal insulation material. The system is directly installed on this layer.
- Final fill . This is a pour over the heating system. Arranged if necessary.
Types of screeds
In addition to different heating systems and the need for different levels of pouring, there are other screed options other than pouring the floor with concrete mortar.
There are 3 types of screeds used when installing heated floors:
- Wet screed: the usual method of pouring concrete or cement-sand mortar.
- Semi-dry screed: leveling the floor with a ready-made compound, a certain degree of humidity.
- Dry: an ideal way to level the floor, recommended only as a rough layer.
Installation features
Working with OSB boards is convenient and simple, but there are certain features of the work that must be observed
So, firstly, it is important in any case to use a level and lay the slabs as evenly as possible, especially if you plan to install a laminated coating or tiles. However, almost all materials used for finishing are demanding on the evenness of the base.
Do not forget that the material contains wood, which is a “living” matter, which means that the slabs may slightly change their width parameters during the process. Between them during installation you need to leave a small gap of 1-2 mm. Otherwise, they may become deformed later. But at the same time, if carpet or linoleum is laid on top, the width of the gaps should be minimal. And it is better to use sheets that are as thin as possible. Sometimes the gaps are sealed with sealant after installation is complete.
OSB floor painting
As for the slabs, when laying ceramics on top of them, it is important to fix the slabs themselves well in order to avoid deformation of the ceramic coating in the future. The step between them should also be small
Laying OSB on a wooden floor
OSB can be installed on the floor using either joists or screeds. In the first case, the slabs are fixed on level logs. Usually the material is installed in two layers to make the base thicker. Thermal insulation can be laid under the slabs.
Also, the slabs are placed either on a ready-made cement screed, or on an old wooden base, if the goal is not to make a new floor, but only to level it. The main thing is that the base itself is more or less even. When installing on a wooden base, you need to fasten the plates with a pitch of approximately 30 cm between the screws.
Installation of OSB boards on a wooden floor
Water heated floors
A water floor heating system is one of the most economical options for operation, but it is very expensive and complex to install. When installing it, it is very important to follow the technology. The system is poured with concrete and it is very difficult to correct any defect after pouring.
Purpose of screed for water floors:
- surface leveling;
- elimination of defects affecting heat transfer;
- formation of the heat distribution process;
- fixation of heating elements.
Where can I use it?
Due to the sufficient thickness and mass of the entire system, its use is limited to private housing construction. It is extremely irrational to install water-heated floors in apartments.
The main reason is difficulties with connecting the power. You can connect to the central heating system only after permission from the regulatory authorities. And it is almost impossible to get it. Even if it exists, the main leitmotif – autonomy – will disappear. We know of options for installing electric and even gas boilers in an apartment, but these are isolated cases that only confirm the rule: water heated floors are used only in private homes.
Wet screed
Concrete for water heated floors is a classic version of this heating system.
The advantages of this installation are that by pouring the solution and forming the surface, the following is simultaneously created:
- a thermal insulation layer that can significantly reduce losses in energy use;
- flat surface that can withstand significant weight loads;
- a system of uniform distribution of heat energy is formed.
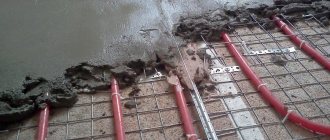
Installation of this system assumes that the warm water floors will be finished poured with concrete.
Wet screed
Compound
When installing floor heating, the type of concrete for a warm water floor and its composition are very important. Due to the fact that the screed will experience constant thermal loads, its strength should be maximized while maintaining ductility.
For this it is recommended to use:
- not sand, but screenings with a fraction of 3 – 5 mm;
- cement M300 and higher;
- plasticizers;
- fiber fiber.
According to accepted standards for pouring in residential premises, concrete of a grade not lower than M150 is used for heated floors, for industrial areas - M 300 or more.
Important points when installing a rough screed
Based on the results of rough filling, the resulting surface must meet the following requirements:
- The corners of the floor and walls must be strictly at an angle of 900 - for the correct fit of the heat insulator and damper tape.
- A sector of one heating circuit should not have a depression or convexity of more than 5 mm.
After the subfloor has dried, it must be cleaned of dirt and dust and treated with a primer. The walls should be leveled and puttied. When the surfaces of the floor and walls are ready, a layer of thermal insulation is laid on the floor, covered with a reflective film, and the perimeter is taped with damper tape.
Before laying water floor pipes, you should draw on the floor plan a diagram of the layout of the pipes and the location of all control and monitoring elements. After the pipes have been laid, it will be necessary to ensure safe movement on the floor, for which it is better to install bridges from boards or shields.
Concrete water-heated floors: pipe laying schemes
Arrangement of edge zones
In cases where underfloor heating cannot completely compensate for the heat loss of the room, you can try to compensate for the lack of thermal energy by installing edge zones. Edge zones are areas of heated floors with an increased temperature of the floor surface, which are usually installed along external walls to a width of no more than 1 m.
- The specific heat flux in the edge zones can be increased in several ways:
- reduce the pipe pitch ( Table 4
;
Fig. 5 A
); - use a separate loop with an increased coolant temperature ( Fig. 5 B
); - use a separate loop with an increased pipe diameter ( Table 5
); - use a separate loop with an increased coolant temperature, reduced pitch and increased pipe diameter.
Table 4. Effect of pipe pitch on the change in specific heat flux (relative to a pitch of 15 cm)
| Pipe pitch, cm | 7,5 | 10 | 15 | 20 | 25 | 30 |
| Change in specific heat flow, all other things being equal, % | +13 | +8 | 0 | –8 | –15 | –22 |
Table 5. Influence of pipe diameter on the change in specific heat flow (relative to the outer diameter of 16 mm)
| Pipe outer diameter, mm | 12 | 16 | 20 | 25 |
| Change in specific heat flow, all other things being equal, % | 9 | 0 | +10 | +25 |
The use of separate loops with increased coolant temperature makes sense when there are several rooms with edge zones. In this case, the pipelines of the edge zones can be served by a separate pumping and mixing unit.
In any case, the temperature of the floor surface in the edge zones should not exceed 31 ° C, as well as the temperature for which the finishing floor covering is designed.
Rice. 5. Options for installing edge zones of heated floors
Semi-dry screed
The main distinguishing feature of semi-dry screed is the use of a composition with lower humidity, namely, with a significantly smaller amount of water in the solution. The quality of the solution can be easily checked by hand.
A small amount of the mixture is clamped in a fist. Water should not flow from the resulting lump, and it should not crumble. The photo shows the composition of the correct consistency.
The composition of the semi-dry screed, when clenched into a fist, should not release water or crumble
Semi-dry screed has some advantages over concrete pouring:
- lower cost;
- ease of leveling the surface;
- the heat and sound insulation characteristics of such a floor are much higher;
- does not shrink when dried;
- the readiness period is much shorter.
The heating system is installed in a semi-dry screed
Warm foundation
The very idea of heating a slab foundation, and sometimes even the ceiling between the first and second floors, is not new. For many years, a technology has been successfully used that involves “immersing” large-diameter metal pipes into a reinforced concrete foundation or floor slab through which hot air flows. It is heated by electric heaters, and its movement through the pipes is carried out by small fans. It would seem that a similar effect can be achieved by placing plastic water pipes for the heating system in the foundation slab. However, for many reasons this is not the case.
Dry screed
It is installed using special bulk compounds or materials on top of the waterproofing material. At the same time it performs the functions of insulation.
Compared to the classic screed, it has its advantages and disadvantages:
| pros | Minuses |
|
|
Dry screed for underfloor heating system
Popularity of tongue and groove connections
Not ordinary, but tongue-and-groove slabs have gained particular popularity. It is explained by the presence of the tongue-and-groove system, which allows you to create the most durable and motionless base. Due to the fact that there are no gaps between the slabs, the subfloor is as durable as possible. Especially if the joints of the plates are glued with a special glue - in this case the structure will be as airtight as possible, not requiring the installation of waterproofing.
Tongue and groove connection
Thanks to the tongue and groove, another goal is achieved - uniform distribution of the load across the entire floor. And this type of connection is much stronger and more reliable than between sheets of plywood nailed to the floor.
Tie size
Regardless of the type of screed, the basic requirement remains the same: the thickness of the concrete above the heated floor and at its base must be the same over the entire area of the room. This is important because otherwise, the process of heat transfer and heating will be at different levels, which will lead to the destruction of the floor cake.
At the bottom
Warm floors on concrete are laid on a rough screed, its minimum thickness is 5 mm. The size of the fill layer largely depends on the type of solution.
The height difference on the screed under a heated floor should be no more than 5 mm
On a note! If the base is in good condition and the thickness of the rough fill is minimal, transfer part of the floor pie under the rough fill.
By moving the thermal insulation and water barrier under the rough screed, you can begin work on laying out the heated floor immediately after the fill has dried. In fact, you will save a lot of time.
The whole pie
More often than others, warm floors are installed under concrete. The thickness of the fill with a regular cement-sand mixture is 50 mm. When adding plasticizer and fillers, the thickness decreases.
On average, you can calculate the size of the cake of a floor with a water heating system. Taking into account the laying of thermal insulation material, in urban apartments, this size will be from 8.5 cm to 11 cm, depending on the floor.
Important! To install water systems connected to central heating in apartment buildings, you must have a special permit obtained from the heating networks.
Primary or secondary?
When choosing a heating system, you need to take into account some requirements. To make a basic system of underfloor heating powered by water coolant, it is necessary to make some calculations. For example, calculate the level of heat loss in the house. This value depends on the number of windows, the reliability of wall insulation and double-glazed windows. The calculation table can be downloaded on the Internet.
In addition, take into account that the wiring is located at some distance from the external walls, which somewhat reduces its effectiveness. By comparing the power of the system and the area of the home, you can draw the desired conclusion.
Electric floors
When using electricity as a heat source for floor systems, everything is much simpler, but more expensive to operate. Installing an electrical system on a concrete floor does not reduce the height of the room; the thickness of the mats is only a few millimeters.
At the same time, modern infrared floors do not require a top screed; decorative roll or sheet material can be easily mounted on them.
On a note! The thickness of the tie for the cable system is 30 mm, and with the use of a plasticizer it can be reduced by a third.
Installation of an infrared floor does not require a top screed
Pouring technology
Having understood the subtleties and nuances, let's look at how to make a concrete floor warm. When carrying out floor installation work, the room temperature should be in the range from 5 to 250C. If the base is in good condition, it should be cleaned and dusted. If necessary, a rough screed is arranged.
Preparation
Damper tape is glued over the prepared base and plastered walls.
This is done without fail in order to:
- prevent heat loss due to wall heating;
- avoid destruction of the screed as a result of thermal expansion.
If you decide to save money, you can lay strips of thermal insulation, for example, foam plastic, around the perimeter, the effect will be the same.
Important! It is necessary to install a thermal barrier not only between the system and the wall, but also between two systems. If the kitchen and corridor have different heating circuits, a damper tape must also be laid at their junction.
The perimeter of the room must be taped with damper tape
After thermal insulation of the joint area, a waterproofing film and heat-reflecting material are laid on the floor.
System installation
Laying a water floor, or any other horizontal heating system with your own hands, is done in strict compliance with the manufacturer’s recommendations. The instructions always come complete with the elements of the system itself. If a cable or pipe passes through an expansion joint, it must be protected with a corrugated hose.
Corrugated hose for laying a heating system element
After laying and fixing the system, the heating elements are connected. Before pouring concrete into the system, it is necessary to check the operation of all elements of the system. If the test run was successful, work can continue.
The video in this article will show the installation of a water floor.
Finishing fill
It is not always necessary to fill the system with concrete from above. Sometimes other materials are used for this.
- Some apartment owners, in an attempt to reduce costs and reduce the weight of the screed, are trying to fill warm floors with expanded clay concrete. What happens if you fill a warm floor with expanded clay concrete?
- The answer is nothing good. Expanded clay is a heat insulator. By adding it to the concrete solution, you significantly improve the thermal insulation properties of the screed. Therefore, it makes sense to install the floor system on such a base to avoid energy losses.
- There is no point in filling the floor heating from above with such a composition, because this will reduce the efficiency of the system. The fact is that the top layer of expanded clay will prevent the passage of heat into the room. In fact, you will simply be wasting your money this way.
Important! The layer with which the floor heating is poured must have the highest possible thermal conductivity in order to reduce the cost of operating the system.
Expanded clay concrete screed has excellent thermal insulation qualities, but requires a leveling layer
Selection of pipes and their installation
The following types of pipes are suitable for water heated floors:
- Copper;
- Polypropylene;
- Polyethylene PERT and PEX;
- Metal-plastic;
- Corrugated stainless steel.
They have their own strengths and weaknesses.
| Characteristic Material | Bend radius | Heat transfer | Elasticity | Electrical conductivity | Life time* | Price for 1 m.** | Comments |
| Polypropylene | Ø 8 | Low | High | No | 20 years | 22 RUR | They bend only with heat. Frost-resistant. |
| Polyethylene PERT/PEX | Ø 5 | Low | High | No | 20/25 years | 36/55 RUR | Can't withstand overheating. |
| Metal-plastic | Ø 8 | Below the average | No | No | 25 years | 60 RUR | Bending only with special equipment. Not frost-resistant. |
| Copper | Ø3 | High | No | Yes, requires grounding | 50 years | 240 RUR | Good electrical conductivity may cause corrosion. Grounding required. |
| Corrugated stainless steel | Ø 2.5-3 | High | No | Yes, requires grounding | 30 years | 92 RUR |
Note:
* pipe characteristics are considered when operating in water-heated floors.
** Prices are taken from Yandex.market.
The choice is very difficult if you try to save on yourself. Of course, you don’t have to consider copper ones - they’re very expensive. But corrugated stainless steel, at a higher price, has exceptionally good heat transfer. The difference in temperature in the return and supply is the largest. This means that they give off heat better than their competitors. Considering the small bending radius, ease of operation and high performance characteristics, this is the most worthy choice.
Pipe laying is possible in a spiral and snake. Each option has pros and cons:
- Snake - simple installation, almost always a “zebra effect” is observed.
- Snail – uniform heating, material consumption increases by 20%, installation is more labor-intensive and painstaking.
But these methods can be combined within one circuit. For example, along the walls “facing” the street, the pipe is laid in a snake pattern, and in the rest of the area in a snail pattern. You can also change the frequency of turns.
There are generally accepted standards that professionals are guided by:
- Step – 20 cm;
- The length of the pipe in one circuit is no more than 120 m;
- If there are several contours, then their length should be the same.
It is better not to install pipes under stationary and large-sized interior items. For example, under a gas stove.
IMPORTANT: be sure to draw the installation diagram to scale.
Laying begins from the collector. Unwinding the coil, fix the pipe according to the diagram. It is convenient to use plastic clamps for fastening.
Corrugated stainless steel is produced in coils of 50 m. To connect it, proprietary couplings are used.
The last element laid between the turns of pipes is a temperature sensor. It is pushed into a corrugated pipe, the end of which is capped and tied to a mesh. The distance from the wall is at least 0.5 m. Don’t forget: 1 circuit – 1 temperature sensor. The other end of the corrugated pipe is led out to the wall and then along the shortest path is brought to the thermostat.
