Other articles on this topic:
⇒ Floors on the ground on the first floor of a private house without a basement. ⇒ How to make the right concrete floor in a wooden or frame house.. ⇒ Wooden floor on joists in a private house. ⇒ Floor with dry prefabricated screed made of gypsum fiber board, chipboard, OSB or plywood
In order to properly make a floor screed based on cement mortars and concrete, the screed must correspond to the purpose of the room and have the necessary parameters for this.
The screed can become a solid foundation for the floor in any room of the house. Cement screed is not afraid of moisture and is convenient to use as a base for flooring in damp rooms, as well as outside the house - on terraces, in the garage. The installation of heated floors in rooms is also not complete without a screed.
Screed solutions
Cement-sand mortar for screed
To install screeds, use a traditional cement-sand mortar of a grade not lower than M75. To prepare the solution, prepare a mixture of one part cement and three parts sand. The strength of the finished screed increases if the solution for laying the screed has a thick consistency.
Cement-sand mortar is easier to prepare and easier to lay in a screed than concrete. But the consumption of cement for constructing a screed of the required strength is greater than for concrete. Therefore, a mortar screed turns out to be more expensive than a concrete one.
Cement-sand mortar is recommended for use in thin-layer screeds.
Lime should not be added to the solution. Although lime increases the plasticity of the mortar, it reduces the strength of the screed.
Concrete of normal, densely plastic consistency
Concrete of classes B10, B15, B20 is used for constructing screeds. Crushed stone and gravel are used as concrete filler. The size of the filler granules must be at least three times smaller than the thickness of the screed.
Concrete for semi-dry screed (prance)
To prepare concrete for semi-dry screed, significantly less water is used than usual. A semi-dry screed has a higher compressive strength (up to 35 mPa) than screeds made from mortar and plastic concrete. In addition, it is less susceptible to shrinkage, which reduces the risk of cracks in the screed.
Semi-dry screed is suitable for installing heated floors. It is convenient to prepare concrete for semi-dry screed on a construction site in a special concrete mixer - mixocrete, which prepares the concrete and immediately supplies it with a pneumatic pump through a flexible pipe to the laying site.
Work order
The most labor-intensive process is the technology of installing a coating on the ground.
First you need to take all the measurements
In this case, concreting the floor includes the following:
- The height of the future floor is marked on the walls.
- The soil surface is carefully compacted.
- Bulk materials (crushed stone with sand or expanded clay) are laid on it in layers.
- All other layers are placed on the bedding according to the above diagrams.
If necessary, reinforce the screed using metal rods tied into a mesh. The cell size should be 100x100 mm, and the rods should be fastened with wire.
If the total height of the concrete coating is large, then it is necessary to install a formwork structure or guide rails.
If the project provides for the installation of heated floors, then laying pipes or heating cables must be carried out after reinforcing the screed.
For interfloor ceilings, as well as when installing concrete surfaces above the basement and attic, the work scheme is the same, only the process of filling and compacting the soil is absent.
Composition of cement mortars for concrete floor screed
Cement mortars and concrete can be prepared at the construction site. It is recommended to include additives in their composition to increase plasticity, accelerate setting and reduce water permeability of the screed.
To obtain concrete of the required compressive strength class, it is recommended to use the following grades and quantities of cement:
During storage, cement loses its activity. The cement consumption indicated in the table is indicated for cement with a shelf life of no more than two months. The consumption of cement with a shelf life under normal conditions of more than 3 months is increased by 20%; more than 6 months - by 30-40%.
It is not recommended to use cement with a shelf life of more than 12 months.
When using old cement, the mixing time of the mixture is increased by 2-4 times. It is recommended to introduce additives that accelerate concrete hardening.
To prepare medium-strength concrete, use a mixture of 1 part (by volume) cement, 2.5 parts medium-sized sand and 4 parts aggregate - gravel or crushed stone.
The indicated ratio of mixture ingredients is approximate and depends on many factors. For example, the amount of sand in the mixture should be sufficient to fill all the spaces between the aggregate granules. For large granule sizes, the amount of sand is slightly increased, and for fine aggregate, on the contrary, it is reduced. Cement consumption is also adjusted depending on its brand, shelf life and required concrete strength (see table above).
The prepared cement mortar must have good plasticity and mobility. This solution is easier to level and compacts better. To increase plasticity, special additives are used - sulfite-yeast mash (SYB) in an amount of 0.15-0.25% by weight of cement; soap naft (M1) - 0.1-0.2% by weight of cement, and others. At home, craftsmen often add a small amount of grated laundry soap to a concrete mixer.
The mobility of the concrete mixture also depends on the ratio between sand and crushed stone. The best mobility is achieved at a certain optimal ratio, at which the thickness of the cement paste layer is maximum. When the sand content in the aggregate mixture exceeds this value, the concrete mixture becomes less mobile, which is explained by the increase in the surface area of the aggregate mixture.
To make the concrete mixture plastic, much more water is often added to concrete than necessary (40...70% by weight of cement). Concrete should not be made too liquid,
adding a lot of water. A screed made from such concrete will take several months to dry and will have reduced strength and frost resistance. The risk of significant shrinkage and cracking of the screed increases.
Excess water that has not entered into a chemical reaction with cement remains in the concrete in the form of water pores and capillaries or evaporates, leaving air pores. In both cases, the concrete will be weakened by the presence of pores and the more water, the more pores and thus the less strength and frost resistance of the concrete.
Dry mixtures for floor screed
The best option, although more expensive, is to use ready-made dry mixtures for screeding. Such mixtures are commercially available on the construction market. The mixture already includes the necessary additives.
Manufacturers can include microfiber in the mixture - fibers that serve as reinforcement. Microfiber screed is more resistant to shrinkage and cracking.
There are mixtures specifically designed for underfloor heating. This should be indicated on the packaging of the mixture.
There are quick-setting compounds. Floor tiles can be laid on a screed made from this mixture within 24 hours.
The packaging of the dry mixture should contain information about what screeds and installation conditions it is intended for, what compressive strength of the screed the use of the mixture will provide.
For residential premises, the compressive strength of the screed must be at least 12 MPa, for a garage - at least 20 MPa.
Where to buy cheap dry mix for screed in your city
Dry mix for screed
⇆
What materials are better to choose
Cement or gypsum or concrete are used as a binder to prepare the solution. Filler – sand. Sometimes mineral or polymer additives are added to improve the properties and appearance of the mixture. All components of the solution are mixed and diluted with water.
Cement screeds are widely used as they are suitable for any premises. Their quality does not decrease due to exposure to moisture. To prepare the solution, mix cement and sand in a ratio of 1 to 3. To speed up the preparation process, use sand concrete. Ready-made mixtures are purchased at construction stores. The minimum recommended coating thickness is 3 cm. To ensure that the composition is distributed uniformly, fiber fiber is added to it. It prevents cracks from appearing.
If fiber fiber is missing, reinforcement of the floor screed is performed. To ensure uniform hardening of the screed, it is regularly moistened with water.
The main disadvantage of cement is the long hardening period. To avoid damaging the coating, do not touch the surface for 15-20 days.
Gypsum screeds are called anhydrite. Their advantages:
- dry quickly (1-2 days);
- plastic;
- not subject to shrinkage.
Plaster is laid out in a thin layer, which saves materials. Disadvantage - they absorb moisture. It is impossible to lay gypsum screed in bathrooms and rooms with high humidity.
Cement-gypsum screeds are sold in the form of a dry mixture. The composition includes components that simplify the mixing of the solution, laying, and distribution over the surface. Substances that prevent shrinkage and help moisture evaporate so that the surface dries faster are used as additives.
The mixture for dry screed is prepared using fillers. Expanded polystyrene and perlite are used as fillers. The material is used for heat and waterproofing.
To screed a heated floor, a special mixture is required. The suitability of the product for working with heated floors will be indicated on the product packaging.
Necessary means at hand
Before starting work, prepare all the tools that may be needed:
- shovel;
- Master OK;
- building level;
- container for preparing the solution.
Types of floor screeds
By design, screeds can be connected to the base on which they are laid, or laid on a separating layer, or floating.
Screeds connected to the base are performed if the base is also made of concrete. For example, a screed on a reinforced concrete floor slab or on a concrete floor preparation. To ensure adhesion of the screed to the base, the surface of the latter is specially prepared - dust-free and primed. The minimum thickness of the screed is 2.5 cm.
In screeds, on the separating layer between the concrete base (reinforced concrete slab or concrete preparation) and the screed, a layer of waterproofing film with a thickness of at least 0.2 mm is laid. The edges of the film panels are laid with an overlap of at least 10 cm and sealed with adhesive tape. The edges of the film are wrapped on the walls.
The film separating layer prevents water leakage from freshly laid concrete. Dewatering of concrete reduces the strength of the screed. The screed concrete must be laid on a separating layer of film in all cases where water leakage from the concrete into the base of the screed is possible.
The minimum thickness of the screed on the separating layer is 3.5 cm.
A floating screed is laid on a layer of insulation or sound insulation, for example, when installing a floating floor or a floor on the ground. The minimum thickness of the screed is 4.5 cm, subject to reinforcement. A floating screed with a thickness of more than 7-8 cm may not be reinforced.
Installation of beacons
Preparing the floor for screeding ends with the finishing work - installing beacons. The type of beacon depends on:
- financial capabilities of the customer;
- construction experience;
- type of screed;
- urgency of work;
- availability of materials.
Properly installed beacons allow you to obtain a high-quality screed, which, in turn, guarantees a durable floor.
The work on installing beacons is discussed step by step in the article: “How to install beacons for floor screed?”
Technology of floor screeding in a private house
The screed is laid at a base and air temperature above +5 degrees C. The technology for laying screed does not change depending on whether cement-sand mortar or concrete, including semi-dry consistency, is used for laying.
The work is performed in the following sequence.
Prepare the base on which the screed will be laid. For a screed connected to the base, the surface of the base is cleaned of debris, dusted with a vacuum cleaner and primed.
To install a screed on a separating layer and a floating one, a layer of sound and heat insulation is laid, and a separating layer of waterproofing film is laid on top.
On walls and other vertical structures, strips of polystyrene foam or edging tape made of polyurethane foam 1-2 cm thick are attached to glue to create an expansion joint.
Guide rails - beacons - are laid on cakes of quickly setting cement mortar. Beacons are laid over the entire surface of the base in parallel rows with a pitch of approximately 1.5 m and at a distance of 20 cm from the walls. Wooden slats or various metal profiles and pipes are used as beacons.
Special galvanized steel profiles for installing beacons are available for sale. Profiles are convenient because they do not need to be removed from the screed layer. But such profiles have low mechanical strength, increased flexibility and require careful alignment when installing on flats and care when pouring concrete.
The upper surface of the beacons is leveled in one plane. If necessary, provide the required plane slope.
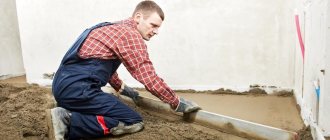
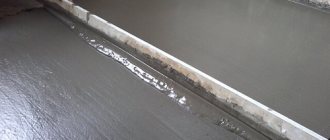
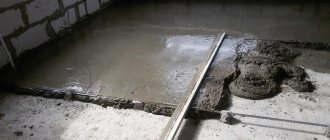
The solution prepared in a concrete mixer is supplied to the work site, and moving towards the door, it is evenly distributed between the beacons so that the thickness of the solution is slightly higher than the level of the beacons.
Using a grater, the solution is pre-distributed between the beacons and compacted. Finally, the solution is leveled with a wooden or metal lath - usually by moving it along the beacons in a zigzag motion towards itself. If shells remain behind the lath in the screed, they are filled with mortar and leveled again using the rule.
After the solution begins to harden and can support the weight of the worker, the beacons are removed from the screed. This is done in a timely manner, until the solution has completely set, and carefully so as not to damage the screed. If a semi-dry screed is laid, then the beacons can be removed within 3-4 hours.
The gaps in the screed left after removing the beacons are filled with mortar and smoothed with a grater, making circular movements.
Until the mortar has completely hardened, furrows are made in certain places on the screed, cutting through the mortar with a spatula to the required depth. After the solution has set, such grooves will have to be cut with a power tool with a diamond blade.
Expansion joints in the screed
The wall expansion joint separates the screed from the walls and other vertical structural elements of the building - columns, staircase supports, etc. The seam is necessary in order to eliminate the mutual transfer of stresses between the screed and the structures of the house. Stresses can arise as a result of thermal expansion of materials or their shrinkage, as well as as a result of deformations under the influence of loads.
In addition, the seam improves the sound insulation of rooms, making it difficult to transmit sounds from the walls to the floor structures and back.
To create a seam along the walls and other elements of the building, an elastic tape 1 cm thick is secured to the entire height of the screed.
When placing underfloor heating pipes in a screed, an expansion joint across the entire thickness of the screed separates the adjacent fields of underfloor heating pipes.
In addition to the expansion joint near the walls, cuts are made in the screed, which divide the screed into smaller rectangular sections. One side of the area should be no more than 3-6 m in size. In narrow corridors, compensation cuts are made across the corridor, every 2-2.5 times the width of the corridor.
Products for construction and repair
⇆
In addition, compensation cuts are made at the junction of different floor coverings, as well as at the boundary of changes in screed thickness, in door openings and in other openings at the boundary of different rooms of the house.
Compensation cuts are necessary to compensate for the shrinkage of the screed material during drying. Without them, cracking of the screed may occur. The cuts are made to a depth of 1/3 - 1/2 of the thickness of the screed. The width of the cuts depends on the thickness of the screed and the presence of heated floor pipes in the screed.
If the screed is reinforced with mesh, then the expansion cuts should be located above the joints of individual mesh sheets.
If the floor covering along the screed is tiles, then the compensation cut should coincide with the joint of the tiles.
Compensation cuts may remain empty if the flooring is parquet or laminate. The cuts are filled with waterproof silicone sealant if the floor covering is tile.
How to properly reinforce a screed
Be sure to reinforce thin ties 4.5-5 cm thick on a separating layer of film. Floating screeds, the base of which is a layer of insulation (sound insulation) or compacted soil, are reinforced with a screed thickness of 7-8 cm or less.
If the screed has a thickness greater than that specified above, then the need for reinforcement is determined depending on the operational load. For example, it is recommended to reinforce a floor screed in a garage for a car or on an open terrace on compacted soil with a screed thickness of up to 10 cm.
Screeds made from a ready-made dry mixture containing reinforcing microfiber fibers in many cases do not require additional reinforcement.
Typically, the screed is reinforced with a mesh of steel wire with a diameter of 3-4 mm. The mesh should have cells measuring 100x100 or 150x150 mm.
The steel mesh is laid on spacer pads so that it is approximately in the middle of the screed layer. The protective layer of concrete up to the mesh must be at least 2 cm in rooms, and at least 4 cm when the concrete screed comes into contact with the ground.
On top of the mesh, as usual, beacons are placed on cakes of mortar and leveled.
Calculation of concrete composition
Necessary tools
To avoid being distracted by searching for tools during the work process, prepare them in advance.
You need to have on hand:
- Hammer, drill;
- Scrap;
- Shovel;
- Tub for solution;
- Trowel;
- Rule;
- Water level;
- Lace;
- Roulette;
- Nails, screws;
- Hammer.
The necessary materials also need to be available in the calculated volume:
- Backfill material;
- Ready-mixed concrete or its components;
- Waterproofing;
- Reinforcing mesh;
- Mounting wire.
Tools for concrete work
Rule for leveling concrete mass
Thickness and level of screed in the premises of the house
When choosing the thickness of the screed, the strength of the base on which the screed is laid, the presence or absence of screed reinforcement and the operational load are taken into account. In addition, there are restrictions on the minimum thickness of different types of screed (see sections of the article above).
In different rooms of the floor, the thickness of the screed, chosen for design reasons, may be different. For example, the thickness of the screed in rooms with heated floors should be such as to cover the heating tubes with a layer of at least 3 cm.
It is convenient in the house to have floors located in all rooms of the floor on the same level. Only in rooms where water can be spilled on the floor - in a bathroom, toilet, it is recommended to make the floor level 1 cm lower than in neighboring rooms.
To make the floors in the rooms at the same level, it is necessary to take into account that the floor covering that is laid on the screed in the rooms may have different thicknesses. For example, the thickness of the porcelain tile flooring in the kitchen differs from the thickness of the parquet flooring in the living room.
In order to determine the level of the screed surface in the room, first mark the level of the finished floor covering on the floor . To do this, choose a room where the total thickness of the screed and floor covering is greatest. The level of the finished floor in this room is taken as the level of the finished floor of the floor.
Then, the selected level of the finished floor of the floor is transferred to other rooms. The screed level in the room should be lower by the thickness of the floor covering.
In floor rooms, the thickness of the screed, selected for structural reasons, is adjusted to the specified level. If possible, adjust the level of the base of the screed, for example, change the thickness of the heat and sound insulation under the screed. Choose the most economical option.
To determine the levels of surfaces when installing screeds in a house, it is convenient to use a laser device - a level gauge, or a hydraulic level - a transparent tube filled with water. Using a staff with a bubble level will not provide the necessary accuracy.
Marking the subfloor
The floor surface before the screed always has defects:
- slope, while in different rooms in different directions;
- bumps and protrusions in concrete that cannot be removed, etc.
To level out these shortcomings, it is necessary to find a conditional horizon above which the base of the floor will not be visible in all rooms of the room. This is achieved by drawing the zero level (horizon line), and then, with its help, the floor screed line. These lines are marked with a construction cord along the walls of the rooms or drawn with a pencil according to a strip or rule.
For information: in the work “How to check the floor level in an apartment yourself?” shows how to take measurements correctly.
The next stage of drawing is calculating the number of rows of beacons and the distance between them, marking their location on the base of the floor with chalk.
Laying the screed
Laying the screed indoors is done in one step, without interruptions. When planning work, take into account that the traditional solution must be laid within two hours after preparation. The shelf life for mortars prepared from ready-mixes is indicated on their packaging.
The solution is placed a few centimeters outside the doorway, and then the excess is cut off along the border of the expansion joint.
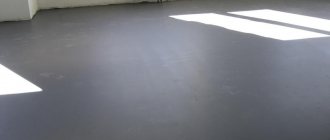
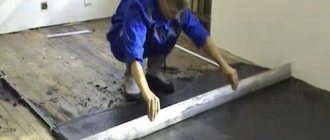
The surface of the screed is smoothed over with a trowel 8-10 hours after laying, until the concrete has completely set. The semi-dry concrete screed laid using a concrete pump is rubbed down after 3-4 hours. Smoothing eliminates minor roughness on the surface. There is no need to grout the screed if tiles will be laid on the screed.
Screed care
The screed should remain damp for a week after installation. At this time, the screed should not lose moisture, otherwise the strength of the screed will decrease. To prevent the screed from drying out, it is covered with plastic wrap or sprayed with water daily.
After seven days, the film is removed, the room is ventilated and the screed is left to dry. After another three to four weeks, tiles can be laid on the screed. Moisture-sensitive floor coverings are laid on the screed after four to six weeks, when the moisture content of the screed is less than 3%.
Purpose of concreting floors
Thanks to the huge number of advantages that floor concreting provides, it has gained such popularity.
The main thing is the high-strength material that is obtained as a result of the process.
But let’s note the other advantages of a concrete base:
- Fire resistance.
- Material that doesn't wear out.
- Moisture resistant.
- Do-it-yourself installation is possible.
- Low cost.
- H6e material contains insects or harmful microorganisms.
Floating screed in the floor on the ceiling
A floating floor with a concrete screed is installed on the reinforced concrete floor between floors. The floor is called floating because the screed does not have a rigid connection with the structure of the house.
The floating screed is separated from the walls and ceiling by a layer of elastic mineral wool. This floor design provides sound insulation between rooms of the house, and also allows the screed to move with changes in temperature and humidity.
If the floor is dry, with a humidity of no more than 3%, and the lower room is heated, then soundproofing slabs can be laid directly on the floor concrete. Otherwise, a vapor-waterproofing film is laid between the ceiling and the sound insulation slabs.
How to choose a material for sound insulation -
Read: Floating floor - soundproofing of interfloor ceilings.
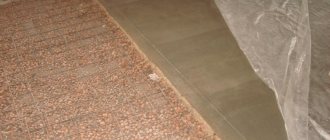
A layer of sound insulation made of mineral wool slabs is covered on top with a construction polyethylene film. The film strips are placed on the walls to a height of about 20 cm. The film strips are laid overlapping. The overlap is 20 cm.
The film prevents the penetration of cement laitance from the freshly laid mortar into the sound insulation layer and into the edge strip.
A reinforcing mesh of steel wire with a diameter of 3 - 4 mm is laid on the film. with cells measuring 100 x 100 mm. or 150 x 150 mm.
The floor screed can accommodate heating pipes to radiators, as well as pipes with electrical wiring. The pipes are laid on top of the reinforcing mesh and secured to it with plastic clamps.
It is recommended to put covers made of corrugated plastic pipes on heating pipes and wires. In the covers, heating pipes will be able to move freely when the temperature changes. In addition, corrugated pipes protect communications laid in the screed from mechanical damage when pouring the cement mixture.
To level the cement mortar in the screed, beacons made of pipes or other profiles are placed on the reinforcing mesh. Beacon pipes are laid in increments of about 1.5 m and leveled in a horizontal plane using a level. The position of the beacons determines the thickness of the screed. The recommended screed thickness for residential premises is no more than 6 cm.
A cement mixture is placed in the space between adjacent beacons. Moving the rule or edged board along the beacons, distribute the mixture and level the surface.
Eight to ten hours after installation, the surface of the screed is smoothed (rubbed). Grouting can be omitted if ceramic or stone tiles will be laid on the screed.
After the cement mixture has hardened, the parts of the edge strip and construction film protruding from the screed are cut off.
Watch the video, which shows in detail how to mark the level and thickness of the screed in the premises.
Preparing for work
Step 1. Dismantling the old coating
Dismantling the old coating
The old floor covering is pryed up with a crowbar and removed to the base. If the rough screed has fractures and heavily crumbled areas, it is also removed. In case of minor damage, you can simply widen the cracks and seal them with mortar, but you must first measure the distance from the surface of the base to the place where the skirting boards are attached. If it is less than 3.0-3.5 cm, the floor will have to be removed to the required depth.
Step 2. Marking the zero level
Zero level marking
The floor level is set along the lower edge of the doorway, since the base will be multi-layered and all possible differences in the rough surface will be leveled by a cushion of crushed stone and sand. From the bottom point of the opening, measure upward 1 m, put the first mark, and then using a water level at the same height, place marks around the perimeter of the room. Next, all marks are moved down 1 m and connected into a continuous line using a tapping cord. This will be the finished floor level.
Zero level marking
Water level
Step 3. Backfilling with sand and crushed stone
Backfilling with sand and crushed stone
The compacted surface is covered with a layer of sand to a height of 5 cm; For convenience, you can drive pegs in several places, set them using a level to the desired height and navigate using them. The sand must be moistened and also compacted. The next layer is crushed stone, which is poured to a height of 10 cm. Instead of crushed stone, you can use expanded clay, then you will not need to lay thermal insulation on top. But in this case, the expanded clay layer should be not 10, but 15 cm in order to reach the zero level.
Step 4. Laying waterproofing
Laying waterproofing
The top of the crushed stone is covered with dense polyethylene film or bitumen-based material. The waterproofing is overlapped by about 10-15 cm, and the joints are additionally glued so that moisture does not penetrate into the screed. In addition, the material is applied to the walls around the perimeter of the room by at least 10 cm.
In dry rooms, where concreting is carried out on an old concrete base, it is not necessary to lay waterproofing: the solution is poured directly on top of crushed stone or expanded clay, having previously laid a reinforcing mesh.
A mesh is laid on top of the expanded clay
Step 5. Reinforcement
Reinforcement
To reinforce the concrete layer I use steel mesh with large cells. The mesh should be slightly raised above the base, so scraps of plastic tube or pieces of shards are placed under the rods in several places. It is better not to use wooden wedges or bars, since the wood will rot over time and voids will form in the concrete. Along the perimeter of the room, the mesh should not touch the walls. If the expected loads on the floor are insignificant, you can do without reinforcement or replace the mesh with special reinforcing fiber.
Features of screed for heated floors
If heated floor pipes will be laid in the screed, then it is better to use a ready-made dry mixture specially designed for this purpose to prepare the solution. The finished mixture for heated floors contains additives that increase the elasticity of the solution.
If the mixture is prepared independently, then an emulsion is added to the solution to increase elasticity. For example, home craftsmen add PVA glue at the rate of 2 liters. per 1 m3 of solution.
The screed should cover the underfloor heating pipes with a layer at least 4–5 cm thick. Thus, the total thickness (taking into account the diameter of the pipes is 1.6 cm) will be 6–8 cm.
Caring for the heated floor screed for the first three weeks is carried out in the same way as usual. Before laying the finishing coating on the screed, the screed must be thoroughly dried. To do this, 21 days after laying the screed, turn on the heating and increase the temperature daily by 5 °C until it reaches a limit of 24 °C.
This temperature should be maintained for 14 days and then reduced by 5°C daily. Consequently, heating of the screed lasts another 23–24 days, which should be taken into account when scheduling finishing work.
More articles on this topic:
⇒ Floors on the ground on the first floor of a private house without a basement. ⇒ How to make the right concrete floor in a wooden or frame house.. ⇒ Wooden floor on joists in a private house. ⇒ Floor with dry prefabricated screed made of gypsum fiber board, chipboard, OSB or plywood
More articles on this topic
- Clinker cladding of the facade of a house with bricks
- Ventilation of the attic and upper floors of a multi-storey building
- What is the best way to make walls for a home?
- Frost index on the map
- Exterior decoration of house walls made of aerated concrete and gas silicate blocks
- Distribution boxes for electrical wiring installation
- Open kitchen studio combined with living and dining room
- Load-bearing, self-supporting and non-load-bearing walls - what's the difference!?
When is it necessary to pour concrete floors?
In the living quarters of a private house, with rare exceptions, wooden, plywood or laminate floors are laid. The materials used are: solid boards, floor boards, plywood, chipboards and other “wood-containing” structural products.
During the operation of the structure, due to construction errors and water ingress, the wood may become infected with the house fungus “Serpula lacrymans”. This fungus is a big fan of wood, destroying all wooden structures within one, maximum two years. Sometimes floorboards infected with fungus literally explode with a loud noise and crash within six months after infection.
The danger of Serpula lacrymans is that it cannot be 100% removed from a building. Even if an expensive set of disinfection measures is carried out, there is still a danger of fungal spores remaining in the thickness of the walls.
In this case, the owner of a house affected by house flex has no choice but to fill the floor with concrete, the price of which is not only significantly lower than re-flooring with floorboards, plywood, solid boards or USB boards, but is also a guarantee that the owner will never again be concerned about such problem.
Therefore, given that infection with house fungus occurs exclusively in conditions of high humidity, in order not to subsequently spend significant funds on repair work, it is recommended to immediately pour concrete on the floor in the garage, basement, shed, bathhouse, sauna, bathtub, bathroom, on an open or unheated veranda , in a cold hallway and other rooms in which there is a danger of moisture condensation under the surface of the structure.