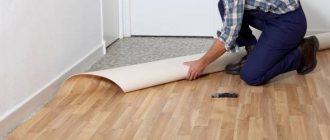
High-quality floors, smooth and shiny, like a mirror, serve as a decoration for any apartment. However, purchasing high-quality flooring does not guarantee that the repair will not suffer a sad fate and you will not encounter flying floor tiles, heaving laminate or linoleum that has become ripple. To avoid these troubles and to extend the service life of the coating, a floor primer is used when preparing the surface. Any hardware store offers a huge selection of primer mixtures; the only question is how to properly navigate this variety and choose the composition that is best suited for specific purposes.
Possibilities and purposes of floor primers
Different types of primers affect the surface being treated in different ways:
- fill chips and microcracks, level the surface;
- penetrating deep into the structure of the material, they strengthen the base;
- improve the adhesion of materials by increasing the adhesion area (making the surface rougher);
- deprive concrete of excessive porosity;
- create a thin film that has water-repellent properties and provides waterproofing.
Most primers perform several of the above functions at once. The choice of floor primer will depend on two main factors:
- from the materials used in the work;
- functional features of the room.
For example, the waterproofing properties of soils are most needed in the kitchen and bathroom, antibacterial - in the nursery, strengthening - in rooms with increased load (in the hallway, corridor, living room).
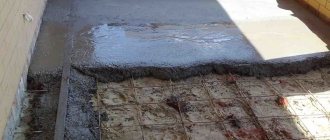
Important! The surface must be primed twice: before installing the screed and before laying the finishing coating.
Total
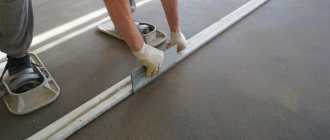
We select the mixture and the tool depending on the material to be primed and the finishing coating, and dilute it in the proportions specified in the instructions. We work with gloves, goggles, in a ventilated area, and a suitable sized tool. In most household cases, the best roller is one with a foam coat. Before applying the primer, vacuum and wash the screed.
The only case when priming the surface is not necessary is when a fresh screed has been applied recently. “Fresh” concrete is covered with adhesive primer if the tiles are placed on top not with cement glue, but with another substance in the composition. In all other cases, we apply primer and use the coating longer than the guaranteed period.
Types of primer compositions used for floors
Specialized types of primers with different bases are used for flooring:
- Alkyd primer is most often used when working on wood floors before painting them. The drying time for the soil is approximately 10 hours.
Important! If the floor will be painted with alkyd paint, you need to choose a zinc phosphate-based primer. When using other coloring compositions, you should buy a composition with zinc chromate.
- Acrylic primer is considered the most universal, it is a deep penetration composition and is used for treating brick, wood, cement, plastered surfaces, fiberboard and chipboard, and concrete floors. Its advantages include the possibility of dilution with water, lack of odor, and ease of application. Drying will take from 2 to 5 hours.
USEFUL INFORMATION: Organization of apartment interior lighting: spot light and backlighting
- Polyvinyl acetate. Suitable for a wide variety of surfaces that will subsequently be painted with polyvinyl acetate paint. It has good hiding power and significantly reduces paint consumption.
- Glyphthalic. Used for metal and wooden surfaces, used to improve adhesion to enamels. Contains pigments that make the color of subsequently applied paint more saturated.
Primers such as polystyrene, phenolic, perchlorovinyl, contain toxic substances, and therefore are not used in apartment conditions.
Polyurethane enamel
This concrete floor enamel can be two-component or one-component (for a garage it is better to give preference to the first type). Such compositions are used for both external and internal decoration.
The advantages of such a paintwork include:
- high stability in extreme temperature conditions (the composition tolerates temperatures from -60 to +80 degrees);
- efficiency;
- mechanical strength;
- wear resistance;
- resistance to chemicals and fuels and lubricants;
- low cost.
Among the disadvantages is the “capriciousness” of the paint, which can only be applied if the room temperature is not lower than +5 degrees and the humidity is not more than 75%. Otherwise, the composition will not “set”.
Healthy! There are compositions on sale that can be applied in severe frosts (down to -30 degrees), but their cost will be more than 400 rubles per 1 liter.
Also, the disadvantages of polyurethane compositions include the paintwork taking too long to dry. The first layer of paint takes a day to set, and after covering the floor with the second layer, you will have to wait another 14 days, only after that you can walk on the floor.
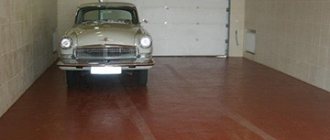
The consumption of such floor paint on concrete is up to 0.2 l/m2. Such compositions are used for painting floors in garages, gyms, swimming pools, parking lots and car washes.
Primers for concrete
A primer for a concrete floor primarily prevents increased absorption of moisture into the surface, due to which the adhesion of materials significantly deteriorates. Therefore, it must perform 2 main functions:
- Filling small pores of concrete pavement.
- Waterproofing – preventing moisture from penetrating into concrete.
These tasks are best handled by deep penetration soils specially designed for concrete. The most popular of them include:
- polyurethane (epoxy) primer;
- latex-based primers;
- "Betonokontakt" ("Beton-kontakt").
Polyurethane primer
A polyurethane or epoxy mixture is the most suitable primer for self-leveling floors. It belongs to deep penetration compositions and performs the following functions:
- reduces the absorbency of the base;
- prevents mold;
- strengthens the base and prevents deep penetration of moisture.
The polyurethane primer contains tiny particles that clog the pores of the concrete and prevent liquid from a fresh screed or self-leveling mixture from being absorbed into the base. This point is extremely important for the quality of the new coating and the adhesion of the floor layers.
Latex compounds
Latex primer, like epoxy primer, is a deep penetration composition. It is versatile and has the following properties:
- non-toxic, absolutely harmless;
- makes the base resistant to moisture;
- dries quickly;
- creates a durable elastic film;
- protects against mold development.
Concrete contact
A suitable primer for a concrete floor is the popular adhesive mixture “Betonokontakt”. Contains quartz sand, which gives the treated surface the roughness necessary for high-quality adhesion.
USEFUL INFORMATION: Do you know enough about vinyl wallpaper?
What tools will you need?
Choosing a tool requires serious consideration. You cannot apply high-quality primer with improvised means. They are based on specific tasks: floor area, surface uniformity, viscosity of the prepared solution. From here you can choose: brush, roller, spray. Another floor will require all three tools. You'll have to combine it depending on the situation.
Brushes
Suitable for priming small areas (bathroom, toilet). If the main part can be passed with a roller, then in the corners, hard-to-reach places (between the toilet and the walls), the lines along the walls are smeared with a brush. And you can’t get by with just one brush. We select several, with different lengths of bristles and handles. It is better to take tools with long bristles; they are convenient for working in narrow places, crevices, and joints.
First, corners, lines near walls, and narrow spots are treated with a brush, then the main area of the floor is covered with a roller.
Rollers
They are purchased for priming large areas where one brush can take a long time to work. When working with a roller, the mixture is not smeared like with a brush, but is rolled out over the surface, pushing it into the pores. The solution is distributed evenly without accumulating on the surface. The downside is that, unlike a brush, the fur coat cannot be washed well after priming. It is removed from the roller and wrapped tightly in a plastic bag so that it does not dry out until the next use.
Spray
It is more convenient to apply the mixture, and the result is better than using a brush and roller. The primer is applied to the floors under pressure, penetration into the material is better. The downside is the high cost of the tool.
Broom, dustpan, vacuum cleaner
Before “wet” procedures, you will need to clean the floors from debris, dirt, and dust. Otherwise, the primer will mix with foreign particles and the tightness of the layer will be broken. The ideal option is a construction or industrial vacuum cleaner. When it is not available (and it is not cheap), the floors are swept well with a broom.
Gloves, glasses, hat
Primers, especially those intended for deep impregnation of the surface, are often highly toxic. The room must be ventilated and the windows must not be closed until the layer has dried. Or use a gas mask. If the liquid gets on the skin, hair, or eyes, it will cause irritation and chemical burns. Therefore, it is necessary to work in rubber gloves, closed-type safety glasses, and tuck your hair under a bandana.
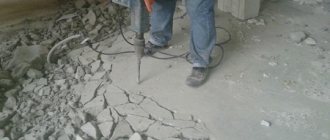
Sandpaper, chisel, hammer
Often, already during priming, defects are discovered on the floor in the form of deposits of cement mortar, protruding stones, dried paint, etc., missed due to oversight. This is where sandpaper, a chisel and a hammer come in handy. Carefully remove.
Homemade primer from PVA glue
The most budget option for a deep penetration composition is a homemade primer made from ordinary PVA construction adhesive.
It's very easy to prepare. You need to take 2 parts of construction PVA and 1 part of water. Glue is poured into the bucket, and water is added to it with constant stirring. The result is a thin mass that is very easy to apply.
To improve the quality of the PVA primer, you can add sifted chalk, gypsum or cement to it. This will make it more viscous and increase strength. This additive is recommended when working with porous surfaces, including concrete bases.
A few nuances of using homemade PVA primer:
- The composition should not be applied in too thick a layer to avoid peeling.
- PVA may turn yellow when exposed to ultraviolet light, so it is best not to use it before applying light paint.
Preliminary preparation
It is very important to ensure that there is no dirt, oil, debris or cracks on the floor before applying primer. Hard-to-clean paint or oil can be soaked in solvent or, as a last resort, use a sanding machine if you have one. If a layer of chipboard is applied on top of the soil, then in this case it can be protected from excess moisture, since deformation or complete destruction of the base is possible from exposure to water.
Features of use on a monolith
If the base is monolithic concrete, then there may be a problem with adhesion to the concrete screed, since the monolith is too smooth. In this case, before applying it, use a primer with quartz sand - with its help you can increase the level of adhesion between the materials.
In addition, deep-penetrating primer must be used before screeding also because it can be used to remove all dust from the surface. It is almost impossible to completely remove dust with a vacuum cleaner or broom, while the primer binds all small particles and covers them with a thin film.
How to prime a floor
When priming any base, the quality of application of the solution is of great importance. To get a good result you need to do the following:
- Prepare the surface before priming by thoroughly cleaning it. It is worth considering that it will not be possible to make concrete perfectly clean, no matter how much you would like it. The dust will remain anyway.
- Eliminate base defects, fill potholes and cracks. Wait for the base to dry.
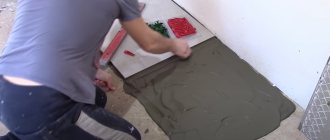
- Mix the primer thoroughly, pour it into the paint bath, and then use a roller to apply it evenly to the base, leaving no gaps. In hard-to-reach places it is better to use a flat brush.
To create a durable impermeable film, it is best to apply the primer in 2-3 layers, each time waiting until the surface is completely dry.
It must be remembered that priming is a mandatory step when arranging the floor. Whatever coating you choose, be it linoleum, self-leveling polyurethane flooring, epoxy paint, thanks to these simple manipulations it will last much longer.
USEFUL INFORMATION: Main types of primer for wall treatment
Priming process
Choosing quality material is the key to success. However, it is also important to understand how to properly prime the floor, so that later screeding will be simple and convenient. Before priming, carefully prepare the floor surface. It is best to treat it with a special industrial vacuum cleaner - it can clean the surface very well. If it is not there, then it is recommended to use a regular vacuum cleaner or broom.
To make the process as easy as possible, it is best to purchase a special container before priming. You won’t need a lot of money to buy it, but with its help you can do everything much faster.
To apply concrete impregnation, you can use a roller or a regular brush. It is very important to take care of protecting your hands, body and eyes. This material is very sticky, it eats into the skin and can cause irritation. To obtain a high-quality result, the primer should be applied evenly; it is very important to treat all areas.
Basically, all recommendations for this process are given by the manufacturer; if you follow these rules, then there will be no problems. It can take 4 to 12 hours for the solution to dry completely, after which a second coat is usually applied. And only when the floor hardens and a film forms on it, a screed is made.
Manufacturers
Among the large number of manufacturers of primers for concrete, buyers single out domestic ones. This is a young company producing dry construction mixtures. The assortment includes both simple and quite complex building compositions. Affordable price, modern technology, quality control at all stages of production are the key to the success of this manufacturer.
The product has a number of undeniable advantages:
- efficiency;
- environmental Safety;
- ease of operation;
- modern packaging;
- production in accordance with all standards and hygienic requirements.
The company uses raw materials from well-known manufacturers when creating products.
She cooperates with many construction organizations and various enterprises, offering them:
- flexible system of discounts;
- consultations and recommendations for use;
- product examples.
How and with what to prime a concrete floor before a self-leveling mixture can be found in the following video.
Briefly about the main thing
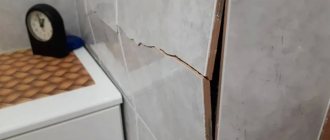
The importance of priming the surface of concrete cannot be overestimated. If you do not fill the pores with special compounds, the base will begin to crack in the cold.
The reinforcement inside foundations and floors begins to rust if access to moisture and air is not blocked. Corrosion eats away not only metal, it can ruin any material in its path.
The use of a primer also increases the strength of the outer concrete layer. Protects it from the aggression of nature and chemical reagents. And although manufacturers have quite widely launched the production of universal mixtures, it is still necessary to carefully select the composition of the primer to suit your needs. This determines how long the primer will dry and what finishing coating can be applied to it.
Scope of application
Walls made of stone or other piece goods have a porous structure. There are capillaries, the polymer composition penetrates into them. Read about façade putty for exterior use here.
During polymerization, an elastic system is formed that is securely fixed to the surface.
When dry, the primer creates an analogue of a spatial grid. This occurs due to the fact that it is not simultaneous removal of moisture, but batch evaporation. As a result, gaps are created between individual fragments. When examining the structure under a microscope, it was established:
- When a porous substance is filled with polymer, there is no continuous coating. Part penetrates into the thickness of the material being processed, the remaining elastic liquid material remains outside;
- As it dries, microscopic tears form at penetration points. Zones arise where the liquid part remains. The dried polymer looks like a fishing net;
- upon final polymerization, the coating becomes sponge-like. It contains capillaries into which paint or glue penetrates during subsequent finishing;
- The strength of the sponge body is so high that it can hold a distributed load weighing up to 90...100 g per square meter on a brick surface. Indicators on a concrete surface are slightly higher, up to 120...140 g/m².
Manufacturers of primer mixtures indicate:
- the primer film on a plastered wall can reach a thickness of 0.20...0.35 mm. Holding capacity increases to 110…150 g/m²;
- plasterboard structures coated with a layer of 1.0...1.5 mm of gypsum-based putty, after puttingtying the plasterboard under the wallpaper, the primer can hold the wallpaper with an applied adhesive weighing 100...135 g/m²;
- a brick wall with smoothed seams can carry wallpaper weighing 45...55 g/m²; after coating with a polymer solution, the load-bearing capacity increases to 85...90 g/m²;
- the enclosing structure, made of gas blocks connected with an adhesive solution, holds up to 95...110 g/m²;
- foam concrete blocks are capable of holding paint coatings weighing more than 95 g/m².
Pre-impregnation improves the conditions for adhesion of the base to finishing materials.
Classification
The market offers a large number of modern primers. The choice of the optimal solution should be based on the type of substrate. Most often, processing is carried out using universal or specialized means. The most popular are polyurethane, acrylic, and epoxy primers.
Acrylic primer for concrete
Acrylic primers are very affordable and are characterized by consistently high quality. The price of the material starts from 150 rubles. This polymer protects substrates from moisture and chloride compounds. The finished layer resists negative influences, demonstrates color stability, and can be characterized by an antiseptic effect.
Scope of application
acrylic primers for concrete are used for universal, interior and exterior work. The base can be painted, plastered or plain concrete. The finished layer dries quickly and is used for short work periods. The primer effectively levels out the absorbency of concrete and strengthens the surface layer.
Advantages of acrylic primers:
- concrete protection;
- simple application technology;
- economical consumption;
- after treatment, the concrete does not generate dust, the pores are sealed;
- the finished layer retains vapor permeability.
Main technical parameters:
- density – 1 kg/l;
- dry residue – 10%;
- diluent – water.
Brief application procedure
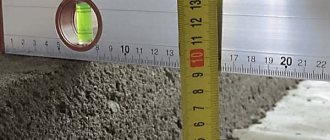
The structure is pre-cleaned until structurally sound concrete is obtained, and all dirt and sludge must be removed. If necessary, the surface is dried. The material is applied at positive temperatures, with stable air humidity not exceeding 80%.
The soil is brought to homogeneity with a construction mixer and applied to the base using rollers, brushes or spraying. If required, it is diluted with water by 30%. 1-2 approaches are enough. Layer drying takes 1-2 hours.
Acrylic structural primers
This type of primer is recommended for use under decorative plasters. This is a more expensive material compared to simple acrylic compositions - the minimum cost is 920 rubles.
Structural primer is a white fluid solution with the possibility of additional tinting . It is applied to plastered or plain concrete.
Scope of application
The primer is necessary for the preliminary preparation of the bases on which decorative plasters will be applied. It can be putty, plastered, painted with water-dispersion paints concrete, foam concrete, aerated concrete.
It’s worth reminding that primers for interior work are in no way suitable for exterior work.
Main technical parameters:
- thinner: water;
- gloss level: matte;
- properties: quick-drying.
Brief application technology
The base must be free of dust, dirt, grease or oil stains. If necessary, loose layers are removed and the concrete is dried with compressed air from compressors. The surface is sanded and treated with an industrial vacuum cleaner, which will remove any remaining abrasive.
Structural acrylic primers are brought to a uniform consistency with a construction mixer. The composition is spread with a short-haired roller or brushes. The work temperature must be above 0 degrees. As a result, a rough, vapor-permeable layer is formed, providing high adhesion . Application of further layers is possible after 12 hours. Structural soil consumption – 5 m2/l.
The need to apply primer
In addition to improving the strength properties of the concrete coating, the applied primer improves the quality of adhesion between the base and the final coating. In addition, it reduces adhesion, which will result in less wet concrete.
The process of priming floors must be carried out during repair work. This will increase the service life of finishing materials, since they will be protected from the formation of mold and fungal growth on the inner surface. In addition, the primer composition will help reduce the amount of dust and debris on the floor surface, since it will not allow it to get stuck in the cellular structure of the concrete. The absence of dust in the room will improve the quality of the final flooring installation and make the atmosphere in the room cleaner.
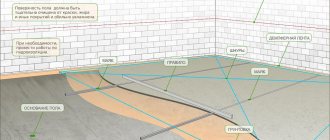
The principle of operation of a primer with penetrating waterproofing.
Primers are most often sold in concentrated form, being in a semi-liquid state. Therefore, during use they must be diluted. This allows you to increase the total mass of the composition, providing coverage of a larger area. Based on their properties, primer compositions are divided into 3 main types:
- street;
- internal;
- universal.
Those. outdoor compounds should only be used outside, as they contain harmful volatile substances. Internal ones are used for work in the room itself, since their composition does not withstand environmental influences well. Universal primers for concrete floors can therefore be used both inside and outside.
conclusions
Painting concrete without preliminary priming is pointless. The finished coat of paint will quickly lose its performance characteristics and the work will have to be done again. To avoid unnecessary financial costs, it is recommended to use high-quality primer in compliance with application technology and consumption standards. The price of polymer primers starts from 350 rubles per 5 kg. When purchasing material, you should take into account that storage and transportation are carried out at temperatures from -20 to +25 degrees.
The properties and practical application of the Concrete Contact primer are shown in detail in the video: