Home » Building a house » Construction and repair
Alexander Korovaev 04/21/2020
5066 Views
In fact, aerated concrete is an inexpensive artificial stone, in which, in addition to quartz and lime, cement is added to increase the strength characteristics, and a gas-forming substance is added to obtain a porous structure and increase the thermal insulation properties. A house made of aerated concrete, built with your own hands, turns out to be quite durable and warm. However, this material will require additional finishing.
Types of aerated concrete
Read also: How to properly plaster walls with your own hands: instructions for beginners (Photo & Video) + Reviews
Its main components are sand, cement and lime
There are several modifications of the material, differing in the degree of thermal conductivity and strength. The letter D when marking indicates density. The numbers following it are the degree of density. The letter B characterizes strength.
The density of aerated concrete may vary
Here are the most common brands of aerated concrete:
- D400 B2.5 : material with the highest thermal insulation properties, this type of aerated concrete is lightweight, recommended for the construction of private 1-2-story houses
- D500 B2 : one of the most popular brands, such blocks can be used to construct buildings up to 3 floors high; but the thermal conductivity of such material is slightly lower
- D600 B3.5-5 : high-strength products with reduced porosity, intended for the construction of buildings up to 5 floors high and their floors; walls made of such blocks require additional insulation, as well as the installation of a ventilated facade
To build a house from aerated concrete with your own hands, purchasing products with a density of D300 is highly not recommended. This is the kind of material that developers complain about – cracks often form in it. It is better to use such aerated concrete for the construction of utility rooms.
Closed cell blocks cost a little more. However, they are less able to absorb moisture. To build a house, it is better to purchase them. It is also advisable to treat them with a special hydrophobic impregnation before finishing to prevent moisture from entering.
Ladder
Construction went very quickly, and in the end we had the stairs ready. I came up with a rounded staircase. The manufacturer produced non-standard steps in accordance with the drawing, which we installed in just a few hours.
The correct installation of the ladder is checked using a level. The load-bearing plinths are installed on a layer of cement-lime mortar applied to the waterproofing. The steps of the staircase, reinforced with aerated concrete elements, are laid with their ends on a thin layer of laying mortar. The first step of the ladder is installed at a height corresponding to the thickness of the floor. After this, it is necessary to check the horizontalness of the installation in the longitudinal and transverse directions. There is useful space under the stairs.
Advantages of the material and its disadvantages
Read also: Siding installation: step-by-step instructions for arranging a facade with your own hands. Online calculator for calculating the required materials (Photo & Video) + Reviews
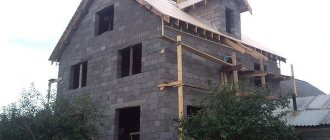
Finished black house frame
High-quality autoclaved aerated concrete containing a sufficient amount of potassium silicohydrate (a similar structure is called tobermorite after the name of the volcanic rock with which it is similar).
In addition to low thermal conductivity, it has:
- low cost
- ease of installation: you can build a wall from aerated concrete much faster than from brick; and the weight of one block, depending on the density, is 21-48 kg; so you can work even alone, without assistants
- increased sound insulation properties
- excellent frost resistance up to 100 cycles
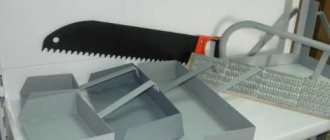
- ease of processing: you can even cut large blocks with a hand saw; when cutting large quantities of material, use an alligator saw equipped with a reciprocating file
- fire safety
- environmental safety
This porous material requires mandatory finishing
A house built from aerated concrete is capable of excellent heat storage. It does not require additional thermal insulation - a simple vapor-tight finish is sufficient. Plus, since reinforced concrete belts are used to cover the walls, reducing vertical loads, houses made of this material can survive the strongest earthquakes.
But, like any material, aerated concrete has a number of disadvantages:
- increased vapor permeability: as already mentioned, closed-cell products have it to a lesser extent, but if you decide to save money by purchasing ordinary blocks, they will need to be protected from moisture using plaster, siding or tiles; otherwise, if moisture gets in, the thermal insulation properties of the material will decrease
- less strength than brick, wood
To protect the walls from precipitation after construction, it is necessary to immediately install the roof and install windows. In this case, the building can stand quietly without finishing for a couple of years.
Jumpers
The simplest solution is to block the openings from above with load-bearing lintels. By measuring we determine the length of the lintel feathering and apply the same layer of mortar to it as when laying blocks. The arrows on the jumper should point upward. Don't forget to check that the installation is vertical. The remaining gap is filled in. The use of YTONG jumpers minimizes the occurrence of temperature bridges and creates a smooth surface for wall finishing.
Another option is to use a built-in jumper. It is easy to assemble from flat jumpers, placing them one next to the other. They are installed on a layer of mortar, the arrows on the jumpers should be directed upward. It is necessary to ensure their precise installation using a bubble level. Existing irregularities are easily removed with a plane, the surface is cleaned of dirt and dust. After this, a series of blocks are laid on top of the lintels. it is necessary to carefully seal the vertical and horizontal seams with mortar. Attention! Such bridges acquire load-bearing capacity only after the solution has hardened. With the help of YTONG, it is easy to produce reinforced concrete lintels directly on the construction site. Special shaped products, the so-called, will help us with this. channel profiles that serve as eternal formwork. We will install them on the mounting structure in such a way that the length of the support of the reinforced concrete lintel is at least 250 mm. And at the ends we will glue them together like standard blocks. We insert reinforcement and thermal insulation inside the profile and fill it with concrete. In this case, the lintels acquire load-bearing capacity only after the concrete has hardened.
Foundation for aerated concrete
Read also: [Instructions] How to properly attach corrugated sheets on the roof: step-by-step instructions for making fasteners with your own hands, cutting, installation with self-tapping screws, tips (Photo & Video) + Reviews
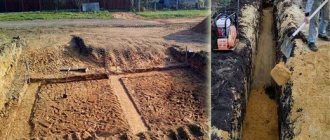
Despite the lightness of the material, structures from it should not be erected without a reliable foundation. After all, the main cause of cracks in any type of wall is frost heaving. During the freezing-thawing process, it can destroy even the most durable material.
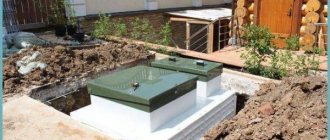
Plus, a foundation that is too weak can create uneven subsidence of the building and, as a result, distortions of the walls, and subsequently the collapse of the building. It is also very important to properly insulate the foundation, protecting it from the cold, and therefore from movement.
Types of foundation
For the foundation of a house made of aerated concrete, you can choose the following types of foundations:
- slab : such a foundation costs a lot, but completely eliminates pressure from below; because it will move simultaneously with the ground
- strip : with digging a pit under all load-bearing walls, including internal ones; such a closed loop provides stability to the building and protects it from movement; a shallow strip foundation can only be used on non-heaving soils that are not prone to strong shifts; in other cases, buildings are installed on deep foundations
- pile (on powerful steel screw or bored piles): used in areas with uneven terrain and difficult soils
- columnar : supports are erected around the perimeter of the building, as well as at its key points; the method is more suitable for the construction of utility rooms and garages
How to make a seismic belt
Upon completion of the arrangement of the row with jumpers, you should proceed to the installation of the armored belt. Reinforced concrete is usually used to make the structure; the integrity of the building depends on the material. To form formwork around the perimeter of the walls, ten-centimeter blocks will be needed. The ditch needs to be filled with reinforcement and filled with cement mortar.
Reinforcement pins are embedded in the armored belt; they should be pre-wrapped. This will help maintain the fastening while pouring concrete. Threaded elements can also be used, which will simplify the installation of the Mauerlat.
Detailed information about the armored roof belt is presented in the video:
Walling
Read also: Blind area around the house: types, structure, schematic drawings, instructions on how to do it yourself correctly (30 Photos & Videos) + Reviews
Laying aerated concrete walls
So, let's describe the main stages of building a house made of aerated concrete:
1 After completely strengthening the concrete base and cleaning it from dust, it is covered with roofing felt to protect it from moisture
Foundation waterproofing
2 To lay out the very first row, it is better to use cement-sand mortar rather than glue. It dries longer, and you will have time to perfectly align future walls and check the evenness of the row
3 The solution for the first row is applied in a layer of 10 mm. This thickness will be enough to level the installation height. Please note that it will be impossible to correct errors later - you will need to destroy the incorrectly laid block and install a new one in its place. Only small cracks can be covered with adhesive.
4 Blocks with a tongue-and-groove connection are more convenient to use. They are also coated on the sides with adhesive.
5 According to the rules, any masonry begins from the highest point. To do this, stretch a fishing line around the perimeter of the building, leveling it with the building level
6 The second block is installed in the opposite corner, and only then do they begin laying between the corner blocks. The central block is cut if necessary
Cutting aerated concrete
7 To get a perfectly flat wall, stretch a rope between the corners and use it as a guide when laying out
8 If the blocks are laid unevenly, after the solution has dried, their surface can be sanded
9 All subsequent rows also begin to be laid from the corners, but with the seams shifted. Just like brick, aerated concrete is laid out “with dressing”, so that the upper block necessarily overlaps the seam of the lower one.
10 It is more convenient to apply the glue with a special ladle with teeth. After laying, each block is tapped tightly to the adjacent one with a mallet (rubber hammer)
A scoop with teeth will help distribute the mixture evenly.
11 To strengthen the wall, it is reinforced first in the first, then every fourth row. Bandaging is also required over windows and doors. To do this, with a distance of 3 cm from the edges, grooves are prepared in the blocks into which the rods are laid. Please note that ligation of reinforcement should not be in corners, door and window openings. The recesses are filled with adhesive solution
Reinforcement of aerated concrete
12 A wooden lintel is attached over windows and doorways. 3 rows of blocks are laid on it: the first outer one, 15 cm thick, then half of the second 15 cm thick, the third 10 cm thick is placed inside
13 Next we need reinforcement mesh. It is cut to the size of the window, and metal rods are attached to it. The resulting frame is placed between the blocks, filled with cement mortar
14 Above the window lintels, an armored belt is made - formwork made of 10 cm thick blocks, inside which the solution is poured and reinforcement is laid
15 To install the mauerlat (support for roof rafters), metal studs are mounted here. For them, it is better to use not ordinary rods, but special threaded products. In this case, the Mauerlat will hold more firmly
Method of laying out a window opening
To keep cutting of aerated concrete to a minimum, the dimensions of the blocks should be taken into account when determining the length of the walls
Reinforcement under window openings.
It is recommended to reinforce the masonry under window openings with reinforcement. Due to the fact that YTONG is easy to process, this can be done very easily. Using a special hand tool, it is necessary to prepare grooves for reinforcement in such a way that the reinforcement protrudes 500 mm beyond the slope of the window opening. You can use a board for this. The cleaned grooves are filled with a solution into which the reinforcement is placed. After this, a layer of mortar is applied, on which the blocks are laid in the usual way. Labor productivity is very high. The extreme precision of the blocks, their gluing with thin mortar and the ease of cutting and shaping allows significant savings on the construction of a standard family house.
Basic mistakes
Read also: Natural ventilation in a private house: device, diagrams, do-it-yourself arrangement (Photo & Video)
Consequence of direct water contact with blocks and negative temperatures
In order for the building to be reliable and durable, during its construction strictly follow the following rules:
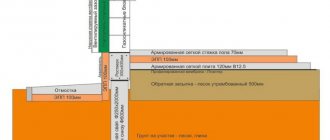
- Ground movements during freezing and further thawing can lead to the collapse of the entire building. Accurately calculate the depth of the foundation and select high-quality material for its construction. The base must rest on compacted soil plus be laid on a bed of sand and crushed stone. An important factor is the insulation of the foundation
- The use of steel instead of reinforced concrete as a grillage when constructing pile foundations is unacceptable. Metal is not able to provide sufficient stability. Plus, it is more susceptible to temperature fluctuations and thermal expansion (size changes)
- The combination of different types of foundations in one building is unacceptable. The load on them will be different, as a result of which the building will move. When building extensions to a house made of aerated concrete on a different type of foundation, an expansion joint is required
- The presence of even a slight tilt during the construction of walls is unacceptable: with vertical deviations of more than 5 mm per meter, cracks will form in them
- Be sure to check the correctness of the laying - moving the seam of the previous row from the center is allowed no more than 40%
- To avoid cracking of walls, especially when using low-density blocks, you should not skimp on reinforcement. To strengthen spans, column locations, and basement walls, use not only horizontal, but also vertical reinforcement
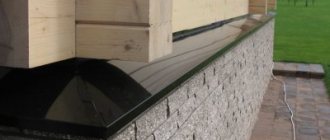
- In places where the height of the building changes, as well as in corners of rotation, additional temperature-shrinkage joints are provided (see photo)
- The use of wire instead of steel rods is permissible only when constructing ancillary buildings: sheds or garages
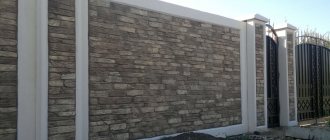
- The finishing for the facade should not interfere with the removal of moisture. She must “breathe”. To protect porous blocks from moisture, use special types of plaster (regular cement-sand plaster is not used), paint for aerated concrete, tiles or ventilated siding facades. Do not leave the building unfinished for a long time
- Similar requirements apply to thermal insulation materials. If the house needs to be insulated, purchase mineral wool or use brick. Polystyrene foam or expanded polystyrene will not work in this case - the walls will constantly become damp.
Laying the first row always causes the most difficulty. You can get acquainted with this stage of building a house from aerated concrete with your own hands in the video:
VIDEO: Laying the first row of gas blocks. DIY aerated concrete house
Do-it-yourself aerated concrete house: review of the material, advantages and disadvantages | (Photo & Video) + Reviews
How to fasten aerated concrete blocks - mortar or glue?
Cement and glue
As mentioned earlier, one of the advantages of a gas block is that it can be fixed either using a regular solution or using a special glue. What material should I choose for the job? It should be borne in mind that each of them has both certain advantages and disadvantages.
There are the following advantages to using glue:
- perfect joints;
- very smooth wall masonry;
- no cold bridges;
- it is simpler and easier to work with.
But it is important to consider that:
- during operation, the glue will release various toxins;
- its price is much higher than that of the solution.
An ordinary solution consists of water, cement and sand. Of the minuses, it should be noted that laying is somewhat more difficult than using glue, since you constantly need to monitor the evenness of the masonry. But it is much easier to correct these irregularities using a solution.
Tools for construction work
To bring to life your aerated concrete cottage project, you need to purchase the following set of tools:
- rubber hammer;
- mixer;
- scraper bucket;
- band-saw;
- hand saw;
- glue carriages;
- drill;
- electromill;
- notched trowel;
- grinding float;
- manual wall chaser.
Tools for construction from gas silicate blocks
We are going to build a house from aerated block with our own hands - we are preparing tools and equipment
The list of materials is limited to three items.
Laying foam concrete blocks
You will need:
- gas blocks;
- glue;
- fittings
You also need the following tool:
- drill equipped with a mixing attachment;
- container for preparing glue;
- “grinder” or metal saw for cutting reinforcement;
- wall chaser for making grooves for reinforcement;
- brush for cleaning grooves and surfaces from dust;
- a rubber mallet designed for pressing blocks;
- an aerated concrete plane or grater, which speeds up the leveling of the surface;
- a file that allows you to adjust the size of the block;
- flat and notched spatulas for grouting and applying glue;
- cord, level and plumb line to control the quality of masonry.
Photo
Aerated block house before finishing
House before finishing
Decorating the house with decorative bricks
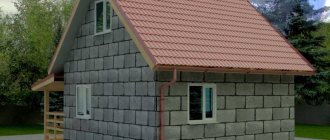
Aerated block house
Two-storey house
House with an attic
House made of aerated blocks with an attic
Garage with a room on the second floor
Did the article help you?
Roof
The roofing is carried out by attaching rafters and filing sheathing to them
If you need a house made of turnkey blocks, all that remains is to install the roof and install all communications. The roofing is done by attaching the rafters and filing the sheathing to them. Additionally, the roof is sheathed with rough boards, which are then covered with thermal and waterproofing. Ondulin can be used as a roofing material, which can withstand temperature changes, moisture and sunlight.
When making, the finished house can be finished on the outside with decorative “breathable” plaster or siding. Houses made from gas silicate are not only strong and reliable, but also quite beautiful, which satisfies the aesthetic taste of the owners.
Video: how to build a house from gas silicate blocks:
Interior decoration
Decorating the inside of a house can be done with any materials that match the properties and characteristics of an aerated concrete block. Plaster mixtures and screeds must be selected from highly specialized raw materials, and finishing materials must meet all the requirements stipulated by GOST and SNiP.
First, you need to decide what you want to see in the end. Let's consider the possible options.
Search for design solutions and a brief description of the progress of work
For clarity, we will use the method of stage-by-stage planning of the design of individual parts of the premises. Table 3. Alternative designs for interior decoration of the house:
| The ceiling in a house can be finished in several ways: by plastering and subsequently painting, or by installing plasterboard boards. In the second case, the choice of design options is extremely large. With the help of gypsum plasterboards it is possible to create complex multi-level ceilings with specialized lighting of any desired shape. Drywall is attached to a pre-assembled frame. Plastering will not be necessary, but insulation will be quite important. |
| First, before applying the finishing layer, the walls should be plastered and leveled at the same time. Priming and laying the reinforcing mesh is mandatory, since the adhesion of aerated concrete does not allow the materials to be reliably fastened together without additional impact. Next, the finished surface should be painted, covered with wallpaper or covered with textured plaster. Individual areas can be decorated with artificial stone or any other material. The emphasis can be placed on the corners, window openings of the room, as well as highlighting certain areas of the room. |
| One of the most common options is laying laminate, parquet and linoleum. Ceramic tiles and porcelain tiles are used more often than usual in bathrooms, kitchens and hallways. The device begins with the installation of wooden logs. Next, the floors are insulated and, as an option, covered with floorboards. |
| With the help of gypsum boards you can diversify the interior with arches. Since drywall is easy to process, you can create even the most incredible designs and shapes. |