Water that drains from the walls tends to accumulate on this part of the foundation. It penetrates into the pores of the foundation and accumulates there, and with the onset of frost it freezes. This leads to the gradual destruction of the monolithic base.
You can avoid destruction of the foundation under the influence of moisture and sub-zero temperatures by covering it with a waterproof inclined strip - a base flashing.
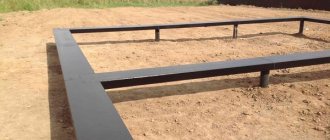
Purpose and need for installation
Water that gets onto the base surface begins to gradually destroy it. Deformation changes are most noticeable during temperature changes - in cold weather, water freezes, in the summer, cracks form on the structure, the plaster peels off and falls off, sometimes even entire bricks fall out. The foundation is destroyed and becomes unsafe. To prevent such negative manifestations, ebb tides are installed on the base of the foundation.
The ebb on the base of the house protects the foundation from the destructive effects of water
Is concrete material suitable for plinth construction?
Concrete plinth flashing is a common protective building structure that protects walls and foundations from melt and rain water .
Atmospheric precipitation is destructive to plaster and foundations, especially in the cold season, when the liquid freezes, destroying the wall surfaces of the house and foundation.
Concrete is considered the most affordable material. For this design, a solution is prepared with M400 cement with the addition of plasticizers to increase the frost resistance and moisture protection of the slab.
Pigment is also introduced into the composition, thereby selecting a color scheme for any facades and foundations.
This option for basement flashings is most preferable for monumental buildings, finished with red brick or expensive natural stone. The high strength of the concrete casting provides reliable protection and creates a high aesthetic appearance, clearly emphasizing the boundaries of the base.
This kind of casting is preferable in houses with a complex shape, while the required solution is poured into special molds with vibrocompression.
When not?
Concrete slabs cannot be used in houses whose walls are made of lightweight materials: wood and frame materials, finished with siding. Due to their heavy weight, they are also unacceptable for use on light types of foundations that cannot withstand heavy concrete pouring.
Concrete castings for the plinth are not applicable for the sinking type of plinth, when the facade protrudes above it. Actually, the wall itself already plays such a role as an ebb tide.
Experts consider the design of a sunken plinth to be the most durable, since it is well protected from precipitation; its runoff flows past the plinth and does not affect the waterproofing layer of the foundation.
Design Features
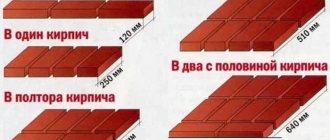
Externally, base ebbs resemble plates. The designs of plinth ebbs are distinguished by the presence of well-thought-out elements that increase their functionality and facilitate installation work. The most important components are the folds and shelves. The structures are fixed to the surface of the walls with special fasteners, while the shelves are mounted at a certain angle relative to the foundation to ensure water drainage.
The sizes of the shelves vary; you can find options from five to forty centimeters in width. The color range is so varied that there is always a choice for any façade.
Base drip device
Manufacturing of straight sections of steel casting
Standard galvanized steel casting is made from a wide strip. It consists of three planes:
- The upper plane is used to attach the ebb to the wall.
- The middle plane (it is the widest) is the ebb along which water should flow.
- The lower plane is parallel to the upper. Often a stiffening rib is made on it, which strengthens the entire structure. The ebb can be attached to the side surface of the foundation via brackets using the stiffening rib.
Although, now in any tin shop you can order castings of any configuration; if you wish, you can make it yourself:
- The first step is to cut the metal into strips. Galvanization is usually sold in sheets measuring 2m x 1m. Accordingly, for a smaller trim when cutting, it is necessary to determine the width of each strip as accurately as possible.
- The width of the upper and lower shelves (planes) is at least 20 mm. Otherwise, the top shelf will be inconvenient to attach to the wall. If the bottom shelf will be reinforced with a stiffening rib, then another 10-12 mm must be added to the width of the ebb.
- The width of the middle shelf is determined by the width of the cornice. Having calculated the width of the strip, you can begin marking the sheet. If possible, you should ask metal dealers to cut the sheets into strips of a certain width. As a rule, they have special guillotines that make this very easy and quick. To cut metal yourself, you can use metal scissors or a grinder with a thin cutting disc.
- Having cut the galvanized sheet into strips of the required width, you can begin bending them. This is done very simply. The strip is laid on a hard, angular surface (a steel corner is best) and lightly tapped with a hammer and bent in the desired direction. When making ebbs, it is necessary to ensure that the shelves of each of them are the same in width and bend angle. Otherwise, joining and fastening them will be very difficult.
Video - How to properly decorate an outer corner with a metallic sheen
Cutting out a metal or plastic ebb for installation on an internal corner is not much different from the technology described above. In this case, the upper bend remains untouched, since the corner marking is done in the opposite direction. When joining sides, it is enough to cut only one.
A clear example of an internal corner cut from metal casting
After completing the corners, we attach the planks to straight sections with an overlap of at least 10 cm.
Advice: to prevent the sound of rain drumming on the surface from being heard during the operation of metal ebbs, create a backing for them from polyurethane foam. Metal tightly seated on the foam will become almost silent.
Using a drill, we make holes in the bends of the shelf at a distance of 300-500 mm. We attach the product to the load-bearing wall and screw or nail the elements strictly according to the markings. We fill the connecting gap between the wall and the ebb with sealant.
The main difficulty of this stage is the lack of inclination of the foundation protrusion. A cavity is formed between the attached strip and the rough surface, which will negatively affect the quality of fastening of the elements and their further operation. This slope is established at the preparation stage during the leveling of the base with cement and liquid glass. Also, for these purposes, a narrow board is used or the ebb is placed on polyurethane foam.
When choosing the latter option, be careful: the foam tends to expand, so do not fill the entire cavity with the material. After screwing the ebb, place weights on it in increments of 400-500 mm.
The extensions are attached after installing the main planks. All ebb connections are treated with a sealed compound.
Examples of additional elements for plastic and metal base flashings
Rules for installing structures made of concrete, stone and clinker tiles
Piece products are difficult to adjust to the desired size during installation, so it is most convenient to install such flashings simultaneously with the finishing of external walls, provided that decorative bricks or other similar materials are used.
Stone, concrete or clinker ebbs look harmonious with similar finishing of the base and facade
The elements are attached to an adhesive composition intended for ceramic or stone products. This glue is sold in every construction store in powder form.
Important! The adhesive must be intended for use on the outside of the building.
You can also prepare an adhesive mixture for attaching piece elements yourself from cement and sand.
Concrete and stone are difficult to cut with hand tools, so when installing these flashings, try to minimize the need for adjustment or avoid it altogether. To do this, distribute the piece products evenly before installation, adjusting the width of future seams.
Installation of any type of flashing starts from the corner
The installation of concrete, stone or clinker casting strips begins from the corners of the building. Apply glue to the back side of the product and press it to the base, without deviating from the horizon line. When all the corners are ready, we proceed to straight lines. We apply the composition and fasten the elements in the same way. When the adhesive composition has dried, we seal the joints. Further finishing work is carried out after the glue has completely hardened.
Installation technology
Depending on the material, the installation is partially or completely different. The place for mounting the strip must first be prepared.
Preparation
The area for installing the drip tide must be cleaned, allowed to dry, if it is wet, the joints, seams, and small cracks must be treated with sealant.
Mark the top attachment point, make an even horizontal marking so that the bar fits without bevels.
If the house is made of logs, an antiseptic is used to level the surface, the concrete pour is leveled with a screed with liquid glass for waterproofing and quick drying. Concrete is also used on stone buildings.
The assembly of an insulated base requires a leveled surface protected from moisture; the structure does not require additional processing.
Installation of plastic and metal ebbs
To install PVC and metal evenly, you need to correctly trim the strips at corner turns. The platform and outer bend are trimmed, the upper one often remains untouched.
The prepared ebbs are fixed in the required places with an overlap, making a spacing of at least 10 cm in order to form maximum protection against seeping liquid. Immediately mark the points for the fasteners.
The layer between the lower surface of the plank and the base made of polyurethane foam eliminates noise during rain - the porous material absorbs sounds well.
To screw the ebb, you need to drill holes at the marked points in increments of 30-50 cm. The fully prepared material is attached to the area with nails, self-tapping screws and dowels.
The joints are treated from the outside with a sealing compound to prevent water from penetrating.
Often, gaps remain in turning areas, which are closed after complete installation using additional extensions. The connection points are sealed.
Water has a destructive effect on various types of seams and joints, regardless of size. To ensure the safety of the base and basements, the construction of protection from drip strips is required. High-quality materials and adherence to installation technology contribute to an increased service life of the structure.
The installation of drip structures is clearly shown in the following video:
average rating
more than 0 ratings
Share link
Installation of plastic or metal drip
The shape of the tide was not chosen by chance. The upper bend allows you to easily attach the shelf to the wall, preventing water from entering the angle between the wall and the base. The lower bend directs moisture down, preventing the accumulation of precipitation. The shelf itself is located at an angle, which also allows water and snow to roll down to the ground unhindered. At the same time, the ebb tides should extend no more than 5 cm from the walls.
Before installation, you must ensure the integrity of the wall and the flat horizontal surface of the base. All cracks must be sealed with a sealant. If the horizontal surface is not level, it is necessary to level it. Otherwise, the ebb will not fit tightly to the base, and water will penetrate into the foundation. After this, you need to wait until all the solutions dry.
For a tighter fit of the tides, it is necessary to install slopes. To do this, you need to tighten the lace, aligning it strictly horizontally. The slopes are made of thick mortar, at an angle of 15 degrees, guided by the lace. For the solution to harden, you must wait at least 24 hours.
Before installing the drip tide, you need to lay a vibration-absorbing tape for sound insulation during rain. Mount the ebbs on metal screws to the guides or on a dowel - nails to the wall. The first option will help to avoid additional work when covering the walls. You also need to fix it in the middle of the width of the shelf, this will give more rigidity and help avoid noise and tearing of the ebb. The ebb tides are overlapped by 3 cm. These places, as well as the joints with the wall, must be treated with a sealing agent. The corners can be made from leftover material or you can buy ready-made overlays. Flashings that extend more than 5 cm from the wall are additionally attached to the brackets.
If the ebb tides are installed correctly, their cost quickly pays off. A protected foundation does not require repairs, as it is not exposed to the damaging effects of weather. At the same time, the decorative finish of the base of the house is preserved much longer.
Installation process yourself
Installation of drip sills on a plinth is usually not too expensive. However, you should monitor the correctness of this work. After all, the safety of the foundation of the building largely depends on it. And that means the entire building.
We are preparing
The preparatory stage is necessary for each type of work. This rule also applies to the installation of ebb tides. The preparation is as follows:
- the wall surface is checked. All its defects are revealed. These may be unevenness, cracking;
- Then the identified defects are eliminated. Sealant, sealants, putty, cement mortar are used;
- Next, the wall surface is thoroughly cleaned and sanded. This measure will allow the tides to be fixed most tightly to the wall. This means it will reduce the risk of leakage.
To make ebb tides, you should carefully measure the width and length of the foundation line. This approach will make it possible to prevent errors during manufacturing and errors during installation of the finished product.
We install ebb tides
Using a level, the horizontalness of the foundation line is checked. Now we carry out the actual installation.
The structure is strengthened on the facade using self-tapping screws, anchors, and cement mortar. Installation is always carried out only after the façade has been completely finished. To install the drip tides you will need the following tools:
- screwdrivers;
- metal scissors;
- perforator;
- screwdriver;
- fasteners.
For the most durable fastening of products, slopes should be made. For this purpose, a radius cord is attached to the corner of the building. It connects to the opposite corner and is adjusted by level. A slope is made along it using prepared cement mortar. Now you should let the solution dry completely. Further work is carried out in a few days.
Next, the ebb tides are secured using fasteners. The long parts of the ebbs are mounted with self-tapping screws. The joints of the parts should be coated with sealant. The overlap is made at least 3-5 cm.
The proposed self-installation scheme is simple. Even a novice master can do it. Despite its simplicity, this measure will protect the foundation. This means it will extend the life of the building.
What tools are required for installation?
To arrange the base drip, you will need to use the following tools:
- hammer - for high-strength materials or mallet for materials that are sensitive to mechanical stress;
- a hammer drill for concrete, brick or stone walls, and a drill for walls made of wooden materials;
- metal scissors (for metal, galvanized or plastic castings)
- Master OK;
- building level;
- chop cord.
The list of tools may vary depending on the material of the plank itself, as well as the finishing of the building.
As related building materials you will need to use:
- mortar - polyurethane foam can be used, however, the outlet secured with its help will be less durable;
- sealant with increased frost resistance;
- mounting brackets;
- hardware that allows you to attach wide ebbs with reduced noise.
Average prices for creating a product by region
Depending on the region and the material used to create the tide, prices for products can vary significantly; average prices in various major cities are presented in the table:
| City | Stone | Metal | Galvanization | Plastic | Concrete | Clinker brick | Tree |
| Price rubles per m | |||||||
| Moscow | 400 | 130 | 140 | 85 | 300 | 250 | 280 |
| Saint Petersburg | 410 | 135 | 120 | 90 | 310 | 265 | 250 |
| Kaliningrad | 420 | 130 | 140 | 82 | 310 | 240 | 260 |
| Novosibirsk | 395 | 140 | 150 | 89 | 305 | 245 | 270 |
| Vladivostok | 500 | 160 | 170 | 95 | 330 | 280 | 300 |
Everything you need to know about building a basement can be found in this section.
How to make a corner at low tide?
Some difficulty comes from processing the corners of the house: the joints must be airtight and look neat.
The ready-made set of PVC flashings already includes the corresponding additional elements. This is a solid cast corner; after installing it, all you have to do is seal the joints with the walls and straight sections.
The corners of metal castings can be processed in different ways:
cut the edges at 45 degrees and lay with an overlap at the joint;
close the joint with a separately cut rectangular strip and secure it with screws;
The joint of the ebb corner with a separately cut rectangular strip
cut both abutting ebbs at 45 degrees with allowances and connect them with a standing seam.
Connecting the corner of two ebbs with a standing seam
When processing an internal corner, you can simply place one of the joining planks under the other and secure it with screws or make an overlay.
Attachment procedure
Now to the question of how ebbs for the foundation plinth are installed.
The work is performed in the following sequence:
- Begin the procedure by accurately marking the installation location. To do this, take a level at least 1 meter long. But 2 meters is better. Use a level and a marker to determine the lowest points. Draw a horizontal line at the required distance from the base;
- Now installation. There shouldn't be any difficulties here. Especially if it is a wooden house. You will need to fasten it using a screwdriver and roofing wood screws;
- If the structure is made of other materials, such as foam blocks or bricks, you will have to act differently. Drill a through hole in the upper ebb shelf. The diameter will be 6 mm. Distance between holes 50 cm;
- Now attach the panels to the base, and also apply markings through the holes in them. Using these marks, make holes in the base itself. Insert plastic dowels into the recesses. Next, take galvanized screws, or fasteners with a press washer, and secure the panels;
- The most difficult step is installing the corners. Internal and external. Here you should first perform cutting using a template or a square with a ruler. I advise you to practice on scraps. Getting the perfect angle the first time is difficult;
- If it is plastic or thin metal sheets, blow a little foam under the panels. And press. This will ensure a tight fit of the tides to the base. And it will reduce the likelihood of noise, as well as separation from strong winds.
That's all. Work is done.
Options for finishing the base with low tide
Although many people regard the finishing of the base with a low tide only as a design solution, from a practical point of view, the foundation and base need to be protected from external influences and pollution, including chemicals.
Combining trim and insulation is also a good idea. After all, after insulation, the base will be doubly protected. Extruded polystyrene foam is most often used as insulation. It is attached with special glue, and then secured with dowels or “fungi” for additional protection. After this, it is necessary to tighten the insulation with a mesh and plaster the base. However, after attaching the heat-insulating material and before plastering, you need to make sure that the base is even. The holes may need to be pulled out with glue, and the bumps will need to be removed with a special grater.
Without insulation
If insulation is not provided, plinth plaster can create a good protective layer without requiring large expenses from the homeowner. The base paint you choose can then add a beautiful aesthetic to the entire building. You can also add dyes to the solution itself, then even if damaged, the contrasting color of the plaster will not be visible.
Choosing material for cladding
You can also use facing bricks or blocks, but due to the large weight, a separate base must be made for the masonry. Installing a foundation with your own hands will ensure reliable fastening of the finish, and will also allow you not to create additional load on the existing foundation of the building.
If the house has a shallow foundation that protrudes 20-30 cm above the ground surface, then before covering the base, you can also glue insulation. For cladding, you can use ceramic blocks, hollow stone or other options.
There are also special clinker blocks that are used to finish the steps. If they are made in the same color with the entire base, it will look impressive.
Foundation drainage
Drainage of the foundation of a house must be carried out on waterlogged soils and at high groundwater levels (where the need to drain excess liquid in a timely manner is especially important), but it is optimal to play it safe and create a full-fledged system at the construction stage of the building. If it later turns out that natural water drainage is ineffective and drainage is still necessary, its installation for a fully built house will be more labor-intensive and require greater financial costs.
Scheme of water drainage from the foundation with the installation of a drainage system.
Sequence of work
- A drainage trench is created with your own hands with a small indentation (up to 1.5 m) or close to the concrete surface of the foundation (optimally the work will be done before backfilling the axillary cavities). Requirements for trench geometry: slope towards water intake points 1-1.5%, bottom 20-40 cm below the foundation base of the house.
- The trench is lined with geotextile or other filtering film (permeable to water, but retaining silt and sand) so that its upper edge is higher than the hydraulic lock.
- A drainage pipe with holes is placed in the trench to ensure the collection and drainage of water. The pipe must drain the liquid into a pit or drainage well.
- The trench is backfilled using a permeable material or mixture (possible options are gravel, sand, crushed stone). The presence of clay reduces the permeability of the backfill.
- The hydraulic lock device is the surface filling of a trench with soil with low water permeability (for example, clay) after the horizontal surface is lined with geotextiles. To increase the density of the waterproof backfill, it is compacted. This hydraulic lock prevents the drainage system from overflowing during heavy rainfall.
- The blind area of the house is mounted on top of the hydraulic lock and completely covers the trench with the obligatory protrusion of the edge of the blind area beyond the drainage structure.
A high-quality foundation flashing with a drainage system will protect the foundation of the house from water.
How to do it yourself?
Installation of ebb and flow sills on various base materials requires different installation methods:
On the base of a wooden house, ebbs made of wood or metal are most often installed, less often - plastic.
Heavy stone, clinker or brick linings are used extremely rarely. Flashings can be installed using any convenient methods, but first it is necessary to protect the connecting sections of the walls and corners from moisture. After this, the planks are installed on flat parts of the walls.- The drip lining is also installed on the base of a brick house - from the corners. After installing the corner parts, it is necessary to proceed with the installation of ebb and flow on the straight part. We must not forget about sealing the joints between the ebb and the wall surface.
- The ebb for the base under the siding can be made of concrete, metal or plastic. The flashing must be installed before the siding finish is applied. This will avoid the use of additional sealants and give the composition a single, neat look. Installation under siding is also carried out from the corners of the structure.
- The casting of the fence base is carried out before applying the finishing coating. This allows you to save money and make a high-quality design that will last for decades. Otherwise, this work is not much different from the work on arranging the basement of a building. You need to start from the corners, and then arrange flat surfaces.
What are they, are they needed?
The ebb for the foundation plinth is a strip that resembles a shelf . The ebb is installed along the entire perimeter of the protruding part of the base with a 5-10 degree slope in the direction opposite to the wall. Installing such a strip allows liquid to drain from the surface of the foundation.
The ebb for the base is made from waterproof materials, either independently or to order in specialized stores.
Installing this structural solution allows you to extend the service life of the foundation and avoid its destruction under the influence of moisture and low temperatures.
Neglecting to install the drip lining for the base leads to rapid destruction of the base and a decrease in the load-bearing characteristics of the foundation. Subsequently, this becomes the reason for the formation of cracks on the surface of the walls of the house, requiring urgent reconstruction of the entire monolith. A particularly neglected foundation can lead to the destruction of an entire building.
Classification of species
Installation of ebb and flow sills on the base of the foundation, if you have everything you need, is possible with your own hands. To do this, you can use different types of plastic, steel, copper or aluminum material.
PVC
Such ebb tides have a large number of advantages, which makes them popular among consumers. The material is primarily characterized by a long service life, resistance to aggressive environments, a wide variety of shapes and a wide range of colors. To this list of positive qualities should be added excellent waterproofing qualities and reasonable cost, guaranteed reliability during operation.
There are also negative aspects. They are mainly associated with the fragility of the material itself and the impossibility of performing repair work if a breakdown occurs.
As a rule, plastic flashings for the foundation base are installed when finishing objects with siding or vinyl.
Installation diagram for drip linings when covering the facade of a house with siding
Concrete
The optimal solution, which has proven itself over time. Best suited for structures finished with stone. Concrete elements are made from the M450 mixture, which includes crushed stone, sand, cement and plasticizer additives, which give the tides the ability to withstand temperature changes and increase their service life.
The products are durable and perfectly resistant to cracks and other deformations. The advantages of concrete castings for the foundation plinth can be continued with a wide color palette and the availability of various sizes, which can vary taking into account the dimensions of the plinth.
There is also one significant drawback - the ebb tide option is cumbersome, and its installation should be provided for in advance in the design decision for the construction of the facility.
Concrete casting for foundation plinth
Clinker tiles
Today builders use this material quite often. This is due to the high aesthetic level of the tiles, strength indicator, long service life, and the quality of protective properties, with the help of which it is possible to reliably preserve the foundation from getting wet.
Here it is fair to note that the cost of such material for drip tides is quite high, and installation work is associated with certain difficulties, which require the availability of appropriate skills.
Clinker ebb on the foundation plinth
Metal
Metal ebbs for foundation plinths are distinguished by a variety of options, while having similarities in certain elements in appearance. Each shelf has two folds. With the help of this, the ebb tide is secured, and water flows down the second one.
The model range is distinguished by color schemes depending on customer preferences. In addition, to produce metal castings for the foundation plinth, manufacturers can use inexpensive galvanized steel or, when fulfilling an exclusive order, apply a special protective coating of a polymer composition over the metal surface, which provides additional durability.
The main advantages of such ebbs include a long service life, resistance to temperature changes and mechanical impacts, a laconic appearance, and the ability to select elements taking into account your own needs and financial capabilities.
Galvanized ebb for the base
Flashings on the foundation of a wooden house: installation for a plinth, photo
In arranging your own home, any, even the most seemingly insignificant element can affect the result of your work and its appearance. The ebbs on the foundation of a wooden house are no exception, which, along with corners on slopes, floor and ceiling skirting boards, window sill boards and other details, can add neatness to your home and its renovation.
Wooden house with low tide
The final part of the finishing is the installation of flashings on the foundation of a wooden house. Photos showing the appearance of the ebb tides on the foundation of a wooden house speak eloquently about the advisability of making such an improvement to your home.
Note! Flashings for the base of the foundation of a wooden house will perfectly protect your home from the harmful effects of negative weather conditions and precipitation that can accumulate at a certain level. Before installing ebbs on the foundation of a wooden house, keep in mind that on one side they are adjacent to the wall of the house, on the other they slightly extend beyond the boundaries of the foundation, as if hanging beyond its limits
In most cases, these elements are made of metal, which is covered with a protective film of polymer
Before installing ebbs on the foundation of a wooden house, keep in mind that on one side they are adjacent to the wall of the house, on the other they slightly extend beyond the boundaries of the foundation, as if hanging beyond its limits. In most cases, these elements are made of metal, which is covered with a protective film of polymer.
Most often, ebbs are purchased or ordered from craftsmen, however, after learning how to make ebbs for the foundation of a wooden house yourself, you may want to make it yourself.
Manual castings are made from:
- copper;
- galvanized metal;
- concrete (in rare cases, since they most often play the role of supports, weighing almost 20 kg).
The main type of do-it-yourself ebb tides is radial. That is, such elements completely repeat all the features of the silhouette of the house.
Low tide on the bend of the wall
Manufacturing recommendations
There is nothing difficult or impossible to do on your own for the foundation of your home. To do this, you must take sheet metal and cut it into strips of the required width.
Then you should bend them according to the level. To do this, you need to make markings, lay the sheet on a corner, tapping it on the surface of the metal, and bend it in the desired direction.
Note! Metal bending is carried out on both sides. In the place where the ebb will be adjacent to the wall, the metal strip must be bent upward, and it will be narrower
On the other side, a downward bend is performed.
Bend pattern
The only parameter that will be subject to correction is the width of your product. Since the foundation against the background of the building is not as clearly defined as the base, the ebb in this case may have a smaller width. If you are dealing with a protruding part of the wall, then refer to the diagram below.
Note! The sequence of your actions plays an important role in this process, so it is recommended not to break it
Installation and Tools
Before installing the drip tide, you should check all the walls of the house for chips, any cracks or other surface defects. If defects are identified, they should be puttied or sealed with sealant.
Low tide installation diagram
Required tools:
- a hacksaw or scissors used for working with metal;
- hammer and pliers;
- mallet made of wood or rubber;
- hammer drill or drill;
- chop cord.
After making the ebb, it is necessary to make markings in those parts where it will adjoin the wall of the house. Using a level, you need to check the size of the ebb slope, and then make markings. Next, a line is drawn along which the installation will be carried out. To do this, you can use a beating cord, which can be found in the assortment of a hardware store along with a product such as paint.
Placing the board for rigidity
Don't forget to measure the width and depth of the foundation. And also make sure that the screws are tightened according to the technology. The cord is pulled tightly across the entire wall, secured at the two outermost points. After this, a pull is made in the middle and the cord is released. As a result, you get an even strip.
Holes for fixing the ebb are made both on the wall and on the product itself, applying it to the foundation. In wooden houses, a board is placed under the ebb to ensure a sufficient level of rigidity. And the junctions with the walls are sealed with sealant.
Materials
Molding strips for protecting basement walls are made from aluminum, copper, steel, PVC, stone, clinker and other materials. The varieties differ in the type of installation, have their own design features, advantages and disadvantages. Let's take a closer look at each of them.
Types of ebb tides for foundation plinth
PVC
One of the most popular materials due to its affordable price and noiselessness. A wide selection of sizes and colors allows you to choose a plastic molding for the base to suit any exterior and harmoniously fit it into the decoration of the house.
Visible advantages:
- durability and reliability;
- moisture resistance;
- resistance to environmental influences;
- easy to install.
The plastic molding harmoniously combines with vinyl or siding trim.
The disadvantage is that over the years, plastic moldings can lose their former aesthetic appeal due to exposure to sunlight. In addition, plastic is quite fragile in the cold. Heavy hail can damage the material beyond repair, but replacing the broken piece will not be difficult.
Concrete
Protective structures made of sand, cement, crushed stone and plasticizer are not afraid of temperature changes and have a long service life. They are very durable, resistant to chips, cracks and other mechanical damage, and cannot be deformed. Like others, they have a wide selection of sizes. The main advantage is that the concrete cast can be painted in any color, matching it as harmoniously as possible to the overall finish.
Concrete sills go well with the finishing of the base made of natural stone
A significant drawback is the bulkiness of concrete structures. The installation of such strips should be considered at the design stage. And if one of the fragments fails, it will not be so easy to replace it.
Clinker tiles
In addition to visual appeal, clinker tiles have other advantages:
- strength;
- long service life;
- high protective properties.
Clinker tiles are a piece material and if one of the elements fails, replacing it will not be difficult.
An example of a flashing for a plinth made of clinker tiles
However, such ebb tides are quite expensive, and not everyone can afford them. In addition, installing elements requires certain skills and dexterity: it is quite difficult to fit piece elements, creating a complete surface with their help.
A natural stone
Most often, stone flashings for the base are made of sandstone; less often you can find products made of granite. The planks are available in black, green, blue and light with a gray tint.
The advantages of stone elements are strength, wear resistance, aesthetic appeal and durability.
Stone casting for the ground part of the base fits harmoniously into the exterior with brick or stone walls, plastered surface or facade panels.
Due to their specific weight, stone casting strips for the base are not suitable for protecting every foundation. Only a base that can withstand heavy loads can withstand such a finish. Also, the disadvantage of natural stone is the rather high price of products, heavy weight and difficult installation.
An example of a basement flashing made of natural sandstone stone
Metal products
Copper, steel and aluminum castings for the ground part of the base differ in appearance, weight, properties and other technical indicators. Some models are equipped with a polymer coating that prevents damage to the planks.
The coatings differ in texture and colors. There are options for wood, stone and other materials. The only things common to ebb moldings made from different types of metal are a wide selection of sizes and a design consisting of two bends and a shelf. One bend is used to attach the plank to the wall, the second is used to provide drainage.
Metal ebbs for the plinth can completely protect the base from the effects of precipitation
The advantages of metal castings include:
- strength;
- long service life;
- neat appearance;
- resistance to natural influences;
- resistance to mechanical damage;
- affordable price;
- resistance to temperature changes.
The disadvantages include the noise of such elements and the possibility of damage at the cut site if they are processed incorrectly. The most expensive are copper castings.
Natural wood
Due to its aesthetic qualities, this option is used when finishing log houses or buildings covered with a block house, wooden clapboard, etc. One of the main tasks of wooden ebb, in addition to its protective function, is not to violate the external integrity of a building made of natural materials.
The wooden moisture-proof element for the plinth most harmoniously complements the natural exterior of the building.
Such tides are made from larch impregnated with an antiseptic and treated with polymer. Sometimes these are simply wooden strips nailed at a certain angle to ensure drainage of wastewater. With a reliable moisture-resistant backing, the material can last about 2 decades.
Metal flashings are also used to protect the base of a wooden building.
Moisture-proof planks made of wood are the most short-lived and require systematic painting and timely replacement. In the sun, the material dries out, in the rain it becomes saturated with moisture, and after several frosts, cracks form on the surface. The main advantage of such ebbs is their affordability, so if you have the opportunity to consider more expensive options, it is better not to stop with wood.
When decorating the exterior of a log house, you can replace the wooden ebb with metal or stone elements.
Polyurethane
The lightest and cheapest. Used for finishing the base, in which the vertical planes are covered with siding. Fastening method - adhesive composition.
As practice shows, metal types are most often used. They are sold ready-made, they can be ordered by specifying the exact dimensions and configuration, or you can make them yourself. In addition, the ebbs are made both from galvanized sheets and from those coated with polymer compounds. Some companies offer aluminum or copper products, which are very expensive in price, but they have a serious service life.
The main stages of installing a basement drip
Installation of the ebb in its place is carried out before cladding the facade. The shimmer material is chosen so that it matches the finishing material of the building’s façade. For siding, a plastic casting is made; concrete or clinker castings are used for brick and stone. Metal canopies are universal and are suitable for any type of finishing material. Since metal types of flashings are most often used in mass individual construction to protect the foundation of a house, let us consider in more detail the features of their installation.
Do-it-yourself basement drip installation
On the horizontal surface of the plinth, called a grillage, several planks are placed along the entire wall. After alignment, they are fastened together with the smallest self-tapping screws. If the walls of the house are lined with brick or made of lightweight concrete blocks, then holes are first made for attaching ebb sills with wooden or plastic plugs. The ebb is attached to them with self-tapping screws. If the walls made of wood or ebb need to be attached to the facade frame, then you need to screw them directly onto the screws. The joints between the planks can be treated with sealant to prevent liquid from entering through them.
Helpful advice! To decorate the ebb tides at the corners of the building, use special corners. They have a presentable appearance and are sold together with the planks themselves of the same color and width.
Scheme of installing a drainage system on a concrete plinth
The use of flashings for the foundation plinth can significantly increase its service life. In addition, the correct choice of the type of ebb and flow and their high-quality installation greatly improves the appearance of the building, giving it integrity and completeness.
Foundation for a house on a slope - all difficulties can be overcome!
The process of erecting a residential building on a slope is associated with certain difficulties due to the instability of the soil in such areas. The integrity of the soil can be compromised by the following phenomena:
- splitting due to destruction of the slope base;
- sliding along a curve or rock;
- liquefaction due to high humidity.
Now there are several technologies that make it possible to lay a completely stable foundation for a house on a slope. First of all, it is necessary to qualitatively strengthen the soil on the slope where it is planned to build a dwelling. They do this through the construction of a drainage system. It is designed to remove excess moisture from the soil on the slope. It is water that causes sliding and collapse of earth layers.
The next step is to arrange a system for strengthening the soil around the place where the foundation will be laid. This design is often made in the form of a set of supports that are installed deep in the ditch dug for the foundation of the building.
Also popular is the technology of strengthening soil on a slope by pouring a special shaft with high-density rock. This structure increases the mass of the soil and prevents its sliding. In addition, you can build a tongue-and-groove fence on a slope with your own hands. It will be quite effective in preventing soil destruction.
Tongue-and-groove fencing on a slope
The main task of any method of strengthening the ground on a slope is to create a special barrier that could most effectively prevent the base of the building from sliding or shifting during its operation
Note! It is strictly prohibited to build a house on a site with a slope of more than 10° without first strengthening the ground.
Strip foundations are ideal for slopes with a relatively small angle of inclination. It is even allowed to be laid not very deep if the soil on the site is not subject to crumbling, and the groundwater lies at great depth.
In situations where the soil has a tendency to heave, is characterized by high water saturation and a large freezing depth, it is best to equip the foundation with a pile or columnar type.
Criterias of choice
The casting for the foundation plinth is the final stage of façade finishing. With its help, the boundary separating the ground part of the foundation from the load-bearing walls is conditionally determined. It follows that it is necessary to choose ebb tides according to the following conditions:
- protective function;
- aesthetic appearance.
The ebb is chosen to match the tone of the façade finishing, and the material used to finish the walls and base must be taken into account.
For structures built from timber, it is recommended to use ebbs from any metal; for buildings made of brick or block, it is allowed to install ebbs from any materials.
You should pay attention to the thickness, weight, uniformity of structure and shades, the quality of the coating (if any), and the specifics of the installation work. Low-cost products have a short service life, so saving in this case is not recommended.
Correctly selected ebbs must completely coincide with the base forms, corner areas, niches, rounded areas, and bay windows. When laying strips, a mandatory overlap is provided, which should be taken into account when performing calculations on the requirements for materials and all necessary components.
There is one more factor that must be taken into account when choosing ebbs - the possibility of their coloring and suitability for repair in case of damage.
We recommend reading:
What is the stage-by-stage construction of a turnkey cottage?
Didn't find an article on a topic that interests you?
Just write a few words in the form at the top of the screen, our search will automatically select suitable articles.
All about country life and construction
Where is Moscow expanding? And what does this mean for summer residents? 586522 Will the Central Ring Road be able to relieve congestion on highways near Moscow? 328461 How to calculate acres of land? 272478 Which areas of the Moscow region are the cleanest and dirtiest in terms of ecology? 234517 Which metro stations will be built in the Moscow region? 210016
How much does it cost to connect a house and land to communications? 157596 Where is it better to live in the Moscow region? Rating of districts 127119 How many acres of land do you need to build a house? 124603 Districts of New Moscow. What are their advantages and disadvantages? 122332 What are the restrictions on construction near rivers and reservoirs? 106600 Which home heating is more profitable: gas or electric? 91610 Building codes and rules for the development of land plots 87137 What exhibitions of finished houses are there in Moscow and the Moscow region? 82492 The best cottage villages in the Moscow region 74987 What houses are currently on sale in the Moscow region? 71058 What are land plots without a contract? 63403 Are the basement and basement considered floors? 59357 Land development from scratch. Where to begin? 56364 Is it possible to leave SNT? 55216 What taxes must be paid for a house, garage, bathhouse and other buildings? 53086 How to re-register a plot? And how much does it cost? 54453 Is it profitable to build a house for sale? 49722 Where will the gas soon be? Gasification plan for villages in the Moscow region 46956 The best places for fishing in the Moscow region 45577 Pitfalls when buying a house
What should you pay attention to? 44219 How to bargain for a house? 43096 Life in a cottage community. Pros and cons 43039 Rating of Moscow region districts by quality of life 46061 Is it worth buying a house in SNT for permanent residence? 45718 Do I need to obtain permission to build a house on my site? 44080 Will a house built in SNT be considered residential? 42271 What to do after purchasing a plot? 38802 How long does it take to build private houses? 36443 The largest and most expensive cottages in Russia 35652 How much will it cost to build your own house? 34879
What is the best material to build a house for permanent residence from? 31842 How to register a rented plot under a house? 31209 Is it worth renting forest land for construction? 29013 How many floors can a cottage be built on? 28775 Ecovillages and ecovillages. What it is? 27789 What is the size of utility bills in cottage villages? 26705 How to build a house on a plot with a slope? 26152 Repair and decoration of a cottage. Work order and all stages 25583 Purchase of a plot with an unregistered house. What are the risks? 24136 Which private houses are warmer in winter? 23893 Division of a house with a plot. How to apply correctly? 23048 Gas to a private house. How to do it? 23048 How to rent out your plot? 22473 Turnkey house construction? Like this? And how much will it cost? 21681 Depreciation of the condition of the house. How to understand? How to calculate? 21108 Modular houses. What it is? 20520 How much will it cost to maintain your home? 20195 Lands of private household plots. What are their pros and cons? 19822 Forest areas (near the forest). What are their pros and cons? 19260 How to change the purpose of a site? 19127 Which is better: Cottage or Townhouse? 18830 Is it possible to turn a dacha into a residential building? 18564
Features and rules for installing ebb tides
How to install flashings for a foundation plinth with your own hands? Let's consider the algorithm of actions in individual stages.
Tools and materials
In order for the installation work to be successful, you will have to prepare everything you need in advance:
- additional elements;
- polyurethane foam;
- sealant or putty material with a moisture-repellent effect;
- grinder, tile cutter, metal cutting scissors, small hacksaw;
- hammer, rubber mallet, pliers;
- building level;
- impact drill or hammer drill;
- dowels, screws;
- brackets for fastening;
- screwdriver
Preparatory work
All imperfections on the base surface are eliminated, cracks and joints are sealed. For this, water-repellent mastic or construction sealant is used. Walls made of wood are treated with an antiseptic.
Now you can make horizontal markings using a laser level. The highest plinth point is located, a line is drawn or twine is pulled along the wall. Using this marking, the upper part of the ebb will be attached. Protruding foundation part. On which it is planned to rest the ebb, it is necessary to level it by arranging a screed made of cement material. The recommended tilt angle is ten to fifteen degrees; for this reason, markings along the wall are made slightly higher than the protruding base plane.
Instructions for installing drip tides
Installation work
Once you have decided on the choice of material, you can proceed directly to installing the ebb tides. It must be taken into account that installation may vary depending on the design of the house and the tides themselves. For example, flashings for a wooden house should be selected taking into account the characteristics of wood: weak adhesion, fear of dampness. In this case, it is better to purchase materials that are attached to self-tapping screws and other fasteners.
For brick and stone buildings, you can use elements fastened with various mortars. These include clinker and concrete products.
Required materials and tools:
- Construction foam.
- Additional elements of ebb tides.
- Sealant and putty.
- Grinder, tile cutter, hacksaw, metal scissors.
- Pliers and hammer.
- Level.
- Hammer or drill.
- Self-tapping screws and dowels for concrete.
- Screwdriver.
- Mounting brackets.
Preparations before installation
Before you begin installing the drip linings, it is necessary to seal the joints between the walls of the house and the base. Cracks and crevices should be sealed with either water-repellent mastic or construction sealant. Wooden walls are treated with antiseptics.
The next step will be to mark the wall horizontally. It is best to use a laser level for this. Using a laser, you need to find the highest point of the plinth, draw a line above it or stretch the twine along the wall of the building.
Fastening elements
The sills need to be attached from the corner of the building - corner elements are used for this. First of all, you need to install sills on the protruding parts of the wall - columns, pilasters, etc.
When using plastic or metal products, holes are made in their upper part using a drill. Next, each element must be attached to a pre-designated line on the wall of the building and attached using dowel-nails and self-tapping screws.
The next step will be to seal the joint between the material and the wall with putty or silicone compound. We also attach the lower part of the ebbs to the concrete base using self-tapping screws. You can fasten every 40-50 centimeters.
After installing the corners and protruding parts of the building, you can begin installing additional elements on straight sections. They should be attached from one of the corners. Adjacent elements must be overlapped by approximately 30-40 mm, and the joints must be sealed.
Concrete slabs and clinker tiles are best installed together with the cladding of the house and basement walls. Otherwise, installation difficulties may arise. Such ebbs look better with similar facing materials that are used to finish the base: porcelain stoneware, natural stone, facing brick.
To attach such materials, it is necessary to use adhesives for ceramics and stone. They can be purchased at a hardware store. You can also make this composition yourself from sand and cement. The ratio of cement to sand should be 1:3. The solution should be quite thick. Installation of concrete or clinker products, as well as metal castings, must begin from the corner.
You need to fasten the drip tides by applying the solution to the back side exactly according to the previously outlined drawing.
Then, as the solution sets, it is important to seal the joints with putty or sealant. After the solution has completely hardened, further cladding of the building can begin.
Design and operational properties of ebb tides depending on the material of manufacture
The structure includes the following elements:
- a shelf mounted at a certain angle to ensure water drainage. Its width is 5-40 cm;
- fastening bend, thanks to which the product is attached to the wall;
- frontal bend, with the help of which water flows are directed downwards.
To make flashings for the foundation plinth, various materials are used, which largely determine the performance characteristics of the product. We invite you to get acquainted with the main types and their distinctive features.
Each part of the tide performs a specific function
Concrete - a high-quality and traditional solution
For the construction of the building, brick or natural stone was used; for finishing the foundation, it is better to use cast concrete. Having a solid appearance, such products reliably protect the base from negative influences.
They are made from M450 cement, which has sufficient strength characteristics and frost resistance. The introduction of a small amount of plasticizer makes it possible to increase plasticity and water resistance, and a certain amount of dye helps to obtain the desired color. It is possible to paint with façade paint if the required color scheme is not available.
During the production process, the prepared solution is poured into special silicone molds, the length of which is usually 3.9 or 6 m. The width of the cast depends on the geometric parameters of the base.
Polyvinyl chloride - a budget solution
If vinyl siding was used to decorate the facade, plastic products will be the best option. Polyvinyl chloride ebbs have a similar texture and color.
They have a long service life. They are not afraid of exposure to natural factors. The waterproof structure allows you to reliably protect the base from external moisture. Moreover, they have an affordable price.
Wall decoration must be appropriate
Metal – strength and reliability
Metal products are highly durable and have a long service life. Can be steel, copper and aluminum. The latter are in particular demand, as they have less weight compared to steel products. Copper ones are of limited use due to their high cost.
Metal castings have a presentable appearance, are easy to install and are not afraid of impact. Their length is about 2 m and can have a width of 5-30 cm. Sheets 1 mm thick are used for production. May have different colors.
The colors of metal products are chosen taking into account the overall design of the house
Clinker is a clear demonstration of status
If expensive clinker tiles are used to decorate the facade, the ebb should be made of the same material. You can purchase it together with the main material.
Clinker finishing will not be cheap
Briefly about the main thing
The foundation is the foundation of the house; the stronger it is, the longer the building will last. The most vulnerable place of its above-ground part is the protrusion under the wall and the joint with it, where rain and snow moisture constantly accumulates. Freezing and thawing, it slowly but surely destroys the base, depriving it of its strength and attractiveness. Something as simple as a plinth molding that covers this projection eliminates this problem. It can be metal, concrete, plastic, made of ceramics and natural stone. You can choose ready-made products in the store or order them to be made according to your sizes.
Methods for connecting ebb tides to each other
There are several ways to fasten ebbs together:
- Overlap;
- Folded method (falsetto - lock);
- Plank.
1. For an overlapping connection, it is necessary to lay the strips one on top of the other by at least 3 cm. For additional rigidity, you can fasten them with rivets; you need to coat the joints with a hermetic compound.
2. When installing the ebb in a rebated manner, water resistance can be guaranteed without the use of additional means. It is more difficult, but also more economical.
3. Joining with a plank is a more expensive method due to the use of additional decorative strips, but it is also more aesthetically pleasing and durable at the same time. It does not require the hassle of using a falsetto lock, while freely allowing the ebb material to expand and contract in accordance with climatic conditions.
Possible errors and their consequences
When installing the plank, a violation of the integrity of both the walls themselves and the material may occur . In addition, choosing the wrong material can lead to a decrease in the performance of the entire structure and, as a result, lead to a decrease in its strength and durability.
Improperly installed or sealed strips can minimize the functionality of this structure. Liquid will begin to seep under it and the destruction of the foundation will occur unnoticed, after which a smooth transition of cracks to the walls of the structure will occur.
To correct mistakes made during the installation of the plank, you will have to not only replace entire sections of it, but also reconstruct the foundation.
Any insufficiently insulated part, insufficient mounting angle or width of the plank can cause unnoticed destruction of the base. Constant exposure to moisture in specific areas of the wall will cause mold and mildew. To avoid such consequences, it is better to seek installation help from specialists .
Sediment removal
The set of measures to protect the foundation and plinth from precipitation is advantageous in that it can be carried out even after the construction of the house is completed with minimal excavation work and disruption to the finishing. Although it is more correct to carry out this work before finishing the walls.
Functions performed by drainage systems:
- The main one is the removal of precipitation from the base.
Often rain or snow water contains small amounts of acids that have a destructive effect on concrete. And simple water, when penetrating concrete, contributes to its accelerated wear through frost cracking and accelerated corrosion of the reinforcement frame. - Additional – aesthetic. A small stripe on top of the base, matched to the color of the walls, will emphasize the completeness of the facade.
Foundation ebbs can be made from various materials:
Installation of ebb tides on the foundation is quite simple and therefore does not need to be described in detail. When installing, you should follow several rules:
- there must be a slight slope away from the wall;
- if the ebbs for the foundation are assembled from metal, then you need to make a small overlap on the wall to prevent water from flowing under the metal;
- You should definitely make a protrusion of at least a couple of centimeters so that the water drips onto the blind area and does not flow down the base.
Requirements for the drip plate
In order for the drip plate to perform its functions efficiently, it must be:
practical;- safe – have no sharp edges, do not emit harmful substances;
- resistant to temperature changes, UV rays and liquids;
- silent (if possible);
- inexpensive;
- easy to install and maintain;
- replaceable in fragments.
In addition, when choosing a drip strip, you should not ignore its aesthetic role. It can carry not only practical functions, but also decorative ones - to decorate the façade of a building in a unique way.
What are the sizes of the tides? The drip strip must be at least 3 cm wider than the base . This is due to the fact that the plank should not only cover the base, but also drain water away from the walls of the building and not allow liquid to flow along the foundation plane located under it.
Creating a Tide Angle
When one flashing is placed on top of another at a corner joint, an unsafe corner is created, which can also ruin the appearance of the house. To make a corner you will need one strip of casting. You need to measure the width and mark the center.
From the center we set aside the width of the ebb and make a note. After this, cut out a triangle from the mark to the center and along the center line. You need to make a cut on the bottom edge. On the opposite side of the center line, we cut only the upper bend. We connect the corners of the triangle, getting an even, beautiful angle.
We coat the joints with a sealing agent. For a more aesthetic appearance, you can attach a decorative strip to the joint with self-tapping screws. You can use a falsetto lock, but this may require additional skills.
Making an external view corner
When making the ebb from plastic, the cutting of the corner elements is simplified. To do this, the lower and upper parts must be cut out, an additional type of element must be built on the area being placed, and then all connections must be treated with silicone material or sealant.
When using metal elements, the work is done differently.
- First, the shelf of the upper and middle view is cut, in one section up to 90 degrees in angle, and in the other an overlap of about 2 centimeters is made.
- Then the corner parts are connected; to do this, the bar is bent at the cut area, and the overlap must be brought inward. The corner element is fastened using self-tapping screws or rivets.
The most reliable connection is considered to be a seam fastening; for this, 2 centimeters are left on both sides of the corner. To fasten the seam connection, you must use a special tool and also have experience with such work.
You can also connect the corner, leaving a small gap; it is subsequently closed on top with a strip, which is secured along the seam using self-tapping screws.
It is necessary to protect the foundation from water ingress on all sides of the house, taking into account the porch and other decorative elements.
Size
Depending on the width of the plinth, you can select a strip for installing the ebb of a suitable size. They can be quite narrow, only 5 cm wide, or can reach a width of 40 cm. It all depends on the dimensions of the foundation.
In this video you will learn more about how to make ebb tides:
The length of the slats depends on the material. For example, metal castings are usually produced with a length of 2 m. Concrete shelves are cast in lengths of 3.9 and 6 m.
Ready-made base sills are divided into several types depending on the material from which they are made:
- PVC or plastic;
- metal – steel, aluminum, copper;
- clinker (ceramics);
- concrete.
Before making a choice, it is worth studying the properties and advantages of each type of protective shelf for the plinth.
Plastic
Plastic moldings made for foundation plinths are in great demand due to their undeniable advantages. First of all, these are high performance characteristics - resistance to external influences, low cost, service life, variety of sizes and colors. PVC products will look great in combination with vinyl siding.
The disadvantage of this material is that if its integrity is damaged, the product cannot be repaired. And because of its fragility, it is quite easy to damage the surface.
Clinker
Flashings made with clinker tiles are more expensive than their plastic and metal counterparts. This material is usually used in conjunction with finishing the foundation and the entire structure with clinker tiles. It will reliably protect the base from external factors and mechanical damage. But the installation of such a product should be planned even before construction begins, and experienced craftsmen are involved in its installation.
Flashings can be made from various materials
Metal
Metal castings are also popular. They are reliable, strong and durable. But the cost of such a protective element is much higher than that of PVC products. Copper shelves are especially expensive. In addition, they require constant care, so aluminum products are most in demand. This metal is very light and will allow you to easily install the plank on a foundation or ventilated façade.
Metal flashings coated with a polymer coating are much more expensive than unpainted ones, but their appearance and durability are much superior to ordinary strips that are not coated with anything.
Important! When installing metal ebbs, you should avoid cutting the metal, as this can damage the coating and cause corrosion.
Concrete
Concrete sills made for the foundation plinth are the most reliable protection against external factors. Made from special concrete grade M450 mixed with river sand and crushed stone with the addition of plasticizers, they are frost-resistant and waterproof. Concrete protective strips are poured into silicone molds of various sizes and parameters, resulting in smooth, massive products after hardening. These shelves can be made to order to suit your size.
It is necessary to plan the installation of concrete sills at the stage of designing a house, since they are very massive and need to be installed on a wide, stable base of the foundation.