When working with piece building materials, hand tools are used that are designed to perform high-quality work operations. The spatula is one of the most important devices to ensure an even layer of glue.
Choosing a working tool is an important and responsible task. The quality of masonry and processing of materials, the speed of work, and the absence of errors depend on the correct selection of equipment. A spatula for aerated concrete is one of the most popular tools, since it is it that determines the thickness of the adhesive layer, which determines the quality and size of the seam. Since this parameter is strictly regulated by current building regulations, the choice of spatula must be treated with maximum attention and care. It is necessary to have sufficiently deep knowledge in the technology of laying aerated concrete, to know the features and parameters of the material.
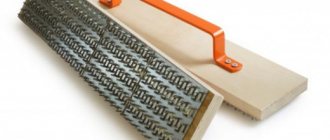
Trowel for aerated concrete tooth size
Advantages of a trowel for aerated concrete
Advantages and disadvantages of a spatula for aerated concrete
A trowel, or spatula for aerated concrete, is a solution dispenser. To maintain the geometry of the rows, it is very important that the thickness of the seams is the same along the entire length. And this is only possible when the solution or glue is applied evenly.
Characteristics and usage features
Spatulas for applying glue to gas blocks from different manufacturers have very different configurations.
The shape of the comb for a gas block is:
- trapezoidal,
- triangular,
- rectangular,
- spherical.
The spreading edge of the aerated concrete spatula has a comb contour, the tooth size varies from 4 to 10 mm. The working part of the tool is made of sheet steel by stamping; the handle is attached to the back wall of the bucket.
What kind of spatula is needed to lay gas blocks
How to make a trowel for aerated concrete with your own hands
The best solution is to make a notched trowel for aerated concrete yourself. If desired, you can copy one of the factory models.
The manufacturing process will look like this:
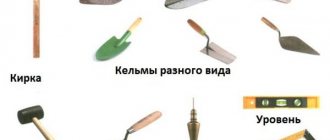
12 types of main and auxiliary tools for laying aerated concrete
Types of basic tools
Mallet with rubber tip
Planer for aerated concrete
When working on aerated concrete, especially cellular concrete, construction industry experts recommend using a manual version of a wall chaser.
Manual electric devices are popular among builders due to their ease of use and mobility.
Pros of hand tools:
- simple design,
- ease of use,
- minimum noise and dust.
Hacksaw for aerated concrete
The table shows the pros and cons of the trowel bucket:
Comb for tile adhesive
Recommendations for using a comb from the most popular manufacturers of adhesive mixtures. Recommendations may differ from generally accepted ones due to the different composition of the adhesive mixture, which affects shrinkage, setting time, mixture density, and viscosity. Carefully study the manufacturers' recommendations, which are indicated on the packaging of the mixture.
Ceresit CM11 Plus
| Tile size, cm. | 5 | 10 | 15 | 25 | 30 |
| Tooth size, mm. | 3 | 4 | 6 | 8 | 10 |
Ceresit CM12
| Tile size, cm. | up to 30 | 60 |
| Tooth size, mm. | 10 | 12 |
Ceresit CM 14 Extra
| Tile size, cm. | 15 | 25 | 30 | 45 |
| Tooth size, mm. | 6 | 8 | 10 | 12 |
VOLMA-Keramik+
| Tile size, cm. | up to 60×60 |
| Tooth size, mm. | 12 |
MOMENT
| Tile size, cm. | 5 | 10 | 20 | 30 |
| Tooth size, mm. | 3 | 4 | 6 | 8 |
KREPS reinforced
| Tile size, cm. | 5 | 10 | 20 | 30 | 40 | 60 |
| Tooth size, mm. | 3 | 4 | 6 | 8 | 10 | 12 |
BEERSMIX ceramics
| Tile size, cm. | 10 | 30 |
| Tooth size, mm. | 3 | 6 |
Trowel for aerated concrete Ytong 250 mm, price
Read more Material?
The material from which the work surface is made.
Stainless steel Handle material Wood Purpose?
Kawabanga! What types of saws are there for gas block?
Trowels are used for batch application and leveling of cement plaster, tile adhesive and other solutions.
For concrete Country of origin Russia Form?
The shape of the trowel depends on the type of work performed. If used for plaster, it must have smooth edges - rectangular
or
trapezoidal
shape, but special ones are used to throw the solution
Flaws
Despite all the advantages of the device, it also has a number of disadvantages.
The main disadvantage is the quality of attachment of the handle to the bucket, especially with inexpensive tools. Regular loads during the application and distribution of the adhesive layer loosen the fastening and lead to premature failure. Because of this, there is a need to re-purchase the tool.
It is worth noting that a similar drawback is present in both plastic and metal trowels.
Breakage can be eliminated or prevented if you use a rivet connection using an additional plate. With its help, you can increase the fixation area and install several rivets that will better hold the handle.
Such an improved masonry device can last a relatively long time. In addition, this saves the employee from purchasing another tool.
What tools do you need to work with aerated concrete?
Tools for working with aerated concrete: notched trowels, metal square, saw, plane and wall chaser.
Main groups of instruments
Return to contents
Hand tools for work
As a rule, hand tools for laying aerated concrete are used at the initial stage. Usually these are tools that are needed to work with mortar, to level and correctly lay the blocks.
Automated cutting complex for cutting aerated concrete.
Return to contents
Mechanical tools for gas block
Electric drill device.
Diagram of the grinder device.
When choosing an electric tool, it is very important to pay attention to the brand and manufacturer. It is better to give preference here to goods that have certain guarantees, which have already been tested by time and sufficient practice.
Return to contents
Accessories
Types of levels: a – metal, b, c – wooden.
When buying a tool for working with aerated concrete or renting it, you should immediately check the serviceability and degree of compliance so that unforeseen situations do not arise during work.
Conclusion
Monolithic reinforced concrete structures are very heavy, so when designing window or door openings, it is advisable to choose aerated concrete products that can be installed easily. They are practical and have good thermal insulation, securely holding the masonry above the opening.
Important points in construction when creating lintels are height and width. With proper calculation and installation, the structure becomes reliable. But, if the distance to cover is very large, then the solution is to use monolithic reinforced concrete beams.
Regular trowel and notched trowel
You can use a regular construction trowel and a notched trowel . Apply glue with a trowel and level it with a spatula. This pair can be used to process both horizontal and vertical surfaces.
The disadvantages of these tools are that it becomes more difficult to regulate the thickness of the glue, and this thickness depends on the inclination of the spatula; the greater the inclination, the thinner the layer. You will always need to hold the spatula at the same angle.
Kawabanga! Diamond grinding cup for concrete
Jumper requirements
The parameters of the jumpers are a matter of the reliability of the entire building and the safety of people. Therefore, the quality and technical characteristics of these elements are strictly regulated by construction standards - GOST, SNiP or SP. Primary requirements:
- strength, high load-bearing capacity. The lintel is a supporting structure for the masonry sections located above it, therefore, it must be able to withstand heavy loads;
- correct size. The lintel in the aerated concrete masonry should not protrude from the plane of the wall or create a ledge inward. In addition, it is important to maintain the depth of support - the width of the lintels should be 30 cm greater than the width of the opening on each side;
- the quality and parameters of the elements should not change during the entire service life of the building.
The material for walls and lintels can be uniform or radically different. The main condition is to ensure compliance with technical requirements and building regulations. Many novice builders believe that the lintel is affected only by a small part of the masonry located between it and the ceiling. This is true, but only partly - the load from the weight of all the upper sections of the building is somehow transferred to all building parts located in the lower tiers. In addition, we must not forget that lintels are installed on load-bearing (external) walls, which automatically increases the requirements for their strength. A frivolous attitude to the parameters of the lintel can cause deformations or even collapse of load-bearing walls.
DIY tool for laying aerated concrete blocks
The following buckets are offered for laying blocks:
Buckets for applying glue. They come in different widths. It is not always convenient for them to work and not as quickly as they would like. Smudges appear along the edges of the blocks and they have to be covered up.
The spatula must be positioned at an angle. This will allow you to apply the glue evenly and without skipping. The process of working with this homemade carriage is shown in the video:
The best option is to make a square from 40x20 mm rectangular pipes. Cut to the required length, screw to the block and weld their connection. To increase the rigidity of the structure, weld the reinforcement diagonally.
In the same hardware store you can buy a nail plate for 150 rubles. and is screwed to a piece of board with a handle made of a block. Another option is to drill holes in the board and screw screws into them (second slide).
Lace fasteners are also an important element for high-quality masonry. You probably guessed that such a simple device can be made from a metal plate and three bolts with a Phillips-head screwdriver. It is fixed to the block with a self-tapping screw.
Kawabanga! How to make a concrete mixer with your own hands; visual instructions and drawings
I hope these tips that I collected for my construction project will be useful to you too. They will allow you to save from 5 thousand rubles without compromising the quality of work. and more. If anyone has used other techniques that simplify the process or allow you to save money, write in the comments.
Photos are taken from open sources, from the Yandex.Images service
Subscribe
to the channel, bookmark it in your browser (Ctrl+D). There is a lot of interesting information ahead.
Wall chaser
Such a wall chaser will be useful for reinforcing rows of aerated concrete blocks. A corner is assembled from two boards and handles are screwed on. At the required distance, 5 self-tapping screws are screwed through; they will serve as a cutter.
The side guide board allows you to make grooves strictly parallel to the wall.
Main groups of instruments
Hand tools for work
As a rule, hand tools for laying aerated concrete are used at the initial stage. Usually these are tools that are needed to work with mortar, to level and correctly lay the blocks.
Automated cutting complex for cutting aerated concrete.
Mechanical tools for gas block
Electric drill device.
Diagram of the grinder device.
When choosing an electric tool, it is very important to pay attention to the brand and manufacturer. It is better to give preference here to goods that have certain guarantees, which have already been tested by time and sufficient practice.
Building level
Simply an irreplaceable tool that no construction site can do without. Construction levels can be mechanical (bubble) or electronic. Different levels differ in accuracy. Often, the more expensive the level, the more accurately it shows. For laying aerated concrete, models of levels in the middle and low price range are quite suitable.
The optimal length of a building level for masonry is 80 cm. But it is not always convenient to use a long level; there are situations, especially inside the house, when a short level (40 cm) would be preferable.
Of the specific manufacturers of building levels, we would recommend Kapro . These levels do not need to be double-checked and calibrated; the accuracy is excellent.
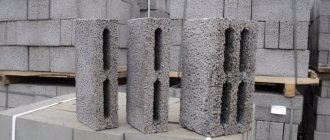
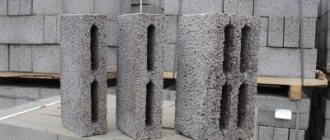
Aerated concrete blocks - advantages
In modern construction, aerated concrete blocks, their use is gaining increasing popularity. It is provided with such advantages as strength, durability, resistance to temperature changes, and moisture.
– Fire resistance – aerated concrete does not support combustion at all. This provides it with such an advantage as fire safety. Walls made of aerated concrete blocks can withstand 10 hours of direct fire exposure and withstand.
– Highly environmentally friendly. Aerated concrete blocks are made only from natural materials, they are non-toxic and do not emit harmful substances. Ensuring safety for people's health.
Features of the material
Aerated concrete is a lightweight building material that can be cut with your own hands.
Aerated concrete is made from a mixture of Portland cement and sand, into which reagents are poured to form foam. Most often, ordinary powdered aluminum, aluminum pastes and powders are used for this. As a result of their reaction with Portland cement, small air bubbles are evenly distributed throughout the structure of the solution.
Depending on the density, aerated concrete blocks are divided into brands:
- D300-D500 – heat-insulating building material.
- D500-D900 – structural and thermal insulation material.
- D1000–D1200 – structural blocks.
The compressive strength of aerated concrete is 1.5 - 3.5 kgf/cm². In a dry state, the thermal conductivity of aerated concrete is 0.12 W/m°C. The density of this material is 400 - 1200 kg/m³.
Enclosing and load-bearing structures built from aerated concrete belong to fire safety classes I and II.
This material is environmentally friendly, since no toxic substances are released from it during operation.
Due to its good performance characteristics, aerated concrete is widely used in low-rise construction.
What mistakes can occur when installing foam concrete walls?
When constructing walls made of aerated concrete, mistakes can be made such as:
- Carrying out masonry work in wet weather, as well as at negative temperatures. High humidity and low air temperature contribute to the destruction of masonry, making it of poor quality.
- Incorrect filling of joints and application of mixture. If the seams are not completely filled, this can lead to a loss of masonry strength, as well as an increase in heat loss.
- Poor setting of elements due to poorly carried out preparatory work. If construction debris is not removed from the surfaces of the foam blocks or the foundation is not cleaned of dust and dirt, or impregnated with a primer to increase adhesion forces, then the material will not have strong adhesion, cracks may occur and, as a result, the masonry will collapse in a short time.
- Incorrect laying of foam blocks on the first tier. In this case, there is a possibility of overusing the adhesive solution when constructing subsequent rows so that the structure does not move vertically.
- Insufficient displacement of foam blocks relative to the previous tier. The minimum shift of masonry elements should be ¼ of the length of one product. The most suitable should be to offset the products by half the size of the brick.
- Shifting masonry elements along the line 20 minutes after laying. It is recommended to make all amendments no later than 15 minutes after laying, until the adhesive composition has set.
- Unreinforced masonry. If the wall is not reinforced, its strength decreases and the structure is easy to destroy.
When laying foam blocks, it is advisable to check the evenness of the lines on each tier. Reinforcement of walls, window and door openings must be carried out due to future shrinkage of the building foundation, so that the load-bearing walls do not crack in the near future.
The most common mistake is covering foam block walls with impermeable materials without leaving air gaps. A house made of U-shaped blocks has one important requirement: cellular concrete must “breathe”, so it is advisable to use a ventilated curtain cladding system to finish the façade of the building.
When erecting walls made of aerated concrete, it is necessary to remember that shrinkage of the structure occurs within six months, so it is undesirable to plaster the walls and proceed to finishing before this period has expired. In this case, it is recommended to first carry out the interior finishing to prevent the accumulation of moisture in the pores of the concrete, and then the façade.
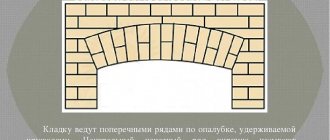
Metal jumper
One of the simplest and most popular ways to make a lintel is to use a support from a steel angle. This option is borrowed from brickwork technology, where metal lintels are quite common. They are used for small buildings or service structures where installing standard concrete blocks is impractical.
Metal lintels belong to the group of prefabricated parts. They are not installed ready-made, but are done in stages. At the same time, the assembly process does not take as much time as when using U-blocks, which makes this option more popular. Installation takes a little more time than installing a finished jumper. Considering that the length of standard elements is not always suitable for installation in a given location, and prefabricated elements are made individually for each opening, the advantages of metal lintels are quite convincing. In addition, you can continue work immediately after installing the jumper, which becomes a decisive factor when choosing the optimal option.
However, there are also disadvantages. The first is metal corrosion. The corner (or reinforcing bars) must be protected from contact with moisture using polymer coatings. The second drawback is the high thermal conductivity of the metal, which does not combine well with the low performance of aerated concrete. A cold bridge appears above the opening, which creates the danger of the gas blocks under the ceiling getting wet. To protect against this, use ventilation to remove moist air from the opening.
Instructions for use
Device for laying blocks
The procedure is elementary. To work you need an adhesive solution, the consistency is normal. The adhesive spreader is placed at the end of the wall row and work begins.
Step No. 1 - loading the device with adhesive solution
Using a spatula, glue is loaded inside the box. There is no need to put a lot of solution - it will be difficult to work with.
Step No. 2 - forming an adhesive layer
Pull the device away from the comb. If the glue spreader gets stuck, then you need to move it back and forth a little, and it will go easier.
Apply glue to the end of the block
Don’t forget about treating the end of the previous block in the row with glue. Apply glue.
Forming the layer thickness
Excess should be removed with a notched spatula.
Step No. 3 - install the block
Place a block along the cord
We install gas silicate locally. Align with the cord. The block installation cycle is completed.
Step #4 – repeat the cycle
We follow the cycle algorithm shown in the steps in the photo below.
Installing a gas silicate block
If necessary, we knock
Step No. 5 – quality control of installation, elimination of defects
After laying several blocks (3-4), until the glue has set, we check the quality of installation.
Using a bubble level, we check the level of the laid out blocks in two planes.
We hit the block with a mallet
If necessary, we eliminate defects. We use a mallet.
The main points of the technology of laying foam blocks during the construction of walls
In order to lay out a foam block house, and at the same time the quality of the walls made of foam blocks is high, you need to know the sequence and rules for laying foam concrete.
- Before laying foam blocks, it is necessary to prepare the concrete surfaces. Namely: to clear the concrete of dirt and dust it. If defective areas (for example, cracks) are found on the material, they must be repaired.
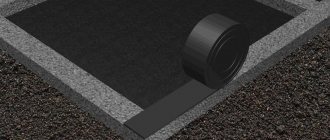
- Laying foam blocks with your own hands in the first row involves making a waterproofing layer using a specialized material. This can be a liquid insulating agent or a rolled material (roofing material, waterproofing material). The waterproofing layer will prevent the growth of fungal bacteria on the material.
- After preparing the base, they proceed to preparing the blocks themselves. Block surfaces are cleaned of dirt or snow. For minor chips, the material is also processed, removing sharp edges and chamfers.
- The first row of masonry under any circumstances is carried out using cement mortar. Therefore, we next begin to apply a solution consisting of sand and cement. The solution, as noted above, is prepared taking into account the proportional ratio between bulk materials - 1 to 3. The layer thickness should be approximately 2 cm.
- The very first to be laid is the so-called cornerstone, or block at the corner. Then the masonry continues along the entire perimeter of the building. The laying is carried out in two rows, while ensuring the uniform distribution of the adhesive or cement composition over the block surface. Layer thickness - no more than 30 mm. Glue is purchased in 25 kg bags. The adhesive is prepared shortly before laying the block material.
- After laying the foam blocks with your own hands in the first row of the wall, check the evenness using a level ruler. If distortions are detected, they are eliminated using any grinding device.
- The blocks in the second row are laid using a lightweight mortar.