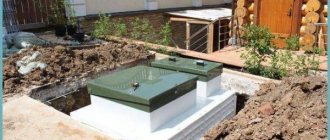
For the construction of buildings, various types of foundations are used, the choice of which depends on the characteristics of the soil. On problematic soils, pile foundations made in the form of reinforced concrete pillars have proven themselves to be successful. The use of drilling rigs increases the estimated cost of construction. A self-made tool – TISE drill – will allow you to reduce the cost of constructing a columnar foundation. Let's consider the design of the tool, as well as the technology of self-production.
Hand drill TISE F200
How the TISE foundation drill works
The TISE drill, which facilitates the work, consists of the following elements:
- a working handle designed to transmit torque through a metal rod to the working element. Structurally, the handle is a steel pipe of square, rectangular cross-section, or a solid metal profile. Rubberized handles are installed on two opposite sides of the rotation mechanism at a distance of 50–55 cm;
- steel rod consisting of two sections. The sliding parts, each 1.1 m long, are locked using a clamp. The base part of the rod provides the ability to accelerate work at shallow depths due to the reduced weight of the device. If it is necessary to extract soil at a depth of up to 1.8 m, an extension element is used. The components of the rod are interchangeable; a hand handle can be attached to each of them;
- soil accumulator with a radius of 12.5 cm, forming a well of the appropriate size. The soil receiver is made in the form of a metal cylinder equipped with loosening cutters, special plates and a guide rod. The design features of the soil storage tank ensure free penetration of loosened soil inside the cylinder and do not allow the auger mechanism to deviate from the vertical position;
- folding knife, hinged at the bottom of the tool. The device is designed to form a spherical expansion in the lower part of the well, increasing the area of the supporting surface of the future column to a diameter of 0.5–0.6 m. When immersed in the ground, the folding blade rotates due to its own mass. The hinged cutting edge is lifted manually using a metal cable, the end of which is fixed to the working handle.
How does the TISE foundation drill work?
The speed of drilling operations and the ease of use of the TISE hand drill depend on the weight of the device and the quality of manufacture.
Components
The TISE drill consists of:
- sliding rod with handle;
- two cutting planes;
- soil intake;
- additional metal strip;
- vertical “cutters” for loosening the soil.
To make a TISE drill with your own hands, you will need:
- metal rod with handle. If the wells are planned to be made deeper, a sliding structure with a lock is required;
- two halves of a circular saw;
- part of a metal pipe to create a soil receiver - its diameter will be equal to the diameter of the well;
- metal plate;
- three metal loops and a rod that will control the additional part of the drill - the plate.
- welding machine.
TISE drill for piles - advantages and disadvantages of the equipment
The TISE foundation drill, which facilitates the formation of cavities in the soil for pile supports, is widely used in private construction. The tool has a number of advantages:
- reliable and proven design. A high-quality TISE hand drill can be used for a long time without needing repair;
- ease of use. To perform operations for forming wells and extracting soil, you do not need to undergo training;
- environmental friendliness. When operating the tool, there is no negative impact on construction personnel, and the structure of the excavated soil is preserved;
- versatility. A foundation drill can be used to form cavities for various purposes, and can also be used in both summer and winter.
The design features of the tool make it possible to use it for preparing supports for piles on soils of varying complexity.
The use of a homemade TISE drill allows:
- build a pile foundation for a private house in a limited time with minimal labor intensity;
- build reinforced concrete supports with increased load capacity;
- eliminate the need to use heavy drilling equipment on a vehicle;
- carry out measures to extract soil under the foundation columns on your own;
- significantly reduce the amount of costs associated with the implementation of measures to form cavities.
Why do you need a drill for the TISE foundation?
The homemade TISE drill does not require connection to the electrical network or water supply lines, which ensures the possibility of its autonomous use. Among the disadvantages, it should be noted the need to periodically renew the sharpness of the cutting edge on the working cylinder. Thanks to its many advantages, the homemade TISE drill has become widespread in individual construction.
What it is?
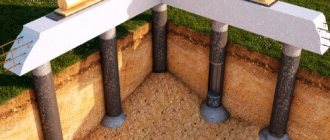
Laying a pile-tape foundation is a new technology that appeared in the late 90s of the last century and today is widely used throughout the world. The difference from a traditional foundation lies in the design of such a foundation - a reinforced concrete grillage is erected on bored pillars with an expanded heel.
Load bearing capacity
The load-bearing capacity of the foundation is related to the diameter of the base of the piles, the resistance and composition of the soil:
| Soil type | Soil resistance, kg/m2 | Load-bearing capacity of the load-bearing structure depending on the diameter of the heel, t | |
| 50 cm | 60 cm | ||
| clay, coarse sand | 6 | 12 | 17 |
| loam, sandy loam | 3 | 6 | 8 |
| dusty sand | 2 | 4 | 5,5 |
| medium sand | 5 | 10 | 14 |
In practice, the load-bearing capacity of the TISE foundation can be 2 times higher due to the fact that cement laitance penetrates into the soil and hardens there, forming a layer of soil concrete 5–7 cm thick.
How is a pile foundation made?
Design begins with the collection of initial data obtained as a result of geological surveys of the soil. Then the foundation is calculated - the parameters of the structural elements are determined, including the pitch between the supports, and the need for building materials is calculated.
Field work begins with marking the pile field in the traditional way. Afterwards, wells are drilled to the designed depth. The widening is done one by one: first, a recess of Ø500 mm is formed, then the blades are straightened to the final position and the widening is brought to the maximum value.
A reinforced frame is inserted into the finished fresh material, after which the structure is filled with concrete mortar. After hardening, the supports proceed to the construction of a reinforced concrete grillage in the form of a monolithic strip in the traditional way. In this case, a gap of 30–45 cm should remain between the lower plane of the grillage and the ground surface.
Work on the installation of the TISE foundation can be carried out with your own hands without the use of special equipment, which leads to additional savings.
Turnkey bookmark price
In the absence of construction skills and understanding of technology, it is advisable for the owner to turn to professionals. Average market prices for services are shown in the table:
| Parameters of the load-bearing structure with grillage parameters: width 40 cm, height 60 cm | Cost of one pile, rub. | Price, rub./m linear | The cost of a foundation with an area of 6x6 m | ||
| Ø support, mm | Heel Ø, mm | Depth, m | |||
| 250 | 600 | 1,5 | 3–4 thousand | 4–5.5 thousand | 150–200 thousand |
| 200 | 500 | 1,5 | 2.8–3.5 thousand | 4–5.5 thousand | 120–170 thousand |
Scope of application and service life
TISE piles are widely used in construction because they are universal load-bearing structures.
The technology is especially effective in such situations:
- during the construction of concrete and brick fences;
- for low-rise construction made of heavy materials;
- during the construction of two- and three-story residential buildings made of timber, foam concrete and frame panels;
- during the construction of baths and other heavy structures.
TISE piles can be built on almost any soil, except for rocks, namely in clay and sandy soil, sandy loam, loess and loam. The listed soil types account for 90% of the total area of Russian regions, which determines the popularity of this technology.
Due to the design features, the piles do not transmit vibrations and dynamic loads that occur near highways and railways to the structure they support.
What kind of soil receivers are included with the foundation drill?
The construction of buildings on columnar foundations is carried out both on heavy soils containing mineral inclusions and on light soils with a high concentration of sand fraction. To ensure the possibility of drilling channels for piles on various soils, the tool is equipped with various types of soil receivers. There are certain differences in the design of the soil accumulator:
- To perform work in clay soil and soils with an increased content of small stones, the working tool is equipped with four soil-collecting elements located vertically at the same distance from each other. Small rocky inclusions up to 50 mm in size penetrate into the gap between the fangs along with the soil. When drilling soils with a high content of clay particles, clay adhesion is eliminated;
- for forming wells in loose soils, the working head is equipped with two cutting elements with a serrated edge. The design and location of the horizontal cutters prevent spillage of soil when removed from the cavity of the drilling device. The sawtooth-type working edge ensures the selection of small rocky fractions and effectively loosens the soil.
TISE auger foundation manual universal set
Manufacturers of hand tools, in accordance with the wishes of the customer, can equip the TISE auger with a soil intake of the required design.
Step by step guide
Since the technology is primarily intended for a wide range of developers who want to independently perform this operation, attention should be paid to the order of work and the requirements for each stage. The main difference from the usual method of installing a foundation is the configuration that the TISE pile has. While focusing on the method of obtaining the desired shape, we should not forget about general construction requirements
The order of operations is as follows:
While focusing on the method of obtaining the desired shape, one should not forget about general construction requirements. The order of operations is as follows:
- Soil analysis.
- Marking the territory.
- Installation of beacons horizontally above each pile location point.
- Drilling a well to the required depth.
- Expansion of the hole in the base.
- Removal of soil and control of the completed operation.
- Installation of fittings.
- Filling the hole for the pile with concrete.
- Making the foundation, grillage.
The technology allows you to install piles on any landscape. The construction of a conventional foundation always involves serious excavation work. Leveling the site, removing vegetation. It is not necessary to do this when using TISE technology
When drilling, it is important to maintain a vertical direction. To control the position, you can use a regular plumb line. The smaller the deviation, the more reliable the pile will be
The blade, which carries out the expansion, is brought into its working position using a cord (cable). The auger mechanism of the soil lifter must be periodically cleaned by lifting the device. The container fills quickly. The rock unloading time is calculated empirically. When the lift is full, the drill does not work. The work will be done in vain
The smaller the deviation, the more reliable the pile will be. The blade, which carries out the expansion, is brought into its working position using a cord (cable). The auger mechanism of the soil lifter must be periodically cleaned by lifting the device. The container fills quickly. The rock unloading time is calculated empirically. When the lift is full, the drill does not work. The work will be done in vain.
Working with a drillSource stroimmaster.ru
Features of filling wells with concrete
The structures must be strengthened. The fittings are prepared in advance. The length is calculated in such a way that it is possible to make a high-quality connection with the grillage. In some cases, it is reasonable to produce metal rods with a reserve. This will make it easier to make horizontal level marks, after which the excess is cut off with a grinder. It is not recommended to use cement grades below 400. The proportions of sand and crushed stone are standard, used when mixing mortar for power structures. 1 part cement to 3-4 parts filling.
Making the foundation
Next, they begin to form the binding around the perimeter. There are two options based on the principle of the device.
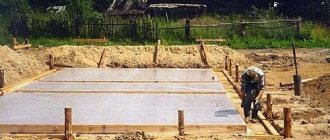
- Strip foundation - made of ready-made slabs, poured concrete supported on the ground. To do this, a trench is made along the perimeter. A cushion of crushed stone and sand is prepared. Then the formwork is installed into which the concrete mixture is poured.
- The second option is to install an independent load-bearing system mounted on piles. This support structure is called a grillage. With correct calculation and high-quality execution, the load on the piles is distributed evenly. The structure is mounted on a framework along a grillage and has weight restrictions. An excellent option for frame houses and buildings made of SIP panels.
TISE pile-strip foundationSource stone-dream.ru
TISE hand drill - performance characteristics
Industrially produced manual drilling devices and home-made tools have common characteristics and differ only in the design of the soil receiver.
Operating parameters of the device:
- maximum soil healing depth – 0.18 m;
- the size of the working body in diameter is 0.25 m;
- working handle length – 0.55 m;
- folded length – 0.125 m;
- size when extended – 0.225 m;
- diameter of the formed expansion – 0.4–0.6 m;
- weight of the tool assembled with the storage device is 10–12 kg.
The characteristics of the hand tool make it possible to effectively use it on light and clay soils, as well as soils with a high concentration of mineral impurities.
Well drilling technology
It always takes a lot of time to pour the solution, because only one column with an expansion of 60 cm will use about 30 kg of cement, and the solution must be moderately liquid and dense. When expanding the well, the controls should remain in one place, and only the plow with guides should rotate.
How to reinforce a load-bearing structure
First you need to decide on the required length of steel reinforcement and only then start bending it. As a rule, a 15 cm margin is always provided. This reserve goes towards the bending radius and the grillage gap. If we take 1.5 m as the standard pole length, then for reinforcement you need to use two rods of 3.7 meters each.
Then you need to waterproof the formwork. For such purposes, cheap construction roofing felt is suitable. It needs to be cut into pieces, fastened into a jacket and only then lowered into a drilled hole. Concreting occurs as quickly as possible; several recesses can be poured simultaneously. Considering that a lot of concrete will be used, it is better to immediately provide a concrete mixer.
How to make a TISE drill with your own hands
To independently manufacture hand tools intended for drilling cavities, you must perform the following work:
- decide on the type of soil receiver;
- develop drawings or sketches;
- prepare the necessary tools and materials.
Do-it-yourself TISE drill
Having completed the preparatory activities, you can begin manufacturing the device. Let us dwell on these points in detail.
TISE drill drawings
When planning to make a TISE drill with your own hands, drawings must be prepared in advance.
The following options are possible:
- acquisition of ready-made drawings or sketches, according to which the drilling device has already been manufactured;
- independent sketching from a full-scale sample, the performance of which was tested during the formation of wells.
You can also use standard drawings with your own dimensions on them. When choosing this option, remember that increasing the diameter of the working part will cause a significant increase in the forces on the handle.
Drill device
What is needed to make a TISE drill
To perform the work yourself, you will need the following equipment and tools::
- electric welding machine;
- drill with drills;
- grinder with a circle for metal;
- brush for painting.
How to make a foundation drill with your own hands
For manufacturing you need to prepare the following materials :
- a piece of steel pipe with a diameter of 25–30 cm, corresponding to the size of the pile;
- used or new blade from a circular saw;
- pipe or metal profile for making a handle;
- pieces of metal 2–3 mm thick;
- profile pipe 4x4 cm or pipe with a diameter of 3.2 cm;
- paint for anti-corrosion protection of metal surfaces.
The design allows the use of materials of other assortments, selected according to the requirements of the drawings.
Homemade TISE drill - assembly technology
After preparing the materials and tools, start making the TISE drill.
Global modernization of the TISE drill
When performing work, follow the sequence of operations:
- Cut the workpieces, the dimensions of which correspond to the requirements of the drawing.
- Make working edges using a cut saw blade.
- Assemble the rod with the locking clamp.
- Weld the cutting edges at the bottom of the rod at an angle of 15–20 degrees.
- Assemble the soil accumulator by fixing the tubular workpiece above the knives.
- Fix the vertical knives on the outer part of the soil receiver by welding.
- Tie the hinge mechanism hinges over the soil pick-up cylinder.
- Hinge the working blades with the loops and attach the steel cable.
- Weld a cross member to the top of the extension to act as a handle.
- Make sure that the extension rod and hinge mechanism move freely.
- Check the quality of welded joints, clean them and remove burrs.
- Remove rust and coat the metal surface with an anti-corrosion compound.
After assembly is completed, the functionality of the tool must be checked. Properly installed cutting edges should effectively fill the soil container with soil.
Drill assembly diagram
Procedure
- The tip can be made from a drill with a diameter of 10 mm or more so that the drill goes smoothly, because the pile requires vertical accuracy. The drill does a good job of this task. A circular saw blade, which is sawn in half and welded to the pipe, is suitable as cutters for collecting earth.
- The length of the pipe must be selected based on the depth of the future pile. For private construction, a three-meter pipe with an outer diameter of 32 mm and a wall thickness of 2.5 mm is quite suitable.
- It is recommended to make the inclination angle of the incisors approximately 30 degrees, no more, because otherwise it will not work well.
- It is better to make the handle removable, since the drill will go deeper in the process. For the handle, a pipe with a smaller diameter than the main one, for example, 25 mm, is suitable. It is inserted into the main pipe. Holes are drilled. Bolted connection. A cross member is welded to the handle. With its help, the entire structure rotates. It is recommended to weld additional holders. They will make rotation easier, reduce discomfort and fatigue from work.
- A pre-prepared extension adapter is inserted into the connecting part as necessary. The butt part of a pipe of smaller diameter is welded to the main one, the connection is also bolted.
- The plow is the structural element of the TISE drill that allows you to make an expansion where the base of the pile will be, the so-called heel. Concrete with a compressive strength class of 25 MPa works with a huge margin.
- The heel is needed to increase the area of support on the ground. The plow is secured with a rope or thin steel cable. Until the expansion depth is reached, the plow is kept parallel to the pipe.
- When the required depth has been reached and it is time to make the heel, the plow is lowered with the help of a rope and begins to widen the hole. The plow can be made from scrap materials. Corners are welded to the sheet of metal. A short tube is welded to the main pipe.
- A sheet of metal with corners is attached to the tube with bolts, which ensures the mobility of the plow structure. The length of the plow is selected taking into account the desired diameter of the pile heel.
The advantage of making a TISE drill with your own hands is that you can equip your construction tool with various parts.
Their choice depends on the nature of the soil at the construction site. For heavy soils, including rocky ones, sharp edges of cutting parts are not needed. It is much more important with what slope they are installed, as this affects the amount of soil captured
It is worth paying attention to the fangs, which can loosen heavy soil. The presence of stones up to 5 cm in the ground implies an increase in the distance between the cutting edges
This is necessary so that small stones can easily fall into the soil collector. This design is also suitable for clay soils. When constructing an object on loose soil, it makes sense to equip the TISE drill with additional loosening elements. Vertically positioned fangs will cope with this task perfectly. The sharp edges of the drill in this case are located at a smaller angle to the horizontal plane and close enough to allow soil to be collected. It is this design that prevents the collected soil from spilling back into the well.
Making a TISE drill with your own hands is not difficult. If you understand the principle of its operation, the production itself can take several hours. It is also quite simple to use. Before the actual use of the drill, the locations of future wells are marked on the site. It is necessary to remove the top layer of soil and get to the ground. We install the TISE drill vertically, focusing on the soil receiver. Rotate the drill clockwise. The soil that will accumulate as the drill moves deeper must be removed from time to time. To do this, the drill is removed from the well.
The drilling depth must be constantly monitored using a tape measure. At the depth that has been previously determined as the flare or heel level, it is time to use the plow. The well will receive expansion at depth, which will further ensure the strength of the pile and the entire structure as a whole. At this stage, you should be extremely careful and remove the tool from the well only with the plow assembled. Otherwise, the walls of the well can be destroyed.
Making a TISE drill from a garden drill
Another video about a homemade mechanism:
How does a foundation drill work?
The drilling technology is quite simple and does not require special training.
When performing activities to form wells, perform work according to the following algorithm:
- Mark the pile field and remove the turf in the drilling areas.
- Assemble a TISE hand drill and equip it with the necessary storage device.
- Dig small pits 15–20 cm deep in the drilling area.
- Place the tool at the drilling point, ensuring its vertical position.
- Rotate the homemade TISE drill, applying force to the handle in a clockwise direction.
- Monitor the filling of the soil receptacle and periodically remove soil from it.
- Extend the length of the rod if necessary and clamp its components with a clamp.
- Continue plunging into the soil and form a depression at the bottom of the cavity.
- Pull the cord, lift the paddle and remove the tool from the hole.
Drilling wells for TISE piles
When working on light soils, one pit can be formed in half an hour. The duration of drilling on heavy soils is 2–2.5 times longer.
How to use
To create a well, you should install the drill in the intended location and begin to rotate the rod by acting on the handle. After filling the outlet pipe with soil and stones, the drilling device is removed and cleaned. In the video you can see the drilling process.
Upon reaching the required depth, to increase the support area of the future pile, the device should be tilted in a circle from side to side, without stopping rotation. The reinforcement is installed into the resulting recess and from it, along the perimeter of the recess from the outside, roofing material is laid. The resulting “glass” is filled with concrete mortar.
TISE drill - reviews and practical recommendations
Private developers and professionals who have used the TISE industrial and homemade drill in their work speak positively about this tool and note the following qualities of the device::
- Ease of use;
- compactness;
- durability.
Experts recommend adhering to the following recommendations when using the device:
- do not apply increased force in the handle, since the tool easily sinks into the soil under its own weight;
- avoid lateral loads, which could result in significant deformation of the assembly rod;
- control the verticality of a homemade TISE drill when immersed in the ground.
The tool will make the job easier and will not cause problems if used correctly.
Where can I use it?
There are no restrictions on the types and materials of buildings: you can make a TISE foundation for wooden, frame, brick and block buildings. Number of storeys - up to three.
The restrictions on soils are the same as when using pile foundations: it is necessary that the piles transfer the load to the soil with normal bearing capacity. To decide whether it is possible or not to use TISE, a geological study of the site in the place where construction is planned is necessary.
What does a TISE pile consist of?
Since the base of the pile is expanded and the resistance to buoyancy forces is greater, this technology can be used on heaving soils. But at the same time you need to consider: there is no point in placing piles closer than 1.5 meters. If placed closer, one extension of the sole will overlap the other. On the other hand, you can’t make a pile larger than 30 cm in diameter either - there is no such drill. If the load-bearing area with such parameters is not enough, you need to use a different type of foundation.