Unlike other zero-cycle technologies, work can be carried out at any time of the year, with the exception of particularly cold periods, which allows optimization of construction planning.
What are the different methods for installing piles?
There are only two ways to install screw piles: mechanical and manual.
In the case of using the mechanical method, special equipment is used to install piles: a tractor, crane or loader that has equipment for drilling. The mechanical method is used for large volumes of work and when it is necessary to install screw piles with a diameter of more than 89 mm.
The use of a manual installation method allows you to carry out installation work on piles without the use of special equipment, but this method is applicable for piles with a diameter of less than 89 mm and requires special skills and experience. Thanks to the possibility of self-construction of the foundation without the use of special equipment, the pile-screw foundation has gained its popularity.
Video description
Look at the video to see how simple mechanisms are used to independently install piles under a permanent building.
The use of mechanisms will greatly simplify the work. For example, it is convenient to create holes for racks using a garden drill. Portable installations are available for screwing piles. The equipment is expensive, it is easier to rent it if there is not much work to do. It will be useful for builders and will make their work easier.
Using a laser level greatly simplifies the work of leveling piles in a vertical position and in a horizontal plane.
Experts advise taking racks without a head and tightening them until they stop. Then cut it level using an autogen, put it on top and weld it.
Constant control of the correct vertical position ensures that the pile is positioned correctly and that lateral loads are kept to a minimum Source arenda-yamobura.com
Stages of work during the construction of a pile-screw foundation
- Preparatory work. Marking the site, checking the parallelism of the lines and compliance with right angles.
- Immersion of corner shafts.
- Installation of intermediate supports.
- Trimming trunks. The surface of the supports should form a flat horizontal plane.
- Concreting the internal cavities of piles to enhance strength.
- Installation of heads. They are installed on the upper end, welded and serve as attachment points for the grillage. All areas located near the weld or areas with damaged protective coating are immediately touched up.
Rules for installing a screw foundation
- The main rule is that the piles must be screwed vertically with a minimum deviation from the axis of no more than 1-2 degrees.
- It is not recommended to screw in screw piles where a hole was dug under the foundation.
- After installing screw piles, it is recommended to fill them with concrete. If a given foundation must support a structure of large weight, then to strengthen such a foundation, pouring concrete into the screw piles would greatly strengthen the structure. Pouring screw piles with concrete can prevent their premature destruction from water penetrating into the piles (due to corrosion) and freezing during periods of low temperatures.
- Screw piles are not installed on rocky soil and it is highly not recommended to install such piles on biogenic soils - peat bogs, or loose subsidence soils.
Video description
This video shows the installation of piles by two people on a site with height differences and other obstacles.
Fences made of wood, metal profiles and other solid materials are subject to lateral - wind - loads. It should be taken into account when choosing a model and determining the depth - how to properly screw in screw piles so that they do not turn out. The supports are strengthened by: filling hollow pipes with soil and mortar, screwing them in to a depth of 40 cm below the freezing level of the ground, installing them in holes up to 40-50 cm deep, followed by filling the remaining space with cement mortar. Strengthening massive fences is done by covering the posts with bricks.
Marking the perimeter for the fence
The site plan will allow you to accurately calculate the number of fence posts. Slopes will have to be dealt with on site. The marking begins as standard, with corner posts. Then the cord is pulled if distance allows. The piles are screwed at a distance of up to 3.5 m from each other. Usually the entire length along the side of the fence is divided into equal parts, or one narrow strip between the posts is made near the corner post.
Marking with pegs using a cord, starting from the corners Source yandex.net
On the side where the gate and gate are located, the distance under the piles is measured from the outer posts in both directions. The last spans have a smaller pitch.
Large spaces between the posts and a lightweight design allow for slight movement along the perimeter axis up to 5% of the diameter of the post. The main dimension for marking is the distance between the centers of the supports. During the construction of the base of the fence, the top line will change, repeating the topography of the soil.
Installation of piles
Less effort is required to install the support; you can think about how to tighten the screw piles with your own hands. The work is doable, but requires more time and additional equipment:
- Make a detachable pipe clamp according to the diameter of the pile rod. It should bolt together quickly and allow the rod to slide inside. Weld a tripod with adjustable legs from pipes under the clamp.
- Mark the location of the corner posts. Then everyone else.
- Prepare screw piles and mark them before hand-screwing them yourself. It is necessary to take into account not only the slope of the hills, but also how exactly the fence will go, with a uniform slope, the same height of the posts above the ground, or in steps, over several spans.
The site is cleared of foreign objects and plants. A hole is dug under each pile Source yandex.net
- If the terrain is hilly, use a shovel to prepare platforms for each post, approximately 400 mm in size. They must lie in a horizontal plane.
- It is difficult for one person to position the pile and keep it vertical. Therefore, a manual or mechanical drill should be used. At each site, make small holes with a depth of 50-80 cm, depending on the height of the fence.
- Before installing screw piles with your own hands, in dense and hard soils, fill the holes with water, carefully so that the walls do not collapse.
- The pile is lowered into the pit and additionally secured from above with a clamp. Using a tripod, the axis of the stand is set vertically.
- Before screwing in by hand, screw piles must be screwed in as deeply as possible, pressing from above. From a stepladder or other device, using a crowbar, turn the screw, driving it deeper into the ground. This will allow you to firmly fix the vertical position of the rack.
- Make a lever from a crowbar and a pipe and screw in the screw yourself, clockwise.
Do you need waterproofing and thermal insulation for a screw pile foundation?
Thermal insulation of screw piles
If you are building a building without communications in the basement and the building is not intended for living in the winter, then you do not really need thermal insulation of the foundation.
When we are talking about building a permanent residence or you plan to use the house also in the cold season, then you absolutely need to insulate the basement in order to prevent freezing of the water supply lines. Insulating the basement of a house on screw piles will make your house much warmer and the floors in the house will be warmer. Decorative covering of the screw piles of the foundation makes the design of the house more complete. There can be many ways to insulate the basement. As one example of such insulation, you can use extruded polystyrene foam 50 mm + mineral wool 50 mm + 9mm flat slate.
Thermal insulation of a screw foundation
Waterproofing of pile-screw foundation
In itself, such a foundation ensures the insulation of the house from contact with moisture in the ground, but when using a frame made of timber, it must be treated with an antiseptic in dry weather, and when installing a concrete frame, install a layer of waterproofing on top of it.
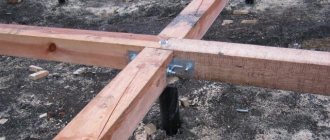
Tying a screw foundation with a wooden beam
Before installation, the piles must be treated with a water-repellent compound that will not be destroyed when the pile is screwed into the ground - this will help to significantly increase the service life of such a foundation. Concreting screw piles is the same method of increasing waterproofing, as it prevents moisture from getting inside the piles. For additional protection of screw piles, the hot or cold galvanizing method is used, or the installation of heat-shrinkable sleeves is used.
How to make a false base
The false base is designed to protect the space of the pile field under the house from the penetration of animals or birds, snow sweeping in winter, from wind and moisture. To create such a base, various materials are used.
The most budget-friendly and aesthetically attractive option is a strip of corrugated board along the outer perimeter. It is attached at the top to a special wooden board installed around the perimeter of the grillage.
The lower part is attached to a wooden beam laid on stands made of brick, cinder block, etc. to cut off contact with the ground .
A concrete ebb should be installed along the lower edge, and an ebb should be installed along the upper edge to drain rainwater.
What size beam should I choose for strapping?
Beams are not always used to tie a pile-screw foundation. In some cases, a metal profile of various sections (I-beam, channel) is used to frame the foundation, which will require welding, but the structure is quite strong.
The standard size of timber used for grillage installation is 200×150 mm. The choice of wooden beam for tying a screw foundation depends on the size and weight of the structure that is being built on this foundation. For example, for a house with 2-3 floors, it is better to take a beam of at least 200x200 mm.
When using timber with a cross-sectional size of 200×150 mm, it is installed on the pile heads with a side equal to 150 mm. That is, the height of the strapping beam will be 200 mm.
Serious disadvantages of a pile-screw foundation
1. The scope of application of a screw foundation is one or two-story structures of low weight, i.e. houses made of timber or frame. Screw foundations are not used for the construction of brick and aerated concrete houses.
2. The short service life of a screw foundation is associated primarily with the corrosion factor of metal structures.
3. Cannot be used in areas with wet soils (swampy, peaty), since in this case the influence of such a main negative factor as mail humidity directly shortens the period of possible operation of the screw foundation.
4. If you decide to make a basement for a house with screw piles, then you will have difficulties.
5. It is impossible to install this type of foundation on rocky soil or if there are hard limestone layers in the soil.
6. If there is a railway nearby, then the vibrations on the house pass through such a foundation very well.
7. You may encounter problems when installing a stove in your home. This must be immediately provided for and the foundation in this place strengthened.
Creating a grillage
Welding special platforms and clamps to the piles for the subsequent grillage, the next element of the overall foundation structure. This makes it possible to create a solid foundation under the floor. It can be covered with siding and insulated.
There are three types of grillage.
- Concrete.
- Wood.
- Metal.
In the first case, it is created by installing wooden formwork, which will encircle all the piles, reinforcement with metal reinforcement, and pouring concrete. Mainly used for the construction of industrial and heavy structures. The basement floor, lined with siding, is not suitable for such a structure. In addition, the construction cost will increase several times.
In the second case, the grillage is made of wooden blocks, the so-called logs. This structure is not as strong as concrete, but it is well suited for the basement of a wooden or frame house, since it will be easy to apply siding to it. It is better to immediately include in the estimate such materials as siding and insulation with timber for the sheathing. This is the most common method for any private construction.
The third option involves creating a powerful structure for a heavy house. In this case, it is possible to build a basement floor, but to finish it with siding and insulation, additional materials will be needed, from which an external structure will be created, onto which the sheathing for the siding will be attached.
The most optimal way is to create a grillage made of wood. The material can be easily attached to the material with siding and insulation, having previously made the sheathing.
Serious advantages of a pile-screw foundation
1. Possibility of building a foundation without the use of special equipment. If you don’t need special equipment, then you don’t need to pay for its operating time.
2. Low cost of installing such a foundation. Low material consumption provides great cost savings.
3. High speed of installation of a pile-screw foundation. Such a foundation can be made in 1-2 days.
4. The possibility of erecting a pile-screw foundation in any weather, if concrete lining is not made.
5. There is no need to carry out large-scale excavation work before installation.
6. There is no need to level the terrain of the site.
The use of screw foundations in the Arkhangelsk region
If the question arises about the use of screw piles in the Arkhangelsk region, then in most cases this foundation should be used for building houses with great caution and after a careful study of the geology of the soil. In most cases, in the Arkhangelsk region, it is impossible to use a pile-screw foundation for building houses due to high soil moisture. For the construction of light-weight structures: fences, utility rooms, compact country houses, a pile-screw foundation is quite suitable. If, over time, corrosion somehow damages the foundation of such a structure, then the light weight of this structure will allow you to correct the situation with little effort.
Other articles on the site:
- Insulating the foundation of a house
- How to caulk the frame of a wooden house?
- Construction of a bathhouse
- 8 myths about wooden houses
- Facades and facade materials
- Risks of building a wooden house without external finishing
Choose a project for your dream home or order a custom project
Regarding the choice of a project for your home or the development of an individual project, you can contact our office. Some of the projects can be found in the “Projects” section of our website . You can view a large number of ready-made projects at our company office.
(Arkhangelsk) - construction of wooden, brick, aerated concrete houses and cottages on a turnkey basis in the Arkhangelsk, Vologda and Moscow regions. We build bathhouses and country houses, and professionally install foundations. Phone 8