Attaching a roof to a building made of foam concrete is more difficult than to one built from other materials.
Foam concrete blocks are an excellent choice for building a house. They combine the functions of structural material and thermal insulation.
However, due to the presence of pores, walls made of them differ from dense brick or concrete. Therefore, many people have a question - how to attach the roof to the foam block? In our article we will try to answer it by considering possible options for the execution of this building assembly.
How to make the roof lighter?
First, you need to use lighter lattice forms. Secondly, wooden crossbars must be hollow. It is better to use a channel based on OSB.
The choice of roofing material must also be approached wisely. The less its weight, the better.
Among the roofing materials for a house made of foam blocks are:
It is not recommended to use natural and polymer sand tiles, slate and other heavy roofing materials. If you use them, then only very carefully and strictly follow the installation technology.
As you know, before moving on to building a roof, it is necessary to build the house itself.
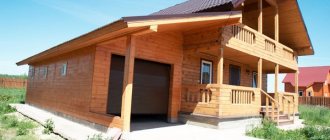
Building a house from foam blocks with your own hands is easy and simple if you take into account all the nuances of its construction. Do not forget that each building has both its pros and cons. You can get acquainted with the pros and cons of houses made of foam blocks here.
Preparing for work
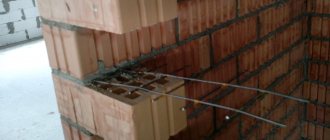
Work on the construction of a pitched roof on blocks is always preceded by the installation of an armored belt - a monolithic reinforced concrete tape around the perimeter of the load-bearing walls, covered with a Mauerlat.
In residential buildings, the tape is reinforced with at least a four-row volumetric frame made of rods with a diameter of 8-10 mm with a tape cross-section of 20 cm.
If it is not possible to pour the tape into permanent formwork made of U-shaped blocks (the best option when working with a factory-quality gas block), the outer wall of the belt under the future roof is always insulated with expanded polystyrene or hydrophobized stone wool.
Fasteners for the Mauerlat are laid in advance , in increments of no more than 0.8-1 m, ideally in the center between the rafters.
Nuances in design and calculations
The rafter system of pitched roofs in residential buildings is laid from timber with a cross-section of 80 mm for the legs and 100 mm for the mauerlat.
The complexity of the supporting frame depends on the distance between the supporting walls and the expected weight load.
- With a wall width of up to 4.5 m, the rafter legs are simply attached to the mauerlat without additional support.
- A width of 4.5 to 6 m implies reinforcement with a support leg (with a rafter leg, with support at the base of the upper wall).
- When the distance between the walls is more than 6 m, the system is strengthened by a vertical girder, supported by internal partitions or horizontal beams.
The calculation of a pitched roof begins with choosing its optimal slope, taking into account:
- Snow and wind loads in the region.
- Rules for installation of roofing materials.
- Type of roofing pie (warm ventilated roofs are laid at an angle of 15 °).
- Other considerations (planning the use of under-roof space, design, budget).
Optimal costs are achieved when laying the roof with an angle within 15-20° , allowing the installation of most roofing materials on a sparse sheathing.
Also, when choosing this option and the correct location of the roof (with the upper wall facing the prevailing flows), the slope is practically not affected by wind loads. But in areas with heavy snowfall, a roof with such a slope needs to be cleared of snow.
In the opposite case (increasing the angle to 45° while simultaneously leveling the snow load), the windage and cost of the roof increase.
The pitch is selected taking into account the size of the insulation boards (if any) and the weight of the cake; increasing the pitch by more than 1 m is not recommended . The thickness of the insulation (and, as a consequence, the height of the rafters) is calculated based on the climatic conditions of residence and its thermal conductivity coefficient; at least 2 cm of ventilation gap is added to the resulting value.
The type and pitch of the lathing depends on the roofing technology. If possible, the part of the flooring protruding beyond the walls is made solid, the same applies to areas adjacent to walk-through structures and loaded areas.
Tools and materials
Taking into account the simple design of the ramp, materials are purchased with a relatively small (within 5%) margin; in order to avoid errors, their calculations should be checked using construction programs.
All lumber undergoes mandatory treatment with antiseptics and fire retardants (including coating of edges after cutting) and is stored under a canopy.
The method of lifting materials to the top is thought out in advance; when carrying out work alone or with a minimum of assistants, it is easier to rent a crane or winch for these purposes.
Additionally prepared:
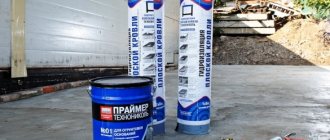
- Materials for the waterproofing layer under the Mauerlat (2 layers of roofing felt or mastic).
- Materials for roofing pie (steam, hydro and heat insulators).
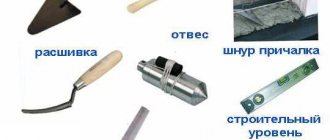
- Tools for cutting and fastening lumber (saws, hacksaw, hammer, sledgehammer).
- Plumb line, building level, tape measure, cord, pencil, marker, crayons.
- Stapler with staples for fastening rolled materials.
- A screwdriver or drill with the ability to adjust the speed.
Features of installation of overhangs and slopes
When constructing a roof for a house made of aerated concrete, the truss and the angle of inclination of its slopes play an important role.
Especially if the building is being built in regions of the country with a cold climate. If you do not maintain a certain angle of inclination, snow will linger on the roof for a long time, placing a strong load on the structure. This will soon lead to the destruction of the roofing and other dangers.
The sharper the angle at which the rafters are installed, the less load the walls will experience, and the faster the snow on the roof will disappear. And the overhangs will no longer be subject to constant pressure.
Construction of an attic roof for a house made of aerated concrete
Let's briefly look at the process of installing an attic roof.
Construction of an attic rafter system is a complex process. Before starting work, remember some installation features:
Stage 1 - waterproofing the junction of the Mauerlat with the wall
There must be a layer of waterproofing between the wall of the house and the mauerlat. For these purposes, you can use ordinary roofing felt. It is laid along the entire perimeter of the walls and is not fixed in anything.
Stage 2 - installation of the Mauerlat
Mauerlat is a wooden beam that is attached along the perimeter of the walls of the house.
It should be fixed using anchor bolts whose diameter is at least twelve millimeters. Holes are pre-drilled for them.
The ends of the anchors are bent into a hook to prevent them from being pulled out further. However, there are anchors with a spacer system at the bottom. The fastening step is 10-15 centimeters. The mounting location is between the rafter legs at an equal distance.
If the attic roof of a house made of aerated concrete has two slopes, then two mauerlats are needed, if it has four slopes, then four.
A beam with a cross section of 15×15 or 20×20 centimeters is used as a Mauerlat.
Stage 3 - construction of the rafter system
The rafter system must be assembled perfectly, because it is the skeleton of the roof. And all loads (wind, rain and others) fall on it. Therefore, it is important to correctly make calculations with an emphasis on the climatic features of your region. It is difficult to make a calculation, so you can turn to professional workers.
It is better to make a rafter system from coniferous wood. Usually it is pine or larch. Humidity should not exceed 23 percent.
In order to protect yourself in the future from the negative consequences associated with the proliferation of microorganisms and attacks by rodents, you need to thoroughly impregnate the wood with special compounds, including fire-fighting ones.
Before you move on to building a roof, think about the future. Maybe in the future you will have a large family, or maybe you already have one. A large family needs more space, which can be created in several ways. One of these is a two-story house made of foam blocks.
Another way is to create a volume located under the roof as a living space, i.e. attic. The construction of a house with an attic made of foam blocks is discussed here.
And the last one is an extension to the house made of foam blocks. You can find out how to do it in this article.
Rafters can be hanging or inclined.
When the span between the walls is no more than six meters, then inclined rafters can be installed. If the span is twice as large, then inclined rafters are used only if additional support is installed.
Hanging rafters are installed when the span between the walls reaches 12 meters. In this case, the installation of additional support is not provided.
Preparing rafter legs
We will install the rafters in increments of 60 centimeters, leaving holes for the windows. Let’s take the bars for the “legs” with a cross-section of 10×10 centimeters. The length is determined taking into account the slope of the slopes and the size of the building (individual for each case).
Installation of floor beams
For beams, you can use logs, timber, or a board that is laid on the edge. Beams are installed with a selected step into pre-prepared grooves in the wall. Their ends are waterproofed with two layers of roofing material. After the beams are laid, they are additionally secured with anchor bolts.
Construction of vertical racks
If the roof on a house made of aerated concrete is broken, then supporting vertical posts are first erected. They will serve as the frame of the walls.
The height of the racks must be at least two meters to make it comfortable to be on the floor.
Vertical posts are inserted into grooves on the floor beams and are additionally fixed with metal corners and brackets.
Select the beam section from the table.
| span (m)/beam pitch (m) | 2 | 2,5 | 3 | 4 | 4,5 | 5 | 6 |
| 0,6 | 75x100 | 75x150 | 75x200 | 100x200 | 100x200 | 125x200 | 150x225 |
| 1,0 | 75x150 | 100x150 | 100x175 | 125x200 | 150x200 | 150x225 | 175x250 |
An attic floor beam is installed between the posts. Additionally, it is secured with bolts or another method.
A certain number of U-shaped racks are assembled with a previously selected step. A cord is pulled between them and checked for level. If the height is different, dismantle one of the arches and then adjust it in height. The racks are sewn together with bars of the same section.
Installation of ridge posts
You can immediately install ridge racks. The ridge itself will be mounted between them, but you can do without them.
Installation of lower rafters
Now you need to install the rafters between the Mauerlat and the upper floor beam. To do this, the distance between the corresponding supports is determined, and rafter legs of the required length are prepared. In the lower part, cutouts are made on the legs of the rafters, with which they rest on the Mauerlat and are additionally fixed with brackets.
Installation of the upper rafters
We need to prepare the upper rafters. To do this, a template is sewn from boards. It is installed at the ends of the attic floor beam, the size is taken and the slope angle of the slopes is determined. Based on this size, the required number of rafter legs is prepared, which are then securely fixed to the horizontal beams.
Depending on what roofing material is chosen, continuous or sparse lathing is laid. Continuous is done when installing heavy roofing coverings.
Installation of roofing material
The selected roofing material is mounted on the prepared sheathing, after which additional roof elements are installed - gutters, protective drains, etc.
Video about the step-by-step construction of the roof of a house made of foam blocks
Start of roof construction
Installation of rafter system beams
Fastening the rafters
Source
Types of rafters
The rafter system is the basis of the roof, which consists of wooden beams that hold the covering and roof structure, and also create the required roof configuration. At the top they are connected at an angle, and at the bottom they are attached to the mauerlat beam. With the installation of this main load-bearing element, the fastening of the rafters to the brick wall begins. The following types of roofs with corresponding rafter systems are distinguished:
- single-pitched;
- gable;
- hip;
- tent;
- broken
Frame systems consist of rafter legs, mauerlat, ridge, sheathing and supporting elements. At the same time, the rafters themselves come in two types:
- Layered. They have two supports - at the top they are attached to the ridge support, at the bottom to the mauerlat beam by cutting.
- Hanging: with one lower support - in the upper part they rest against each other at an angle and are connected;
- at the bottom - they are attached with movable fasteners to the Mauerlat.
Return to contents
Possible dimensions of rafter legs
| Rafter material | Sections, cm | ||
| Length | Thickness | Height | |
| Boards | 300 | 4 | 18 |
| 6 | 16 | ||
| 8 | 14 | ||
| 400 | 6 | 20 | |
| 8 | 18 | ||
| 500 | 8 | 22 | |
| Bars | 300 | 10 | 12 |
| 400 | 10 | 16 | |
| 500 | 10 | 20 | |
Return to contents
Roofing and foam block
So, let's define what it is. It is from this device that the roof begins, as we have already said, and is a mauerlat, a simple beam or even a log, hewn from the underside.
The beam is located around the perimeter of the outer wall. And if the construction of walls made of foam blocks presupposes certain conditions, then the roof is also designed taking into account all technical aspects and recommendations. This means that we consider the presence of a Mauerlat to be a mandatory condition.
Purpose
The purpose of the timber, or as it is also called in construction circles – “murlat”, is quite clear; it serves as a support for wooden rafters. That is, it is clear that our roof is wooden, and at least pitched.
In addition, the “murlat” distributes the load that is created by the pressure of the roof. Here we need to understand that we can either strengthen the wall made of foam blocks or not, but this will not affect the distribution of loads. And this is an important point; let’s not confuse the quality of the walls with the fact that they can withstand loads.
The fact is that this doesn’t really matter, the timber that goes along the perimeter of the wall distributes and dissipates the pressure. Moreover, our roof can be quite heavy, especially if we choose clay tiles as the roofing material.
Interaction with foam blocks
Since we agreed that we have a foam block structure, we will consider all the nuances associated with the roofing and “murlat” in relation to foam blocks (see also the article Subfloor in a house made of foam blocks: types of flooring, and step-by-step installation instructions ).
And there is an interesting point here, because foam block is a material whose physical properties are somewhat different from brick. He:
That is, we, of course, understand how to build a wall from foam blocks, but it is not a fact that it will be ready to take over the roof. Let me explain.
Foam concrete cannot withstand either the fastening or the beam itself without deformation, so we use a concrete belt.
Let's say right away that there is nothing difficult in making a concrete belt. The principle of operation and all actions are identical to what we have already done from the foundations. We will repeat if the foundation work has gone unnoticed.
First of all, prepare all the components of the belt:
Installation
The most difficult thing in the belt is the installation of formwork, and the most labor-intensive is pouring concrete. Let's install the grillage step by step.
Important! We must maintain the design height of the walls, and for this, we simply do not add the last row of foam block stone. That is, our belt will be approximately 30 cm high and 20 cm wide. We need these parameters, plus the length of the walls, to know how much concrete will be needed for the entire job.
So, step by step our work will look like this:
In any case, the construction of walls made of foam blocks involves finishing, so it’s not scary if we cause a few cosmetic defects to the wall during the installation of the formwork. We make the concrete not too liquid so that it does not leak out of the small cracks between the wall and the formwork.
After 5-7 days, you can remove the formwork and begin installing the Mauerlat.
Laying
Some builders suggest laying the Mauerlat with their own hands only under the rafters. But this is not entirely correct, because there will be a serious loss in the rigidity of the entire roof structure (see also the article Cost of laying walls from foam blocks: we consider everything thoroughly).
First, we waterproof the surface of the concrete belt. This can be done with mastic or simple roofing felt.
This event will preserve the timber and prevent it from rotting. We will lay the timber itself almost in the middle of the armored belt.
Important! It is quite difficult to determine the cross-section of timber that is suitable for “murlat”; we can offer 150x150 mm, but this is not a mandatory size for every case.
The timber must first be treated with an antiseptic and laid around the perimeter for preliminary verification.
Fastening
There are several ways to attach timber, but we will choose the one that suits us in terms of price/quality ratio.
First, let's look at mounting with anchor bolts. In order for it to go perfectly correctly, we will have to place anchors in the belt while pouring.
This again hints that all decisions must be made before work begins, let's look at this option step by step:
Important! As a rule, no matter how we install anchors, they will still deviate during concreting. It’s not scary if one line is not maintained, it’s worse if the angle of inclination is large. Therefore, we are monitoring this first.
Advice! We drill holes for the anchor from the bottom side of the beam, while trying to ensure that the drill is almost equal to the cross-section of the bolt. If the beam goes tight, it’s not scary, you can always finish it off, but if our holes turn out to be too spacious, the Mauerlat will not be able to provide the required rigidity.
But the second instruction will give us the opportunity to completely save on fastening, because, frankly, anchors are quite an expensive pleasure. Therefore, instead of the anchor option, you can turn to our old friend, simple reinforcement with a cross-section of 12 mm.
We used it throughout the construction, and before laying out the wall of foam blocks, we prepared it, used it for the belt, and here it came in handy.
We carry out the fastening step by step as follows:
Comparing fasteners
These metal corners are used for attaching rafters to the mauerlat, beams and walls:
Types of metal plates
Note that there are two types of such plates: nail and perforated.
Perforated ones have many holes for bolts and screws, and it is with their help that such plates are attached to wood. The advantage of perforated plates is that they are able to connect the necessary elements of the rafter system at almost any angle. Moreover, such plates can be easily cut to the required size. Install perforated plates on both sides of the connections.
Nail plates do not have nails themselves. This fastener is used only in factory conditions, or in the presence of a special press. The fact is that you cannot hammer such a plate into the rafters with a hammer - you need proper, uniform pressure.
Additional items
Sometimes, in addition to the same metal corners and nails, support bars are additionally used:
And also like this:
Some valuable tips
If you use flat or shaped steel fasteners in joint connections, then:
- The thickness of the wooden elements should not be less than 5 cm. All because of the screws.
- Secondly, simple nails cannot be used here - only screw or rough nails, which simply won’t come out. Especially if the wood for the rafters has a moisture content of more than 18%, i.e. not completely dried, and after this material dries, the nodal connections are always weakened.
- Thirdly, take nails with a diameter of at least 4 mm and a length of at least 40 mm.
- Always use two angle irons per assembly if possible. Just place them symmetrically.
How to attach a roof to a foam block: options and components
Attaching a roof to a building made of foam concrete is more difficult than to one built from other materials.
Foam concrete blocks are an excellent choice for building a house. They combine the functions of structural material and thermal insulation.
However, due to the presence of pores, walls made of them differ from dense brick or concrete. Therefore, many people have a question - how to attach the roof to the foam block? In our article we will try to answer it by considering possible options for the execution of this building assembly.
Final choice
As the video in this article shows, even in the simplest case, the process of installing a fastener element for the Mauerlat of the roof of a house made of aerated concrete requires some knowledge and skills. Therefore, in the absence of these, it is better to choose those methods, methods and types of fastenings that will confidently not raise doubts and questions during the work. This path will not lead to further hassle and problems associated with the destruction of the roof or its foundation.
Why you need to pay special attention to attaching the roof to a foam block structure
Porous structure of foam concrete
It's all about the porous structure of the material, it can be seen in the photo above. It can easily withstand loads distributed over a large area. If you apply it pointwise, the surface will be pressed through.
The thin walls between the pores are easy to destroy. This does not happen with brick or dense concrete. For the same reason, the fasteners become loose in the foam block. It is easy to drive a nail into it, but it will not sit firmly; you can loosen it and pull it out even with your bare hands.
Therefore, it is necessary to pay special attention to fastening the roof in foam block buildings. If the procedure is not performed correctly, the walls may collapse.
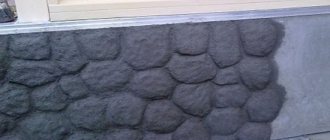
A crack in the wall is one of the consequences of improper roof fastening
Types of roofing for foam block buildings
All existing types of roofing are used with foam block buildings. In principle, they can be divided into only two groups, flat and pitched.
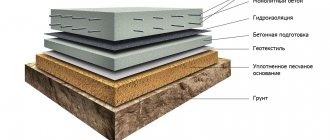
Flat roofs
Flat roofs have the least amount of problems
There are no problems with them at all. Covering or ceiling slabs are laid on the walls and a roofing pie is made over them. The load from the slabs is evenly distributed over the entire cross-sectional area of the walls.
The foam blocks on which the roof rests find themselves in the same conditions as if we continued to build the wall higher, and this would be the weight of the upper floors, not the roof.
Pitched roofs
In addition, there are roofs of complex shapes that are not classified. But this doesn’t matter to us, all these roofs involve a truss structure that supports the roof.
The load from the rafters, if they are attached directly to the walls, will be point-like, which is why problems arise in designing the attachment points for the roof to the foam block. First, let's look at the features of rafter structures.
Elements and types of rafter structures
As is clear, the main detail is the rafters, connected to each other by lathing; they support the weight of the roofing pie.
They are divided into two types:
Hanging and layered rafters
The first rest at both ends (the lower ones are called rafter legs) on walls, mauerlats or racks.
The second type is supported only by the legs, the upper ends hang freely. Together with other elements they can form a roof truss.
The figure shows the names of the parts of the truss structure (trusses)
The picture above shows the most common types of roof trusses (we don’t call them structures, as this means all the rafters and sheathing).
And two more explanations:
Note. The figures show the recommended span sizes for each type of truss. This is useful information.
Determine the height to which you want to raise the wall
To ensure the found slope angle of the pitched roof, it is necessary to raise one of the walls higher. How much higher we will find out by remembering the formulas for calculating a right triangle. Using them we also find the length of the rafter legs.
How to calculate the parameters of a pitched roof
When calculating, do not forget that the length is obtained without taking into account overhangs, and they are needed to protect the walls of the house from precipitation. The minimum overhang is 20 cm. But with such a small protrusion beyond the building, the pitched roof looks short. Therefore, overhangs of at least 60 cm are usually made on one-story buildings. On two-story ones they can be up to 120 cm. In this case, the width of the overhang is determined based on aesthetic considerations - the roof should look harmonious.
Example of a drawing in ScratchUp
The easiest way to determine how much the roof needs to be extended is in design programs that allow you to draw the building to scale and “play” with the overhangs. Everything should be displayed in 3 dimensions (the most popular program is ScratchUp). Twist through different sizes of overhangs, decide which one looks better (if there is no project), and then order/make rafters.
Fastening without armored belt
Let's immediately look at a simpler way to install a roof on a foam block, when the roofing parts are laid directly on the masonry surface. This option is most often used in small buildings erected by hand.
What to pay attention to
When attaching a roof to a building made of foam blocks, you need to pay special attention to the following details of the truss structure.
Mauerlat
Mauerlat laid on the wall
Parts of the rafter system cannot be attached to the foam block without this part. The Mauerlat will evenly distribute the weight of the roof over the entire wall area. Its width should be maximum; it is best if it is equal to the width of the wall.
The mauerlat is attached to the masonry using pins or dowels inserted into it. It is advisable to plant them on a solution or glue them. Also, the diameter must be chosen at least 30 mm; the larger it is, the less loosening of the fastening in the foam block will be.
Rack, upper ends of layered rafters
The rafter post must be installed on the purlin
If the racks or upper ends of the layered rafters rest on a partition, also made of foam block, then a purlin must be placed on top of it. It will distribute the load over the entire area, just like the Mauerlat on the external walls.
Puffs
Hanging rafters “move apart” to the sides without tightening. Only a wall can prevent this. In the case of a foam block, this load can loosen the studs that secure the Mauerlat. Therefore, the tightening must be mandatory and preferably not raised.
For the same reason, it is undesirable to install an attic roof, the side rafters of which also transmit horizontal force to the wall. You can bypass all the restrictions if you additionally secure the rafter legs extended beyond the dimensions of the wall to the floor beams, which will act as tie-downs.
You can do without tightening if the rafters are attached to the floor beams
Why do you need a Mauerlat?
The Mauerlat is the foundation of the roof under construction, through which the weight of the roof is transferred to the walls of the house. Another purpose of this roofing element is to attach the roof structure to the walls of the house.
The lower part of the Mauerlat beams is waterproofed using roofing felt or any flexible building material that is impermeable to moisture. This is done to prevent rotting and destruction of wooden parts. Mauerlat is not always used in construction. For example, without a Mauerlat it is possible to build frame, log houses made of wood. In such wooden housing constructions, the functions of the mauerlat are performed by the timber at the very top or the top logs. The recommended dimensions of the Mauerlat bars are at least 10x10 cm. The optimal section is 15x15, 10x15 cm.
The wood is pre-treated with a special antiseptic that protects against rot and insects. The best option for installing a Mauerlat on the walls is to place solid beams along the entire perimeter of the roof. The beams are connected into one whole using a “direct lock” connection. The dimensions of this connection are determined by the dimensions of the beams.
The lock must be fastened with nails, which allows you to obtain elements connected into a rigid single system. The bars are located as close as possible to the inside of the masonry so that there is an equal distance to the outside of the wall along its entire length - no less than 5 centimeters. Often, a special protrusion is made at the outer edge of the wall - a brick parapet built on top; the mauerlat beam will then rest against it.
Important: you can attach the Mauerlat segmented - only directly under the legs of the rafters.
Fastening the roof with an armored belt
Fastening rafters with and without armored belts
A more reliable design is obtained if an armored belt is provided (the second name is a monolithic belt).
What is an armored belt
The armored belt on the house is shown by an arrow
The armored belt is a strip of monolithic reinforced concrete up to 0.5 m thick along the upper edge of the wall. It is installed not only on foam blocks, but also on masonry made of any piece material (for example, brick).
Its task is to additionally connect the masonry and evenly distribute the loads across all four (or more) walls. In the case of cellular concrete, it additionally protects the surface from crushing.
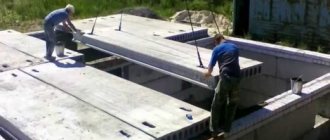
A monolithic belt can be made in formwork, but usually two rows of small-thick blocks are laid out on the outer and inner sides of the wall so that a tray is formed between them (sometimes a tray is cut out to form a “U” block). A reinforcement frame is installed in it and concrete is laid.
The installation of an armored belt slightly complicates the design of the building, but increases its reliability and strength. The cost of construction also increases slightly, since little steel and concrete are needed. For buildings with a large area and a heavy roof, a monolithic belt is almost mandatory.
Functional purpose of the Mauerlat
Typically, the same material is used to make the Mauerlat as for the rafter system. Most often it is made from wooden beams. However, if the rafter system is made of metal, then this structural part can be made of a channel or I-beam.
Typically this element is made from the following materials:
- Wooden beam with a section of 100x100 mm, 150x150 mm or 200x300 mm. The timber is made from hardwood and undergoes mandatory antiseptic treatment. The product is laid around the perimeter of the walls of the structure. The joints are fixed with nails or a straight lock. In private construction, a wooden roof structure is most often used.
- Less commonly, rolled profiles are used for these purposes - a channel with a U-shaped section or an I-beam with an H-shaped section. The profile height is determined by calculation and can be in the range of 70-120 mm.
A beam or steel beam is attached to the walls. In this case, different fastening methods can be used. Next, the rafter legs rest on the mauerlat. They exert a load on this element, which in turn, evenly distributing it, transfers it to the walls of the building. In addition, this beam keeps the rafter system from shifting.
Important: since aerated concrete does not tolerate long-term point loads and gradually collapses, it is recommended to erect a monolithic reinforced belt along the top of the walls before laying the Mauerlat.
However, there are ways to install this structural element on aerated concrete walls without an armored belt. It is also worth remembering that the upper edge of the Mauerlat should be located at a height of at least 30-50 cm from the surface of the ceiling. This will ensure effective ventilation of the under-roof space, and will also facilitate inspection and repair of roof structures.