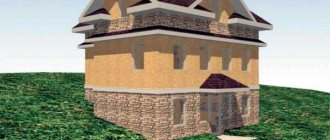
Many families are moving from an apartment to their own home. They sell their living space in the city and move closer to nature. The area is incomparably larger than city apartments.
Many people prefer to build country houses rather than buy a ready-made option.
A plot of land for construction is mainly purchased in places where there are main communications: electricity, main gas and water supply. The owner of the site will have to install a sewer system.
It is necessary to register ownership of the object. The main documents include a house and plot plan. Construction is carried out in accordance with state standards and current SNiP.
Construction of houses
The quality and duration of operation of any building is determined primarily by its foundation. Before arranging the foundation, a number of preparatory work should be carried out aimed at preparing the site for construction work. We’ll talk about this further about how deep to dig the foundation and how to prepare the soil for its construction.
Table of contents:
Soil for the foundation: preparation features
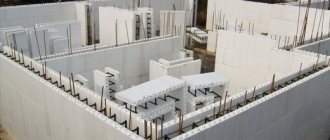
Before moving on to the specifics of preparing the soil for foundation construction, we suggest that you familiarize yourself with its main types. There are foundations:
- pile type - its installation is appropriate in cases where leads arise;
- solid foundation - can be built on any soil with a sufficiently low level of groundwater;
- a columnar type of foundation is installed if it is planned to build a light-weight building, in the form of technical buildings, small garages, etc.;
- strip foundation is the most popular for low-rise construction.
The most popular material in the process of making foundations is a concrete composition with reinforced metal inserts. It is he who is able to provide the necessary strength of the structure and protect it from external factors such as moisture and temperature changes.
The main advantage of concrete is the creation of a single monolithic foundation that can withstand heavy loads.
However, an important process of arranging the foundation is preparing the foundation for its construction. We suggest that you familiarize yourself with the basic recommendations for preparing the soil for the foundation:
- in the presence of weak soils and a significant load on them, we recommend giving preference to the pile type of foundation;
- the columnar type of foundation is suitable for fairly strong and durable soil;
- if groundwater is present unevenly on the surface, we recommend giving preference to a solid type foundation, which is laid on the surface in the form of a slab;
- in all other cases, we recommend using a strip foundation.
Some types of soil and geological studies carried out before building a house on them suggest the arrangement of two or three different foundations for one building.
A correctly and efficiently executed foundation is the key to long-term operation of the entire house. Therefore, you cannot save on it under any circumstances.
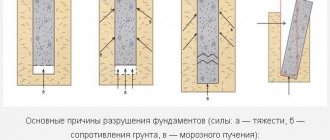
Testing the soil under the foundation includes, first of all, determining the depth of soil freezing. If this is not done, then heaving of the soil cannot be avoided, and it will lead to the destruction of the integrity of the foundation and subsequently the entire building.
In order to calculate the freezing depth of mail, you should perform the following steps:
- determine climatic characteristics in the region;
- determine the depth at which the main communication systems are laid;
- calculate the load from the entire building;
- determine the properties and characteristics of the soil.
Thus, when determining the optimal depth for laying the foundation, all these factors should be taken into account, which will help to avoid its destruction under the influence of soil heaving.
If the soil does not have a predisposition to heave and the height of the groundwater is at a high level from the ground, then it is allowed to build a foundation higher than this indicator. However, in this case, you should definitely use the calculations of specialists.
If the building has a basement or ground floor, then care should be taken to organize high-quality waterproofing. At the same time, special fillers are added to the concrete composition to improve its resistance to moisture.
How to dig a foundation correctly: preparatory stage of work
Before starting work on the foundation, specialists develop a project that indicates all the individual features of the work in a given area.
The main part of the foundation is the foundation that is built under it. It has the appearance of a pillow; the strength of the foundation and its ability to withstand heavy loads depend on the quality of the construction of the pillow.
In the process of constructing the most popular strip foundation type, two types of pillows are distinguished:
- cushion based on poured concrete composition;
- bulk type pillow.
Therefore, when determining the depth of the foundation, you should first decide on the size and type of pad.
The main functions assigned to preparing the foundation for construction:
- ensure minimal contact between the base and the base of the foundation;
- create good bearing capacity of the soil on which the building is constructed.
Instructions on how to prepare the soil for the foundation are as follows:
1. Carry out work to mark the location of the foundation. Clear the surface of excess vegetation, foreign objects and debris.
2. The maximum cleaning of the bottom of the foundation can be carried out by a bulldozer, which cuts off the upper part of the soil from the surface.
3. The next, quite important step is to compact the soil under the foundation. For these purposes, you will need a cam or smooth heavy roller or special tamping machines.
4. This process should be carried out gradually, first one section of the foundation is compacted in parts, and then the next. We suggest you familiarize yourself with tips for compacting the soil under the foundation:
- Vibration is used to compact sandy soil;
- in order to compact forest subsidence soil, you must first soak it, fill previously prepared pits with water, and then fill them with drainage;
- to perform deep compaction, you should use a device that simultaneously wets the soil and affects it with vibration;
- soil or sand based piles can help compact silty or weak soil;
- Vacuuming or electric osmosis should be used to compact peat soil.
5. The next step is not necessary for all types of soil, however, in some cases, it is simply necessary. It consists of moistening or drying the soil while compacting it.
Strengthening the soil under the foundation: technology for performing the work
After preparing the soil and arranging a pit in it, the procedure for laying crushed stone in the foundation follows. Please note that the width of the foundation at this stage should be greater than the standard width of the foundation, which will be filled with concrete. The difference between the values should be 10-20 cm, depending on the depth of the foundation.
In order to arrange a crushed stone cushion under the foundation, you should perform the following steps:
- lay a sand cushion, its thickness is up to 10 cm;
- Fill the base with water and compact it well;
- lay crushed stone, layer thickness about twenty-five centimeters;
- compact the surface, add crushed stone if necessary.
In order to arrange a sand cushion under the foundation, we recommend following these steps:
- take care of constructing a pit of the required size;
- level the bottom of the pit;
- lay sand 200 mm thick in the pit, gradually adding water, compact it;
- monitor the thoroughness of the work;
- in addition, you should not forget about the horizontal and evenness of the resulting coating; if necessary, add sand so that the pillow reaches the desired thickness;
- begin the procedure of reinforcement and arrangement of formwork for pouring.
What are the advantages of arranging a sand cushion for the foundation:
- this foundation element perfectly resists compression and protects the foundation from soil influences;
- it is possible to replace the soil under the foundation with sand;
- with the help of sand it is possible to achieve perfect evenness at the bottom of the pit;
- sand increases the stability of the soil before shrinkage and gives it additional strength;
- used to protect metal reinforcement from moisture, that is, it performs a waterproofing function.
We suggest that you familiarize yourself with the tips for arranging a sand cushion before digging a trench for the foundation:
- to make a sand cushion, it is recommended to use coarse gravel sand with a coarse fraction or sand from a river with a medium fraction;
- divide the width of the pit in which the sand cushion is laid by three, the resulting value is equal to the maximum thickness of the sand layer that is installed under the foundation;
- We recommend laying sand in the form of a trapezoid, that is, the cushion should expand towards the top of the foundation and narrow towards the bottom.
Features of performing soil analysis for the foundation
To conduct soil samples under the foundation, we recommend seeking help from specialists, however, if you do not have such an opportunity, then we suggest considering recommendations for independent soil analysis:
1. Take some soil from the place where the foundation will be located. Scatter it onto the paper. Take care to remove foreign matter from the soil in the form of stones, debris or plant roots.
2. Take a spray bottle and spray water onto the surface of the soil. Fill one quarter of a three-liter glass jar with soil.
3. Fill the third part of the jar, including the kidney, with water. It is recommended to add one teaspoon of dishwashing detergent to this composition. Shampoos or liquid soap should not be added to the composition.
4. Next, close the jar and shake it for ten minutes. Thus, the soil is divided into several mineral components.
5. Leave the jar alone for three days. Next, the process of settling, first large and then small parts of the soil, will occur.
6. Using a marker, after you leave the can, mark the level at which the sand settled. After two hours, the level of sedimentation of sludge inclusions should be noted.
7. After the water becomes transparent, the clay should be marked. The last mark is set on the third day, however, if after three days the water remains cloudy, then the jar should be left for a maximum of seven days.
8. Write down the values measured according to the marker marks. Next, you should calculate the percentage of each component in the soil, and based on it, calculations are made on the depth and type of foundation being built for the construction of the building.
General recommendations for determining soil type:
- sand settles to the bottom within one minute after the jar is left alone;
- sludge settling time is from 15 minutes to one hour;
- the clay settles longer, over several hours.
How to dig a trench under the foundation: technology and features
Conducting a soil analysis allows you to determine how much to dig the foundation. After the answer to the question of how to dig deep into the foundation has been found, we proceed directly to the work, the essence of which is as follows:
1. To carry out the work, calculations must be made, the accuracy of which is measured in centimeters.
2. The entire cycle of work, which includes digging a pit, arranging two types of pillows, preparing the soil, etc. are carried out continuously, in the same season.
3. Please note that the main guarantee of proper operation of the foundation is to ensure its protection from moisture. For this, high-quality waterproofing should be provided.
4. You should not reduce the size of the foundation by saving building materials, since this is a very important part of the building, which bears a large load during its operation.
In order to manually dig a trench under the foundation, you will need:
- shovels;
- device for compacting soil;
- wheelbarrows with which the earth will be removed;
- peg;
- roulette;
- level.
Before digging a foundation for a house, you should decide on its size and make markings for this, use our recommendations:
- to mark the area, you will need pegs, which are installed first at the corners of the foundation, and then along its perimeter;
- pull the thread, which will serve as a guide to determine the evenness of the foundation.
Digging the foundation The price for performing this work depends on its volume and the depth of the foundation. How much to dig under the foundation should be determined based on the characteristics of the soil and the total load of the building on the surface of the foundation.
There are two ways to dig the foundation:
The choice of one option or another depends on the individual characteristics of the building, the possibility of hiring machinery and the depth of the pit itself.
How to dig a foundation video:
Artificial consolidation of weak soils
There are times when the soil is so weak that it is impossible to consolidate it using natural methods. In other words, neither deep nor surface compaction gives the desired results. The way out of this situation is to artificially stabilize the soil.
This happens in several ways:
- silicification;
- smolization;
- thermal fixing;
- cementing.
The silicatization process occurs as follows. Sodium silicate is used as the base. After the site is well cleared, a sodium silicate solution is injected into a special injector under high pressure; after the injector is immersed in the ground, the solution is also squeezed out under pressure. Then the injector is removed and the well is temporarily tightly closed. Sodium silicate is used only in areas with loess soils, since the latter are very rich in calcium salts, which, when interacting with silicate, form silicic acid, which has a gel-like consistency. Afterwards it turns into a very dense and hard mass. For soils from silty sands, sodium silicate and phosphoric acid are used. Next, the consolidation process occurs in the same way as for loess soils.
Resinization is practically the same as silicatization, only a special resin is used as the basis. It also interacts with the soil due to its sticky and viscous properties and hardens after a while.
The thermal fixing method is based on the combustion of various fuels. It can be gas or any other liquid fuel. To do this, drill a well to the depth specified in the project and pump fuel into it. Afterwards, air is pumped under high pressure and fuel is burned. As a result, a pillar of burnt soil appears underground. The height of such a column will depend on the length and depth of the well, and the diameter on the amount of burned fuel and the duration of its combustion, i.e. thermal effects.
Consolidation of soil by cementation is used in areas where fractured rocks predominate, as well as gravelly and loose sandy soils. The cementization process is similar to the two previous processes: silicatization and resinization. The surface of the site is also well cleaned, wells are drilled at a certain distance and depth, injectors are installed, cement mortar is pumped in and also squeezed out into the soil under pressure. When finished, the injector is pulled out, and the cement hardens after a while.
Thus, we examined methods for preparing the foundation, which are used in areas where the soil has weak bearing capacity. Now let's talk about ways to prepare the foundation in areas where the soil is stable, has optimal humidity, etc. in such cases, as well as in low-rise construction, concrete preparation for the foundation is used.
How to prepare a site for foundation construction
Many families are moving from an apartment to their own home. They sell their living space in the city and move closer to nature. The area is incomparably larger than city apartments.
Many people prefer to build country houses rather than buy a ready-made option.
A plot of land for construction is mainly purchased in places where there are main communications: electricity, main gas and water supply. The owner of the site will have to install a sewer system.
It is necessary to register ownership of the object. The main documents include a house and plot plan. Construction is carried out in accordance with state standards and current SNiP.
How to fill the hill
To create an embankment, hard-plastic clay in a swollen state, loam or sandy loam is used. The ability of the bedding to pass water is determined by geomorphology: if, when there is an abundance of water, it is not possible to fill a tightly compacted terrace or the bedding is carried out on top of a porous layer, the embankment should have limited water permeability. It is optimal if the load-bearing capacity of the clay matches the underlying layer, so don’t be lazy to take samples.
In places where the site plan rises above the adjacent areas by more than 30–40 cm, it is necessary to backfill with road crushed stone of a fraction of 70–90 cm. It is also used in surface drainage. Crushed stone is dumped immediately after excavation under the formed edge. The width of the fill in the lower part must be at least half the height of the crushed stone shaft. On the sides of the site along the slope, crushed stone can be used to immediately form the bottom of drainage trenches.
Supports more than a meter high are covered with geotextiles, which are immediately pressed down with a small layer of clay. After this, imported soil is brought in and distributed throughout the site. The simplest route for laying is starting from the shaft, laid from the point of entry of the equipment to the opposite point, and then into the dump in both directions.
It is not recommended to pour more than 0.7–0.8 meters of clay embankment at a time. If it is necessary to raise more, you should wait for heavy rain or give the embankment time to overwinter. But with the use of compaction and excavator equipment, you can quickly create more impressive dumps.
Cleaning up the area
Preparing the site for excavation work begins with clearing plants and debris. Use a chainsaw to cut down unnecessary trees and branches and then burn them. Anything that cannot be burned is cut into firewood, stacked to dry and re-burned.
A tractor is uprooting tree roots. In hard-to-reach places, tree roots are dug up and cut. Stumps and wood are taken to a landfill.
After cleaning, the full picture of the building and landscape is visible. The site is ready for further work. The site is leveled with a tractor and an entrance to the site is made. If the entry of heavy vehicles is difficult, it is better not to install a temporary fence. It is optimal to build the fence after pouring the foundation slab.
Pit preparation
Preparing a pit begins with cleaning its bottom. Based on the size of its area, this can be done independently, or you can use special equipment - a bulldozer. The surface of the pit is sighted and, using small thin sticks, the places where the wall lines intersect are marked. The highest place is calculated using a level. If the soil is located above this mark, it must be cut off manually. If the pit has a large area, cleaning occurs mechanically, then the soil is cut below the established mark and filled with sand. This type of work gives better results, since the contact between the surface of the foundation and the soil increases significantly. If the soil is very unreliable or loose, surface or deep compaction is used, which we talked about earlier.
Ground leveling
Preparing the site for the foundation includes the stage of leveling the soil. In practice, foundations are poured without preparation.
A series of small mistakes add up to a big one and lead to disaster. Errors begin with the appearance of cracks. Doing it right means not ignoring the preparatory stage. Consult a structural engineer and designer. Specialists will select the best option.
There are three types of site preparation for the foundation:
Crushed stone is used under the foundation slab. Preparation is needed when the groundwater level is high enough. The weak lower layer is covered with crushed stone, compacted and a foundation is built.
Additionally, you will need a leveling layer of concrete, waterproofing, a protective layer over the waterproofing and a reinforcement cage. Crushed stone is used to distribute the load. The material is poured into a trench, compacted and a monolithic slab is placed on top.
Sand preparation is often used in cases where foundation blocks or prefabricated soles need to be placed under the base.
Sand is used to level trenches, depressions and hills. Due to its good compaction properties, sand transfers uniform load to the base. The material is used for prefabricated foundations if there is no monolithic tape.
The concrete preparation is designed to level the trench and distribute the load correctly. Many people choose the cement option using B7.5 concrete. It is convenient to fasten the formwork during installation. Cement preparation plays the role of an additional protective layer of concrete and convenient placement of reinforcement in the clamps.
Why is it necessary to level the land?
In most cases, the ground cover does not have a level surface. Many who own a country house or garden think about how to level the plot when they want to lay out a lawn or make a summer lawn for a picnic. But this is far from the only reason to give your site a smooth, even surface.
It is usually necessary to level the territory in three cases:
- During capital construction;
- When improving the territory, arranging paths;
- For gardening and gardening.
Any modern capital construction requires that the load on the foundation be distributed as evenly as possible. If a pile or strip foundation is used, the condition of a level building site is most important; the height difference should not be more than 50-60 centimeters. If you are building a house on a monolithic foundation, the presence of unevenness and height differences on the surface of the earth are not so significant.
When the house has already been built on the dacha plot, all the necessary engineering and infrastructure facilities are installed and functioning, it’s time to equip pedestrian paths or improve recreation areas. A sidewalk around the house protects the foundation from the seasonal lateral pressure of the soil layer. At the very beginning of spring, the load reaches peak values, the soil freezes and increases in volume. It is much easier to concrete or tile a flat surface of the ground than one that has uneven surfaces and slopes, and the result will be of better quality.
In the third case, when it is planned to use the land for gardening, if the unevenness does not provide shade on the beds, the result of growing fruit and vegetable crops does not depend on the topography of the fertile layer. But planting, caring for and harvesting crops is much easier and more efficient on a flat surface. Watering plants becomes more economical.
If you decide to arrange a real lawn, you should think about how to level the area. A smooth surface is needed for several reasons:
- Aesthetics – a green, leveled lawn looks much more impressive than one with holes and hillocks
- On flat terrain, lawn mixtures take root better and faster
- Water may remain in the holes for a long time after watering or rain. With prolonged exposure to moisture, the lawn becomes “soaked” and begins to deteriorate. High humidity becomes a beneficial environment for the development of life of simple organisms and insects - woodlice, worms
- Hillocks and protrusions make it difficult to quickly and efficiently mow the lawn with either a wheeled lawn mower or a hand trimmer.
A leveled piece of land is convenient for decoration. Many housewives want to decorate their garden with design solutions in the form of a pond, winter garden, or alpine slide. For any, even the most modest landscape design, you need a prepared, flat surface. The recently fashionable rock garden can only be beautifully created on a smooth area.
Calculation of foundation parameters
The most popular types of foundation: strip, slab, columnar, pile or combined. For each type, an individual calculation is made with an in-depth assessment. The initial indicator of a quality foundation is the correct calculation of the supporting part.
The foundation must fully transfer the load from the house to the ground. If the supporting part is calculated incorrectly, the weight of the construction object will push the soil. There will be uneven shrinkage of the house with the appearance of cracks in the foundation and walls.
Calculation is not a guarantee of a quality foundation. Quality is spoken of together with the calculation, correct implementation of the device and operation. The formula contains two indicators:
The weight of the house is the force of pressure on the foundation and soil. The weight is multiplied by a safety factor of 1.2. Other coefficients are designed to reduce the support area. If construction is planned with complex terrain, the greatest attention is paid to the calculation of the foundation. As a comparison, order a project from a designer and do geology.
S >(P x 1.2)/R, where S is the support area; P – weight of the house; 1.2—reliability factor; R – soil resistance. The specific pressure of the house (P) on the bottom soil (R) must be less than the design resistance: P
A full list of norms and rules is stated in the document “Planning and Development of Individual Housing Construction Areas.” A rectangular plot is the most convenient option for the appropriate use of the property.
You will need twine, tape measure and a square. According to the project, the first stakes are driven in. A cable or fishing line is pulled along the perimeter between the marks. The optimal distance from the facade is 5 meters. Dimensions can be adjusted depending on the material used.
The sides are measured, then the diagonals are checked. After hammering in the pegs, a control measurement of the diagonals is made. At a distance of the planned width of the foundation, the second cable is pulled. They dig a trench along it.
Features of performing soil analysis for the foundation
To conduct soil tests under the foundation, we recommend seeking help from specialists; however, if you do not have such an opportunity, we suggest considering the recommendations for independent soil analysis:
1. Take some soil from the place where the foundation will be located. Scatter it onto the paper. Take care to remove foreign matter from the soil in the form of stones, debris or plant roots.
2. Take a spray bottle and spray water onto the surface of the soil. Fill one quarter of a three-liter glass jar with soil.
3. Fill the third part of the jar, including the kidney, with water. It is recommended to add one teaspoon of dishwashing detergent to this composition. Shampoos or liquid soap should not be added to the composition.
4. Next, close the jar and shake it for ten minutes. Thus, the soil is divided into several mineral components.
5. Leave the jar alone for three days. Next, the process of settling first large and then small parts will occur.
6. Using a marker, after you leave the jar, mark the level at which the sand settled. After two hours, the level of sedimentation of silt inclusions should be noted.
7. After the water becomes transparent, the clay should be marked. The last mark is set on the third day, however, if after three days the water remains cloudy, then the jar should be left for a maximum of seven days.
8. Write down the measured values with marker marks. Next, you should calculate the percentage of each component in the soil, and based on it, calculations are made regarding the depth and type of foundation to be built for building a house.
General recommendations for determining soil type:
- sand settles to the bottom within one minute after the jar is left alone; — sludge settling time from 15 minutes to one hour; — the clay settles longer, over several hours.
Digging up the soil
Foundation structures are the most loaded parts of a building. Before digging a trench, approximately a 15-centimeter layer of plant soil is removed from the site of the future building. If not removed, the roots of the plants will rot, causing the floor and partitions of the house to sag.
There are many tools for digging a foundation. It is convenient to use trench diggers. Without special equipment, they dig with a shovel or use a tractor.
Advice! Handwork pays off in spades. The walls are smooth, without defects. The deviation from the planned width is approximately 1 cm. The tractor makes an error of 5-10 cm. Irregularities are smoothed out with a shovel.
The bottom is leveled with a liquid level. It is necessary to monitor the depth and constantly measure with a ruler. Wet sand is thrown into the trench and then compacted. On clay soils, reinforcement is mandatory.
We recommend additional video for viewing:
Site preparation requires patience, accuracy and thoroughness. How reliable you build a house depends a lot on the quality work of laying the foundation.
Alignment methods
There are three main options for leveling the area:
- Fill the excavations and hollows with earth to the same level;
- Remove the top layer of soil to the lowest point of the site;
- A combined option consisting of the first two points.
The third option is often the most economical and less labor-intensive. But do not forget that the site is being leveled for specific purposes, where at the planning and design stage the altitude level at which the ground surface should be leveled should already be determined. Sometimes it is necessary to deliberately raise the soil level in order to avoid the accumulation of wastewater from neighboring areas; in some cases, on the contrary, it is necessary to remove as much soil as possible, for example, if the future building is planned to be built on a hill, and the surrounding area is a slope.
Leveling the area with a mini tractor:
Mechanically, the area is leveled using special equipment: at the roughing stage, work is carried out with an excavator, then the earth is compacted with a roller; if the area is small, an industrial vibrating plate is sufficient. After completing the work on a level area, you can continue construction work, load construction materials and drive the truck through.
Preparation for foundation construction
The construction of any foundation begins with the preparation of the construction site. The area under the future home must be cleared of debris. Then, at the site of the future construction, the fertile layer of soil 10-30 cm thick is cut off, depending on the type of soil. This will preserve good soil for use in the garden or vegetable garden. It is advisable to preserve the land not only under the future house, but also 3-5 meters in each direction, since the area adjacent to the house will also become clogged and trampled during construction.
The turf is folded either in the far corner of the site, or in the place where the vegetable garden and garden are planned, so as not to carry it around from place to place.
Possible errors and difficulties
In the process of preparing for construction, errors of various levels can be made. What mistakes should you avoid :
Incorrect determination of the building area before ordering the project.
As a result, the finished project will be much more expensive to finance. It is necessary to take into account not only the number of rooms, but also the area of stairs, auxiliary rooms, and halls.- Orientation of the building to the cardinal points. Violation of this rule results in shading of common rooms and strong lighting of bedrooms.
- Wrong choice of foundation type for the site. This occurs when geosurveys are abandoned in order to save money. Without this data, it is difficult to determine the optimal design.
- Illiterate choice of material for walls. If the house is countryside, then it is recommended to take wood. Brickwork is difficult to heat if you are only visiting for the weekend.
- Unskilled calculation of hydraulic systems of the site. As a result, mold appears in the house, windows fog up, and leaks in the pool bowl.
This is a small list of errors. In order to avoid possible difficulties, you need to strictly adhere to the structure of the preparatory operations.
Preparing the soil for foundation construction
Depending on what kind of soil is on your site (you should have found this out when choosing a site for construction), it may be necessary to carry out preparatory work before laying the foundation.
If your site has clay soil (as well as loam or sandy loam), you will need to make a sand and gravel cushion under the foundation. Its thickness depends on the characteristics of the specific soil.
If under the layer of cut turf there is sand of medium or coarse grain, as well as sand with small stones, then no additional work is required, such soil can be used as it is.
The most difficult and costly option awaits you if there is peat or silty soil on the site. Such a base will have to be completely replaced and here you cannot do without consulting a professional. Only a specialist, based on a geological examination of the soil, will be able to correctly calculate the composition and structure of the artificial base for the foundation.
Features with uneven memory
Preparation and construction on a site with a slope should begin by drawing up a work plan. A standard project will not work in this case, so you need to contact specialists to create a plan and drawings taking into account the relief. It is important to take into account the angle of inclination and orientation to the cardinal directions.
- A flat area has a slope of up to 3%.
- A small slope is considered to be 8%.
- Average - up to 20%.
If more, then this is a strong bias. The main feature of construction is mandatory geodetic measurements. They will allow you to determine the degree of slope of the site, the level of groundwater, and the composition of the soil. This is the most important stage in construction on uneven sites.
The following steps are identical to those carried out at any site.
Foundation plan breakdown
After clearing the construction site, the area under the future house needs to be leveled. Hills must be razed, holes, on the contrary, must be filled and compacted. At this stage, it is not necessary to level using a level; a regular level screwed to a flat bar 2-3 meters long will suffice.
After this, the very important stage of laying out the foundation plan on the ground begins. Its essence is to transfer the drawing from the drawing to the ground of your construction site.
First you need to determine the dimensions of the future home. On the plan, the house is tied to the so-called “red line” or to the boundary sign. First of all, you need to find this sign and, stepping back from it according to the plan, mark the position of the first wall and the corner of the house. After this, using a tape measure and a theodolite or an “Egyptian triangle” (that is, a right triangle made of planks with sides of 3x4x5 m), the remaining lines and corners of the foundation are measured. Temporary pegs are driven into the corners.
Carefully check the corners of the foundation, they must be strictly straight (for rectangular foundations). If you do not have an accurate instrument such as a theodolite, you can determine with high accuracy the rectangularity of the drawing by measuring both diagonals - ideally they should be equal. Do not use cords as they will stretch and the measurements will be inaccurate. It’s better to take a long tape measure, then you can control the length down to millimeters.
After marking the corners, you need to install the “cast-off” of the house. To do this, corner pillars about 10 cm thick with corner supports are installed at a distance of 1-2 meters from the future walls of the building. The indentation is made so as not to damage the main markings when excavating the foundation and future construction work, and the supports are made so that the pillars do not move from their vertical position.
After installing the pillars, boards (1) are attached to them at the level of the zero level of the house, aligning them strictly horizontally. This is the template for the future “zero”. If “zero” turns out to be too low and it is inconvenient to mark at this level, then you can fix the boards at a height of 1-1.5 meters. In any case, it is better to check the depth of the finished trenches or foundation pit with a level.
After installing the cast-off, they mark it out - measure the position of the actual boundaries of the foundation and put the appropriate marks on the cast-off boards, signing everything. At the marks, nails (2) are hammered into the boards, to which tension cords (3) are then attached. You can make your own markings of intermediate important points on the cords. Then it will be convenient to attach a plumb line to these points and determine the position of the desired point on the ground.
It is important to once again check the perpendicularity of the tensioned cords. This is done in the same way as when initially marking the corners of the house - by measuring the diagonals.
After the foundation is marked, excavation begins. This process differs depending on the type of foundation, so it will be discussed in articles about the construction of specific types of foundations.
When does it make sense to raise a site?
One of the worst geomorphological conditions is considered to be a rise in groundwater level above the depth of soil freezing. In such areas, heaving is especially pronounced, which is why there is a need for complex types of foundations, for example, pile-grillage. Shallow foundations do not work in such conditions, and full deepening requires support on a layer of soil 2.5–3 meters from the surface; above that, the foundation remains unstable and can be subject to precipitation due to high soil moisture.
Types of designs
As you know, the foundation is the foundation of every house. Depending on the type and composition of the soil and its application, several types are distinguished. Its main task is to transfer the weight of the house to the ground.
What should be done first during construction:
- Conduct a soil analysis.
- Make a quality layout. How to mark the area for the foundation, features of the work and calculations - this is the first and most important stage of the work.
- Make waterproofing using columnar or pile foundations
- Purchase quality materials.
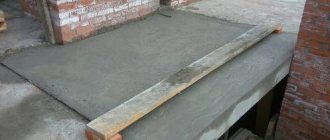
Concrete preparation for the foundation
The main and probably the most important advantage that concrete preparation for the foundation has is its relatively low cost. Why are the costs in this case much lower? Firstly, such preparation does not require special and additional equipment, devices and chemical reagents, and secondly, much less time is spent, i.e. no need to pay employees for extra hours.
Concrete preparation for the foundation is carried out in two ways: without reinforcement and with reinforcement.
Reinforcement-free method
less expensive, but also less reliable. In this case (to save on cement), so-called lean concrete or crushed stone is used for the foundation. Lean concrete is concrete that contains only five to six percent cement, and the rest is crushed stone or gravel. The grade of such concrete is M100 or M200, which means not very high quality, but at the same time low cost. Crushed stone and lean concrete are laid in a layer of 20 cm, carefully compacted and filled with bitumen resin. Of course, this method of preparation is not suitable for serious buildings, but for the foundation of various utility, technical and auxiliary premises it is just right.
Concrete preparation for the foundation is more reliable and is necessarily used in the construction of reinforced structures. What is it for? Firstly, the safety of the entire building will depend on it, and secondly, it increases resistance to erosion of groundwater, especially if it is close to the surface. It is recommended to use only grade M50 and higher concrete as a raw material for the manufacture of concrete preparation for the foundation. It must be laid in a layer of no more than 10 cm. This is enough to level the site and create a reliable foundation. In other cases, the concrete preparation is poured in a relatively small layer, the thickness of which varies depending on various factors, for example, the total mass of the building, soil type, etc. Then the concrete grade and layer thickness will be selected based on the project parameters. In addition, concrete preparation for the foundation helps prevent the leakage of cement mortar from concrete, since this greatly reduces its quality, reduces the load force by distributing the forces that appear in the soil, and makes it more convenient to install reinforcement, since such a flat surface allows you to do all this with the greatest accuracy.
Today, various construction polymers can serve as a replacement for concrete or gravel-sand preparation. Manufacturers of such materials believe that their cost is not only much lower than the prices of cement mixtures, but they are also more functional and technologically advanced.
Types of foundation
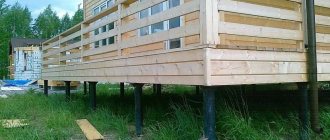
Previously, they used one main type of foundation - concrete; a good half of Soviet buildings were laid with it. Now there are houses with no foundation at all. Basically, foundationless buildings are built for outbuildings. You can build a house without a foundation in one of the simplest ways. The method consists of constructing a foundation from pillars-supports; these supports will support the building.
Fencing a construction site
There are the following types of structures:
- Tape. This is a fundamental ribbon-shaped structure embedded in the base of the building. A strip foundation is laid in order to reach a difficult-to-compress area of land. The width depends on the weight of the house; the wider the foundation, the less pressure on the ground. Clay soil or soil with groundwater is not problematic for installing a strip foundation. Such a “sole” is not recommended if the soil structure is particularly uneven.
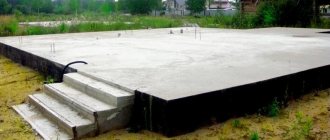
- The foundation slab is a paved area. The load with this design is minimal, but at the same time it is most susceptible to destruction of all types of structures.
- Column and pile foundation. These two types are similar, but not the same. They are designed for the most difficult soils (for swampy areas). Such foundations are laid by driving and screwing piles into the ground.
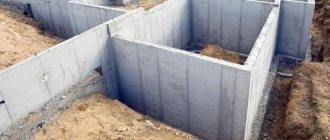
- Combined types - foundation with a basement. To do this, a pit is dug, the walls of the basement are mounted in it, and then the floor is poured.
- Columnar. This is done by placing pillars in corners and areas where walls intersect. With such a foundation it is impossible to build a basement.
- Monolithic foundations are used in the construction of lightweight wooden structures.
- Tiled foundation is one of the monolithic foundations; a monolith is often used as a floor.
- A floating foundation is used on bulk soils and areas with abundant groundwater.
- Screw foundation. Consists of screw piles, designed for soils with groundwater and landslides.
Preparing the ground for the foundation
Preparation for the foundation - what and how
Preparation for the foundation is a set of actions necessary to ensure that the base of the foundation fits as tightly as possible to the base of the soil, as well as to ensure that the soil itself has optimal characteristics for the subsequent pouring of the foundation.
The main action of preparing for the foundation consists of two main stages:
- soil preparation - moistening or draining, if necessary, and its subsequent compaction (compaction);
- preparation of the pit (cleaning the bottom of the trench).
Preparing the site for marking
Before carrying out work, you should ensure that you have the tools. To mark with your own hands you will need:
- Metal tape measure.
- Wire made of twine or steel.
- About a dozen wooden stakes.
- Plumb and hydraulic level.
- Reinforcement scraps
- Laser range meter and level.
Before marking the location of buildings on the construction site, it is necessary to prepare a construction project and prepare the site. The project must be drawn up taking into account the size of the building, the characteristics of the soil, the thickness of the future walls, the presence of a basement floor, the placement of sewerage and the type of building material for the building. Standard installation technology involves maintaining squareness.
The density of the soil, the quality of the material and the depth of the trench influence the design of the foundation - vertical (depth up to 1 meter), with a slope (depth more than 1 m).
When preparing the site, you need to clear the site of debris, level the surface, to do this, level the soil, remove all holes and bumps.
It is worth initially preparing a good storage place for building materials, as well as providing a place for storing waste - it should be located so as to provide access for vehicles to remove waste. Directly during the installation process, water and electricity will be needed; providing these and similar benefits of civilization will be mandatory.
Soil compaction methods
As we have already said, there are several ways to compact soil. Let's look at each of them in more detail.
Deep compaction
First way:
preparation of the foundation by soil compaction. Here, the role of special equipment, as is already clear from the name of the method, is a heavy rammer. The rammer can be reinforced concrete or made of carbon steel. It has the shape of a truncated cone with a strong center of gravity located in its lower part. This shape and location of the center of gravity allows it to fall strictly vertically, which guarantees maximum impact intensity when falling on the ground. The weight of the rammer ranges from five to fifteen tons, and its standard diameter is from 1.2 to 3 meters. The heaviest rammers are used when preparing foundations where loess soils and loose sands predominate. In any other cases, the dimensions of the tamper are selected based on the depth of compaction determined by the project, the area and shape of the base to be compacted.
External boundaries
The organization of the work process for marking the area for the foundation takes place in several stages. First on the list is the beginning of the marking. Marking a site is a very important process; if certain rules and proportions are not followed, an error may occur, which in the future can lead to the destruction of the building.
- The first peg is driven in as follows: so that it is located closest to the boundary of the site. An even line in length is measured from the first peg; it must run parallel to the front border. The width of the line is measured in the same way.
- The resulting angle should be 90 degrees. To check whether the angle is correct, you need to use a laser receiver. If such a device is not available, you can use an alternative square with sides of at least one meter.
- The vertical mark is made by hand in case of installation of a prefabricated block structure. For this, several layout slats are prepared, with special divisions, the standard step is 20 centimeters.
Designation of foundation boundaries
The slats are driven in at all outer corners; they must be in a vertical position. The layouts are immersed in the ground until the first mark (zero) reaches the surface of the foundation. To check, you can apply the Pythagorean theorem - a triangle with sides 3,4,5 has a right angle, which is formed by joining the smaller sides to the larger one. In practice, this work is carried out in this way:
- Take a cord 12 meters long.
- From the beginning of the rope, a mark is made for the first 4 m, then a mark is made every 3 m.
- The cord is attached to the first marking line; the section where the first four meters are marked must be made perpendicular to the beginning of the cord.
- The remaining end of the rope should be fastened to the beginning, so that the resulting angle between the shorter parts will be right.
- If the ends of the rope are not connected, then there is an error in the calculations, in which case you need to adjust the size of the section and move the pegs.
- For foundation marking of the site, it is better to select the correct (whole) angle value.
What mistakes can be avoided
Before construction begins, you should not plant any plants on the site. In most cases, they get in the way and do not receive proper care. You should also not neglect thoroughly cleaning the space from organic debris. Plant remains will rot and may cause fungal infection of wooden building materials.
Remember that proper leveling, organization of drainage (if groundwater is close), and high-quality uprooting of unwanted bushes will allow you not to return to this work in the future. Try to prepare the entire area of the site at once, because after the delivery of building materials and the start of work, cleaning the area may be difficult.
The best way to save money is to perform as many operations yourself as possible. However, if the site is large and also very neglected, preparation may take many days. If you are not ready to waste your time and energy, then call ZEMLECHIST. You will get a clean area in just one day!
More information on the topic: Prices for clearing a site for construction! Prices for raising a plot in a dacha.
Internal boundaries
You should start marking the internal contour only after completing the external contour marking. According to experts, the optimal foundation thickness is at least 40 centimeters. The thickness is measured from the outer boundaries, the inner boundaries are fixed with a peg.
- If the structure has internal load-bearing walls, external and internal markings are made in a similar way. In order to reduce the pressure on the ground when marking each existing corner, you need to check the equality of the diagonals of the square.
Digging a trench along the border line
The final step is to draw internal boundaries.
The last step is drawing out the borders. In this case, all calculated data for the future construction are marked on the surface of the site. Before fencing, the top soil layer is removed.
- The fencing is carried out with wooden slats; they are mounted into the ground along the width at a distance of one and a half, two meters from the corner. When the cord is pulled, the resulting enclosure forms a contour of planes; one plane should cover several columns.
- The planks must be nailed to the same level. The length of the base of the structure depends on the height of the cast-off. The correct enclosure is of the same size, taking into account the slope and topography of the surface, since the height of the foundation is measured from the base in the depth of the trench to the enclosure.
- The basic order of markings is the same for many foundations, regardless of the size of the trench or the design of the foundation.
By following the instructions, it is quite possible to mount the markings yourself.
How to level it yourself (with the help of small mechanization)
If the area is small or there is no way for special equipment to enter it, you can try to level the area yourself. It is advisable if several adult men take on the work, firstly, this will speed up all the rough physical work, and secondly, the result will be more accurate, because more than one pair of eyes will be watching the alignment process. It all starts with marking and placing vertical beacons on pegs - in this case, pegs are installed only on elevations and slides. When all the rising points are marked in the area we are working on, we proceed to the second stage - using a construction rod or a pre-selected board with a perfectly flat side, we combine two nearby peaks, the resulting gap between the soil and the flat side of the rule or board is thrown earth and level the top layer. After all the irregularities between the designated peaks are filled in at once, the entire surface of the area on which we worked will be an order of magnitude smoother. If you are not yet satisfied with the result, you need to repeat the markings at high points again and once again fill all the cracks that have formed on the leveled area with earth. Next, you need to compact all the poured earth; instead of an industrial vibrating plate or roller, you can use an old barrel, throwing stones, bricks, concrete mixture or the same earth into it for greater pressure on the ground. You can attach wooden handles to it to make it easier to roll.
How to level a site with a cultivator:
Installation features
When planning to create a common pit, it is better to excavate the earth by machine (excavator). The manual method will be too time consuming. The stages of work are carried out in the same order as for manual soil processing.
The following points must be taken into account:
- The boundary of the trench should exceed the size of the foundation; experts recommend retreating half a meter from each wall.
- If the cord is worn, it can impede the movement of the equipment, so it should be well secured. To do this, the borders are filled with sand or significant stakes need to be placed around the entire perimeter.
- Control over the excavation of the pit must be carried out, since the excavator with a bucket will probably capture the excess part of the site.
- After placing the cast-off at the level, a cord is pulled, from which, using a plumb line, you can control the outer foundation side during installation.
- A cord or wire is pulled at the level of the base of the pit. This is necessary for precise placement of the pillow under the blocks.
- After marking the area for the foundation is completed, you can begin installing the foundation.
How to manually make a level area
The best dacha plot is flat. It will be easier for inexperienced summer residents to work on a flat area. When leveling a site with your own hands involves changing small differences in ground level, you need to:
- Mark the area into squares using pegs.
- Insert pegs at the corners of the squares and pull the rope.
- Attach the rope to each peg evenly in height. This way you can see all the unevenness of the ground.
- Use a shovel to remove excess soil by hand and add it to existing holes.
- Do not touch the area for about two weeks.
- Remove the pegs and level the ground with a rake.
This is how you level the area with your own hands. If it is difficult to level the ground yourself, you can use equipment. For example, rent a tractor for particularly labor-intensive work.
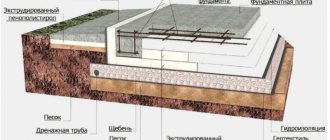
Differences between an insulated monolithic Swedish slab and a video about its construction
As mentioned earlier, the insulated slab under the house developed by Swedish builders is energy-saving. During its construction, permanent formwork made of extruded polystyrene foam is used. As a result, heat leakage into the ground is minimal. The second fundamental difference is the water heated floor system built into the slab.
Since engineering systems are poured deep into concrete, it requires accurate and competent calculations. High demands are also placed on execution. Even small mistakes are critical. You can make USP yourself, but it is better to order the project. See the following photo for an approximate breakdown of costs. The amounts are no longer relevant, but the percentages are correct. The cost of the foundation project is about 1%.
Approximate percentage of costs for a monolithic slab foundation
In the following videos you will see the stages of making a Swedish stove for a specific house. Many useful devices are described that will make work easier, and explanations are given for some of their features.