Nowadays, modern, high-quality and functional foam blocks are perfectly suitable for fast and almost spotless renovations in an apartment when constructing interior walls. And when asked how to create a partition in an apartment from foam blocks, there are good tips, tested by specialists, which are presented in our article.
The relevance of this material is simply explained by its low cost, availability with a large selection of such foam concrete options and almost all the valuable specific advantages that are not typical of other construction analogues.
For example, air bubbles inside these blocks significantly reduce their weight and repeatedly enhance thermal insulation. So, the savings and properties of such walls are irrefutable, especially if you build it yourself.
The main properties of foam blocks
Let us specify the main advantages of these blocks:
- Cellular concrete gives low heat transfer, which means we do not need to waste additional money on thermal insulation and expensive insulation materials.
- Foam blocks perfectly muffle sounds - so additional sound insulation is no longer needed.
- The air cells of foam concrete practically do not absorb water. This is the most fundamental requirement for any building material, guaranteeing the reliability and durability of the building. Such a foam block wall in an apartment is completely not subject to shrinkage.
- Foam concrete does not burn and does not even support combustion.
- Foam concrete blocks are environmentally friendly, which is very important for our health. Such blocks are in 2nd place after wood in terms of environmental safety: they do not emit toxins (Ancient Greek toxin (toxikos) - poisonous - poison of biological origin)
. - The cost of a cubic meter of foam blocks is 40% cheaper than the same amount of brick.
Drywall as an alternative
An acceptable alternative to strengthening walls with plaster is to cover them with frame materials, such as plastic panels or plasterboard. This method is much simpler, faster, cleaner and cheaper than plastering. Drywall is an environmentally friendly material, it creates a pleasant microclimate, provides good sound and thermal insulation, and in addition, it will help level very uneven walls without excessive hassle. Its architectural and design qualities make it possible to experiment interestingly with interiors. A wall made of foam blocks covered with plasterboard can be painted, covered with non-woven wallpaper or tiled.
However, it is worth considering three important points: firstly, you still can’t do without putty. Secondly, drywall can only be used in small, regularly heated rooms with normal humidity levels. Thirdly, you should think in advance where you are going to hang kitchen cabinets, shelves, heavy lamps, etc., in order to maximally strengthen the metal frame on which the drywall is mounted in the right places.
Making walls
Tips for working
Without a doubt, any beginner who has never renovated an apartment before can independently build a wall from a foam block.
- For “clean” but strong bonding of blocks, we can use not cement, but new high-quality adhesive mixtures specifically for foam blocks.
- The wall must be erected strictly according to the level, then the foam blocks for the partitions in the apartment will line up completely evenly.
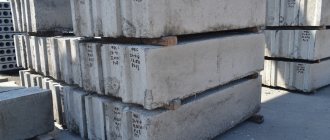
- foam blocks;
- reinforcement, reinforcing mesh, alloy rods;
- glue;
- betoquartz contact (i.e. acrylic styrene primer).
Materials
Calculation of the number of foam blocks
We will measure the characteristics of the partition, taking into account the clearances of windows or doors.
- Total area of the partition: multiply the height by the length.
- From this acquired area we subtract the area of all planned openings.
- Determine the area of the foam block.
- We calculate the number of blocks: divide the resulting area of the partition by the area of 1 block and get the number of blocks.
Laying foam blocks
Because building a wall of foam blocks in an apartment?
- Let's start by marking the boundaries of the future partition, first on the floor, then symmetrically on the ceiling and, accordingly, on the walls.
Pay attention! Experts advise using a modern laser level. To perfectly mark the lines, use a tapping cord or marker.
- Using this marking we install the iron smoothing base from the profile. This will ensure normally even strips of foam block laying. And we align the middle with a stretched cord.
Advice! Before laying, the floor, ceiling and walls must be cleaned of dirt and covered with a high-quality, deep-penetrating primer.
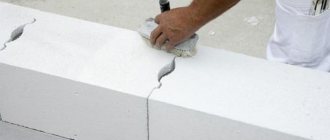
- We fasten the blocks with glue for foam concrete, or with ordinary cement. But the glue gives perfectly even seams, increases thermal insulation and provides strong adhesion.
{Instructions} guarantees glue consumption for 2mm joints - 15 kg/m3. It is more economical to apply this adhesive solution with a spatula so that when laying the block the glue does not drip copiously.
By the way, let’s not forget about grinding in the foam blocks when laying them: slightly rocking the block, press it into the solution on the lower foam block and move it to the adjacent block.
Pay attention! This masonry will be strengthened by rods and reinforcement pins driven into the load-bearing walls in the places where they adjoin any new row of blocks.
- 2 days after finishing the masonry under the ceiling, we will seal the gap with polyurethane foam. It is even cleaner, lighter, better than cement.
Preparation of lumens
When solving the problem of how to create a wall of foam blocks in an apartment, we remember that after installing the partition, it is worth disassembling the framing base - it is no longer needed.
- Now we will trim the door or window openings and trim the edges with a saw.
- If this requires cutting a gap in the partition, we will create it a little larger so that the installation of the window or door is correct.
- The foam blocks at the top need to be firmly strengthened. To do this, we will cut deep 10 cm grooves at the top of the side walls and insert pins secured with spacer wedges.
- Before finishing the surface, we will create the wiring.
- When finishing, we will fill all the voids with a good quick-drying substance.
Interesting read: Do-it-yourself TV wall mount
Strengthening the wall
- We cover the foam concrete partition with plasterboard, wood, plastic, or usually plaster it.
Reinforcement and plaster
Before applying plaster, foam concrete walls are treated with two layers of deep penetration primer with hydrophobic, that is, water-repellent properties.
After the primer has dried, the foam concrete wall is reinforced with an all-metal or fiberglass mesh. The optimal mesh cell size is 25x25 mm. It is attached to dowels, which are installed in such a way that the mesh between them is tensioned and fits tightly, without gaps, to the wall. Then, if necessary, beacon profiles are installed on top of the mesh. Work using reinforced mesh is a little more expensive, but the mesh greatly facilitates the plastering process itself, and also serves the main purpose - strengthening foam concrete walls.
If you plan to plaster a small area, you can do without reinforcing mesh. Just make a series of frequent, neat notches on the wall. Since foam concrete is a rather soft material, notches can be made with a regular hacksaw. However, this is only true for cut foam blocks. If the foam block is not cut, but cast, mesh reinforcement, even in small areas, is not only desirable, but necessary, due to the extremely low adhesion of this material. That is why, before starting work, a smooth block of cast foam concrete must be carefully processed with sandpaper or a file in order to give the surface the necessary roughness and increase its binding ability.
After installing the mesh and beacons, the foam block wall is treated with a special gypsum, moisture-resistant, vapor-permeable plaster. It is better to take a ready-made dry mixture specially designed for surfaces made of foam concrete and aerated concrete. It is simply diluted with water and is easy to apply. You can make the necessary mixture with your own hands: 3 parts sand, 1 part cement, 1 part lime, 0.6 parts chalk. After applying the plaster, the wall must be puttied.
Walls made of foam blocks are painted with water-based silicate and silicone paints, which additionally cover shallow, up to 2 mm, cracks and, thanks to antiseptic additives, prevent the appearance of bacteria and microorganisms.
Conclusion
Let's briefly list the order of work:
- marking the space for laying a foam block partition (possible with profiles);
- We drive reinforcing bars into the load-bearing walls through any 2 rows, also in the floor (self-tapping pins and dowels will also work);
- Let the other end of this rod fit into a horizontal, even seam of the masonry (candidates are duralumin hangers, one edge attached to the block, and the rest to the wall);
- along a stretched cord, place the first row of blocks moistened with water on the primed floor;
- Next, we lay out the 2nd row, so that the vertical seams do not coincide with the first row;
- we reinforce the first 2 rows with a laying network or rods, or even a fiberglass network, and then the next ones in the same way;
- we lay a support on the door clearance;
- We will leave a 1 centimeter gap at the ceiling, which we will later fill with foam;
So, with little labor input, we will build all-purpose walls with sound absorption, efficient heat transfer, and good strength. Everything is simple, and the video in this article will clearly demonstrate all aspects of the work.
Budget savings
When using this material, you can save about 25% on heating costs, because such houses accumulate heat. This leads to a reduction in heat that is lost through the external walls of the building; thick-walled insulation for houses made of foam blocks is no longer so in demand.
However, there is one feature of the work process - during construction you need to use reinforced foam blocks. This is done to increase the strength of the structure, because the walls are subject to various loads, which include horizontal loads created by winds.
There is no need to underestimate them, because the larger the wall area, the greater the wind resistance it experiences. Vertical loads include: point loads from floor beams, window and door openings. And a reinforced foam block can withstand all these loads.
Below we will provide a small list of areas that require reinforcement:
- Long walls . As mentioned above, the loads on them are enormous.
- A row of blocks under a window opening . The entire width of the opening is subject to reinforcement, plus one meter in each direction.
The doorway is also subject to “reinforcement” using reinforcement
- Those places where the jumpers rest on the blocks . Just as in the previous case, the support zone itself is reinforced, plus the perimeter in different directions from the lintel.
Construction of partitions from foam blocks with your own hands
Builders approach the construction of partitions from foam blocks differently. There is a lot of discussion on this topic, but even adherents of traditional brick interior walls agree that working with foam blocks is faster and easier. Even a beginner who has never done such work before can do the installation of partitions from foam blocks with his own hands.
Foam concrete surface
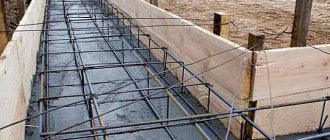
Before installing the ceiling, you need to install an armored belt on the foam block. Arm belt is a reinforced concrete strip, 10 to 30 cm high, designed to evenly distribute the weight and load of the floors on the walls.
This is called getting rid of point loads. In addition, it increases the reliability of foam block masonry and helps prevent splits.
The photo shows a reinforced belt in foam concrete blocks with a layer of insulation
Note! The only disadvantage of the armored belt is the requirement for additional insulation, since in comparison with foam blocks, masonry with ordinary mortar loses in all thermal characteristics. But this can also be easily eliminated; with a block thickness of forty centimeters, the armored belt is filled to 30 cm, and the remaining 10 cm remain outside and are filled with insulation.
Such walls, like any other, need external finishing.
This would work great here:
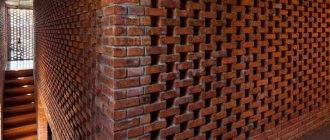
- Facing brick.
- Various types of siding.
- Easy application of plaster. When applying plaster, it is best to use a construction mesh to increase adhesion.
- Facing a house from foam blocks with facade bricks.
Important! The use of ordinary dowel nails on such walls is strictly prohibited; special dowels having a completely different shape and diameter must be used here. The price for them is not much different from standard hardware.
What foam blocks are used?
To understand which foam blocks to use for installing partitions, there is not enough information about the material as a whole.
Foam concrete is made from sand, cement and a foaming agent. The more binding component, the stronger the product and the greater the weight. But with all this, the thermal insulation characteristics deteriorate. Depending on the density, foam concrete blocks come in the following types:
- structural;
- structural and thermal insulation;
- thermal insulation.
Products of the first type are the strongest. These include brands D 1000-D 1200. It makes no sense to use such a foam block for partitions.
The most common is structural and thermal insulation material. D 500-D 900. It has low thermal conductivity and sufficient strength properties. It is used both for the construction of walls and for the installation of partitions from foam blocks.
And thermal insulation. D 100-D 400. Take closer to the upper limit. The construction of partitions specifically from such foam blocks is most common.
In fact, when choosing foam concrete blocks, it is easier to focus on the gradation depending on the area of application:
- thermal insulation;
- wall;
- partition foam block.
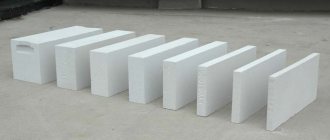
Regardless of its purpose, the length of the block according to GOST does not have to exceed 600 mm. A typical product has dimensions of 600x300x200 mm. For laying interior walls, partition blocks measuring 600x300x100 mm are used.
Well, the last thing I would like to say about the material is that, depending on the production method, molded and cut products are distinguished. The first ones are obtained by pouring foam concrete into molds, separately, piece by piece. The second ones are cut from foam concrete mass.
Sliced ones are usually the highest quality, both in size and composition. In other respects, this is, of course, important, but not as much as in the construction of load-bearing walls.
The construction of partitions from foam blocks is often carried out from tongue-and-groove blocks. It is comfortable and most reliable.
Answer
Properly laid blocks will not wobble even if there is no mortar at all, if the blocks have precise geometry. In the old days, stones were laid without mortar, hemmed so that the blade did not pass through, and nothing, medieval castles still stand (by the way, these types of masonry are still used to this day, but they have not become widespread due to the high cost of making “ideal” ones) blocks).
A common misconception is that the mortar “sticks” the masonry elements together. This is wrong. The solution ALIGNS the places where masonry stones rest on each other to distribute the load over the entire plane of contact of the blocks. Essentially, the solution performs a precise adjustment of the stones to each other. The fact is that the task of masonry walls (and they are designed for this) is to perceive vertical load. But only.
Indeed, after the mortar has set, a wall made of small blocks acquires the properties of a single structure, but this is a consequence of the cement hardening processes. binders, that is, a nice bonus, but the initial task of the masonry is to support the load of its own weight and the weight of the structures resting on the masonry.
The destruction of a structure made of individual blocks occurs precisely because of the loss of stability of the walls, and of course, the fact that the wall is shaking is very bad.
As for the appearance of cracks in vertical joints, this is a normal phenomenon, moreover, inevitable, since after setting the solution shrinks. To prevent cracks from appearing, jointing is carried out simultaneously with the laying (in the simplest case, grouting). By the way, wall laying is often done without special filling of vertical joints (the so-called “empty space”), for example, this is usually done on internal walls, partitions that are subsequently planned to be plastered. That is, this does not affect the overall strength and stability of the masonry.
A masonry grid across a row is usually redundant in terms of the structural strength of the wall for garage walls, with the exception of the front wall into which the gate is built. Usually free-standing structures (without lateral dressing), for example columns, are reinforced. Partitions that have a relatively small thickness, corners, especially critical elements (where structures rest on them, for example). Reinforcement is performed to strengthen the wall against loss of stability, crushing and shearing loads.
But let's get back to your problems. It's a pity that you didn't send any photos; it's hard to say anything from the description. But if the wall sways, then the problems are usually:
- the foundation is made incorrectly, i.e. the foundation is unstable or missing; - the binding of masonry stones (blocks) is incorrect or absent altogether, that is, the wall does not have a solid structure (in this case, as a rule, individual elements will wobble); - the wall does not have connections with others at the junction points (a free-standing structure); such a wall, of course, will yield under a sufficiently large lateral load, since it is not fixed; - poor-quality horizontal seams, that is, the presence of foreign inclusions in the masonry mortar, incomplete filling of the bed with mortar, etc. (in such cases, usually one or two adjacent blocks can sway, where there is a defect; it is unlikely that the ENTIRE wall will be out of order poorly built).
If possible, send photographs, if possible of high quality, of a general view, places of junction with adjacent walls, close-ups of problem areas of the masonry.
And yet, some mobility of the masonry is sometimes acceptable (a certain elastic plasticity is inherent even in brittle stone materials), but just that some. If the structure can be deformed even by small impacts, and if cracks also appear, then most likely something is wrong.
Leave your tips and comments below. Subscribe to our newsletter. Good luck to you and good luck to your family!
How to calculate the required quantity
The easiest way to use the calculator is on a construction website. A reliable website to eliminate the possibility of errors. I'll try to get one in the future.
And it’s not that difficult to do the calculations manually. Everything you need to know:
- foam block size for partitions;
- total length of walls (m);
- average height (m);
- total area of window and door openings (m²).
- We multiply the height by the length of all future partitions.
- We subtract the area of the designed openings (windows, doors).
- We calculate the area of one partition foam block.
- We divide the total area from the first pt by the area of the 1st block.
- We add 10 percent. Definitely. Because there will be both forced halves and an unforced fight.
What will we need?
Materials:
- construction blocks actually;
- adhesive for foam concrete;
- polyurethane foam;
- fittings for lintels (at the rate of two pieces per opening);
- reinforcement fittings or iron mesh;
- fastening corners (they can be replaced by a zinc-coated perforated strip);
- boards.
Tools:
- construction mixer (as a simplified version: a hammer drill or a drill with an attachment);
- gun for working with polyurethane foam;
- a hacksaw or grinder with a cutting disc for stone or concrete;
- building level;
- roulette;
- hammer with rubber striker;
- trowel;
- spatula-comb (do not abuse the comb, apart from the rest, it significantly saves the solution).
Auxiliary equipment:
- container for adhesive solution;
- brush (broom);
- beacons;
- cord (line);
- dyeing thread for marking.
Personal protection:
- protective glasses;
- respirator;
- gloves.
Because When sawing blocks, a lot of dust appears; I strongly recommend that you carry out the work in a respirator and safety glasses.
Testing modern technologies
Fix hanging kitchen cabinets, install radiators or stair railings... For such tasks, you need to choose the right fasteners depending on the material in which you will install them. After all, a fallen dowel will cause a lot of problems when fixing critical structures and variable loads. The cabinets may be damaged, the radiator may leak, and a significant piece of the wall around the hole may fall off along with the fasteners! We list the main solutions for the most common loose materials.
Dowels for gas and foam concrete
For example, you want to install an air conditioner in a private house made of foam blocks. Which fastener should I choose? The most common mistake is using concrete dowels. They will not stick to a loose wall! Moreover, the thinner the element, the greater the likelihood of falling out. There is no point in trying to strengthen the dowel using traditional methods: after all, there are special fasteners.
Dowels for aerated concrete and foam concrete come from different materials. Plastic ones are suitable for attaching lightweight objects, such as paintings, lamps, shelves and mirrors. Metal ones can withstand heavy loads and are intended for installation of equipment, partitions, plumbing fixtures, etc.
It is important to know: the foam block has a cellular structure and is quite fragile. Therefore, for fastening heavy objects, it is better to use dowels of large diameter, for example, 10 - 14 mm. It is worth considering the shape of the element. If it has longitudinal ribs , there is a risk that the fasteners will become loose and fly out of the wall due to changing loads. The transverse ribs better engage the material inside the hole, so they are not afraid of dynamic loads. They are great, for example, for hangers or shelves.
We'll tell you how to secure a dowel in foam concrete. We drill a hole, screw in the plastic element using a hex key, and then fix the suspended object with a screw or self-tapping screw. You will need a screwdriver, or better yet, a screwdriver.
Drywall dowels
Partitions, niches, suspended ceilings... Increasingly, they are made from gypsum plasterboard - plasterboard sheets. These are literally two sheets of cardboard with compressed plaster between them. The structure of the material is very loose, so heavy shelves or air conditioning units cannot be attached to it. However, you have to fix lamps, photo frames, baseboards or cable ducts. For such purposes, there is a special fastener - drywall dowels.
Note : now there are elements that do not require pre-drilling the wall. This solution reduces the risk of the hole becoming loose. You can take so-called self-drilling dowels with a drill-shaped tip. There are also classic ones, but they require a special attachment for the drill. The butterfly dowel is suitable for structures with variable loads, as it has spacers and is securely fixed in the wall without the risk of twisting.
Chemical anchor
An almost win-win way to strengthen a dowel in a loose wall. Suitable for brick, thick layer of plaster, foam and aerated concrete. Fixation occurs due to the spacer of the shell at the base, and the adhesion is created by the chemical composition that secures the stud or reinforcement. It has been proven that a chemical anchor can withstand 2.5 times more load than a standard threaded fastener. Suitable even for installation of equipment. You can read more about the installation process in a separate article.
Development of masonry partitions made of foam blocks
For installation, foam blocks with a width of 100 mm are usually used. Interior partitions made of foam blocks often have this particular thickness. If the work is carried out in a private home and the foundation has not been poured for the partition, then you need to make a shallow foundation 30-40 cm deep. In order for the partition in the apartment made of foam blocks to be stable, the floor covering is removed up to the floor slab and a level screed is made.
Vertical beacons (profiles) are installed on the back walls so that the partition made of foam blocks is strictly vertical.
To make the interior partition made of foam blocks stronger, and for fastening to adjacent walls, pieces of reinforcement with a diameter of 10-12 mm and a length of 40-50 cm are placed in blind holes 100-150 mm deep in 2-3 rows. These works can be carried out both during the process of reinforcing the partition from foam blocks, and separately.
Step-by-step {instructions} for constructing a partition from foam blocks
The construction of partition walls is carried out similarly to masonry from all other piece materials. The construction of partitions from foam blocks involves ligating the rows to separate the vertical seams. This increases the strength of the structure being built.
Construction of partitions from foam blocks step by step.
- Removed debris and removed dust.
- A primer is applied to the ceiling area, load-bearing wall and floor.
- Surfaces are marked. Draw a straight line with chalk. Another option is to use a strong cord or narrow twine for marking. First you need to create marks on the ceiling. For the correct geometry, before erecting a partition from foam blocks, other boundaries are marked in advance by level.
- If necessary, before installing the foam block partition, a soundproofing floor covering is installed. You can lay a layer of roofing felt or other rolled material with similar qualities.
- Lengths of iron rods are driven into the floor to support the first course of masonry.
- A layer of adhesive is applied to the wall and floor surfaces. This could be a cement-sand mixture or assembly adhesive.
- The partition foam block is installed close to the wall. At the same time, binding with reinforcement is carried out. Half of the rod, 25 cm long, is inserted into a hole drilled in the supporting structure. The remaining part is laid between the rows of masonry material.
- When installing foam concrete blocks, the following rows must be offset with respect to the previous horizon. Small deviation - 25% of the length of a separate partition foam block.
- An indispensable condition is reinforcement of the masonry.
- If clearance is planned, then after the 7th row for the lintel, 2 reinforcement rods are laid in grooves prepared in advance in the blocks. After this comes the laying of at least 2 rows. There should be a gap of 20-40 mm between the ceiling and the foam blocks of the partition. After two days, the glue will dry and the gap can be filled with construction foam.
- The dimensions of the doorway are adjusted using a grinder, removing excess bulk and at the same time controlling verticality.
- If the construction of a partition from foam blocks is carried out during construction, a gap of 15 mm is left between the top row of interior foam blocks and the ceiling. It is blown out with polyurethane foam on both sides of the wall. This thermal gap compensates for possible shrinkage of the structure.
About the mandatory gap between the ceiling and the top of the partition in a little more detail. The fact is that over time the building shrinks. Load-bearing walls can sag, but partitions cannot. If there is no gap, the ceilings can be pushed through and the foam concrete partition can be destroyed. Well, polyurethane foam, which is usually poured between the partition and the ceiling, absorbs such movements.
The need for reinforcement
There is a worldview that increasing strength is only necessary if construction is carried out in a seismic zone. But when the site is located on stationary soils, this is not necessary.
However, in a private home, especially if the partition made of foam blocks is not interior, it is better to create reinforcement. When she shares a toilet and a pantry, for example, having only one point of contact with a serious wall.
For reinforcement, iron mesh or reinforcement is used.
In the first case, strengthening is carried out as follows:
- Glue is applied to the row of masonry, on which the mesh is laid.
- The reinforcing material is pressed into the mixture, and excess glue is removed with a spatula.
The mesh does not have to protrude above the surface of the binding solution, because this will lead to a decrease in the properties of the bond of masonry rows.
In the 2nd option, the reinforcement is placed in previously prepared grooves and filled with glue. Rods with a diameter of about 8 mm are used.
Material selection
Exterior wall finishing made of foam blocks: blocks, insulation, plaster.
So that the hard work of strengthening the walls does not go in vain, the first thing you should pay close attention to is the quality of the foam blocks themselves. Walls made of high-quality material will serve well for many decades, while low-quality foam concrete will begin to collapse within a couple of years. Therefore, you should purchase foam blocks from trusted manufacturers, having previously read the hygiene certificates and test reports. The foam block should be gray, but not white, slightly rough to the touch, dense, without cracks or chips. It should also be remembered that after release the foam block must rest for at least 28-30 days. During this time, it gains the necessary strength. A foam block that has not “ripened” to the required condition is very similar in properties to unfired brick and crumbles easily.
Foam concrete walls should be strengthened during the construction stage. This is achieved by properly reinforcing the masonry and pouring a concrete armored belt 10-20 cm high under the floors, sufficient to support the weight of the floor slabs.
The blocks are reinforced every three to four rows using masonry welded mesh, which is a guaranteed way to increase the strength of foam concrete walls. Since the diameter of the masonry mesh is 4-5 mm, grooves are cut out for it in the masonry. They are made with a wall chaser, circular saw or grinder, since foam concrete is easy to process.
Upon completion of construction, there are two ways to further strengthen the walls made of foam blocks: plastering with reinforced mesh or covering them with frame materials, such as plasterboard.
Tips for beginners
Experts recommend that newcomers adhere to the following rules:
- prepare the adhesive composition or cement-sand mixture in small portions;
- lay the partition foam block no later than 10-15 minutes after applying the glue;
- work should be carried out at a temperature of +5...+25 °C, at the highest - the block must be wetted;
- It is better to apply the mixture with a notched trowel, the seams will be even and of similar thickness;
- apply the binding solution to the horizontal and end parts of the foam block for partitions;
- the laid block must be settled and leveled vertically and horizontally;
- reinforcement should be carried out through 3-4 rows;
- remove bulges with a pick or grater, remove dust from the surface;
- use block halves for dressing.
The installation process is shown very clearly in this video:
Application of reinforcing mesh
During the masonry process, a standard reinforcing mesh can be used, which makes it possible to obtain a durable, reinforced foam block. Use a 4-8 cm wide mesh made of steel wire.
It is convenient to use a purchased mesh. You can make it yourself by welding or fastening transverse and longitudinal rods with knitting wire. After placing the mesh on the masonry and marking the locations of the rods, make the corresponding grooves in the block elements. The number of grooves depends on the size of the squares in the grid.
When placing the grid in the cells, pay attention to the joints, which should not extend beyond the plane of the block. Concrete the finished frame with a high-quality concrete composition. Remove excess concrete with a spatula, leveling the filled cavities with the level of the block surface.
Properly selected and installed reinforcement can not only prevent the formation of cracks, but also make the wall stronger and more reliable.
Possible errors
What mistakes can there be if the installation of partitions from foam blocks is carried out for the first time.
- Poorly laid 1st row leads to deviation from verticality, which is unacceptable not only for the walls of the building, but also for partitions made of foam concrete.
- The strength of the structure decreases if the masonry is carried out in the rain, as well as at negative temperatures, if a non-frost-resistant mortar is used.
- Seams that are not completely filled negatively affect not only the strength of the partition, but also the heat and sound insulation between rooms.
- If you do not sweep away dust from the blocks during laying, the adhesion between them is reduced, which can even lead to the formation of cracks.
- The lack of reinforcement significantly reduces strength and reliability.
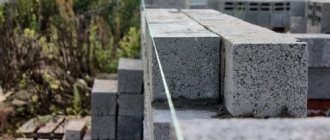
Installation of the second row
The second and all subsequent rows of walls begin to be laid from the corners after measuring the deviation from the vertical and horizontal position. When performing such work, the cord is moved to a higher block and secured in the seam. An adhesive mixture is used to lay all subsequent rows, which saves material and work time.
It is not recommended to lay foam blocks with gaps crossing at an angle of 90 degrees; such seams only weaken the masonry. For high-quality dressing of seams, the products are shifted at least 25% of the length. The ideal option is to bandage half the size of the element.
The second and subsequent rows of blocks are laid on glue. The thickness of the building mixture should be within 5 millimeters. The glue is applied with a notched trowel, spreading evenly over the surfaces. After laying and preliminary leveling, the thickness of the seam will decrease to 3 millimeters.
During work, the horizontal and vertical position of the blocks is adjusted using a plumb line and a building level. To improve the load-bearing capacity of the wall, reinforcement is carried out every 3-5 rows of blocks. To do this, grooves of the required depth are made in the products and reinforcement is laid. Attention should be paid to the fact that the metal rods should not extend beyond the surface of the blocks.
When laying foam concrete with your own hands, you must comply with a number of requirements:
- The adhesive composition or cement-sand mortar must be prepared in small portions, because such substances retain their performance characteristics for 1.5-2 hours after mixing.
- The blocks are adjusted within 10-15 minutes after installation. When doing DIY work, use mixtures with maximum adjustment time. In this case, an inexperienced builder will have more time to level the masonry. When using a high-quality solution, it will be problematic to correct the block without damage.
- Work on the installation of foam concrete walls must be carried out during the warm season from spring to mid-autumn, at temperatures from +5 to +25 degrees.
- To simplify installation, the surface of the blocks is moistened. After such procedures, the adhesion of the porous surface improves.
- You can apply an even layer of glue using a notched trowel.
It should be noted that finishing work is carried out only a month after the walls are installed. This is due to significant shrinkage of foam blocks, up to 3 millimeters per meter of length.