Plastering walls made of aerated concrete and gas silicate is performed using the same methods, although these materials are different.
For the production of aerated concrete blocks, a concrete cellular mixture with round cells of 1 - 3 mm is used. diameter Shaped in the form of bricks. Curing can be natural or in an autoclave. Has low thermal conductivity.
Gas silicate blocks are also cellular blocks made on the basis of lime, sand, water and gas-forming additives (aluminum powder and analogues). Drying is carried out in special ovens. The products are characterized by slight sound insulation.
When to plaster aerated concrete walls indoors
Now let’s study the question of how to plaster aerated concrete walls inside various rooms, based on the time of year, temperature, and humidity.
Indoor work involves the release of large amounts of evaporated moisture. She needs to go outside. This happens most quickly if the outside walls are “bare”.
Sometimes it is necessary to maintain high permeability of walls in certain rooms. In these cases, you should use textile, non-woven or paper wallpaper for finishing. Vinyl is not recommended. They don't let steam through.
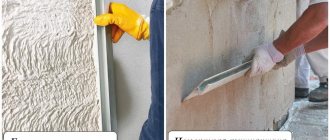
Types of plasters for aerated concrete blocks
Rice.
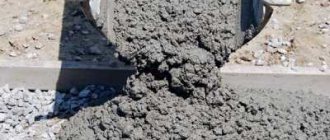
1. Types of plaster for aerated concrete and aerated silicate We choose what to plaster aerated concrete with to ensure the required properties - protection from temperature changes, weather resistance, excellent adhesion:
- Gypsum plaster for aerated concrete with perlite sand. Compatible with all finishing materials. It dries quickly, does not shrink, and allows you to make the surface as smooth as possible. No finishing coat required. Cons: high water consumption. A bag takes up to 15 liters. It should not be used outside as it does not withstand precipitation well.
- Cement is heavier and will not work without lime components. Therefore, a combined composition of cement, lime and additives is used.
- Silicate is made on the basis of potassium liquid glass. It is durable, moisture resistant, and easy to apply. Provides resistance to abrasion and dirt. The service life can reach 25 years.
- Silicone based on organosilicon polymers, resins. Provides strength and elasticity, protecting against cracking even during shrinkage. A good solution for facades. The downside is the higher price compared to other types.
The most popular manufacturers are Ceresit (mixtures CT 24 and 77), Osnovit (Startwell T-21), Baumit, Weber.pas. These products are certified according to modern standards and are of high quality and reliability.
We described in detail about other types of plaster here.
Price comparison
Very often, the choice of building materials has to be made based not only on their technical characteristics and appearance, but also on cost. In this table we have collected the most popular plaster mixtures for aerated concrete with an indication of their cost.
Keep in mind that prices may vary not only in different regions, but also in neighboring stores.
Therefore, they are given approximately so that you can compare and roughly estimate the budget.
| Plaster brand | Price, rub | Packaging, kg |
| Cement | ||
| Aegis XI-S-42 will win | 240 | 25 |
| Bolars | 205 | 25 |
| HandPutz Baumit | 260 | 25 |
| Plaster | ||
| Aegis TM-35 will win | 270 | 30 |
| Knauf Rotband | 400 | 30 |
| Acrylic | ||
| Ceresit ST 60 | 1850 | 25 |
| Baumit Nanopor Top | 4300 | 25 |
| Silicate | ||
| Baumit Silikat Top | 4100 | 25 |
| Knauf Kati | 3500 | 25 |
| Silicone | ||
| Ceresit ST 75 | 5200 | 25 |
| Terracoat Silicone | 4050 | 25 |
| Kreisel SilikonPutz | 1950 | 15 |
To compare prices, it is not enough to calculate the cost of plaster per kilogram. You need to know its consumption and layer thickness, which is necessary to level the surface.
Features of plastering walls made of aerated blocks
It's better to start with the internal rough work. When the moisture comes out, move on to the outer walls and facade. But how to properly plaster a gas block in different rooms? If work is carried out in a damp room, a cement-based composition is used. It is not destroyed by water, but only gains strength. It is important to install a powerful hood. Plaster will last less. And over time it will collapse.
For work in bathrooms, mixtures of lime, cement and sand are used. You can use those you make yourself. Don't forget about reinforcement. A mesh with a density of at least 120 is used.
Gypsum plaster for a wall made of aerated concrete is suitable for residential premises. It is vapor permeable, which is important for creating the desired microclimate. Low material consumption is also ensured. The surface is easily smoothed to a glossy finish. Therefore, you don't have to putty it.
The final work is carried out with a special finishing solution. If the surface is plastered for wallpapering, it is not necessary to sand it. Smoothness is not required here. And when plastering for paint, you will have to eliminate minor defects. After all, they will be noticeable even after painting in several layers. The finishing layer is fine-grained putty. It is rubbed with sandpaper, and then dust is removed from the surface.
Thickness of plaster on aerated concrete
What is the best way to plaster aerated concrete for facade work, and how thick should the layer be? Vapor-permeable compounds are usually used:
- On a mineral and silicate basis - 2 mm or more.
- Lime-cement mixtures - from 10 mm.
- Silicone – 2 mm.
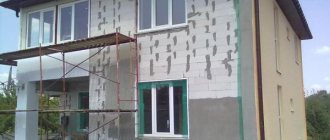
Rice.
2. Scheme of plastering a façade made of aerated concrete. If internal plastering of aerated concrete is carried out, the thickness depends on the composition. Typically gypsum mixtures are used. In this case, 2 to 5 mm of the mixture should be applied to the wall surface. Aerated concrete walls usually do not have significant differences or irregularities. Therefore, no leveling is required when performing interior work.
If you use cement plaster mixtures, the thickness should be at least 10 mm, otherwise they will crack and peel. If internal aerated concrete plaster is applied in rooms with high humidity levels, the requirements are as follows:
- Cement-sand-lime, self-mixing compositions – 15-20 mm.
- Ready-made cement-sand with additives and cement-lime - at least 10 mm.
Compliance with these requirements ensures reliability and durability.
If the thickness is 10 mm or more, beacons are used.
Required Tools
To complete the work, you will need a notched spatula with teeth up to 6 mm long, plastic or fiberglass mesh. Also prepare a deep penetration primer. If subsequent tiling is planned, a suitable adhesive is needed. To knead, you will need a construction mixer or drill with a suitable attachment. Also prepare a set of alignment beacons.
Work order
Applying plaster to aerated concrete blocks is carried out according to the following scheme:
- Preparing walls for plastering. If there are any unevenness or chips on them, they should be repaired. It is important to align everything to the same level. Any repair solution or special glue for this material will do. Consider structure. For example, a sawn block does not require additional preparation; formed ones need to increase their adhesive ability by opening the pores.
- Next, dust is removed with a metal brush.
- Now a layer of primer for aerated concrete is applied under the plaster. Use a roller, brush or spray to save money. They also often use an old vacuum cleaner, setting it to blow mode.
- It is important to use reinforcing mesh when plastering aerated concrete. It is secured with a small amount of mixture or construction fasteners.
- The first stage of plastering is carried out. The solution is applied mechanically or manually.
- The plaster is leveled according to the rule. Grouting is in progress.
- After complete removal of moisture, you can carry out a fine finishing or apply a decorative third layer of plaster.
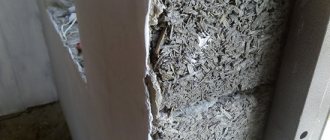
Rice. 3. Applying a primer to aerated concrete and leveling the plaster
Reinforcement
Before plastering, walls made of aerated blocks must be reinforced. It is necessary to install reinforcement even if you plan to plaster the walls on just one side, either the inside or the outside. Reinforcement can be abandoned when the inside of the wall is sheathed with plasterboard and the outside with siding.
A gas silicate wall is not reinforced with the aim of increasing its load-bearing capabilities. Reinforcement is needed to prevent cracks from forming when bending the wall. Such loads occur when the foundation moves unevenly.
The reinforcement is mounted on the first row of masonry, then every four rows. In addition, the support areas of the lintels and under the window openings are subject to reinforcement. It should extend a meter in each direction.
Reinforcement can be made using ordinary rod reinforcement with a diameter of eight millimeters. First, furrows (grooves or fines) are cut. Before installing the rods, the cut grooves are filled with special glue or cement-sand mortar. The rods are cleaned of dust and placed in grooves. Two rods are placed in each furrow. The rods are pressed into the glue or solution until completely covered. After completing the pressing procedure, excess solution or glue is removed.
Instead of rods, you can install a special reinforcement cage. It consists of paired strips of galvanized steel, which are connected by wire.
Subtleties of applying external plaster to aerated concrete
The procedure for applying plaster to aerated concrete for exterior work looks approximately the same. First, leveling is carried out, then priming with mixtures based on acrylate siloxane. After this, you will need a thin layer of mortar onto which the mesh is attached. It will protect against cracks.
After leveling, apply the next layer to form a smooth, uniform surface. Next is grouting and applying the finishing layer. After about a year, it is recommended to apply protection - a water repellent solution. It will provide a water-repellent effect.
Most often, construction begins in the spring and continues in the summer. The drying time of the foundation and walls is taken into account. First, the performers complete the external work, and move on to interior decoration as the weather gets colder. The required temperature is maintained by heating.
Ten years of experience of our specialists shows that the facade needs to be plastered only after the interior finishing and floor screed have completely dried. Otherwise, concrete, which has a cellular structure, will not be able to remove moisture in time.
When cold weather sets in, the condensation will turn into ice, destroying the material from the inside. If the cold takes you by surprise, it is better to wait with exterior work, limiting yourself to a primer that penetrates deeply into the pores.
The question arises: what should be used to plaster aerated concrete on the outside of a house to ensure durability? We offer several available options:
- If you need an inexpensive, breathable option, use a mineral composition. Water-repellent mixtures withstand significant temperature changes well and are inexpensive.
- Silicate plaster materials protect the facade from mold. Even if the surface has changed color after precipitation, it will dry out and return to its natural state. Also, the surface does not attract dust. The only negative is that there is no choice of colors. It can be removed by painting.
- Silicone plaster for gas block is also suitable. It is durable and plastic. Sold in various color variations.
The block structure absorbs moisture very quickly. Therefore, the mixture must contain moisture-retaining components. If there is little liquid, cracks will appear, and when there is a lot of it, the drying process will be delayed.
Advantages of gas silicate
First, let's briefly look at the performance characteristics of the building material. Aerated concrete has a number of obvious advantages that explain the popularity of its use. In addition to the already mentioned attractive cost, these include:
- Clearly consistent block size. This allows for laying in perfectly even rows, and not a thick layer of ordinary mortar is used to adhere the blocks, but a thin layer of a special adhesive composition. As a result, “cold bridges” that cause a lot of inconvenience in the future do not form in the masonry.
- Light weight. The intensity of the load on the foundation and, as a consequence, the likelihood of uneven shrinkage depends on the total mass of the structure. If you follow the technology for laying lightweight aerated concrete blocks and carry out the necessary procedures for reinforcing the structure, you can not be afraid of distortions in the house and the appearance of wall cracks.
- Heat and sound insulating properties. According to this indicator, gas silicate occupies a leading position among the main building materials. The porous structure creates excellent energy-saving characteristics and prevents the penetration of external noise.
- High vapor permeability. This property of the material ensures the maintenance of a constant microclimate in the interior. The house will not be damp when it rains, and you will not have to use humidifiers in the dry heat.
Does the technology for performing the work depend on the finishing of the facade?
When choosing how to plaster aerated concrete inside a house, take into account the façade finishing and the presence of external insulation.
Water vapor is constantly generated in the house. It appears during washing, cooking, during cleaning, when residents take a bath. Part of the moisture is removed through ventilation and removed naturally. But in winter this process slows down. The vapor pressure inside becomes higher than outside.
Moisture penetrates the wall, trying to escape. Success will depend on the vapor permeability of the external walls. The maximum indicator will be for a block without finishing. But no one will leave a “bare” wall. Therefore, it is important to create a structure in which vapor permeability (μ) gradually increases from indoors to outdoors. A reliable solution is to install a ventilated façade.
Vapor permeability and humidity balance
If plastering of aerated concrete walls was carried out using heavy cement mixtures, it is important to ensure proper ventilation. The best solution would be forced exhaust systems. They allow you to remove excess moisture.
If the aerated concrete surface is protected from the outside by a ventilated façade system, a gap is provided to allow vapors from the room to freely escape outside. This allows you to use different types of plaster for aerated concrete without fear of disturbing the vapor permeability parameters. Do not use foam for protection. It has almost zero vapor permeability. Mineral wool will do.
If you want to balance the humidity, then when finishing the interior, use materials with a vapor permeability lower than that of the blocks. These can be special hydrophobic impregnations, paints, compositions with a dense consistency or moisture-resistant wallpaper. However, in this case, the importance of arranging high-quality ventilation increases. Otherwise, a greenhouse effect will occur.
Insulation of aerated concrete walls
Rice.
4. Laying insulation (mineral wool) on aerated concrete or gas silicate As soon as the aerated concrete plaster is applied, the wall should be insulated. Should we rush? If protection from moisture was not provided during construction, you must first dry the structure for 2 to 5 months (depending on the climate), and only then proceed with insulation.
If you choose from the available materials, it is better to buy extruded polystyrene foam. It has zero thermal conductivity. For a better fit to the wall, notches are made on the surface.
Polystyrene foam is often used for outdoor work. However, it is important to correctly calculate where the dew point will be. Foam insulation reduces the natural vapor conductivity of the walls. As mentioned earlier, this means the cost of a powerful forced ventilation system.
Mineral wool is also used. It is non-flammable and environmentally friendly. The service life when using high-quality samples from Knauf, Termolife and other brands is up to 70 years. A fiberglass mesh is attached over the mineral wool and a layer of glue is applied.
Let's sum it up
By doing all the work yourself, you can save tens of thousands of rubles. The money saved can be spent on furniture, high-quality finishing materials or something else. If this is your first time doing this work, it is better to study the entire process in detail and only then start plastering gas silicate blocks. Doing everything yourself is quite possible. All that remains is to put all this into practice.
Additional material on the topic: How to plaster without beacons.
Manual and mechanical plastering of aerated concrete walls
You can mix and apply the material by hand. You control the process, but you spend more time. A mechanized station is much more efficient. Firstly, you save time. Secondly, you ensure the quality of surface treatment. Thanks to this equipment, aerated concrete plaster is laid down in an even layer, neatly.
There is another nuance. The installation grinds and mixes dry ingredients with water more efficiently. This way you achieve homogeneity of the mixture, which means the required parameters over the entire surface. The consistency is controlled by hardware. The speed of work increases by 3–4 times.
Rice. 5. Mechanical plaster
Less costs for materials, since they are cheaper for machine-assisted plaster. Thanks to pressure supply, adhesion to the wall improves. There are several disadvantages - you need a three-phase network, drying up to 7 days, high noise level. This is not relevant if the walls in a new building are being plastered.