Do you want to live like behind a stone wall? Just build a concrete fence and your dream will come true; construction will also cost much less than a stone one. Reinforced concrete products combine two opposing characteristics of a permanent fencing - durable construction and aesthetic appearance. You can see this for yourself by looking at photos of concrete fences.
Advantages of concrete fences
Concrete fencing has many advantages, which is why they are increasingly appearing both in urban areas and in suburban areas:
- exceptional strength and durability;
- the fence does not deteriorate over time, it is not exposed to natural factors;
- a solid concrete fence has excellent soundproofing properties;
- if necessary, the fence can be made without joints and gaps;
- the concrete surface can be easily finished with any finishing material;
- concrete is the most economical material of all capital ones.
Relative disadvantages include the large weight of the structures.
The construction of such a fence will require considerable labor and the mandatory installation of a foundation.
Concrete fences differ in their manufacturing technology and functional purpose.
Advantages and disadvantages
Concrete fences have the following advantages:
- durability and reliability,
- simple installation that does not take much time,
- fire safety (concrete does not support combustion),
- high level of reliability (concrete fences effectively protect the territory from penetration),
- long service life,
- easy maintenance, practicality,
- a large selection of design options (fences can be painted, plastered, decorated with tiles).
Among the disadvantages, it is necessary to note the high weight of the sections, which often requires the use of not only support pillars, but also a foundation.
Stacked (sectional) fences
Stacked, or sectional, are called fencing, each section of which consists of several slabs or panels. The slabs can have different textures and differ in decorative design. The posts for a stacked fence have grooves on the sides into which the panels fit.
The main difficulty in constructing a sectional concrete fence is the precise installation of the posts.
The distance between them should correspond to the length of the panel. Otherwise, the panels will not stay in the grooves or will not fit there at all. As a rule, a strong foundation is made under the pillars of such a fence so that they do not warp after the phase of freezing and thawing of the soil. The convenience of a stacked fence is manifested in the assembly of panels into the grooves of concrete fence posts. Each of the parts is light in weight; two or three people are enough to carry and stack it. Top panels that are installed at a height of more than a meter are usually made openwork. Due to the numerous holes they become much lighter and easier to install.
Decorative concrete fencing
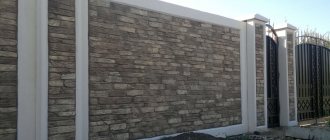
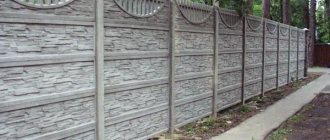
Decorative fencing is made in a wide variety of styles and colors. With the help of decorative concrete casting, craftsmen create durable and aesthetic compositions that combine perfectly with other materials - wood, openwork forged metal, natural stone. Manufacturers offer many options made to resemble brickwork and stone of various textures. Concrete casting successfully imitates a balustrade and even wooden lining. Decorative concrete fences are in great demand when fencing private property, where solidity and respectability are primarily required.
Preparatory work
The first stage of the work is marking the territory:
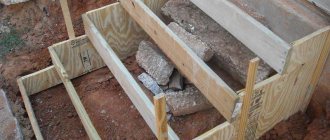
- If a strip foundation is used, you should use a rope and pegs to mark the boundary of the site and determine the location of the supports. With this width, the future ditch should be equal to the width of the section or blocks plus an additional 40 cm for reserve.
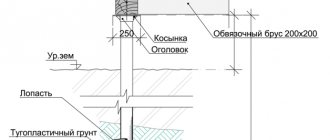
- The depth of the trench should be from 60 cm, with high soil moisture - from 80 cm. To correctly determine the depth, it is necessary to take into account the characteristics of the region and soil, the freezing point, and the occurrence of ground moisture.
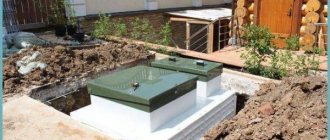
Most often, a strip foundation is used for a concrete fence; for this, a layer of sand and crushed stone is poured onto the bottom of the trench, and waterproofing in the form of a sheet of roofing material is used for the walls. The next step is to install support pillars, formwork, and pour concrete.
sand cushion
Laying the foundation
Waterproofing scheme
When pouring the foundation, it is recommended to use a reinforcing belt, which provides the necessary strength of the foundation and the ability to withstand the weight of the fence.
How to make a concrete fence with your own hands
To install a concrete fence with your own hands, you will need tools and building materials:
- steel reinforcement 4 mm for the fence and 8 mm for the posts;
- crushed stone with a fraction size of 2–6 cm;
- washed river sand;
- cement grade of at least M500;
- molds for casting concrete;
- plasticizer;
- concrete mixer;
- vibrating table
You can buy a vibration table ready-made or make it yourself. To make it yourself, a frame is welded from a metal corner and a vibration motor is mounted on it.
It is possible to make concrete panels without the use of vibration equipment, but their quality will be much lower.
Plot
0 votes
+
Vote for!
—
Vote against!
A well-maintained private home should have a reliable fence that protects the area from uninvited guests. Modern plots, country houses and dachas on the street side are often decorated with an aesthetically pleasing decorative concrete fence. A structure of this type is often called a “Eurofence”, although it is not widely used in Europe. You can make and install such a fence yourself, and it will cost half as much as the services of specialized companies. A simple technology for making panels and columns is available to the home craftsman.
Table of contents:
- What is important to know about installing decorative concrete fencing?
- Advantages and disadvantages of a concrete fence
- Cost of prefabricated concrete fencing: calculation features
- Forms for decorative concrete fence
- Making panels yourself using ready-made molds
- Installation of a decorative fence
What is important to know about installing decorative concrete fencing?
The associative series of words “fence”, “fence” and “fence” paints not the most pleasant pictures in the memory. But rough concrete tile panels are a thing of the past, thanks to people who thought of bringing aesthetics to the fencing industry. And now decorative concrete fences are becoming increasingly popular. Of course, no one will make a decorative concrete fence for an industrial zone, but courtyards in residential areas are increasingly being equipped in the same way as the private sector - with an attractive concrete fence. They enclose the territories of kindergartens and schools, private enterprises and banks.
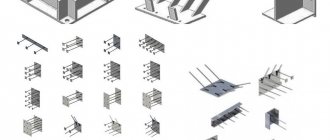
There is no need to rush into purchasing reinforced concrete panels; you can make them yourself if you stock up on molds, tools and patience. To do this, select the types of slabs from which the fence should be constructed:
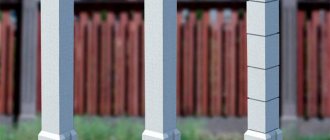
- pillars and supports (concrete concrete, stone, brick, metal);
- decorative panels (solid, openwork);
- decorative finials for a concrete fence.
The panels are made one-sided (with a pattern facing the yard or the street) and with a print on both sides. Compared to ready-made blocks produced industrially, they can be made lighter and more delicate. It depends on the height of the fence, functionality and desires of the owners. Someone wants to isolate themselves from the outside world with a high solid fence. Others like a light openwork fence - the landscape design is visible through its design. Carved figured blocks are one and a half times lighter than solid ones, and much less consumables are required.
No matter how beautiful the future decorative fence may be, there is nothing complicated in its construction. Together with a helper, it’s easy to cast slabs of different configurations in a week, using ready-made molds - for the base, filling and tops. Additional whitewashing or coating with facade paint will help to add individuality to such a fence. A few good examples are a decorative concrete fence, photo:
To install the finished fencing slabs, a team of 3-4 people is invited to prepare holes for the supports. Using markings, they will prepare a line for installing the columns, after which, together with a helper, it is not difficult to install a decorative concrete fence. A hole drill or other suitable equipment will help you make holes yourself. Large monolithic sections are lifted by crane.
Advantages and disadvantages of a concrete fence
Many people have noticed how the aesthetic concrete fence and its decorative panels compare favorably with other fences. And those who installed it managed to appreciate this durable fencing for landscaping the site, especially when its panels have a double-sided pattern.
Advice: There is no point in labor-intensive production of a decorative concrete fence when part of it overlooks the utility part of the yard, runs along a blank wall or tall bushes. In this segment, limit yourself to ordinary panels without a pattern, while maintaining the dimensions and distance between the columns. In the area along the smooth panels, in order to improve the appearance of the fence, plant decorative climbing plants or hang hanging flowers in flowerpots - photo:
The main advantages regarding stone, wooden, metal fences and a transparent chain-link fence:
- relatively low cost compared to other capital fencing with high quality;
- it is possible to do all stages of the process with your own hands;
- quick installation thanks to the prefabricated structure;
- strength of reinforced concrete structures;
- reliable and stable fencing;
- fire resistance, frost resistance and high resistance to adverse weather conditions;
- long service life (about 50 years);
- the ability to replace damaged sections (for example, if a car drives into the wall during an accident) without radically repairing the entire fence chain;
- sufficient choice of design solutions;
- budget updating or changing the appearance of the fence by replacing the upper sections or repainting.
The only drawback is that a solid decorative concrete fence does not allow sunlight to pass through, slowing down the development of flowers and plants. To ensure that the area in the place of the high blank wall is not empty, tall trees or shade-tolerant climbing plants are planted. In Britain, such fences are decorated with evergreen ivy. As an option, in this area of the garden you can set up an area for a barbecue or barbecue.
Attention: If heat-loving plants that require sunlight should grow along a concrete fence, then choose a low openwork option, ensuring full development of the seedlings. Behind a high solid fence, light-loving shoots are withering away.
An important advantage is changing the height of a concrete eurofence without compromising its appearance. Can choose:
- one decorative section - with low partitions inside the site;
- two sections - for a low wall, so that animals on the back side of the site do not wander into the site;
- three sections are a standard configuration, where the lower solid, middle openwork and elegant upper sections of an intricate shape are harmoniously combined;
- four sections - heavy fences where a foundation may be needed, used for a high decorative concrete fence, photo:
Cost of prefabricated concrete fencing: calculation features
Do-it-yourself decorative concrete fences cost almost half as much as ordering from a specialized company. But at the same time, it is difficult to name the exact amount of what the euro fence on the site costs. It is important to consider:
1. The final cost is influenced to a lesser extent by the difference in individual panels from the manufacturer and the complexity of the patterned finish, but by the configuration and installation method. The exact price tags for finished panels are specified by region or selected from catalogs. Do not forget about the columns for fixing the sections, which should be one more, and the tops for the columns. The gap for gates and wickets is subtracted from the total number of sections.
Attention: If it is expensive to install a fence along the entire perimeter of the site, then it is limited to the facade facing the street. Along the remaining length, columns are installed and a chain-link is pulled, which will last for many years.
2. You can save a lot of money by installing a concrete fence made of decorative blocks. If the minimum price per linear meter of a Eurofence is from 1000 rubles, then installation services are priced at half. Installing a heavy continuous fence with a foundation costs about the same as the fence itself. The cost of installing a fence yourself depends on how heavy the concrete sections are and whether there will be a need for lifting equipment. An important factor is the excavation of soil under the columns that are being dug:
- shovels by hand;
- using technology;
- garden hole drill or other device.
3. The cost of a linear meter depends on its height (the number of decorative panels for the fence in one section between the columns). Typically, fences are chosen in 3 sections with the end point of the arch above eye level.
4. When independently producing decorative fence posts made of concrete, finials and typesetting blocks, their cost is affected by:
- type of reinforcement of sections and costs for metal inside them;
- the cost of molds for casting openwork blocks and formwork for solid sections;
- the cost of components for concrete mortar (river sand can sometimes be washed and sifted yourself);
- complexity of the terrain on the site;
- total number of elements.
The costs for forms for solid and openwork sections and columns will pay off if, after successfully making a decorative concrete fence with your own hands, you launch a mini-production. Surely, such a fence will be in demand among friends or relatives at a slightly cheaper price. Used forms can also be purchased through advertisements and sold.
Advice: If you are not confident in your abilities, but want to have an exclusive decorative fence on your site, develop your own version of the sections and let specialists make them to order. But one-time work on an individual design, not stamping, will cost more.
Forms for decorative concrete fence
The easiest way to buy molds for decorative eurofence is ready-made, since there are many enterprises that specialize in their development and production. Solid sections are cast using formwork. You can also make matrices for figured sections yourself - video at the end of the article.
Ready-made forms do not require additional processing after purchase. It’s not difficult to choose a print for the designs you like most, with such a large assortment. To date, about 30 matrix design options have been developed for casting sections, decorative elements and columns.
The forms and panels that seal them are made of ABS plastic with imitation of different patterns, for example:
- wooden plank;
- vine;
- Muslim side;
- chip;
- rope;
- Kremlin wall;
- convex brickwork;
- concave masonry;
- ancient mosaic;
- rocky mountain;
- Chinese Wall;
- lock bars, etc.
There are also composite versions of sections where different materials are combined. The designers also developed sections with a puzzle joint. The most common types of panels:
- one-sided and two-sided;
- solid (monolithic) lower ones, smooth or with texture (like wild stone, brickwork, cobblestones, tiles, wood bark);
- openwork (lattice, patterned, columnar), middle and combined (transitional);
- upper arches.
Making panels yourself using ready-made molds
For self-production you will need:
- ready-made forms for decorative concrete fences and finials;
- formwork for stamping pillars;
- vibrating table for compacting the mixture;
- small concrete mixer;
- machine for welding reinforcing frame;
- pallets or boards for drying items.
Tip: Buy ready-made molds, and there will be no problems with production. This is the best option for quickly assembling a standard fence design. The catalog contains forms:
- made of silicone;
- made of plastic;
- made of polyurethane;
- made of fiberglass;
- made of light metal.
If you want to do something exclusive, make the matrices for the blocks yourself. There are several technologies for independently releasing forms; a good example is in the video at the end of the article.
To make panels and decorative caps for a concrete fence, you will need the following consumables:
- river sand;
- fine crushed stone;
- metal rod for reinforcement;
- high viscosity cement;
- plasticizers (to obtain a solution of the desired texture);
- frost-resistant additives;
- ready-made forms.
The basis of the mixture is ordinary cement mortar, to which crushed stone is added for stabilization. If desired, the form can be sprinkled with granite chips, then on the front side it will have a more interesting texture, sparkling with crystals in the sun. When forming thin concrete products, you cannot do without a frame, and metal scraps and rods that are joined by welding are suitable for reinforcement.
The finials or caps can be rounded or faceted, but you can do without them. The posts for fixing the panels are cast using formwork. They must have recesses that are designed to hold the fence blocks.
Some materials used to make molds for casting concrete products provide some adhesion, which makes the finished product difficult to remove. To do this, you will need a stripping agent or a special liquid sprayed from an aerosol.
When the forms are prepared, the components for the mixture are poured into a concrete mixer in proportion - 2 parts sand, 3 parts fine crushed stone, 1 part cement and water. In order for this base to be better mixed, it is better to add crushed stone and a plasticizer to the cement mixture, about half a percent of the total volume. The water repellent will increase the frost resistance of the blocks and water resistance, which is especially necessary for the lower blocks.
A vibrating table gives the best results - the blocks are uniform, without air inclusions. Don’t forget to put a reinforcing frame on top of the solution, which will sink when vibrated.
Attention: If you plan to make rotary corners, then you need to cast pillars with grooves at an angle of 90°.
Pouring the base is done in an open and closed way, but it is labor-intensive for home conditions. It is used for casting double-sided decorative panels. Open pouring is much simpler; it makes it possible to see preliminary results and eliminate air inclusions. To imagine the entire casting process, watch the video master class:
Installation of a decorative fence
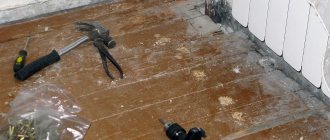
After all the elements of the future European fence have been prepared, all that remains is to prepare the holes for the posts, marked along the stretched rope. Places for fixing points for supports are marked with pegs. The holes are dug at an equal distance, taking into account the shape of the column into the grooves of which the panels will fit. It is important to accurately follow all calculations so that you do not have to redo them. It is very convenient to dig holes using mechanical devices.
To dig in the pillars, you will need crushed stone and sand for compaction, and the holes are filled with concrete on top for strengthening. Be sure to check the verticality of the installation with a plumb line before the solution sets. A foundation is laid under high, heavy fences, but you can limit yourself to supports dug in the center.
The final stage is laying concrete slabs between the pillars. It is important to consider how these slabs will rise and fall into the grooves. If the panels are light and openwork, then two people will be enough, and monolithic heavy blocks can be handled with a crane. Upon completion of the work, the horizontal and vertical lines of the structure are checked and all defects are eliminated. The finished fence can be whitewashed or painted with façade concrete paint after priming. It is easier to work with a spray gun, but if you need to paint individual parts, then this is done with a brush and roller - on smooth parts.
Concrete panel casting technology
Crushed stone is loaded into a concrete mixer, filled with water and washed to remove dust and impurities. Then the water is drained and sand, cement and water are loaded. The exact proportions of the solution for the selected brand of cement are usually written on the packaging.
Currently, there is a wide range of plasticizers on sale - special additives for imparting certain properties to concrete or for accelerating (slowing down) the setting of the solution. When making a concrete fence, plasticizers are used to give the solution mobility, non-delamination and additional strength.
The casting mold is placed on a vibrating table, lubricated with mineral oil to prevent the solution from sticking, and the fittings are prepared. The reinforcement scheme must be thought out in advance, based on the characteristics of the shape. Ideally, the reinforcement should extend across the entire thickness of the panel without protruding on the surface.
The mold is filled to half the volume and the vibrator is turned on. Then the reinforcement is laid, the solution is added to the top of the form and the concrete is compacted again with a vibrator.
At the stage of pouring the form, fasteners should be provided to connect the panel with other parts of the fence - above or below the panels or posts.
After the solution has dried, stripping is carried out - separating the finished panel from the mold. Then the product is rubbed manually or with machines to a standard appearance, the form is cleaned of concrete residues and prepared for the next pour.
Stages of manufacturing sections
Before pouring the mixture, the molds must be greased with a greasy composition to facilitate subsequent separation. If you were unable to purchase a vibrating table, you will have to stand nearby during the setting process and knock (not too hard) with a hammer on the pile or surface on which the forms are placed.
The semi-dry mixture for pouring is prepared in the same proportion as for the foundation. It is important not to overfill the water, otherwise the drying process will be lengthy. In the standard version, the period of setting and initial strength development takes up to 48 hours. Important: the surface should not dry out too quickly. Moistening is carried out periodically to avoid the future appearance of cracks and internal voids.
The finished parts are removed from the molds and left for further drying. Do not forget that concrete reaches full maturity within 28 calendar days. You won't be able to build a fence in a week with your own hands.
Assembly of the entire structure
The finished panels are placed in the grooves of the pillars or the reinforcement of each panel and pillars, previously brought to the surface, is welded together.
At this stage, the installation work of the reinforced concrete fence can be considered complete. The finished structure is additionally finished with decorative materials - plaster, facade paint for concrete, tiles. Be sure to paint all welded parts with weather-resistant paint to prevent corrosion.
Fences made in this way retain all the advantages of a concrete fence. They do not absorb moisture, have low windage, excellent sound insulation, and are extremely durable. A solid concrete fence in rural areas can become a reliable barrier to ground fire during spring grass burning, which leads to huge fires and human casualties.