Even before the advent of high-strength insulation materials, solid slab foundations were considered an effective means of compensating for seasonal (frost heaving) and non-seasonal soil movements. Being “floating”, they maintained the relative position of all elements of building structures relative to each other, even when houses fell into areas of small landslides. An original engineering innovation that combined the solution to energy efficiency problems was the so-called USP foundation, the technology of which came to us from Sweden and Germany. This article describes the design and operational features of the insulated Swedish stove (as the abbreviation “USHP” stands for).
Where is it recommended and when is it advisable to use USP
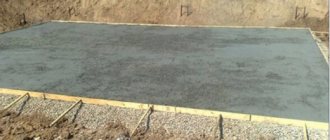
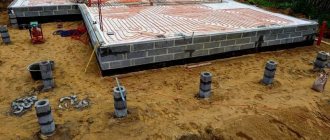
Insulated Swedish slab at the stage of constructing a reinforcement frame and laying a heated floor system.
The construction of a USP is justified in the construction of lightweight buildings and structures, when there is no technical possibility or desire to build a ground floor or basement. It should be borne in mind that the Swedish slab is not just an alternative to a shallow strip foundation for a house, it is an engineering solution for the simultaneous installation of internal communications of the heating system and the basement of the building. When a different heating system or a different method of laying pipes is envisaged, there is no point in resorting to such technology. The Swedes developed it precisely to speed up, facilitate and reduce the cost of the listed construction stages.
Study of the geology of the site
The strength of an insulated Swedish slab directly depends on compliance with technological requirements when preparing the base for the foundation. The first of these is soil research.
USP is recommended for building sites with different types: sand, sandy loam, loam, clay, and even in some cases water-saturated and weak-bearing soils. Also, geological surveys can be combined with digging a well for a well, as in the photo above.
Important:
Since USHP is a slab foundation, it is erected on flat areas. The differences in height should be small, otherwise preparing the base will require more time and money.
In the case of a relief surface, it is better to pay attention to the classic strip, columnar or insulated Finnish foundation close to USP technology.
Design specifics
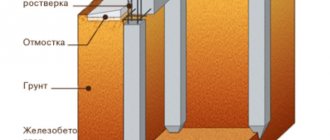
Unlike a strip foundation, a Swedish slab does not have buried stiffening ribs. The entire structure is located flush with the ground and is poured in one step in a non-removable “trough” made of polystyrene foam.
Due to the presence of a monolithic slab and an insulated blind area around the building, there is no freezing of the soil under the building. As a result, there is no movement or heaving of the soil.
The layer of thermal insulation on which the warm foundation rests is not needed to insulate the base, but to prevent heat loss from the room deep into the ground. But the insulated blind area prevents the penetration of cold from the surrounding air to the soil surrounding the building.
Calculation
The basis is taken from the geometric data of the future foundation: total area of the base; foundation perimeter; height of the building. During survey work the following is determined:
- soil characteristics, bearing capacity;
- groundwater level;
- soil freezing height.
Then the thickness of the sand cushion and the volume of concrete to be poured are calculated.
The cost of installing a stove depends on the features of life support systems, the method of supplying electricity and water.
It is important to immediately think through all the nuances to avoid mistakes.
Sequence of construction stages
Any construction begins with survey work and the preparation of design and technical documentation, and the Swedish foundation is no exception.
Survey work
Geodetic tools help specialists improve the accuracy of survey work and speed up their completion.
When buying a plot to build a house on the USP, the first thing you need to do is make sure that the soil on it is not filled. Otherwise, it will not be possible to build a fixed foundation using Swedish technology.
Absolutely all types of soil are suitable for developing USP, except peat bogs and silty, swampy soils. The only mandatory condition that must be met is that installation is carried out only on soils that can withstand the vertical pressure we need. This parameter is calculated individually (but is usually 1.5 kg/cm2).
Therefore, it would not be entirely correct to give any exact figures regarding the depth of the future pit. They may vary depending on the type of soil, the characteristics of the territory and the topography.
During survey work, the level of groundwater and precipitation (including expected ones), the degree of their impact on the structure is determined, and protective measures are developed.
Excavation
The initial work when installing a USP is earthwork. Earthwork
begins only after drawing up a project (with all the calculations, plan, reference to the area).
It is advisable at this stage to supply water and electricity.
The area is cleared of vegetation and the contours of the future foundation are marked. To do this, starting from the reference point indicated on the site plan, find the “angles” of the USP. Drive stakes or wooden frames into the marked points and stretch cords between them - beacons. To better visualize the boundaries of the pit, they are covered with sand.
Then the soil is excavated. If heavy equipment (excavator or tractor) is used for work, it is not recommended to loosen the base of the pit and deepen it further than specified in the project. It is better to do the final finishing of the bottom manually using ordinary shovels.
If during the work the bottom is nevertheless damaged, then it must be leveled and compacted with a vibrating shovel.
Drainage system
After the pit is ready, a trench is dug along its perimeter for installation of the drainage system. The width, which is usually equal to the width of the excavator bucket, and the depth is laid according to the project, depending on the groundwater level, the amount of precipitation in the region and the type of soil. The bottom is formed with a slope towards the water flow, towards the location of the drainage wells.
The trench is covered with geotextile (with a density of at least 300 g/m2) for additional filtration and to prevent blockages in the drainage pipe.
A layer of crushed stone is poured on top, a drainage pipe is laid, and inspection drainage wells are installed in the corners. Fill the trench with crushed stone and cover it with the free edges of geotextile.
Cushion and waterproofing
Having finished installing the drainage system, they begin to form a sandy base for the slab. The following is used as backfill material:
- Crushed stone;
- Sand.
The Swedish company Dorocell recommends using crushed stone. However, this condition is associated not so much with technical characteristics as with the cost of the finished slab. In Scandinavian countries, crushed stone is cheaper than sand. Therefore, it is advisable to focus on the quality and price of the material in your region.
For backfilling, you can use only coarse quarry sand without organic and clay inclusions.
Step-by-step instruction
Laying geotextiles
The layers of the cake are laid as follows:
- The bottom is covered with non-woven geotextile material with a density of at least 200 - 250 g/cm. This material prevents the mixing of layers and the migration of spreading material deep into the natural base;
- A layer of inert material is poured, the thickness of which is specified in the design documentation. Be sure to compact it. The use of rammers is a prerequisite for quality construction;
- If coarse crushed stone is used for backfilling (to reduce cost), then in order to prevent sharp edges from damaging the integrity of the geotextile and membrane, backfilling is done in several layers. First, 2 - 3 cm with small crushed stone, then the required height with large ones, and then again with small ones. To improve the quality of the base, you can add sand to the top layer of fine crushed stone, and then compress the resulting cake with a tamper;
- When using sand, it must be moistened before compaction. The better the base is compacted, the more stable and reliable it will behave during operation.
If tampers weighing 150–200 kg are used, then the compacted layers should not exceed 150–200 mm. If heavy rammers weighing 540–500 kg are used, then layers 300–400 mm thick can be compacted.
- Check the filling level with a level. If necessary, trim and smooth;
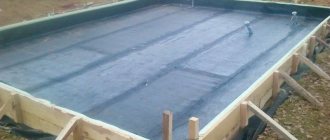
- A waterproofing layer is laid on top of the poured base. You can use regular polyethylene film, but for durability it is better to use a flat geomembrane made of high-density polyethylene with a thickness of 0.3 mm or 0.5 mm. If there is no flat membrane, it can be replaced with a profiled one by filling the spikes with sand. Waterproofing is necessary to cut off the thermal insulation layer from wet soil and prevent the penetration of Radon gas from deep layers into the room.
Communications layout
Installation of communications
After the formation of the sand cushion, restrictive beacons (laces on stakes) are installed, removed during the excavation process. The axis of future utilities (water supply, sewerage, electrical wires) is drawn on the site and their actual location is checked with the project plan.
The soil is removed, forming trenches, and pipelines are laid in them.
Sewerage is laid with a slope towards the flow of wastewater. According to SP. 30.13332016 The slope of the burial of a sewer pipe with a diameter of 110 mm must be 15 mm per linear meter.
Lay water pipes and electrical lines in sleeves or protective casings. The trenches are filled in and the soil is compacted.
Formwork and thermal insulation
Expanded polystyrene blocks are used as USP formwork.
To create the foundation perimeter in USP technology, L-blocks are used, which simultaneously serve as the base frame and permanent formwork when pouring concrete.
For the production of L-blocks, heavy grade expanded polystyrene foam is used, the compression characteristics of which are established by the project, depending on the design load. In accordance with GOST 15588-2014, the following brands are allowed:
- PPP -30;
- PPS - 35;
- PPS - 40;
- PPP – 45.
To obtain corner L-blocks, an additional third plate is glued. To increase rigidity, it is fixed with special fasteners.
Sometimes L-blocks in production are additionally reinforced and decorated with special asbestos-cement slabs, fixing them with polyurethane glue. However, this is a completely optional option.
Laying L-blocks begins from any corner of the building, aligning them along the lighthouse thread and pressing them tightly against each other. After assembly, all seams are glued with polyurethane glue. To ensure that the permanent formwork for USHP is not squeezed out of the blocks during the concrete pouring process, it is additionally fixed with a structure made of wooden beams.
Lay sheets of expanded polystyrene under the future power screed.
Note. The thermal insulation layer is assembled from sheets of expanded polystyrene of various densities. Extruded polystyrene foam is placed in the locations of the stiffeners with supporting structures, and in the middle of the “rooms” there are blocks of medium-density sheets. This not only reduces the cost of construction, but also solves certain technical problems. The vertical load on the stiffeners is much stronger than in the center of the slab, so that the base does not rupture under the influence of gravity, and it is recommended to assemble thermal insulation from various materials that compensate for this difference.
Thermal insulation is assembled from several layers, placing the slabs staggered to prevent the appearance of cold bridges. Typically, the gaps for installing reinforcement frames are covered in one layer, and the blocks between load-bearing bases are covered in three layers. To fix the slabs, they are connected to each other using disc-shaped screw polymer anchors.
Reinforcement
Construction of a reinforced frame for USHP
First, a spatial frame is made for the foundation beams, using ribbed reinforcement of a given section and knitting wire. In order not to compromise the integrity of the heat-insulating boards, it is better to assemble metal structures on separate stands and install them in place ready-made. This is much more convenient, easier and practical.
To prevent the metal structure from touching the heat-insulating layer, it is mounted on special plastic stands.
Next, the lower grid of the foundation screed is laid. You can use welded mesh or knitted mesh with a diameter of 5 mm and a cross-section of 100 by 100.
Heated floor pipes are placed on top and secured to the mesh with plastic clamps or knitting wire. Where pipes intersect with foundation beams, they are additionally protected with tubular insulation.
After fixing the heated floor pipes, install the upper grid of the power screed.
Warm floor
If the heating of the room is planned solely through the underfloor heating system, then before installing it it is necessary to carefully calculate the total heat transfer power and make sure that it exceeds the total heat loss of the building. Otherwise, it is unlikely that you will be able to heat the room and you will have to use additional heating sources.
- Typically, with standard insulation of a building, the turns are placed in increments of 17 - 20 cm. In the ranet zones, the pipes are laid closer to each other;
- If enhanced insulation of the structure is provided on all sides, the pipe placement step can be increased to 25 - 30 cm.
After laying the heated floor pipes, they are collected into a collector, pressurized and left in this state until the concrete slab hardens.
During the pressing process, a slight expansion of the pipes occurs. In the future, the gap formed in the concrete screed will allow the pipes to expand unhindered as the coolant circulates through them.
Concrete laying
The strength of the USP base largely depends on the quality of the concrete used and compliance with the pouring technology. The faster the concrete mixture is poured and leveled, the more durable the USHP slab will be in the end.
If possible (technical and financial), it is advisable to use a concrete pump. In this case, it will certainly be possible to fill the base in one go, without waiting for the concrete to partially harden before pouring.
It is preferable to use concrete using granite crushed stone, even though it is much more expensive than gravel. This is because granite always has sharp chipped edges, which means it has a better degree of adhesion of composites and greater strength. Ideally, if you can buy a brand of concrete M300 or M 350 with the following indicator:
- Waterproof W4;
- Frost resistance F100.
Before pouring the base, it is advisable to install beacons. Using them, leveling the concrete mixture will be much faster and easier. For high-quality filling and removal of air bubbles from the mixture, it is necessary to use a vibrating shovel and a vibrating screed (at the finishing stage).
After the concrete has partially hardened, when it can already be walked on, but the cement laitance will still remain mobile, grinding is carried out using a rotary machine, which is popularly called a “helicopter”.
Such careful preparation of the base allows it to be used as a subfloor without additional manipulations (screeding, leveling, sanding).
Base reinforcement
Reinforcement of stiffeners is done according to the design.
Important:
In order not to damage the laid XPS, the working reinforcement must be tied into spatial frames on the ground, and only then the finished frames must be installed on the reinforcement clamps and tied.
The rest of the foundation, as a rule, is reinforced with one row of reinforcement bars with a cross-section of 6-10 mm. They are placed in increments and tied into a 150x150 mm mesh. The longitudinal joining of the rods is done with an overlap of at least 24 cm.
Important:
the lower protective layer of the reinforcement must be at least 30 mm thick - for this, the rods and frames are installed on special PVC clamps for the reinforcement.
Advantages and disadvantages
(USHP) insulated Swedish stove has a lot of undeniable advantages.
- High speed of installation work;
- Light weight;
- Easy processing;
- Low water absorption;
- High compressive strength;
- Durability;
- Thermal insulating ability.
Of course, like all types of foundations, it also has disadvantages:
- Impossibility of arranging a basement, basement or cellar;
- Low location relative to the ground surface.
Disadvantages often include the high cost of materials and work, as well as the lack of maintainability of internal networks and communications. Such conclusions are spread by people who are new to the technology of laying water supply, sewerage and electrical cables and who have not carried out calculations of the cost of a turnkey building.
Insulation of the blind area
To further protect the house from frost heaving, you need to carry out a simple procedure for installing an insulated blind area for the USHP.
There are three stages of blind area insulation:
- The fertile layer is removed, at least 10 cm of sand is poured and compacted.
- XPS boards are laid on the compacted pad - no mechanical fixation is needed.
- Lay out the PLANTER geo drainage membrane. It is covered with crushed stone on top, or covered with sand with a tamper and paving slabs are laid, or a green blind area is made.
Important:
when installing a sand cushion under the blind area, a slope from the foundation of at least 1.5% is required.
Potential problems and ways to prevent them
Perhaps pragmatic Europeans, accustomed to trusting building materials manufacturers at their word, are building residential buildings with utilities built into the slab (and under it) without fear. However, the harsh realities of our lives force ordinary people to think about the durability of such structures even at the time of their design.
Ardent opponents of building a foundation using Swedish technology argue their position by the impossibility of carrying out repair work on internal utility networks in the event of damage.
In reality, if at the installation stage, sewer pipes are laid in special protective casings, and connecting elements and bends are placed in shafts made of corrugated pipes with a diameter of 350 mm, then replacing individual sections (if the need arises) will not be difficult. Such shafts are recessed into the concrete base only 5 cm, which is absolutely not difficult to remove.
Larger diameter pipes can be used as protective casings. For sewerage Ø 110 mm, cases Ø 160 mm are suitable.
It is better to make the entire sewer network running under the slab from pipes Ø 110 mm. In this case, adapters for a smaller diameter will be located above the surface of the concrete base, which means they will be easier to maintain.
To quickly disconnect the main sewer line, a compression coupling is installed at the outlet from under the insulated blind area. If necessary, dig up an area near the house and, using a long hook, hook a part of the sewer pipe located in the building and pull it out.
To minimize risks, it is recommended not to save on purchasing materials. For sewerage, it is better to use low-noise pipes made of heavy plastic (usually white) and connecting elements with high-quality rubber seals. It is the sealing rings that are the weakest parts of the sewer network - sooner or later they fail and begin to leak wastewater.
Plumbing and electrical lines are installed in the same way.
Of course, this installation method will slightly increase the cost of construction, but it will guarantee peace of mind for homeowners.
Technology development: methods, materials, components
To date, more than 1.5 million houses have been built using the USP scheme in Germany and the Scandinavian countries. In Northern Europe, the insulated monolithic slab foundation technology has received generally accepted status and is reflected in EU building standards. In the USA, complete external insulation of slab foundations is not widespread, since 90% of the country has a frost index of no more than 3000. However, USP has also found application there: first of all, in the construction of “passive houses”.
Over the past 10 years, project developers have given greater preference to extruded polystyrene foam (EPS) as a material that provides more uniform shrinkage of foundations and maintains thermal insulation properties regardless of time and operating conditions. The stresses in concrete arising during the operation of shallow slab foundations were studied in detail. Based on their results, builders abandoned the idea of using insulation materials with different ultimate strengths (previously it was assumed that in order to equalize shrinkage under the floor slab, it was necessary to use less strong slabs than under the stiffeners). It has been proven that the most dangerous stress concentrators in a slab can occur at the junction of different types of heat insulation.
Manufacturers of extruded polystyrene foam began to produce materials and components specialized for the installation of USP.
For example, Dorocell itself currently produces a complete set of “designer” parts for permanent formwork made of EPS. The company's calling card is blocks with built-in guides for fittings. Some brands pay increased attention to the aesthetic properties of the components: the sides of the formwork are molded in the form of plinths of a traditional variable section.
Formwork for USP
If we talk about the domestic market, then there are 2 brands on the market: TechnoNIKOL and Penoplex. Both companies produce EPS of European quality level for slab foundations built using USHP technology. I would like to dwell in more detail on the specialized series TECHNONICOL CARBON ECO SP. In addition to the basic slab formats, it includes L-shaped profiles for quick installation of sides. In addition to the cross-section, these elements are interesting because CSP (cement-bonded particle boards) are fixed to their base parts on the outside. DSPs allow you to apply decorative plaster without additional preparatory stages. Thus, installation of USP using TechnoNIKOL components is currently the most convenient.
USP device using PENOPLEX boards
Ushp: expensive or not
There are even more myths surrounding the cost of the stove. Most residents believe that building a USHP foundation with their own hands is an unreasonable waste.
Construction costs
If you sit down and carefully calculate the estimate of all construction work and materials, the result will be very unexpected. This applies to any point, from using a concrete pump to transporting materials. The cost of renting a concrete pump will not cost much more than paying a team of good concrete workers.
If we take into account that simultaneously with the pouring of the base, installation of all communications, insulation and formation of the subfloor takes place, then the results are almost identical.
Budget option USP
Compounding the foundation
The desire to reduce the cost of the construction process is common to any person. But in this case, you should think several times before you start saving.
The use of low-quality materials (cheap concrete, insulation, pipe fittings) will certainly have an impact in the future and will require repair and replacement. It’s good if you can do it yourself, but if you have to call a specialist, the costs will increase several times.
You should not save on work. If it is said that compacting the base is a mandatory process, then it must be done. If it is recommended to pour concrete at one time and very quickly, then it should be so.
Of course, you don’t have to hire heavy equipment and dig a pit yourself with a shovel, transporting excess soil outside the site in a wheelbarrow, but the basic technological processes must be followed.
Other advantages of an insulated Swedish stove
USP is not only a type of foundation, which is based on a certain construction technology. This is at the same time a warm floor, ready for final finishing, as well as communications brought into the house.
An insulated Swedish slab is very quick to install - the process from removing the plant layer to the complete readiness of the foundation takes only two to three weeks. Thanks to this, it is possible not only to build a house, but also to complete all the interior decoration in one season.
To install a USP, you do not need heavy construction equipment and a huge team of workers. Four people are enough, a vibrating plate at the base preparation stage, simple tools for performing formwork and crimping heated floor pipes, and a deep vibrator when laying concrete. Of the complex equipment, you only need to order a one-time concrete pump with a concrete mixer at the concreting stage.
Thanks to the closed circuit, cold bridges do not form in such a foundation, so the stove allows you to save a lot on heating - payments in houses with USHP can be halved.
In our article, we tried to give step-by-step instructions for installing an insulated Swedish stove. Still have questions? Write in the comments!
How long will it last?
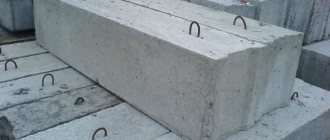
USP blocks
According to the developers of the Swedish company Dorocell, such buildings can serve faithfully for more than 50 years; the same guarantee (sometimes more) is given by manufacturers of high-quality building materials for their products.
Such terms are quite realistic, especially considering that more than 50,000 houses built in Sweden in 1978 on such a foundation are still perfectly preserved. After carefully studying the technology and the possibility of soil freezing, the Norwegians also built more than a million similar buildings at the end of the 20th century.
Therefore, with timely care, such buildings can constitute a serious alternative to traditional buildings.
Warm floors throughout the house at once
Underfloor heating pipes are laid throughout the entire area of the house. The house is divided into several zones, for example, kitchen, living room, bedroom, bathroom. Each zone has its own underfloor heating circuit, which can then be adjusted using a manifold.
It turns out that the whole house is heated with underfloor heating. And if the house is well insulated, then such a system is sufficient for heating in any frost (for a 1-story house or for the first floor of a 2-story house). And this is a very comfortable warmth, it comes evenly from the entire surface of the floor in all rooms, which is much more pleasant than a classic radiator under the window.
Since the heated floor is poured into concrete, the concrete monolithic slab serves as an excellent heat accumulator. It does not warm up immediately, but when it gains heat, it takes a very long time to release it. Even if your gas or electricity is turned off, you won’t feel it right away, maybe after a day or more. The temperature in the house will drop very slowly!
The Comisa underfloor heating manifold regulates the flow of coolant along the contours
* in fact, the order of the story is a little broken, most often the TP pipes are mounted before the reinforcement and attached directly to the foam - this is the best option, but for understanding the meaning of the USP this does not play a role.
Briefly about the main thing
Having considered what USP is in construction, we can come to the conclusion that the high functionality and operational reliability of the structure is ensured by strict adherence to construction technology, selection of high-quality materials and careful preparatory work.
As practice shows, the immediate costs of its arrangement are lower than those of an expensive slab foundation. This is due to the use of less concrete when pouring. In this case, one should take into account savings on partially equipped utilities, as well as a significant reduction in heat loss of the entire building.
If the owner of the house has the opportunity to initially spend a certain amount of money to save it in the future, then it is definitely worth investing in the construction of a USP.
Let's summarize the benefits
By ordering USHP, after completion of the work you will immediately receive:
- Foundation - monolithic concrete slab;
- Divided communications - water, sewerage, electricity, grounding, etc.;
- Ready-made heating system - warm floors throughout the entire area of the house;
- Floor insulation - under the slab there is a thick layer of PSB/EPS;
- Insulated blind area - no freezing of the soil around the house;
- The finished subfloor is smooth and you can immediately lay tiles or laminate on it;
- Finishing the base with flat slate - you can simply paint it;
- Storm drainage and storm water inlets [optional];
- Drainage [optional];
- The resolved sewerage issue is a septic tank or VOC [optional].
Communications - water, electricity, sewerage
Here we will skip a little and move on to point 9. In addition to the heated floor, all the necessary communications are laid inside the slab - these are electrical cables (they can be routed to any place, for example into future walls), pipes for cold/hot water, sewer pipes, water drains for a future shower, you can install a central vacuum cleaner according to your taste and any other cables\air ducts.
Standard set: heated floors, sewerage, cold water/hot water supply and electrical cables
The USHP slab is not created for an abstract house, say, 10*10 in size. You need at least a preliminary design, then you can immediately install heating in the rooms, run pipes to future bathrooms and the kitchen, install underfloor heating and water supply manifolds in the technical room, etc.
Outputs of hot and cold water pipes, there will be a collector here
This is what the “filling” of a standard slab looks like (the first part of the video):
Video description
The video below will show an insulated Swedish stove - pillow preparation technology:
Laying insulation and formwork
After the pillows are ready, they proceed to installing the insulation and begin with the walls of the pit. If standard EPS boards are used, they subsequently become formwork for concreting. But the Scandinavians came up with special blocks and their use significantly simplifies the work. It also makes it much easier to control the correct placement of the material.
L-modules have a locking system that allows them to be connected correctly. Therefore, the desired transition from the vertical to the horizontal plane is immediately formed. And to avoid even the slightest displacement, there is a groove in the upper part of the blocks into which the rod fits. It connects adjacent modules to each other. For horizontal slabs, a steel plate with spikes is provided.
Laid insulation for USHP Source tn.ru