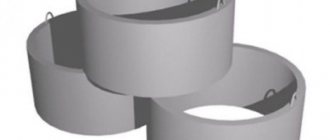
Concrete wells on the construction market are presented in two versions. Concrete wells can consist of several rings that overlap each other, or they can be monolithic, that is, solid. Each system has its own advantages and disadvantages, installation features and service life.
When building a concrete well, you can immediately purchase a ready-made kit, or you can assemble all the parts separately. No detail can be overlooked, otherwise the plumbing/sewer system will not work or a breakdown will occur.
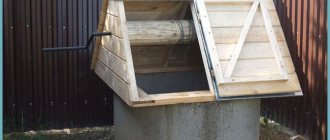
Why is a blind area necessary?
The blind area is arranged for several reasons. The first thing the owner thinks about is how to ensure access to a source of water regardless of the weather. You don’t want mud squelching under your feet or getting tangled in the grass. A level area around the well will eliminate these problems. In addition, it gives the building a beautiful finished look. The second reason is functional. The top of the well is covered with a lid to prevent leaves and dust from getting in. But it also needs protection at ground level. A special threat is rain and melted spring water. When they are mixed with drinking water, it becomes cloudy and tasteless. Additionally, there is a high probability of pathogenic bacteria entering, which then affects the residents. The blind area is necessary because adds beauty to the structure, creates convenience in using the well, and protects the health of everyone who consumes water from the source.
When to start construction?
Major construction of the blind area begins a year after the construction of the well. The long waiting period can be explained simply: during construction around the structure, the structure of the soil was disturbed (it became loose). It is necessary to give time for the soil to compact and for the voids around the rings to disappear. Then any blind area on a dense area will stand for decades without subsidence or cracks. To protect from melt water and rain, make a temporary blind area for convenient access. They remove the soil with a shovel and compact the earth. You can lay plastic film on the bottom, tucking the edges. Cover the top with clay and compact it. To prevent slipping on it in rainy weather, lay several boards or a wooden board. This temporary structure will allow you to use the well without fear of harmful substances getting into it.
It is important to choose the right season for installing a blind area. The best time is May or September, when the soil is moderately moist, the sun is not too hot, and rains are infrequent. The climate of the region makes its own adjustments. The time is chosen so that it is not too hot: dry soil, especially clay, is difficult to dig. The concrete will have to be watered daily to prevent it from cracking. Working with wet soil is no fun either.
Is it possible to concrete in water, how to lay concrete in water
When it is necessary to concrete a surface under water, problems arise with the concrete hardening in water. This usually happens when fence posts and piles are concreted. Or how I had a problem - an inspection hole in the garage, water filled into the pit, and quite quickly.
There are several options. In the garage, I did a simple thing - I expanded the inspection pit a little on one side, dug a hole 30-40 centimeters deep, and made the bottom of the pit sloping into the hole. Water began to collect in the hole, I placed a pump there and pumped out the water from time to time.
Then he poured concrete to the bottom and pumped water out of the hole until the concrete set, then he mounted the wall formwork and poured the concrete. That's it, the concrete has set normally and does not allow water to pass through.
To fill holes in fence posts, you can use several options. The first is to pour concrete into a plastic pipe.
The second is to pump out the water,
lay a piece of foam rubber or thick plastic film, and pour concrete. Foam rubber or film will not let water in and will not prevent the concrete from setting.
Builders' opinions on whether it is possible to pour concrete into water or not vary to the contrary. Some say it’s impossible, the grade of concrete will drop, others say it’s okay, it will only increase the drying time, and the concrete will push water up and prevent new water from flowing in.
I think (I didn’t specifically measure the strength of concrete) that it’s still not worth pouring it into water, especially since it’s quite easy to avoid it.
What type of blind area should I choose?
The blind area is conventionally divided into soft and hard. For the first, you will need waterproofing made of film, which is secured with tape around the shaft. A layer of sand is poured on top and decorated with any material: paving stones, brick, natural stone, wood. The advantage lies in the simplicity of the device, durability, and the possibility of easy dismantling. Solid options are also beneficial. A blind area made of fatty clay does not require any special expenses. It seals well, does not deform, and does not require repairs. The concrete structure is more complex in construction, but if the technology is followed, it lasts almost forever. It is impossible to say unequivocally which blind area is better, because... each has its own characteristics. Experts prefer a soft blind area. Its advantages:
- does not put pressure on the walls of the shaft;
- does not move away from them, as can happen with concrete;
- No worries about subsidence - easy to fix;
- You can change the decorative coating without dismantling the base.
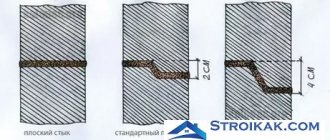
Leak sealing sequence
Before starting work, prepare the surface. To do this, it is enough to crumble the damaged layer of concrete using a jackhammer or similar tools.
At the leak site, create a hole up to 5 centimeters deep and 2.5 centimeters wide. If necessary, of course, you can go deeper. A funnel-shaped hole would be optimal.
Now you need to quickly prepare a hydraulic seal. Mix enough mortar to seal cracks, chips and joints. A lump is formed from this mixture (you can do it directly with your hands), sharply press it into the hole and hold it for a couple of minutes (while it hardens).
Convenient is that the composition is easily held in a vertical position. There is no need to build additional formwork. If the gap is long enough, it will not be possible to completely seal it in one go. Then the hydraulic seal is installed in several stages, working from top to bottom.
In addition to sealing the connections of concrete rings of a country well, a hydraulic seal is also convenient for other types of waterproofing. It can be used to deal with the problem of liquid leakage from reinforced concrete tanks and artificial reservoirs. If a water leak occurs in mines, tunnels or other underground structures, the composition will also be effective. She will even cope with the issue of capillary leaks perfectly.
Construction of a clay castle
building a clay castle
correct and incorrect clay castle
All blind area options require the construction of a clay castle, which prevents melt and rain water from entering the mine. The place is left immediately after the construction of the well. A trench is dug in a circle up to 1 m wide and 1.5 m deep. The space is filled with soft, greasy clay and compacted thoroughly. Subsequent work is carried out a year later. The best time to build a clay castle is spring.
Particular attention is paid to careful compaction. If the clay is poorly compacted, there will be voids through which water from the soil and above ground will penetrate into the mine. It is possible that they will bring with them putrefactive bacteria that multiply in these caverns.
Then you will need to excavate the clay, pump out the water and disinfect the well. Sometimes the formation of vertical cracks is observed, which appear due to soil subsidence. The clay is removed and a new lock is laid.
There is a danger that the bulk layer of clay will act as a jack if the soil freezes. The top ring may move. To compact the clay castle as much as possible, crushed stone, cobblestones, and broken red brick are added to it. In cross-section, with the correct design, the structure resembles a hemisphere with a slope from the well. Under these conditions, water flows over the surface without penetrating into the source.
A clay castle is sometimes used not only as a base, but also as a blind area. This option has significant disadvantages: the clay gets wet from rain and becomes slippery. After some time, depressions form on the surface. They are easy to repair, but in order not to slip on clay in the rain, in early spring, additional finishing is necessary.
Self-waterproofing of wells
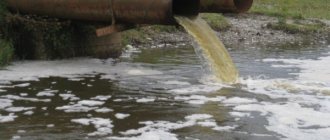
For residents of country houses, the issue of water supply is solved using a well. Sometimes it is built on a site when there is no house yet. Building your own well is not as simple as it seems at first glance. One common difficulty is waterproofing the joints of the rings. Only filter wells do not require careful sealing of seams. For the rest, made of both concrete and brick, the seams between the structural elements are sealed. For drinking and storage, it is especially difficult to prevent water from getting inside the mine. For sedimentation tanks, on the contrary, tightness is necessary so that wastewater does not enter the ground.
The accumulated experience indicates the most common cases of unsuccessful and successful attempts at waterproofing, as well as the main problems during the work process.
Concreting the site
concreting the area around the well
diagram of the concrete blind area around the well
The durability of the structure ensures proper preparation of the solution. Cement-sand is not suitable, because... After a few months, the surface will crack and begin to crumble. To prepare high-quality concrete, take clean sand without foreign inclusions, fine crushed stone and cement, mix dry in a ratio of 5:3:1. Add water and mix until a homogeneous, creamy consistency is formed. Step-by-step instructions will help you properly concrete the site:
- They are preparing a trench. Take out the soil to a depth of 30 cm, arrange a sand cushion with a layer of 15 cm. It is moistened with water and compacted well.
- Fill in 10 cm of fine crushed stone and compact it. Lay reinforcement or mesh, placing stones so that it is in the concrete layer.
- A formwork made of boards is installed around it. The entire space is divided into segments - this will protect the blind area from destruction in frosty weather. They use slats, which are removed after the concrete has set, and the voids are filled with mortar.
- The site is planned with a slight slope from the rings. The level is set using slats.
- Fill with mortar, tamp to remove voids, then level. Cement is scattered over the wet mortar and smoothed. The procedure is repeated several times - this strengthens the surface layer.
- The area is covered with wet burlap and left. Make sure that the material does not dry out and moisten it regularly.
Technology
There are two methods by which wells are built: open and closed digging. In the first case, a shaft is dug, after which concreting immediately begins. The size of the shaft is selected individually, it should not be narrow, and it should be easy to clean in the future. This way it is convenient to build a well if the soil is dense enough and the depth of the well is small. The same applies to areas where groundwater flows deeply.
Closed digging is more labor-intensive, but reliable. The second name of the method is lowering. A shaft is also initially dug. After this, the formwork is installed and the open part is concreted. It is displayed as high as possible. A cutting shoe is installed at the bottom of the concrete support. The ground is undermined and the existing structure is lowered. When the formwork drops 2 meters below ground level, the structure is built up. After each stage, one week should pass, during which time the concrete has time to dry. Digging is carried out until the aquifer is opened.
You should continue digging until dirty water appears at the bottom of the shaft. The liquid is pumped out and the depth of the shaft increases by another 15 cm.
At the next stage, three layers of 20 cm of the future filter are laid. The first layer is sand, the second is fine gravel, the third is coarse crushed stone. All materials are first washed with water with the addition of a small amount of bleach.
If water flows to the bottom in large quantities, then additional boards are laid before laying the filter.
How to build a foundation for a sand well?
sand well base
schematic representation of the blind area around the well
It is believed that a sandy base is used only for soft blind areas. Using a special technology, they make a durable monolithic structure from sand with their own hands. Liquid glass is the most widely used. You will need a setting accelerator, for which calcium chloride is used. It is sold in construction stores at a price of 35 rubles. for 1 kg. 25 kg in a bag. Consumption - 5-10% of the volume of water for preparing the solution. Liquid glass is bought ready for use or made from semi-finished products. Place the powder or solid particles in a container and add a little water (10% of the total volume). Requires low heat and continuous cooking for 8 hours. Dig a pit around the ring to a depth of 25 cm. Compact the bottom, fill it with 10 cm of sand, and compact it. Water with liquid glass and immediately with fixative. The area is covered with plastic film. The edges are pressed well so that moisture does not penetrate the base. After a few days, the solid sand blind area is ready.
Safety precautions
The procedure for preparing and using a hydraulic seal is quite simple and can be done with your own hands, even without the help of specialists.
Carrying out work with active compounds requires additional protection for the body. Hands must be gloved.
Since the mixture is quick-hardening, tools and all surfaces that come into contact with it must be washed immediately. After final hardening, the composition can only be cleaned off mechanically and is very difficult.
If he does not use this composition, you need to know that other solutions may not be as effective.
Ivan Pokrovsky
The author of the article and well master of our company.
Perhaps the material will be useful to your friends. Share the article on social networks.
Source
Features and arrangement of soft blind areas
This is an inexpensive, quick-to-manufacture method, and the base has all the functions of a blind area. First, plan the width, which is 0.5-1.5 m. If you plan to build a house over a well, choose one so that raindrops from the roof do not fall on the blind area. Having marked the area, dig a trench 40 cm deep. Form a bottom slope in the direction from the well at an angle of at least 5°.
The soil is compacted and waterproofing is laid on top. It is not recommended to use roofing felt, because... it does not have the necessary flexibility and elasticity. It is better to use a special film for waterproofing foundations or polyethylene, but thicker. The main required property is frost resistance.
Lay from the center to the edges. They are fixed on the shaft with double-sided tape or a tie, which is attached to the rings with dowels. The film is not stretched, but folds are formed. It will not tear during seasonal deformation. Cover with sand, lightly moisten if dry, and compact thoroughly. The edges should rise 5 cm above the soil. The platform will serve as the basis for the subsequent design of the blind area. The seemingly primitive design has a lot of advantages:
- Heaving of the soil does not destroy the blind area, because she moves with him. There is no gap formed at the well ring through which melt water can penetrate.
- Natural compaction and settling of the soil occurs, which does not affect the condition of the blind area. Dips and voids do not form in the soil - a breeding ground for putrefactive bacteria. The waterproofing film reliably protects against the penetration of ground and surface water into the well.
- Simplicity and ease of repair and dismantling. Various decorative coatings are used. The service life is limited only by its type.
- Low cost. There is no need to have professional builder skills.
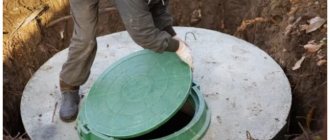
What is the bottom
Regardless of the type of structure, it is mandatory to install the bottoms of the wells. The bottom must be concreted to prevent groundwater from entering the structure. This is especially true where water is collected. Wells must also be protected from liquid penetration.
Not only the quality of the water, but also the durability of the object, how reliable the operation will be, and the importance of preserving communications and equipment located inside depend on how well the material is installed.
The bottoms of the wells must be strong, since they will constantly be subject to heavy loads. In some cases, they must withstand the entire mass of all reinforced concrete rings that press on the bottom of the well. To support all this mass, heavy concrete and very strong steel are laid.
In order to extend the service life of the well bottoms, during the work process, vibration pressing is used to connect the components using an innovative method. Using this method, very smooth concrete with high strength can be obtained. Thus, a dense reinforced concrete structure emerges. There are no gaps between the bottom ring and the bottom.
Today, factories have mastered and successfully used the technology for producing high-quality products of several types of rings, as well as well bottoms.
Due to various circumstances, builders cannot always place monolithic products at the bottom of a well.
Before laying materials on the bottom of the well, you need to pay attention to the parameters of the bottom. This is necessary in order to calculate the largest load. Moreover, they must be combined with the standard parameters of the rings.
Properly laid well bottoms should be in the form of a monolithic slab of reinforced concrete materials. The shape should be round, and for installation there should be three loops. The diameter of the slabs may vary, but the thickness is standard and is 14 cm.
Such parameters are not random; they are prescribed in state standards and are strictly regulated. Studies were carried out, during which it was established that this particular thickness has a sufficient margin of safety and can withstand high pressure of reinforced concrete products, as well as incoming water, resist soil mobility and the influence of groundwater. The design must be selected together with other details.
Well bottoms must be selected in such a way that the diameter is no less than the diameter of the rings. During the production process, it is imperative to indicate its dimensions, what volume, and also what operational properties it has.
The most common types of products are marked PD-10, PD-15, and PD-20. They differ in weight and diameter.
bottom of well PD-10
There are products designed for collector wells. They have a high level of water resistance, are resistant to low temperatures, while maintaining their qualities. This slab is rectangular, there are elements for connection.
How to lay paving stones or paving slabs?
A blind area made of paving stones or paving slabs is especially durable and aesthetically pleasing. There are a variety of colors available to choose from, allowing you to choose the design you want. There is also a wide variety in shape: from simple geometric to intricate. The material is resistant to temperature changes, and therefore durable. The tiles are easy to remove and install back. They use simple installation technology. Geotextiles are spread over the sand of the soft blind area and sprinkled with a thin layer of dry cement. Place decorative elements. Lightly tap the mallet to level it out. Apply a rail to control the level: all tiles must be in the same plane. After completing the work, water the surface so that the cement sets.
Technical requirements
Advice! It is best to use ready-made reinforced concrete modules, which simply need to be installed in the pit. If it is technically impossible to do this, the bottom and ceiling are poured with concrete with your own hands.
The base is made of durable reinforced concrete, the grade of which must be at least M-200. It must meet the following technical requirements:
- Corrosion resistance and waterproof class W4.
- Reinforcement – steel V-1.
- Compressive strength – V.
- Specific effective activity up to 370 Bq/kg.
- Frost resistance – no less than F50. Must be designed to withstand more than 100 freeze/thaw cycles.
GOST for compliance with technical requirements is also provided. According to it, the product must meet a certain strength, resistance and rigidity to cracks.