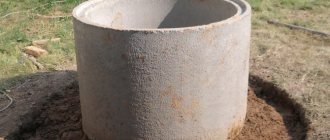
Almost finished well ring obtained using formwork
By definition, do-it-yourself formwork for a well is a type of form used in construction and in the well industry. When constructing concrete wells, which are very popular in dacha and garden plots, the sliding formwork method is used. The video in this article will help you decide and choose a formwork method that is convenient for your conditions, and the instructions contain a description of all the important points and nuances of working with formwork.
How to make a reinforced concrete ring yourself.
Every homeowner has desires to improve his home and the territory on which his personal possessions are located.
An important place among the general plans is occupied by the desire to be independent from the general utility systems of the regional municipality, or to improve everything in one’s own way if there are no general utility systems. Who would refuse a personal water supply, a well dug with their own hands, or an equipped septic tank that not only receives sewage water, but also, for example, produces gas for the kitchen stove?
The main element involved in the listed structures is the reinforced concrete ring that is familiar to us.
It’s good when there are conditions for purchasing rings and having them delivered to your home. But what about the rest who do not have financial or delivery options?
You can buy ready-made formwork for making rings, or you can make formwork for a reinforced concrete ring.
First, you need to decide on the dimensions of future rings: diameter, height. The thickness recommended everywhere should be at least 7-10 centimeters. And this is an important recommendation.
The technology is simple and no difficulties arise if everything is done carefully and slowly. Even those who do this for the first time get successful results.
How to build a house for a well
Construction of the house begins after taking measurements of the well. These will be the dimensions of the frame. Its base frames are made of beams measuring 8x10 cm.
To make the structure stronger and stronger, you need to drive in nails measuring 10 cm. From the highest part of the base, 2 racks are brought out to a height equal to the height of the future house.
After this, rafters are made from the beams, cutting their edges at an angle of 45 degrees, and making grooves in them for connection with the higher frame. Installing crossbars and jibs will give the roof strength.
If your structure has a base in addition to the roof, then it must be covered with boards; the same can be done with the triangular sides of the roof.
Gate for lifting the bucket. It is made from logs by removing the bark and sanding it. The length is needed 3-4 cm less than the distance of the posts, otherwise, when scrolling, it will cling to them.
Grooves are drilled in the middle of the log frames, as well as in the racks or base walls. After this, metal rods are fixed into these grooves; first, in order to save the structure from premature wear due to friction of the elements in the grooves, metal bushings are installed. After this, you can attach a chain with a bucket to the gate.
Roof. A sheathing is made on the frame, after which it is covered with roofing felt or roofing felt to insulate it from moisture. Then the roofing work begins. The roofing material can be slate, tiles, etc.
The final part of the work is the decorative design of the well. Wooden products can be decorated with carved elements. The decor depends only on the imagination and wishes of the owners of the plot.
A well is not only a place to store water resources, but also an original decoration for a yard or garden. It’s easy to build and decorate a house for a well yourself, and to pick up ideas and find inspiration, you can look at photos of houses for a well.
Source
The header is beautiful and functional
The final stage of the construction of any well will be the installation of the head - a beautiful and functional part. The head is based on a primitive lifting mechanism, but is also designed to protect the source from contamination. If beautifully executed, it can become an excellent decorative element on the site. Also, at the construction stage, it is advisable to think about organizing the water supply to the outdoor shower, if there is one on your site.
The well head is designed at the discretion of the site owner
To organize the head of the well, the upper ring of the well should protrude 60-80 cm above the surface. But in the first year after construction, it is not recommended to arrange the site, since the ground may still subside a little. A temporary lift with a good roof is being built. You can make a head or house for a well yourself or purchase a ready-made one. As a rule, they are sold disassembled, but assembling all the parts is not much more complicated than a children's construction set.
Installation of equipment
The equipment must ensure stable water supply. For uninterrupted supply, there are different types of pumps, and they require electrical power to operate. The simplest option for arranging a site for well equipment is a pit. The undeniable advantage of such a platform is that it can be made from scrap materials.
Due to the fact that moisture can get into the pit, experts recommend this type of equipment platform as an adapter. Methods for arranging sites with an adapter imply that the casing plays the role of a caisson. The method can be used if the casing is arranged in one container and the tightness of the pipes is ensured. For this case, pipes are usually selected from steel. Plastic is not recommended for the adapter design since the pump is attached to the water pipe rather than suspended by a cable.
Another option for a site for arranging equipment is the caisson mentioned above. This is a sealed container that is considered reliable and durable. You can equip the container ready-made or make it yourself. Caissons are made of plastic or steel. Plastic ones are sealed, weigh little, and are easy to install. Steel options are hermetically sealed, reliable, but require treatment with anti-corrosion compounds and are more expensive
The equipment is installed after the site has been installed, and it is important to take into account some nuances
Requirements for rings
Existing wells on the sites intended for drinking water must be isolated from the ingress of contaminated water.
More details:
- Sewage wells are used to collect polluted wastewater. Protection of wastewater discharge into the ground is unacceptable. For this purpose, they are waterproofed.
- For maintenance of underground communications, technical inspection rooms have been installed. Water entering these wells is unacceptable.
Letters and numbers are used to mark rings:
- The letter index indicates the purpose of the ring.
- The numbers indicate the diameter and height of the ring.
The photo shows all the types that are used in water supply structures.
Shakhtny
During construction work, strict compliance with appropriate safety precautions is required.
- A helmet is required. For those working at the bottom of a pit, there is always the danger of a bucket of earth or another heavy object falling. It is better if the head is protected at this moment.
Construction helmet sample
- Use only thick, proven ropes to lift buckets of soil.
Advice: at a depth of more than six meters, it is recommended to use, in addition to the main one, a safety rope. This will reduce the likelihood of the soil container falling, which can be fatal at such a height.
- While below, tie yourself to some well-fixed object on the surface. This will insure you against possible soil movements.
- Check particularly deep mines periodically for the presence of gas. To do this, light a candle. If it goes out, it means there is gas contamination that needs to be gotten rid of.
Having studied the safety measures, we proceed to choosing a location. It must be located at least 20 meters from any points of contamination.
Tip: It is recommended to choose the lowest point on the site for construction work. This will reduce the distance to the aquifer, which, accordingly, will reduce the amount of work.
The following instructions follow:
Excavation
- At the selected location, we dig a pit with dimensions of 1.2 m in diameter and a depth until groundwater appears, which is usually about ten meters. We remove excess soil using a bucket on a rope.
Tip: It is recommended to use a shovel with a small handle. This will increase your maneuverability in tight mine spaces.
- Having dug a shaft, we create a bottom filter for the well structure. For these purposes, we fill in a half-meter layer of washed crushed stone.
This is what the bottom filter looks like from above
Wall material
Now let’s look at what a well can be made from:
- Monolithic concreting. High reliability, strength and moisture resistance at an affordable cost. Before making formwork for a well, be sure to make sure the walls are even. Then:
- We install internal and external formwork from board panels, between which we maintain a distance of 15 cm.
- We install reinforced steel rods horizontally and vertically between the boards, connecting them to each other using soft wire.
- Mix a solution of cement, sand and gravel in a ratio of 1:3:5 with the addition of water.
- Pour the concrete and wait for it to completely harden.
Wall concreting process
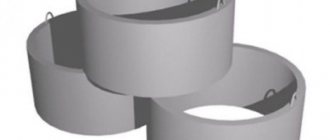
- Concrete rings. Having all the advantages of monolithic concreting, it is much easier to install. For convenience, it is recommended to understand the question of how to make a tripod for a well, since with its help it will be much easier to lower the products. In this case, you can use the following installation options:
- After completely digging the pit, we lower the required number of rings, having first fastened them to the tripod. To prevent them from moving relative to each other in the future, we place steel brackets between them.
Installation of a concrete ring
- Dig a couple of meters deep and install the first rings. Next, select the ground from under them so that they sink. And so on to the desired depth. This method prevents the possibility of collapse.
- Brick. How to make a well from brick? Much the same as any other masonry. It is important to use ceramic products that can withstand an abundance of moisture well and without consequences.
Heading
How to make the top of a well? To do this, the walls should be brought out 80 cm and the entrance to the shaft should be equipped with a roof to protect it from precipitation. The head can be decorated with various ornaments if desired.
Beautifully equipped upper part of the well
You can also consider how to make a hexagon for a well or other intricate outlet. This does not affect functionality, being a purely aesthetic point.
How to make formwork for a reinforced concrete ring
To make such formwork, you can use Tips from Maksimych, or you can also use your ingenuity. For those who don’t have enough time for this, I offer my proven option, which turned out to be the most convenient for me. Whether it suits you - decide for yourself.
According to the diameter of the future ring you have chosen, select two metal barrels. Extruded stiffening ribs on the walls of the barrels will not affect the ring manufacturing process.
You can find the required diameter of air ducts or pipes. You can also assemble formwork cylinders by connecting individual sheets to each other. Formworks made from plastic barrels show good results.
Houses for wells are open and closed
Of course, making an open house is easier and cheaper.
The well ring is finished with wood or stone, a canopy (wooden or metal) is arranged, and a cover is made for the well. The advantage is that minimal materials are required, but the water in such a well will freeze in winter. Although there is a solution here too. The well can be insulated using polystyrene foam before finishing the well, and the cover and overlap for the ring can be made using several layers of boards, and they are laid in different directions to cover the joints.
Closed house for a well with a gable roof
House frame
This is one of the most popular and simplest houses in design. The material usually used is that which remains after the construction of larger construction projects. We begin work by making the frame.
Let's prepare a beam with a cross-section of 80mmx100mm and an edged board with a thickness of 40mm. These are the most optimal sizes of lumber; they will not weigh down the structure, and at the same time make it durable, then the house will withstand wind loads. We prepare four racks from timber that are suitable in size for the lower and upper trim with a width of 120 cm. Having sawed the boards to size, we begin to nail them to the racks. For fastening we use 10 cm nails; they will firmly connect the parts together.
To get an even and strong frame, we assemble it in a certain sequence. We first connect the two racks from below and above with boards, then we do the same with the other two racks. Having placed them around the ring, we finally connect them with straps to each other. We begin to make the roof by making construction trusses - this is the structure on which we will attach the sheathing.
Choose the length of the boards yourself; the height of the well house will depend on it. For crossbars and crossbars, we take boards 2.5 cm thick. You should get 8 crossbars, 3 crossbars and 6 rafter legs. Having cut the rafters at an angle, we connect the upper ends to each other. We fasten with self-tapping screws.
It is best to assemble this structure on the ground.
We use crossbars for additional strength, placing them 30 cm below the point of the upper attachment of the rafters. We make a cutout on the rafters, where they will be connected to the boards of the upper trim.
We connect the frame and rafters using nails. We strengthen the installation of rafters by installing jibs.
The trusses are connected by a ridge, a structure of two boards. Next, the sheathing is attached at intervals of 15 centimeters.
The protrusions on both sides should be 10 centimeters. We cover the roof with slate or metal, covering the corner joints with wind boards. We make the cover of the house - it is a shield made of boards, which is made in a simple way. Having cut the boards 20 cm wide and 85 cm long, we begin to fold them one by one, fastening them together using two bars, which we fix with self-tapping screws, one at the top and the other at the bottom.
To give rigidity to the product, you need to nail the block diagonally. Next, we sheathe the gables, screw on the handle with the latch and hang the lid on the hinges. varnish paint.
House made of timber
Such houses create a unique flavor on any site.
To make a house from timber you need to prepare:
- rounded logs;
- edged boards;
- roof covering;
- material for making a gate with a handle.
Build a frame from rounded timber according to the dimensions of the well. The connection can be made using any method convenient for you.
Then install two racks - supports, using timber.
A wide roof structure must be installed on the support posts. You saw how to do this in the previous instructions. Everything is done in the same way. The ends of the logs should protrude, this will protect the well shaft from precipitation.
Hexagonal well house
In fact, this is one of the varieties of the previous structure.
The difference is in the greater number of edges. This log house is very compact, which allows it to be used in small areas. The construction of such a house is carried out using the same technology as a quadrangular log house made of timber.
To build such a house, we recommend taking a ten-centimeter beam. The roof can be decorated with wooden boards, which will give the building an original look.
The work is also completed with antiseptic impregnation. We looked at several types of well houses that you can make with your own hands.
You can decorate such houses using different methods.
Implement any ideas for your well
Carving decoration is very popular. This house will fit into any interior. Dyeing is also a simple and popular type of decoration.
Modern impregnations can change not only the color, but also the texture of the material.
The building can be decorated with a figurine of some animal made of wood or ceramics.
Of course, each home for a well, which is made by hand, is individual. It all depends on the imagination and skills of the owner of the site.
Well house - device
Characteristic features of well construction
Before building a well from concrete rings, it is important to know its structure. There are two elements in a well: an underground element and an above-ground element. Before starting work, the location of the well is determined
They begin to dig the earth to a depth that allows for the installation of water filtration, which is required to purify the water from clay, dust and other contaminants. The hydraulic structure must be protected from the penetration of wastewater, precipitation and sewage
Before starting work, the location of the well is determined. They begin to dig the earth to a depth that allows for the installation of water filtration, which is required to purify the water from clay, dust and other contaminants. The hydraulic structure must be protected against the penetration of wastewater, precipitation and sewage.
The construction of a well structure consists of 3 parts:
Installation of the head of a hydraulic structure, which is the upper part in wells located above the ground. The above-ground structural element serves as protection against the penetration of wastewater and sediments that can contaminate drinking water. It consists of a roofing part, a blind area, a canopy and a lifting mechanism. The head is decorated with: wood, stone, plaster or other facing materials
It is important to provide an element for draining rainwater, which is installed outside the head. Arrangement of shafts of hydraulic structures. This is a place located underground in the space between the top and the bottom. Water is lifted up the trunk using a bucket and rope or other lifting device
The shaft of the mine has a casing, the function of which is to protect the concrete well from destruction and penetration of groundwater into the middle of the structure. Construction of a water intake section, which is designed to store water, filter and settle it.
Water is lifted up the trunk using a bucket and rope or other lifting device. The shaft of the mine has a casing, the function of which is to protect the concrete well from destruction and penetration of groundwater into the middle of the structure. Construction of a water intake part, which is intended for storing water, filtering and settling it.
The water intake part includes a casing, a filter and comes in 3 types:
- Incomplete - this concrete structure does not have any difficulties in execution, in it the casing column does not reach the layer of impenetrable rocks and water comes from below. The imperfect design has a small water capacity and is suitable for small families.
- The complete water intake part is complex in design and has a casing that rests on a layer of waterproof rocks. The volume of part of the water accumulation is average, and the liquid is supplied through the walls of the well.
- Perfect water intake part with sump. The depth reaches one and a half meters of water reserves. Used in cases of large amounts of water consumption.
How is a shaft-type well constructed?
Knowing the structure of a shaft well, it will be easier to create it yourself. The design has three main parts:
- water inlet - the lowest part that serves to collect and filter water.
- trunk – the entire underground structure above the water intake. It prevents the soil from collapsing and does not allow perched water to enter, maintaining water quality.
- head - everything that is located outside, above the ground. It prevents dust particles and debris from penetrating into the water, and in winter it protects from freezing.
In addition to the main elements, we need additional ones with which we lift the water up. This is a gate, a chain, a bucket.
Types of reinforced concrete modules
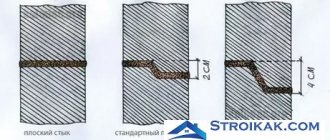
The simplest standard models are produced without additional fasteners. They have a smooth and flat rim on both the top and bottom.
When laying, they are placed one on top of the other and fastened with metal brackets. The joint area is covered with cement mortar or dry repair mixture.
A hydraulic seal can be used as a sealant for well rings. The material consists of a special grade of cement and quartz sand. It hardens quickly and expands over time. Protects reinforced concrete mains from sewage penetration
After such treatment, the system acquires optimal integrity and tightness. Correct insulation in the contact area of concrete elements extends the operational life of the shaft and almost completely eliminates water leakage through the cracks between concrete elements.
Despite their reliability and strength, standard rings without a lock are suitable for installation in regions with low seismic activity. Strong ground movements can lead to displacement of modules and cracking of cement in the joint area
Euro-rings are available with a practical flange-type locking connection. There are protrusions at the top of such products, and deep recesses at the bottom.
During installation, the elements are inserted into each other, thus providing a monolithic and strong connection that does not require additional processing in the joining area.
When purchasing well rings with flanges, you should carefully monitor their quality. Poorly cast joining parts will complicate the work and require the use of diamond cutting to eliminate errors and imperfections
This facilitates and speeds up the process of creating a communication system and reduces the overall financial costs of the project.
A well shaft made of Euro-rings with a lock is not afraid of seismic activity with shifts and maintains the integrity of the structure even on very active soils prone to subsidence.
A monolithic glass is a one-piece structure made of a wall ring and a bottom. Used in places with increased requirements for tightness, for example, for sewer tanks.
Provides a high level of environmental friendliness and does not allow the contents of the well to seep into the ground or get into groundwater.
Production of reinforced concrete structures
Reinforced concrete products are used to construct wells of various types: gas, inspection, sewer and water supply. Rigid concrete is used to make rings. There are several known technologies for the production of reinforced concrete rings for wells:
- Volumetric vibrocompression. The creation of the structure is carried out by volumetric vibrocompression of concrete products. Processing takes place in special metal forms that have the function of immediate removal of formwork. The use of a brick press increases the speed of manufacturing rings for wells. Vibrocompression significantly saves space for performing the necessary processes. The use of such an installation reduces the need for a large number of maintenance personnel. For high-quality production you will need only 2-3 people.
- Molding creation. Outdated production technology. In this case, the birth of reinforced concrete structures is carried out using metal formwork. A special form, called metal-plastic, has two cylindrical surfaces: an outer and an inner part. A concrete mixture is laid between them. When the concrete has hardened thoroughly, the metal formwork is removed. The use of injection molding technology is only possible if there are large premises, since space will be needed not only for creating products, but also for their drying and subsequent storage. Production volumes depend on the number of metal molds.
https://youtube.com/watch?v=NPLgo_RSpXw
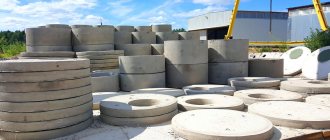
Types of products
The round reinforced concrete structure serves as a reliable assistant during the installation of utilities. Rings are conventionally divided into several main types:
- water intake;
- collectors;
- rings intended for installation of underground cable electrical networks;
- sewer and gas pipeline concrete structures.
Also on the modern market you can find the following products:
- Overlapping rings.
- Device with a lock or with a bottom.
- Auxiliary. Made to order. With non-standard sizes. They are used in emergency situations when conventional rings are not suitable for forming a well depth shaft.
- Wall. Suitable for constructing any type of well. They participate in the formation of the neck of the created structure.
- Reinforced concrete. Actively used during installation of system communications. They will be useful during the construction of a water supply, network, gas, drainage or sewer well.
Concrete structures with different parameters are available in modern construction stores. The standard, maximum dimensions of this product are as follows: height - 100 cm, internal diameter is about 200 cm. Specific weight no more than 300 kg. The maximum wall thickness is 120 mm.
Advantages and disadvantages
Ready-made structures, like any existing building material, have their pros and cons. The strengths and weaknesses of reinforced concrete rings should be noted. Each of the advantages improves the performance of the well. Reinforced concrete products have the following positive qualities:
- Rigidity. Thanks to its rigidity, the ring can be used even on unstable ground.
- Availability of a rich and wide range of sizes.
- Concrete adapts well to any environment, so structures have a long service life. Products can perform their functions without interruption for 100 years.
- They speed up and facilitate the process of installing a sewer or water supply system.
- High quality and reasonable price.
- High level of tightness. The seams fit tightly together. This eliminates the possibility of groundwater getting inside the product.
However, reinforced concrete products have their drawbacks. So, the main disadvantages of these small structures are:
- Lack of mobility. It is almost impossible to move the created water supply structure.
- The weight and dimensions of the product are also considered a disadvantage. To install reinforced concrete devices you will need special equipment. Its use requires additional material costs.
Well rings
The well is used for collecting water, laying communications and wires, and installing sewerage systems. Its presence is mandatory for multi-storey buildings. The treatment system of a country house also requires a hydraulic structure.
It is subject to sanitary and hygienic standards; the structure must be strong and durable. To meet these requirements, ring elements are used when constructing a well.
The purpose of the hydraulic structure directly affects which parts are best to use. There are several varieties of it:
- Drinking - for collecting drinking water, equipped with appropriate mechanisms. Water must be as clean as possible from impurities and dirt;
- plumbing - part of the water supply system, the necessary equipment is installed in it;
- drainage - to control the drainage system;
- inspection room - to monitor the condition of the sewerage system;
- telephone - for laying communication networks;
- for gas pipeline networks. The structure is installed in cases that comply with GOST;
- for a cesspool - a way to organize sewerage;
- for a septic tank - a place for a sump;
- stormwater - to drain excess water from the site.
What can you make a mold from?
Reinforced concrete rings are usually poured in formwork made from:
- steel sheet;
- boards
In both of these cases, the finished form is a prefabricated structure consisting of several parts. It is impossible to make continuous formwork for pouring reinforced concrete rings. After all, once the cement mortar has hardened, it will be very difficult to remove the finished product from the mold of such a design.
Formwork of this type is cut from sheet steel using a grinder with preliminary cutting. Next, the metal is given the appropriate shape by bending and secured in this position.
To make a wooden mold:
- Four narrow metal rings are welded. The diameter of these formwork elements is selected in accordance with the internal and external diameter of the future reinforced concrete product.
- The rings made in this way are sheathed vertically with boards. The lumber for assembling such formwork should not be too wide.
- Divide the internal and external parts of the resulting formwork into compartments.
- Locks are made to connect the arched parts of the mold.
Models from scrap materials
There are also no drawings for these well houses, since they are manufactured according to the “whatever comes to hand” principle.
One example is using a perforated metal barrel or washing machine drum. The product not only looks quite original in the garden, because to resemble a well house you only need to add a canopy on posts (metal) and a bucket on the collar. In such “wells” it is good to burn paper waste or use them for cooking over an open fire.
“Well houses” made from painted car tires also look interesting. Of course, they cannot be used in any way; these are purely decorative structures. But pots with outdoor plants look very good in them. This placement option is especially suitable for those plants that need protection from too bright sun.
Video description
The work procedure and installation of a septic tank made of concrete rings in the video:
How to choose the optimal location for a septic tank
The structure is mounted above the groundwater level. The best location is at the maximum distance from the house (at least 7 meters, but no more than 20, so as not to increase the cost of pipeline construction). It is logical to place the septic tank on the border of the site, next to the road. This will reduce operating costs, since the cost of leaving a sewage tank is affected by access to the system and the length of the hose. In addition, with the correct location, the sewage disposal truck does not need to enter the yard, and the hoses will not lie on the beds or paths (otherwise, when the hose is rolled up, waste may end up in the garden).
Pit preparation
Ground work using an excavator takes 2-3 hours. The size of the pit should be slightly larger than the dimensions of the wells. This is necessary for the smooth installation of the rings and their waterproofing. The bottom is covered with crushed stone and concreted.
Preparing a pit for a septic tank made of concrete ringsSource rostovgruz.ru
Installation of rings and sewer pipes
Rings for a septic tank are installed using lifting equipment, which significantly saves time (when compared with manual installation). Fixation of the seams is ensured with cement mortar; additionally, metal ties (staples, plates) are installed.
The crucial moment is the process of installing ringsSource remoskop.ru
Sealing and waterproofing
The seams of a septic tank made of concrete rings are sealed on both sides of the structure. For this purpose, cement and coating protective solutions are used. You can install ready-made plastic cylinders inside the well. This additional cost will make the system 100% sealed.
In the process of waterproofing concrete rings for a septic tank, the connections are treated with liquid glass, bitumen or polymer-based mastic, and concrete mixture. To prevent freezing (and destruction) of the structure in winter, it is recommended to insulate it with a layer of polystyrene foam.
Sealing joints and waterproofing a septic tank made of concrete ringsSource zen.yandex.ru
Hatch installation and backfilling
The wells are covered with concrete slabs, with holes for hatches. In the first two wells, ventilation is installed, which is necessary for the removal of methane (gas appears as a result of the activity of anaerobic bacteria). To backfill the installed floors, use soil taken from the pit (backfill).
Backfilling of finished wellsSource lanshaft.com
Note from my experience
A large trough costs 1,500 rubles, and don’t spare money on it. You need to dig together together! If you are young, you can dig with your wife, or better yet with your son or a neighbor for two - then there will be enough water for everyone. Filling the ring takes only an hour and a half if it works well. Each site has several different layers of soil, but if you know that there is quicksand, it is better not to dig in this place. You won't be able to pass it anyway. And even worse - the house can be drowned in a well. Such cases have happened.
If you get to the bottom of black clay, wait for water.
After filling the ring, you can start digging after 20 hours without removing the formwork. The tightening bolts can be unscrewed after the ring has sunk 10 cm to the ground; dig a groove 60-70 cm deep in this place.
And the last thing: you need to make 6 pieces of planks 86 cm long and a square 30x30 mm. We place these strips before pouring the ring so that the formwork is even all around. We level the outer formwork in narrow places with fragments of red brick. You need 2-3 of them, and pour the solution along with them. Compact the concrete with a board every 5 buckets of mortar. There is nothing complicated.
I’ll also mention the factory rings 100x120 cm. Firstly, for a private owner they are large in diameter, a lot of unnecessary work with the ground. Secondly, they are not suitable because working with them is dangerous unless they are bolted together. Individual rings turn over in the well and you can become pinched when you are working below. Even a 6-meter pipe can fall, especially in deep sand. The sand flows and you cannot see what is happening behind the rings.
How to put a septic tank into operation
In order for the system to begin to function effectively, the constructed septic tank must be saturated with anaerobic microflora. The natural accumulation process takes several months, so it is accelerated by saturating the septic tank with imported microflora. You can do this in two ways:
- The new septic tank is filled with wastewater and left for 10-14 days. Then sludge sludge from an existing anaerobic septic tank is loaded into it (2 buckets per cubic meter).
- You can purchase ready-made bioactivators (bacterial strains) in the store (the main thing here is not to confuse them with aerobes, which are intended for other treatment systems).
Ready-to-start septic tank made of ringsSource remont-book.com
What rules must be followed when servicing a septic tank?
There are simple rules that support the high-quality operation of the system.
- Cleaning. Twice a year, in addition to cleaning the drains, the septic tank must be inspected and the pipelines cleaned. Once every 5 years (or better yet, every 2-3 years) the bottom heavy fats are removed. The volume of sludge should not exceed 25% of the tank volume. When cleaning, part of the sludge is left to restore the microflora.
- Quality of work. The wastewater leaving the system must be 70% purified. Analysis of wastewater in the laboratory will determine the acidity indicator, which will allow you to find out the quality of the drainage system.
- Security measures:
- Work inside the septic tank is allowed only after intensive ventilation and using a safety belt (gases formed inside can be dangerous to human life).
- Increased safety measures are required when working with power tools (humid environments).
A septic tank made of concrete rings makes private housing more autonomous and, despite its shortcomings, it is one of the most reliable and durable options for treatment facilities for suburban real estate.
Buy ready-made or make it yourself?
First, let's analyze the cost. On average, a finished ring costs from 1,500 rubles. up to 4,500 rubles, depending on the brand of concrete, weight and size.
To make one ring with a diameter of 1.5 m you need 0.3 cubic meters of concrete. The price for a cube of cement is from 2500 rubles. up to 4500 rubles, depending on the brand. The average cost of a ring is 750 rubles. The savings are obvious.Secondly, we will analyze labor costs. When purchasing ready-made concrete products, all efforts will be aimed at finding a reputable manufacturer from whom you can purchase a quality product. You will also need to organize delivery of finished products to the site.
If you decide to make reinforced concrete rings yourself, then there is a need to search and purchase high-quality material, tools and the manufacture of special molds for pouring reinforced concrete products. Based on the efforts made, the first place comes to the option of buying ready-made rings.
Ring production costs
The procedure for making rings for a well is quite labor-intensive, but quite financially rewarding. Paradoxically, purchasing a ready-made version turns out to be much cheaper than starting production at home.
This is explained by the following factors:
- The manufacturing process is on stream;
- Raw materials are purchased in bulk, which automatically reduces the cost of the final product;
- Mechanical labor is much cheaper than manual labor.
The production of well rings must strictly comply with the stated technology: formwork with a diameter approved by GOST is selected, the solution is mixed in the required proportions, etc. There are no particular difficulties here, but extreme care will be required. Or you can do it simpler: order ready-made rings and simply install them in the future well. Here the quality is already guaranteed by the manufacturer.
Useful video on the topic
In the video clip, the master independently assembles a metal form, coats its walls with waste oil, prepares a concrete solution and fills the formwork. Using special equipment, the mixture in the mold is carefully compacted so that there are no defects in the walls of the well.
The video shows how it is easier to remove the formwork, starting from the inner ring. By the way, the well ring is made without a reinforcing frame, so the thickness of the product is at least 15 cm.
In this video, the mold is designed to cast a thinner reinforced concrete ring. The master uses steel wire as reinforcement. The story shows in more detail the process of putting ingredients into a concrete mixer.
As you can see, any healthy man can make reinforced concrete rings for a well. No special skills are required in making molds and mixing concrete mortar.
You can watch little tricks in videos on this topic. In a month, a person can cast up to ten reinforced concrete rings using one mold. This is quite enough to equip a well shaft. Its depth depends on the level of the aquifer in your area.
Do you have experience making concrete rings? Please share information with our readers, tell us about the features of your method. You can leave and ask questions about the topic of the article in the form below.
What material is better for strengthening a mine ↑
To get a source of water, it is not enough to simply dig a hole; you need to strengthen the walls of the finished mine. There are several ways to do this:
- wooden frame;
- concreting;
- brick or stone masonry;
- installation of reinforced concrete rings.
Wood has many advantages, but moisture resistance is not one of them. It should only be chosen if no other materials are available. In addition, the surface of a log house is much more difficult to clean and treat with antiseptics than smooth walls.
Finishing a shaft with stone or brick is more durable than a wooden frame. However, it is only suitable for structures with a depth of no more than 7 m, built on clay or loamy soils.
To prepare cement-sand masonry mortar, you need to take only high-quality compound cement. Moreover, the solution for the upper and lower parts of the shaft is prepared differently: for the upper - with the usual proportions, and for the lower - with a minimum amount of water.
Concreting is a more practical way of constructing a mine. The essence of the technology is simple, but it is labor-intensive: formwork is placed in the finished shaft, which is filled with concrete. After the first layer has dried, do the same for the rest. If concrete is chosen, the well will last a long time, and cleaning the shaft will be easier than walls lined with wood or brick.
The most common way to strengthen walls is to install reinforced concrete rings. The technology of their installation allows you to install rings during the process of digging a well, gradually deepening the entire structure, adding new rings and fastening them with metal reinforcement. You can buy reinforced concrete rings or make them yourself.
How and from what to make molds for concrete rings
Factory molds are made of sheet metal and reinforced with stiffeners. Metal thickness is 3-8 mm depending on the dimensions of the ring.
Molds for well rings are most often made of metal
From thick-walled barrels
At home, bending sheet metal with the required radius of curvature is not at all easy. It is much easier to find two thick-walled barrels with different diameters. The diameters should differ by 14-16 mm. In this case, the wall thickness will be 7-8 mm. For a well ring with reinforcement, this is what is required.
To make it easier to work with the mold for reinforced concrete rings, you can fasten the two halves together with door hinges
The bottom of the barrels is cut off, the inside is made higher by about 10 cm - this is more convenient. To be able to remove the formwork from the finished ring, the barrels are sawn lengthwise into two parts. The halves must be connected securely. You can do this in different ways:
- Having welded the corners with drilled holes, tighten them with bolts;
- make “ears” into which to drive wedges.
To prevent the inner part from leading, several spacers must be welded to each half, which will keep the walls from bending.
Having inserted one part of the formwork into another, they are placed at the same distance from one another (measuring the gap in a circle). Holes are drilled in several places for the studs with which they will be secured. Studs are pieces of rod with threads on both sides. The holes are placed one opposite the other so that parts of the formwork can be securely fixed.
Studs are inserted into the drilled holes and tightened with nuts. If the walls of the mold for concrete rings are not very thick, you will most likely have to place large washers or metal plates with holes cut out of metal under the nuts so that the mold does not bend when pouring concrete.
Sheet metal
If desired, you can make forms for concrete rings from a strip of sheet metal and wooden blocks, which will give rigidity to the formwork. Cut the strip to the required length - along the circumference + 10 cm for the connection. The width of the strip is equal to the height of the ring + 10 cm. Bend the sides 5 cm at the bottom and top, and make the same side along the edge of the strip. Drill holes in the side panel for the tightening bolts. Cut the top side every 20-25 cm (less if the diameter of the ring is small). Now the strip can be bent to create a ring. But it is very unstable - it “plays”. Rigidity can be added using a wooden frame.
Molds for concrete rings can be made from sheet steel
From the bar, cut pieces 20-25 cm long. Attach them under the side, drill a hole in the metal, screw sections of bars onto self-tapping screws. With a length of bars of 20-25 cm, the shape will not be round, but multifaceted. If this is critical for you, you can make cuts more often and cut the bars shorter. The height also needs to be strengthened. Bars are also used for this. They need to be fastened more often so that the walls do not sag.
If you know how to use welding, you can go the other way. In addition to sheet metal, you will need a profiled square pipe. 15*15 mm or 20*20 mm will do. First you need to bend four identical half-arcs from a profile pipe. Four large ones are for external formwork and four smaller ones are for internal formwork. Weld cut strips of metal to the arcs.
How to use arches from a profile pipe as a basis
From wooden boards or bars
If it’s easier for you to work with wood, you can assemble molds for reinforced concrete rings from wood. They are assembled from narrow planks, fixed at the bottom and top with a ring. The ring can be made of metal, for example, from a bent profiled pipe. It can be bent using a pipe bender to the required radius of curvature.
Molds for the production of rings can be made from wood
If cooperage is your thing, you can also make arcs from wood. The material is not that important. The strength and rigidity of the resulting shape is important
Please note that the side is attached to the outside of the larger formwork and from the inside of the smaller one.
Important! To make the formwork easy to remove, the mold must be lubricated before pouring. If you plan to use concrete rings for a drinking water well, you can use sunflower oil. If some kind of technical construction is planned, waste mixed with machine oil or diesel fuel (or pure machine oil) can be used as a lubricant.
If some kind of technical construction is planned, you can use waste oil mixed with machine oil or diesel fuel (or pure machine oil) as a lubricant.
Assembling round formwork for a well
1. Drop well method 2. Where and when to dig 3. Assembling square formwork 4. Assembling round formwork 5. Digging a well and pouring sections 6. Well shaft 7. Filtration layer and clay castle
If you still decide to make a round well, then you will have to tinker thoroughly with the formwork. Of the materials, in addition to all of the above, we will need plywood with a thickness of 12 mm or more. We will make formwork based on the diameter of the well, equal to 1 m. This is what our future round formwork will look like:
External formwork.
We take a sheet of plywood measuring 1.5 x 1.5 m and draw a circle with a diameter of 120 cm + board thickness multiplied by 2. (Diameter = well diameter + 2 well wall thicknesses (10 cm) + 2 formwork board thicknesses) That is. with a board thickness of 20mm, you need to draw a circle with a diameter of 124cm. If you don’t have such a large compass, it doesn’t matter, hammer a nail in the center and tie a pencil with a thread, at a distance equal to the radius of the circle.
First, use a jigsaw to carefully and accurately cut out the inner circle: drill a hole, insert the jigsaw blade into it and go! (It is better to use a jigsaw, since cutting out such a volume with a hand jigsaw will be very labor-intensive).
IMPORTANT! You just have to do it very carefully, otherwise the formwork will be crooked!
The cut must be smooth, because We will also need a plywood circle! Next, saw the sheet in half, exactly in the center and saw off unnecessary corners:
Plywood blank for round formwork. View from above.
You need to make two such blanks (two pieces, each of two halves). To make the blanks more or less identical, we mark the second sheet of plywood not with a compass, but simply lay two ready-made halves, trace them and cut them according to the markings. We take one half from one and one from the other blank, install them perpendicular to the ground in a semicircle upward and nail them together with two slats, driving nails into the end of the plywood. (it’s better to use self-tapping screws).
The distance between the sheets should be 40-50 cm, with a formwork height of 80 cm. Next, we trim the workpiece along a semicircle with prepared boards (80 cm long).
IMPORTANT! The boards must be absolutely perpendicular to the plywood and their ends must be in the same plane! The narrower the boards, the more round the well will be in the future.
We do the same with the two remaining halves. The distance between the plywood sheets must be the same and the formwork halves must be symmetrical to each other, otherwise the formwork will not fit together! We combine the finished formwork halves on a flat plane - we get something like a pipe. Then we fasten the halves with corners, the same as for square formwork. We attach the corners with self-tapping screws to the plywood - this is a non-separable connection, and we fasten them together with bolts - this is a collapsible connection:
Demountable and non-removable fastening with corners. Side view.
The assembly of the outer formwork is completed, now let's assemble the inner formwork.
Internal formwork.
We take the two remaining circles of plywood, draw a circle with a diameter of 96 cm (the diameter of the well minus two thicknesses of the board) and carefully cut out two circles. Next, we saw our circles into two equal halves and cut out unnecessary internal semicircles:
Blank for the inner part of round formwork. View from above.
We install them on the ground, similarly to the halves of the external formwork, and cover them with boards. Then, we install it vertically and fasten it with corners, as in the previous case. The upper part of the corners, which are clamped with bolts, on the inside of the formwork should face one direction, otherwise it will not be disassembled after the concrete hardens. Well, perhaps, enough has been said about formwork, let’s start actually digging the well!
Basic information
Postulate 1. Position correctly
Choose a place for the septic tank on the highest area of the site. This is necessary so that stormwater does not flow into it.
For the placement of the septic tank, see SP 32.13330.2012, the distances to it should be as follows:
- from the house – 5 m;
- from the reservoir – 30 m;
- from the river – 10 m;
- from the well – 50 m;
- from the road – 5 m;
- from the fence – 3 m;
- from the well – 25 m;
- from trees – 3 m
Postulate 2. Look at the groundwater level
If the groundwater level (GWL) is high, i.e. water accumulates in the pit already at a depth of 1-1.5 m, then this is a reason to think about choosing a different septic tank design, possibly a plastic septic tank or a biological treatment station. We described in detail about ready-made VOC options in this article.
If you have firmly settled on wells, then you should wait until the groundwater level is lower. For example, in summer or winter. This will simplify the development of the pit and the construction of wells: you will not stand knee-deep in water and will be able to properly concrete the bottom and seal the seams between the rings.
Postulate 3. Calculate the volume of the septic tank with a margin
Carefully calculate the volume of the septic tank. Please note that the rule according to SP 32.13330.2012, in which the volume must be greater than 3 times the volume of wastewater discharged into the sewer per day, is valid only on sandy soils and at low groundwater levels. The rules assume that 1 person per day will discharge 200 liters of wastewater. This means that in this case you need a septic tank with a volume of 600 liters.
In other cases, the worse the soil drains, the larger the volume of the septic tank.
There is a working rule: for a family of 4-5 people with permanent residence, depending on the soil, the septic tank will be 30 m³ - on clay, 25 m³ - on loam, 20 m³ - on sandy loam, 15 m³ - on sand. Calculation of septic tank volume
| Number of people | Septic tank volume, m³ (working values) | |||
| Sand | Sandy loam | Loam | Clay | |
| 1 | 4 | 7 | 10 | 15 |
| 2 | 7 | 12 | 17 | 22 |
| 3 | 10 | 15 | 20 | 25 |
| 4 | 15 | 20 | 25 | 30 |
| 5 | 15 | 20 | 25 | 30 |
| 6 | 17 | 23 | 27 | 35 |
| 7 | 20 | 25 | 30 | 35 |
It is necessary to vary the volume of the septic tank not by the depth of the wells, but by the diameter of the rings. Those. if you have a choice of rings with a diameter of 1.5 m and a height of 0.9 m, or a diameter of 1 m and a height of 0.9 m, then it is better to take the former. Fewer quantities will be required to obtain the required volume. This means that a pit will not be as deep and there will be fewer seams in the wells.
Postulate 4. Hire people to develop a pit
If you are not a 20-year-old young man, and you do not have a couple of similar assistants ready to work for barbecue and beer, then entrust all excavation work to hired workers or hire an excavator.
The pit must be larger than the volume of the treatment plant, i.e. the distance from the wells to the walls of the pit is 30-50 cm. Subsequently, this volume must be filled with sand and gravel mixture (SGM) or sand.
Postulate 5. Order rings with delivery and installation
Order rings only after the foundation pit is ready. Immediately with installation, i.e. a truck with a crane should arrive.
All lower rings must have a bottom. They are available in a factory version - convenient and reliable. The exception is filter wells, which are made on well-draining soils. But under no circumstances should you do this
like the picture below!
After 1-2 years, the bottom of the filter well silts up and does not allow drainage to pass through; you have to call a sewer truck to clean the well, but this does not provide a long-term effect.
Postulate 6. Use only red pipes
Pipes are only red, with a diameter of 110 mm, for external sewerage. They need to be insulated only if in some area they are located in the open air. Anything in the ground does not need to be insulated.
Red pipes are specially designed for external sewerage. They are multi-layered and can withstand soil pressure. Gray pipes are intended for work inside the house; they are single-layer and the soil will simply crush them.
The pipes are laid in trenches on a compacted sand bed with a slope of 2 cm by 1 m. Avoid turns of 90 degrees, maximum 45. A layer of ASG or crushed stone 30 cm thick is poured on top and on the sides. Next is soil.
Postulate 7. The filtration field occupies a large area
A filtration field is needed at high groundwater levels; at low water levels, a filter well can be used. On average, expect that the drainage field area should be at least 10 m² per person.
It is appropriate to make a filtration well on well-draining soils: sand and sandy loam. On clay and loam, significantly larger areas are needed from which drainage will be carried out. Underground filtration fields allow this to be done.
Pipes on the filtration field must be laid with a slope of 1 cm by 1 m so that the treated wastewater has time to seep through the holes into the crushed stone layer.
Stage two. We prepare everything you need
Water supply from a wooden well
The procedure for constructing wells is not regulated by any government regulations or standards. The classical device was formed for more than one century until it acquired its modern form.
To make a well with your own hands, you need to prepare:
- a tripod made of metal corners or wooden poles;
- winch;
- rope ladder;
- shovel;
- scrap;
- material for strengthening the mine.
Regarding the last point, the most promising material is concrete rings. They are strong (reinforced with steel rods ø1 cm or more), durable (service life is 50 years), frost-resistant and waterproof.
| product name | Height x Wall thickness, cm | Internal diameter, cm | Weight, kg |
| KS-7−1 | 10x8 | 70 | 46 |
| KS-7−1.5 | 15x8 | 70 | 68 |
| KS-7−3 | 35x8 | 70 | 140 |
| KS-7−5 | 50x8 | 70 | 230 |
| KS-7−9 | 90x8 | 70 | 410 |
| KS-7−10 | 100x8 | 70 | 457 |
| KS-10-5 | 50x8 | 100 | 320 |
| KS-10-6 | 60x8 | 100 | 340 |
| KS-10-9 | 90x8 | 100 | 640 |
| KS-12-10 | 100x8 | 120 | 1050 |
| KS-15-6 | 60x9 | 150 | 900 |
| KS-15-9 | 90x9 | 150 | 1350 |
| KS-20-6 | 60x10 | 200 | 1550 |
| KS-20-9 | 90x10 | 200 | 2300 |
| KO-6 | 7x12 | 58 | 60 |
| KS-7-6 | 60x10 | 70 | 250 |
Concrete rings can be:
- wall (abbreviation - KS), which are used to arrange the neck and are suitable for all types of wells;
- additional - used in cases where standard options are not suitable, because these have non-standard sizes;
- Reinforced concrete rings - used for drainage and sewer wells, communication systems, gas and water supply.
There are other types - with a covering slab, with a bottom, prefabricated, etc. To avoid displacement of the rings after installation, they are equipped with special grooves that prevent the moment of displacement.
After choosing a location and preparing everything necessary, we can begin construction.