Paving slabs are an affordable building material that is used in various areas of construction. Using tiles, you can beautifully decorate your summer cottage, protecting your shoes from swamps and dirt in bad weather, arrange a parking space near your house, or lay out a walking path. The advantage of this solution is its low cost and ease of self-installation.
Curb functions
In addition to aesthetic functions, such an element of landscape design can strengthen the coating, making it invulnerable to heavy loads. The design protects the area from spreading and adds completeness to the design composition. If it is missing, prolonged rainfall and other unfavorable conditions can lead to erosion of paths.
Other functions of garden borders include:
- Limiting vegetation growth. The design allows you to highlight the territory of the flowerbed where it is planned to plant plants and ornamental shrubs. In this case, green spaces will not spread beyond the specified area, since they will be fenced. Another option allows you to control the growth of the lawn and protect it from overgrowing by weeds.
- Simplifying the care of beds or flower beds. Any curb raises the earth to a small height and holds it there. Even heavy rain will not wash away the soil, so the gardener will not have to re-make the embankment.
- Creating beautiful multi-tiered structures. Modern fences have different heights and shapes, which allows you to create beautiful landscape compositions based on them, giving the site a special originality.
But sometimes owners are forced to abandon traditional solutions in favor of other methods. This may be due to lack of money, design considerations or technical reasons.
In this case, the following technologies are practiced:
- The surface is reinforced with a metal corner, and storm drains are used as an alternative for the border.
- The tile is buried at the soil level.
- Cement formwork is fixed around the perimeter or plastic edging is made.
Some builders also attach the last rows of tiles to cement mortar, abandoning curbs without losing the strength properties of the coating.
Arrangement of a parking space
If you need to equip a platform for a car with your own hands, you cannot do without a tiled border. When using a metal corner as an alternative, it is treated with an anti-corrosion compound and secured to the ground with pegs or nails. Reinforcing mesh or metal rods are laid across the path on a sand cushion.
Another technology involves fixing paving elements with mortar. It is prepared from 1 part cement and 3 parts sand. First, the side parts of the track are laid on the solution. The middle part is placed on the dry mixture. The master moves along it during the work process.
If the path is made on a slope or wet ground, the curbs are replaced with wooden formwork into which concrete mortar is poured. However, the formwork is done after laying the paving elements.
The polymer border is fixed in the ground with stakes or nails. This method is widely used when designing curved paths.
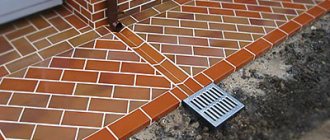
Storm drains are installed only on one side of the path. Therefore, this technology is most often used if the path on one side is adjacent to the building.
A storm drainage system is installed near the house
How can I replace the curb?
If laying curb elements becomes impossible due to technical or financial reasons, you can consider alternative solutions that have similar functions but are cheaper:
- Lay paving slabs without a curb, deepening them into the ground.
- Secure the outermost elements of the tile masonry with concrete.
- Use wooden formwork and reinforce it with a composition of stones.
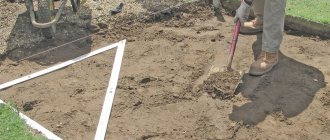
Marking future paths
The markings help to pave the path correctly. When working, please consider the following:
- It is imperative to prepare the base of the trail (dig a trench for a layer of sand or gravel).
- The depth of the hole depends on the building material for constructing the path.
- The canvas should be 5 or 6 centimeters higher than the soil layer.
- To prevent sedimentary water from accumulating on the surface, a slope is made from the central part to the edges (15-20°).
- If the path material is loose, you will need to install curb elements.
The marking is not difficult to do; you just need to fence off the future path with pegs driven into the ground. There should be a distance of 2-3 meters between them. The pegs are connected with a cord. The second side of the path is also arranged, the selected width of the path is fixed. First, the main paths are marked, then the secondary ones.
Using cement mortar
This technology for paving paving slabs with your own hands without curbs is very popular, due to its distinctive properties and advantages.
The method involves planting the last row of FEM on a cement screed along the perimeter. The result is a durable and reliable coating that does not deform during intensive use. To improve the quality of the structure, you need to use a cement mixture of grade M400 or higher.
This solution simplifies the process of laying square tiles. If a figured option is used, you will need to be more careful, since at the paving stage it may be difficult to align the pattern.
To carry out the work, you must adhere to the following instructions:
- Prepare the foundation - you need to remove the top part of the soil from the surface and arrange a sand and crushed stone cushion.
- Next, the coating should be spilled with water and tamped.
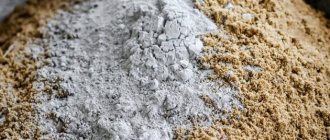
- At the next stage, markings are applied and the first row of mortar is laid. Subsequent layers are laid on a cement-sand mixture. Some builders use only sand, but in this case the strength of the coating will be reduced.
Some people start work from the second row, claiming that it is easier. However, such technology often leads to displacement of rows.
Rules of care
Paving slabs have a number of advantages. However, it can serve the billing period with constant care, which includes compliance with the following rules:
- in the warm season, the paths are swept and washed;
- in winter they clear snow without using metal shovels or ice axes;
- The use of formulations containing salt is not allowed.
Concrete is a hygroscopic material. In winter, water penetrates deep into the pores of concrete, freezes, expands, destroying the structure of the material. Water repellents - protective impregnations - allow you to avoid the destructive effects of moisture.
Plastic border
When using such a border, the perimeter must be limited by a tape made of polymeric materials. We must not forget that in terms of strength, plastic is much inferior to concrete solutions, so if there are high loads on the coating, it is better to abandon it.
In most cases, plastic fencing is used to organize garden paths. Their key advantages are ease of installation and the ability to realize any shape, since plastic lends itself well to bending.
To install the border you need:
- Apply markings.
- Make a base for paving tiles.
- Give the plastic tape the correct shape and secure it with pegs in the soil.
Experts advise performing installation in such a way that the tape does not end up on top of the tiles. It is recommended to deepen the structure by a third.
Installation technology
When designing a paving area, you should take into account the following nuances:
- perfectly flat areas are extremely rare; users additionally create uneven landscapes to increase the aesthetic value of the design;
- shaped concrete paving elements are a waterproof coating, from the surface of which rainwater and flood runoff are drained by specially made slopes;
- the curb is located along the perimeter of the pedestrian zone, barbecue area, and serves as a riser for stairs inside the retaining walls that are used to terrac the area;
- the curb is much higher than the paving slabs, you need to dig trenches for it;
- curbs are installed on sand concrete.
Therefore, first, the cords are tightened on their own, taking into account the gravity slopes and trenches are torn off to bury the curb stone, concrete is mixed at the rate of 1 bucket per curb 1 m long.
Leveling and making slopes
In contrast to finding the top point of the floor when finishing premises, the technology for dividing the area is significantly modified:
- there is no attempt to level the existing landscape in a general plane;
- the slopes of paving slabs and curbs replicate the elevation changes of the area;
- on narrow paths only longitudinal slopes are created; on wide paths and platforms, transverse slopes are added to them;
- runoff is collected in point storm inlets or linear storm drainage trays located along the edge of the shaped paving elements;
Marking the area with cords.
After installing the cast-offs, cords are pulled over them along the outer perimeter, taking into account the width of the curb of 8 cm. The upper edge of the curb should not protrude above the paving stones, unless this is provided for in a special design.
When marking paving stone stairs and low retaining walls made from curbs, installation of pegs or cast-offs is necessary for each step separately. To reduce cutting waste and the number of FEM trims, the width of the path should be adjusted to the size of the paving slabs.
Curb steps.
Trench and underlying layer
Since concrete products are prohibited from being installed on a fertile layer, which can sag after the organic matter contained in it rots, it is removed entirely from the paving area. The depth of the resulting pit is usually greater than the thickness of the paving stones, but less than the vertical dimension of the curb. Therefore, you need to perform several steps:
- fill the bottom of the pit with sand at a low ground level or crushed stone on wet soil, leaving 8 - 10 cm to the ground level (5 cm contact layer of sand or gravel on which the tiles are laid, plus the thickness of the tiles themselves);
- deepen the pit around the perimeter with trenches to the size of the curb, a 2 cm layer of sand concrete on which it is installed, and the underlying layer under it (15 - 20 cm).
Non-metallic material must be compacted using an area vibrator (vibrating plate) or a manual tamper. It is not recommended to spill sand with a bucket/hose; it is better to moisten it generously before placing it in the ground.
With a slight increase in the construction budget, you can dramatically increase the service life of the structure if you line the bottom of the pit with non-woven material (dornite, geotextile), which prevents mutual mixing of non-metallic material with the soil and the germination of weed roots.
Installing a garden border
The classic technology for installing concrete curbs is as follows:
- making a bed - plastic sand concrete is laid on the underlying layer, leveled with a trowel for a maximum of 2 - 3 elements;
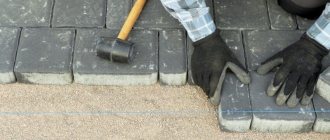
- installation of the curb - the exposed stone is settled on the concrete with a rubber mallet;
- lateral fixation - concrete is applied to the laid curb with a trowel from the outside and inside to form a slight widening in its lower third in height.
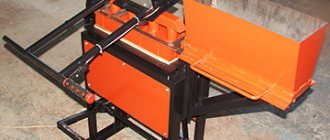
The curbs are installed along the cord close to each other. The cutting is carried out with a special tool - a guillotine or an angle grinder with equipment for concrete (diamond, abrasive).
Guillotine for splitting curbs.
Using a metal corner
When laying paving slabs in your dacha, you can use metal corners instead of curbs. With their help, you can build a rigid frame that will maintain strength for a long time.
The installation technology involves performing the following actions:
- A hole is made in one shelf in increments of 0.5-1 m; the corners will be attached through this distance.
- The metal surface is treated with a primer or paint to protect it from corrosive processes.
Using this method, you can arrange narrow paths by fastening the corners with reinforcement or make large areas with your own hands.
In order to increase the rigidity of the frame, the corner is fixed with cement mortar. However, the problem is often solved with the help of long stakes that hold the structure.
Requirements for track design
The border serves not only as a decorative element, but also performs a practical function, preventing the tiles from spreading.
Therefore, the technology of paving paths without a curb is used for arranging paths only on a personal plot.
But even in this case, their design must meet certain requirements:
- paving elements must be laid in a rigid box;
- it is necessary to create a gravity slope that will allow rainwater to drain away;
- it is necessary to partially replace the soil in order to ensure the geometry of the coating.
Using gutters
There is another technology with which you can lay paving slabs yourself. It involves the installation of drainage systems made of concrete, plastic or metal. The market offers products with a height of 15-40 cm with different thicknesses. To choose the best option, you need to take into account the load on the channels.
Concrete products are characterized by the greatest strength. Plastic models are less durable, but this is justified by their cheapness. As an additional reinforcement, the plastic is covered with a metal grid, which prevents dirt from penetrating inside the trays.
Often, owners use metal trays. They are characterized by light weight and strength, and the presence of a zinc coating prevents corrosion processes. However, when it rains heavily, the metal can make an unpleasant drumming sound.
To install the sills yourself, you must follow these instructions:
- A pillow is prepared for FEM.
- Next comes the installation of paving slabs.
- A trench is dug under the drainage pipe (the slope should be 5 millimeters), after which cement mortar is poured.
Following these guidelines will give the elements additional rigidity. However, the technology also has some peculiarities - in most cases, the ebb is fixed on one side of the paving, since it is necessary to maintain the slope for faster water drainage.
In this regard, it is recommended to combine the method with others. Using trays you can increase the rigidity of the structure and prevent the paving stones from slipping.
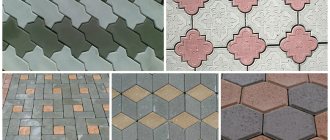
Types of side stone
The variety of this type of road building material offered on the market today is very large. If desired, you can find side or curb stones of various shapes, cross-sections, sizes and colors, made from concrete, natural or artificial stone, from ceramic materials or from composite mixtures with the addition of plastics.
They differ primarily in their size. Paving stones are typically larger in length, mass, and cross-sectional area than sidewalk curbs. In addition, in the manufacture of such materials, steel reinforcement is used, which gives them increased strength and durability.
The advantage of paving products lies in the wide variety of materials used, colors, shapes, and sizes. In addition, they are more suitable for cases where curbs are installed with your own hands, rather than by involving a construction crew. They are most often used when framing sidewalk paths, areas in the courtyards of private houses, designing flower beds and other garden plantings.
Pouring formwork
Builders call this technology “hidden curb” and use it when organizing parking spaces, driveways into courtyards, and paths with a non-standard shape. It is in demand for work in areas with difficult terrain, where the use of curbs becomes difficult and unreasonably expensive.
To install the formwork, you should follow these instructions:
- Prepare the base and make a pillow.
- Start laying FEM.
- Set up a trench around the perimeter for formwork.
- Fill the hole with cement mortar.
- As the screed sets, the trench is backfilled with soil or other powder.
For the successful completion of the work, it is necessary that the FEM be recessed into the concrete to half its thickness. Otherwise, the tile will begin to deform. The concreting method may involve the use of removable formwork, but you can do without it. The strong walls of the recess will prevent the solution from spreading.
If there is a need to develop large areas, the work is carried out jointly. However, it is not necessary to lay out the entire area to start pouring. When laying tiles in conditions with heavy loads, concrete needs additional reinforcement. This will increase its strength and increase its service life.
Required tools and materials
When the issue of the location of the future path has been resolved, it is worth preparing the necessary materials and tools.
Photo: checking the horizon using a level
These should include:
- wooden pegs and rope (for marking);
- rubber mallet (mallet);
- rake;
- watering hose with sprayer;
- Master OK;
- shovel;
- building level;
- roulette;
- grinder and diamond-coated disk (for cutting tiles);
- manual rammer;
Photo: manual tamping - sand;
- crushed stone;
- geotextiles (for moving soils);
- cement grade no less than M400–500.
In addition, it is important to ensure the possibility of unhindered connection to electricity and water supply. It is better to work in rubberized pants or knee pads and mittens.
You need to remember that tiles are sold by square meters, and borders are sold individually. To calculate the number of the latter yourself, you need to multiply the length of the path by two and divide by the length of one curb.
And knowing the approximate price of the coating, you can calculate the average construction costs. So, it is worth adding another 20% to the amount of expenses for tiles, taking into account possible damage and trimming of products.
Laying recessed tiles
The arrangement of a path made of paving slabs in a country house without curbs can be done using the deepening method.
Preparatory work
Installation technology with tiles buried in the ground is only suitable for flat areas. Pegs are fixed around the perimeter and a cord is pulled. At least 30 cm of the top layer of soil is removed from the marked area.
The recess can be leveled using a rake or shovel, and the trench is made at a slope of 5 mm for each meter of length. To prevent the tiles from subsiding, the soil is moistened and compacted. For these purposes, you can use a hand tool or a roller.
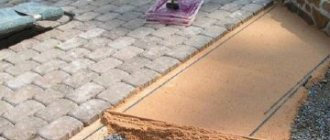
Next, sand is poured out in a layer of 7 cm, leveled and moistened. The liquid must be added until small puddles form. After a couple of hours, the pillow is leveled and compacted again. Next, a mixture of sand and cement is added. It is filled to the level of the lace.
Laying tile elements
Having completed the preparation stage, you can proceed to the installation of tiles. Before this, you need to stretch a thread between the pegs around the perimeter, which will mark the upper edge of the paving elements. The outermost row is laid out first (it is important to make sure that it does not touch the cord).
Subsequent paving elements are fixed away from themselves so as not to damage the cushion of cement and sand. The elements are compacted using a rubber mallet by light tapping. This will prevent the material from cracking. If the tiles sag significantly, a mixture of cement and sand is added underneath.
After completion of the masonry, the tile joints are backfilled. In this case, the paths are evenly sprinkled with sand, and the remaining composition is swept into the seams. The pillow is moistened and dried, after which a mixture of sand and cement is added.
Using this technology, you can create a reliable surface with increased strength.
Areas of application
Paving slabs are available in different sizes, shapes and colors.
Types of paving slabs
It is used to equip the following elements:
- pedestrian paths;
- sidewalks;
- blind areas;
- driveways;
- parking places on the site;
- for industrial purposes (they pave floors in factories).
The scope of application depends on the thickness of the material. Paving elements 25-40 mm thick are laid on a sand cushion and are intended for pedestrian movement. Increasing the thickness to 60 mm allows the material to be used for paving a parking space in a country house.
The thickness of the most powerful tiles is 60-80 mm. This material is not used in everyday life due to its heaviness and high cost, so it is used only on a production scale.
Construction of the first part of the load-bearing layer - leveling
The next stage in the construction of a garden or country path is the construction of a load-bearing layer - the main part of the foundation.
First of all, we lay a leveling layer of crushed stone 5-7 cm thick, which is essentially part of the load-bearing layer of the foundation. It is on this that we will install the curb stone.
Having evenly distributed the crushed stone over the entire surface of the bed of the infield path, we must compact it. We control the level of crushed stone by measuring the distance from it to the string. It should be equal to the height of the curb stone.
At the end of compaction, sprinkle the leveling layer with sand and water. It is advisable to do this, since sand penetrates inside between the crushed stone and makes the crushed stone layer monolithic.