The most important thing in installing fence posts is to ensure that they do not rise due to heaving forces or fall from other influences. These natural forces can not only mow the fence or ruin all its beauty and harmony, but also prevent the owner of the fence from leaving his own yard. This happens when, due to the movement of the pillars, the wicket and gate jams. Of course, this is an extreme case. It can occur in regions where the depth of soil freezing breaks records and saddens many owners of private houses.
How to avoid problems with the fence due to improper concreting of the posts? If you don't want to get depressed over wasted money and wasted time, do it right the first time. You won’t have to suffer or spend money redoing the fence again. It will stand without any changes, causing the envy of neighbors and the admiration of passers-by. But that's not the main thing. It is important that it is beneficial, convenient and pleasant for you personally.
Hammering with a headstock
If the fence is planned to be of light construction but of significant height (from 1.5 to 3 meters), using a sledgehammer when hammering becomes difficult.
In this case, a special device, popularly called a “grandmother,” will help drive the profile pipe into the ground under the fence. The mechanism of the device is simple; anyone can assemble it using available materials:
The basis of the “headstock” is a meter-long pipe with an internal diameter slightly larger than the transverse size of the support being driven in. It should fit easily onto the pole.
“Granny” with your own handsSource fb.ru
- On one side of the pipe, a circle of metal is welded, as well as, in order to maximize the weight of the structure, additional metal elements. Ideally, the “grandmother” should weigh from 10 to 30 kg. The heavier the device, the easier and faster it is to hammer the stand into the ground.
- When welding a metal circle, it is recommended to place the circle not at the end of the pipe, but with a recess of several centimeters inward. The resulting “glass” is filled with molten lead. This procedure will make the structure as heavy as possible.
- For ease of use of the device, two metal handles measuring up to 1.5 meters in length are welded to the edge of the pipe without weighing it down.
Driving pillars with a "grandmother"Source ytimg.com
The technology for driving pillars with a headstock is simple. The support is installed in the desired location. A “grandmother” is put on the upper part. It's better to score together. Using welded handles, the mechanism is lifted to a height of about half a meter and sharply lowered, while applying some effort. The pipe is lowered along the support and, using lead weights, drives the post into the ground.
Preparatory stage
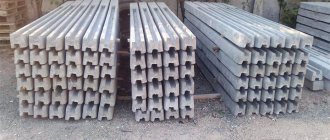
For a permanent fence, we recommend taking metal posts: they are strong, last for 40 years, do not break, do not rot, and installing them yourself is much easier than making brickwork. Another option is wood, but wood is only suitable for temporary solutions. It won't last long.
The distance between the posts (run or “step”) is 2–2.5 meters, for chain-link mesh – up to three. The smaller it is, the more resistant the fence is to strong gusts of wind, so look at the circumstances. The mesh has a low windage, air passes through the cells without creating a strong load on the supports, but a solid profiled sheet has a high windage. The wind presses on the pillars. Over time, the hedge may become askew.
It is important to consider how much the soil floods in autumn and spring. In summer the soil looks dense and dry, but if by autumn it becomes limp and the supports are installed without reinforcement, the fence will simply collapse.
Work begins with marking the area around the perimeter. The turning pillars are placed first, along which the rest are aligned with a thread.
Hammering with a piledriver
The problem of how to quickly and easily drive fence posts, regardless of the financial component, is solved by using a piledriver. The principle of operation and purpose of the structure is impact technology for driving piles, supports, pillars, etc. into the ground. Using a pile driver, drive the support into the ground, and maintaining its vertical position will not be difficult.
Copier installations can be used in different versions. Hand-held pile drivers are mobile and relatively light, but a person cannot work with them alone; an assistant is needed to install the post in the initial position for driving.
Clogging a pipe with a pile driverSource ytimg.com
Mechanical self-propelled pile drivers are heavy equipment. With its help, you can not only drive poles, but also drag the support to the place of driving, install it in a vertical position before driving, and also dismantle old fences.
The time required for driving fence supports using a pile driver, even in large volumes, is minimal. In just one shift, you can install posts on a fence with a length of more than 100 meters along the perimeter. But the work is not cheap.
Knowing all the subtleties and nuances of how to hammer in fence pipes with your own hands, using available materials, you can find the optimal way to hammer in supports, taking into account the price and expected quality of work. The strength and reliability of the fence depend on proper installation, durability on the preparatory work performed, and aesthetics on the accuracy of the installation.
Fencing on marshy soil: what to consider
With the onset of cold winter days, the swampy soil oversaturated with water begins to harden. According to the law of physics, it is known that water turning into ice leads to the expansion of frozen soil. Then any support immersed in the ground is pushed out by the force of the frozen soil. In the spring, when the ground thaws, the pillars raised by heaving begin to move, and they do not always return back to their places.
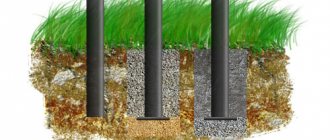
Pile placement diagram
If the support is poorly placed in a swampy place, without taking into account its peculiarities, then it will not last long; then repairs and adjustments will not be possible.
To build a stable fence in a swamp, you should first learn the technology of how to install poles. It is the peculiarity of the soil in such areas that makes the procedure difficult.
Scheme of a shallow, economical strip foundation for heaving soils
To avoid having to remove the canvas and tear off the posts to reinstall them, it is necessary to think through the entire installation process and prevent them from tilting and falling with subsequent destruction of the fence structure.
Repairs will take a lot of time and nerves, and will also require considerable material costs.
The principle of operation of heaving forces
Therefore, when arranging supports for a fence, so that they last for centuries, they should be laid taking into account the depth of solidification of groundwater. You should contact surveyors to assess the nature of the soil and take a sample. Based on the indicators of the sample taken, it is possible to calculate the diameter of the pillars and the depth of the future fence. The mass of the fence web is also taken into account.
To prevent fence supports from being pushed out when the soil swells, you should follow the correct technology when installing posts in swampy areas.
Scheme of the main types of piles depending on the type of soil
After determining all the parameters for installing the racks, it remains to choose the type of arrangement of the pillars.
There are several not too expensive, budget-friendly methods that have proven themselves in practice to build fence posts in swampy soil with your own hands. Let's look at some of them below.
Pillar concreting scheme
Briefly about the main thing
To install support posts for a fence, 3 methods are used: concreting, backfilling, driving.
Hammering fence posts is an effective method of constructing supports, economical, but labor-intensive.
The advantages include quick installation and use in many types of soil. Disadvantages: fragility (up to 10 years) and labor intensity.
For light decorative or temporary fences up to 1.5 m high, driving is done using a sledgehammer; to speed up the process, use a hammer drill (using a special attachment).
For high posts (up to 3 meters high), it is advisable to drive the posts using a headstock; if you need to mount the fence quickly and do not take into account the financial issue, you can drive the posts using a piledriver.
How to make a “baba” yourself?
Before driving pipes onto your fence, you should familiarize yourself with the method of constructing the “headstock” itself. Initially, a circle is inserted into the pipe, which will be comparable in diameter to the pipe itself. Next, the circle needs to be weighted to about 20 kg by welding scraps of metal and other things. For convenience, make handles from dense rods up to 1 m long or weld thin tubes in the form of handles to a circle. Such a homemade handle can be wrapped with electrical tape before use.
That is, shortly before hammering pipes onto the fence, take up the issue of preparing improvised means that you will choose yourself, based on your strengths and knowledge. You can also hammer pipes into any fence with a sledgehammer if it is not possible to build a “headstock”, but with this method, we repeat, you will need to hammer them in for a long time and carefully, wasting your strength. You can't do without frequent breaks.
The length of the pipes for the proposed fence is also significant. If the supports are at least 2.5 m, then driving them in with a sledgehammer is not rational, so it is recommended to strengthen any pipe onto the fence using a popular hammering device, which helps to bring the support to the required depth faster and easier. Overcoming soil resistance is much more effective if there is a “grandmother” that deepens the support step by step firmly and reliably.
Installation of wooden poles on the site
- Mark the position of the pillars. After preliminary marking the area, installing pegs and pulling a cord between them, we mark the places for digging holes for the pillars.
Make sure that they are located strictly in one line. To do this, using a stretched cord as a guide, make markings directly on the ground, marking the locations of the pillars using a plumb line. After this, the cord can be removed.
- Dig or Drill Holes Use a shovel or mechanical auger to make holes.
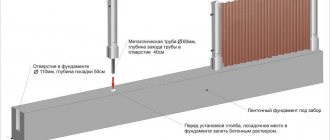
Do not forget that the depth of the holes for installing poles should be approximately 30 centimeters greater than the freezing level in cold climates. The holes should be dug as narrow as possible - their diameter is usually made twice as large as the thickness of the pillar. The bases of the entrance pillars, as well as the corner ones, are recommended to be made somewhat wider for additional strength. Pour a layer of crushed stone or gravel about 15 centimeters thick into each hole - this is necessary to improve drainage.
- Install the pillars Place the pillars in the holes prepared for their installation. Check their verticality using a level. If necessary, adjust the height of the posts with the amount of crushed stone or gravel. You can trim the posts after they are installed, using a reciprocating saw, a hand-held circular saw, or an electric jigsaw for convenience.
Secure all the pillars with struts made from scrap boards on two opposite sides.
Using a cord, make sure that all the posts are aligned and make the necessary adjustments.
- Concreting the pillars Pour the concrete mixture into the pits with installed pillars so that the pour is just above the surface of the ground. Once again, check and ensure that the pillars are strictly vertical, and then give the concrete around them a rounded sloping shape to ensure unhindered water flow.
The concrete should be cured for a couple of days, after which the struts can be removed and installation of the veins and sheathing of the fence can begin.
By the way, the veins for the fence when installing wooden posts do not have to be made of timber. So, if the fence is planned to be sheathed with corrugated sheets, then the crossbars are cheaper and better made from a metal profile pipe with a section of 20x40 with a wall thickness of 1.5 mm.
Once a high-quality installation of posts and pre-treatment of wood with protective compounds against rotting can ensure a long service life of the fence.
Features of heaving type soil
There are features of installing a fence that are located in areas of heaving soil. The main danger lies in the possibility of the soil pushing the supports out of the ground with the base itself. Even a reliable post on heaving soil can tilt, ruining the fence. The presence of nearby groundwater also worsens the situation. Their presence accelerates the process of rotting or corrosion. In this state of affairs, it is very important to take additional measures to protect the supports.
Some sources may advise making a hole for the foundation below the passage of groundwater. But this technique is not always justified, and can only increase the cost of materials. A more effective method is to install a drainage system. To do this, it is necessary to cover the bottom of the prepared hole with a layer of expanded clay and crushed stone. The layer should be about 15 centimeters. It is necessary to fill the element in a circle not with earth, but with crushed stone. It is this layer that will prevent water penetration.
Additional measures to protect these parts must be taken for iron or wooden parts. It also doesn’t matter whether corrugated sheeting or the simplest chain-link mesh is used for cladding. Additional measures will increase the service life of the fence while maintaining an attractive appearance. Therefore, there is no need to carry out any kind of repair work.
Anyone can install a fence with their own hands. The methods for performing this process directly depend on what material is chosen. You can install the pillars and then secure the crossbars yourself, but in some cases it is worth taking an assistant. the work gets done faster this way.
Materials for finishing the ceiling in the Loft style
The limited color range does not allow the use of a large number of materials for work, so the choice is not so difficult. Ceiling decoration in Loft style is made with the following materials:
- Concrete solution. This option is a classic solution when decorating a room in the Loft style. Treating the surface with concrete mortar is the easiest way.
- Tension fabric. When choosing this option, you should take into account the need to attract professional craftsmen, which leads to additional costs. In addition, the tension structure involves reducing the height of the room, which is undesirable for the Loft style.
Tools you will need for the job
In order to bring my idea to life, I needed the following tools:
- grinder with cutting disc;
- welding machine;
- the hammer drill itself;
- an old, unnecessary drill that you don’t mind ruining.
I was lucky that my neighbor at one time did welding work on his property and purchased an inverter machine. I used it once and left it gathering dust in the closet. He lent it to me, along with the mask. The rest of the power tools were found on my farm.
Technological options for installing poles
The method of installing fence posts is determined by the design of the fence and the nature of the soil.
Installing fence posts in a universal way is well suited for installing metal, reinforced concrete and wooden structures on stable, non-moisture-saturated soils. This method involves digging a hole for the support, installing the pillar itself and filling the remaining space with concrete.
The use of a drill will significantly facilitate the process of digging a hole and excavating soil
You can increase the efficiency of drilling by pouring water into the hole and waiting 10-15 minutes so that the soil in it becomes softer and more pliable.
To install pillars up to one and a half meters high, it is enough to dig a hole 0.5 m deep, and for installing higher support pillars - 0.8 m. On average, a pillar is buried 1/3 of its length.
If you decide to dig support posts for a fence on non-heaving soils, you can do without using concrete at all
But how to install fence posts on “difficult” soils with high groundwater levels? Indeed, in such conditions it is necessary to deepen the supporting structure below the soil freezing level, and this, with traditional concreting of the base, is a troublesome and costly undertaking. In such cases, before installing the supports, the bottom of the pit is lined with a layer of crushed stone 15-20 cm high.
The pillars are immersed in the hole and aligned vertically with a building level or plumb line. After this, the empty space around the entire circumference of the pillars is filled with a layer of crushed stone
Such a crushed stone “cushion” simultaneously acts as a drainage for the supporting structure and softens the effects of frost heaving forces. The layer of crushed stone should not reach 12-15 cm to the ground level: the remaining space of the hole is concreted with fresh mortar.
Hammering poles is one of the simplest and cheapest ways to install supporting metal structures.
This method is effective when constructing fences on low-stony soils that contain layers of dense rocks
You can hammer in small one and a half meter fence posts using a regular sledgehammer. To install three-meter supports, you can use a “grandmother” - a device for driving piles, pipes or poles into the ground
The design is a meter-long piece of pipe, one of the ends of which is tightly welded and weighted to 15-20 kg. When hammering in the headstock, the guide of the structure is located in the pipe, which makes it possible to increase the accuracy of the blow, since it must be performed strictly along the axis of the object.
When driving pillars using a headstock, difficulty may arise when lifting the structure. You can make the work easier by welding long handles to it, which, as they are hammered, are adjusted to the most convenient position.
Traditionally, such pillars are erected on a concrete strip or column foundation. The strip foundation is a continuous reinforced concrete strip 500-800 mm deep, the width of which is 100 mm greater than the width of the fence.
Since brick pillars are quite heavy structures, in order to install brick pillars for a fence, it is necessary to make a shallow foundation
To build such a foundation, it is necessary to dig a trench. Pipes are driven into the bottom of the trench, which will subsequently act as the basis for brick pillars.
The trench is filled with a 300 mm layer of sand, crushed stone, broken brick and compacted tightly
Along the perimeter of the trench, formwork is installed, equipped in such a way as to prevent the loss of moisture from the concrete solution and ensure waterproofing of the structure.
The assembly of the formwork is clearly shown in the video:
After arranging the formwork, they begin to knit the reinforcement frame and fill the trench with concrete mortar. The concrete hardens within 5 days, but the construction of the fence can begin within a couple of days after laying the foundation.
The use of piles can significantly reduce the cost of the construction process. The cost of a screw base is an order of magnitude lower compared to a traditional columnar or strip base.
In recent decades, when constructing fence posts, screw piles are often used as a reliable foundation.
Piles are easily installed manually or using small-scale mechanization. They, like “screws,” are screwed into the ground, compacting the space between the blades as they go deeper, and form a reliable foundation for heavy building structures.
Installation methods
The most important thing in order to make a good fence is to securely and efficiently fasten the supports on which it will stand. It is the pillars that will determine how long your fence will last.
Depending on the chosen material for construction, you need to select the installation method.
If you are building a fence made of wood, then the simplest, but no less reliable option would be to simply drive the posts into the ground
This method cannot always be used, since it is important to take into account the specifics of the soil. If it has a high density or rocky inclusions, then driving in a support will be unrealistic and you will need to select something else
If we talk about the advantages of this method, then we can note the simplicity of the work. There is no need to dig holes for posts, prepare a solution and wait for it to dry. It is enough just to find a suitable material, the driving of which is carried out using a sledgehammer. All this saves not only effort, but also money on materials. You can build such a fence yourself without hiring additional workers, because driving in the supports is not too difficult.
A fence installed on wooden supports will withstand any weather if the wood is initially treated and similar procedures are carried out at least once a year. As for the barrier material itself, in this case the most convenient would be to use a chain-link.
If we talk about the disadvantages of this option, we can note the gradual loosening of the structure, bending of the posts and the fall of the fence over the years. Any mechanical impact causes the soil to diverge and the column to become loose. If there is a heavy, massive fence on wooden boards, it may sag over time due to the influence of weather conditions. If there are stones in the ground, then driving the support to a significant depth is often almost impossible.
Another method, which is considered much more reliable, involves using concrete to secure the posts. Installing such a fence is a little more difficult, but it will last much longer. In order to install the support, you need to make a solution and pour it into the prepared recess. Backfilling in this case will also be indispensable, because without cement it will help make the entire structure stronger and more reliable, capable of supporting any weight of the fence.
The use of concrete helps protect the pipe, which is located in the ground, from corrosion, because it securely fixes it. Both metal and concrete supports can be concreted. If we are talking about concrete structures, then there is no other option for them other than using a solution. This is due to the fact that if such pillars were driven in, they would simply crumble or become severely deformed.
Typically, such work is carried out during the warm season, because in winter there will not be an optimal temperature for concrete to harden and the fence will dry out for a very long time. In addition to the positive aspects, there are also negative ones associated with the high cost of the work, because the number of necessary elements is significantly higher in this case. In addition, nature itself, under unfavorable conditions, can push the pillars to the surface if you have weakly strengthened them.
When it comes to brick fences, we also work with concrete mortar, which is applied to the brick. If you are using scrap or material from a dismantled house or garage, then you cannot do without cladding. When new bricks are purchased, it is both the base material itself and a decorative facing element in one bottle.
Technology for constructing a fence from corrugated sheets
The process of building a fence must be prepared with special care. Even small errors during the design and installation of a structure can lead to unplanned expenditures of time, money and nerves.
After developing the construction project, it is necessary to accurately mark the entire area intended for the construction of the fence. In this case, it is necessary to accurately calculate the number and location of entrance gates and gates. All markings must be carried out taking into account the slope of the terrain.
Installation of support pillars
There are several options for installing mounting supports, the choice of which depends entirely on the nature of the soil, the height of the fence and the depth of groundwater:
- full concreting (with reinforcement);
- partial concreting (combined type);
- butting (strengthening with crushed stone and sand);
- driving supports.
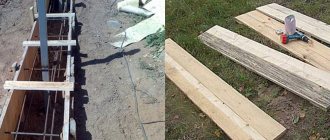
The most reliable method is to install supports with full concreting. First of all, it is necessary to install the outer supports. It is necessary to dig holes for posts 150 mm wide and 1-1.5 m deep. Excavation work is easier to do with a hand drill. The amount of depth depends on the planned height of the fence: the greater the height of the fence, the deeper the supports will have to be lowered.
The technology for filling the hole is carried out according to a standard scheme. First, roofing material is laid to prevent the soil from shedding, then the pipe is set strictly according to the level. The next step is to fill the hole with concrete, while tamping the mixture periodically.
Three days later, after the concrete has completely dried, you can begin attaching the crossbars.
Fastening the crossbars
Installation of logs is carried out after reliable concreting of the vertical posts. There is no need to rush into the process of attaching the crossbars, so that the supports do not deviate from the vertical.
If you have a welding machine, as well as the skills to work with such equipment, you can securely secure the crossbars by welding.
You can also screw the logs to the vertical posts using special brackets. Thus, a special X-bracket is screwed to the support post. The cross beam is screwed to the bracket plate. This type of fastening makes the entire structure a little longer, which must be taken into account at the design stage of the fence. But the fastening is considered more reliable in terms of operation, and also simplifies repair work.
There are three main ways to attach crossbars to posts:
- At the back of the post using a bracket. This mount is very convenient for creating sectional fencing.
- Front racks (butt). The use of this method is very convenient when constructing a continuous fence.
- On the side of the support. The main advantage of this method is that the profiled sheet is attached not only to the crossbar, but also to the vertical post. This allows you to strengthen the entire structure.
The fully assembled fencing frame must be treated with anti-corrosion primer and paint.
Installation of corrugated sheets on the frame
The sheet is fastened using galvanized or painted rivets or self-tapping screws. If desired, the fasteners can be matched to the color of the fence, which will significantly improve the appearance of the entire fence.
Fastening through the wave of the sheet is considered reliable. To increase strength, fasteners can be installed in a staggered manner.
It is very important to position the first sheet strictly vertically during installation. Compliance with this condition will allow you to avoid problems during further installation of the entire fence
Each subsequent sheet overlaps the one installed on one wave, while the self-tapping screw is installed in the lower part of the wave strictly perpendicularly. Tilting the fastener can cause paint to peel and rust.
A fence made of profiled sheets is resistant to any type of precipitation and temperature changes. Has an aesthetic appearance. Such a fence is a reliable and durable structure that can protect any suburban area from external factors.
Preparation of material: making a shank for the nozzle
If you noticed, there was a drill on the pallet along with the power tool (photo 1). That's what I decided to use. For this purpose, the shank with a reserve was sawed off. The calculation of the length was such that it was enough to be inserted into the hub and provide high-quality welding. If you have a grinder, sawing off part of the drill is quite simple, but care is required here too. If it is possible to clamp the drill in a vice, then it is better to do so. I had to step on one side of it with my foot, which is quite dangerous. The fact is that if the disk is skewed, the drill can fly out at a fairly high speed.
We saw off the drill to a pre-marked length sufficient to connect to the hub
Now all that remains is to connect the two parts (the drill bit and the hub) and thoroughly weld the joints. In fact, if the welding is weak, it can easily fly off due to the vibration and impact of the hammer drill. And this is quite unpleasant when the work of nailing down the posts has already begun. In general, welding work is a separate story, we will dwell on it later.
Instructions for concreting
In order to make a fence that will last forever and not have to return to repair it every year, it is best to concrete the posts into the ground. This can be done by completely or partially immersing the lower part of the pipe in concrete. The first option is used on stable soil without groundwater leakage. A layer of fine crushed stone is poured into the finished hole, on which a support is placed, and then filled with concrete.
If your soil is unstable or there is a body of water nearby that affects the condition of the ground, then it is better to use a partial fill. It is poured into the base of the pit, where the support is immersed. The rest of the space needs to be filled with stones and other rubble. It is the butting that helps make unstable soils stronger and more immobile.
For brick pillars, you also need to choose the right dimensions. The height of such a support should be about two meters, and the width should be 38 centimeters. To ensure that your pillars are level, you need to erect them using a special device called a level. They are the ones who have the opportunity to find the cause of any distortions and straighten them out. When working at height, you need to use an appropriate ladder, something you need to think about in advance.
If you have an old fence that you really love, then you don’t need to remove it completely. Repair of any old structures is carried out by searching for damaged elements that need to be replaced with new ones. If your supports were wooden, then you can use corrugated sheets. The same option is suitable for metal supports.
From theory to practice
There are several ways to get around such an unpleasant effect as squeezing pillars out of the soil. Here are some of them:
- installation on a shallow wide strip foundation;
- installation of a jib system - for rural areas and country-style houses;
- backfilling of pillars into the ground with preliminary installation of drainage.
The easiest way is not to bury the bases of the pillars into the ground. Installing fence posts using a jib system is a fairly common method where the freezing depth is above two meters, and we have a lot of such areas. The photo shows an example of such a fence in a rural area.
It is quite acceptable to use jib fences in agricultural fences, but in urban conditions a fence on jib fences is an undesirable phenomenon. Free space in the city is in short supply, and the jibs take it away and also spoil the appearance of the fence.
Not every owner will decide to make a strip foundation for a fence with his own hands; the method described below for installing pillars is more often used.
Backfilling of pillars without concreting
In this case, the hole for the post is made 30-40 cm deeper than the planned level for embedding the support. First, small crushed stone, broken brick, expanded clay, or other drainage material are poured into the well to the above 30-40 cm. It is thoroughly compacted, pouring water. And a support is installed on this drainage pad, followed by backfilling with the same crushed stone mixed with sand or soil.
Drainage around the lower end of the support allows groundwater to recede in time, and swelling does not occur. To prevent rain and melt water from entering the drainage layer, we compact the soil around the support in a dome-shaped manner. The cross-sectional diagram is in the photo.
The above method on very damp soils is often supplemented with the so-called anchor. A crosspiece or platform with a diameter 6-10 cm wider than the support is welded to the lower section of the support, or nailed if the post is wooden. When the soil swells, this cross rests against the overlying layers, and the pillar remains in place.
Wooden poles
The material is considered a traditional option and has been used for many centuries in a row. Today, using wood is quite expensive, especially for really high quality options. The construction of such options must be done using solid hardwood logs. Practical options that are distinguished by high levels of resistance to negative weather conditions include pine, larch, ash, oak, acacia, and mulberry. practical options are representatives of the spruce or fir group. It is not recommended to build a fence from birch, maple, linden, aspen, or alder. You can actually increase the service life by treating it with special antiseptic preparations. Sometimes the ancient method of charring is used. Modern companies produce a variety of compounds that protect wood, destroy various microorganisms and pests that destroy the material. The action of other compositions significantly reduces the penetration of moisture, which reduces the likelihood of the development of the rotting process. Wood is used extremely rarely for the construction of fences today. More often the elements are used if it is intended to erect a fence using a wooden picket fence. In this way it is possible to create a complete structure.
Advantages of the hammering method
Using the method of driving load-bearing piles, you can build an enclosing structure in a short time. The advantages of this method include the following points:
- there is no need to drill a hole for support;
- the cost of constructing the structure is significantly less, since there is no need to buy additional consumables;
- There is no need to use complex equipment in installation.
When constructing a fence and installing piles using the driving method, it is necessary to take into account some nuances:
- Increased windage of the soil and insufficiently dense soil will not ensure the reliability of the supporting elements. During operation, the structure may become distorted.
- Lightweight fences are installed using the hammering method. heavy ones may sag over time.
- The pillars are driven only into fine rocky soil, to prevent the pile from hitting a large stone.
- Impacts should be applied carefully so as not to deform the element.
When constructing a fence for a suburban area on your own, you must take into account all the nuances when installing the structure and recommendations for deepening it using the driving method to build a reliable fence.
Heating solid fuel boilers using wood for long burning in the upper layer
In a long-burning solid fuel boiler, only the top layer of firewood burns in the upper layer.
The fuel in a top-burning boiler is laid in a thick layer in a high firebox and burns (smolders) from top to bottom, like a candle. The burning time of one load of firewood in the minimum mode reaches 30 hours.
The boiler operates with high efficiency up to 90% throughout the entire power control range. The boiler power is adjustable in a wide range from 10-100%.
The boilers do not have complex electronic control and monitoring systems. When working with wood, no electrical connection is required.
Top combustion boilers are less expensive than pyrolysis boilers. They require the mandatory use of firewood with a moisture content of no more than 20-30%.
They do not allow additional fuel loading; they operate only in the cycle: loading fuel - ignition - combustion - extinction - cleaning the boiler.
Top combustion boilers of the Liepsnele, Stropuva and Candle brands have proven themselves well.
The coolant fills the space between the inner and outer walls to the entire height of the cylindrical boiler body.
Combustion air is supplied directly to the combustion zone through a telescopic tube pos. 18 and air distributor pos. 11. Only the top layer of fuel, position 12, 10-20 cm thick, is constantly burning. As the fuel burns, the air distributor moves down, following the fuel.
Fuel is loaded through the door pos. 10. Exhaust gases are discharged into the chimney through the pipe pos. 7. The air supply is regulated by valve pos. 3, which is controlled by power regulator pos. 1. In chamber position 6, the combustion air supplied is preheated by the exhaust gases.
There are also more expensive models of boilers with combustion in the upper layer on sale. For example, a boiler from one of the manufacturers is equipped with a built-in heat exchanger for heating water in the hot water supply system.
The boiler has an electric air blower, which is controlled by an electronic system from a thermostat. As a result of changes in the amount of air, the power of the boiler during the combustion process changes depending on the temperature of the coolant.
The electronic system displays various indicators to monitor the operating mode of the boiler. The boiler has an indicator of the minimum amount of fuel in the firebox and sends a signal to the owner about this. The design of the boiler provides the possibility of additional fuel loading without stopping the combustion process.
Equipment manufacturers produce universal combi boilers
, which can burn fuel in two modes - with air supply either from below or from above. The cost of such boilers is naturally higher.
Options in the interior
Lighting on the ceiling will help get rid of the use of chandeliers and make the room softer and more comfortable.
Exposed communications and a mesh on the ceiling will help to refine and give effect to the interior. In studio apartments, the kitchen area can also be separated with a grid on the ceiling. A multi-colored soft corner looks bright.
Heavy oak-colored wooden beams fill the room with a calm atmosphere. Minimalism and practicality are ideally combined in this interior.
In the next video, watch a master class on decorative painting of a concrete ceiling in the loft style.
What material is needed to make a hammer drill attachment?
While rummaging through various junk in the garage, I came across a hub. I don’t know exactly what car it came from, it seemed to me that it was an ATV – it was too small. Perhaps one of the readers can tell me. In any case, the size of the hub seemed suitable for the experiment, and the diameter of the internal hole (in the center) perfectly matched the size of the drill bit from the hammer drill. This is what I needed.
A hub from a technology unknown to me with a drill shank inserted into it
Driving metal posts and wooden supports - the pros and cons of the method
Financial capabilities and time reserves do not always allow you to build a concrete foundation for a fence. In this case, wanting to speed up the process of constructing a fence and reduce costs, site owners often use the method of plunging supports into the soil using a regular sledgehammer or using a special device.
Driving metal posts
When deciding to use the driving method, evaluate all the features of the technology. Main advantages:
- the ability to immerse supports into the ground without performing excavation work. When using the impact method, the installation process is simplified and installation time is reduced;
- a significant reduction in the cost of installing posts for the future fence. A sharp reduction in the estimated cost is influenced by the lack of need to use Portland cement, gravel and sand;
- no need to involve assistants or use special equipment. It’s easy to drive the posts into the ground yourself, using a massive sledgehammer or a hand-held device;
- stability of columnar supports driven into the soil. With a low moisture content in the soil and the location of aquifers at an increased depth, the supports will retain their original position.
The main disadvantages of the impact method:
- a sharp decrease in the stability of the fence with supports driven into peat, sandy and swampy soils. With an increased area of the fence, the supports may become skewed and the fence may fall due to the increased windage;
- significant deformation of the upper part of the column, subject to mechanical stress. Impacts applied at different angles deform the end of the fence post;
Evaluate all the features of the technology when deciding to use the driving method
- breaking of the soil around the pillar as a result of impact immersion of the support. Due to the different directions of the strikes, the soil is deformed, causing the support to become loose;
- increased likelihood of supports shrinking under the weight of a massive fence. With an increased concentration of moisture in the soil, subsidence of the pillars is possible, causing deformation of the fence;
- the difficulty of driving posts into soil with large inclusions of the rocky fraction. The end of a fence post in contact with a large stone will not be able to penetrate the soil to the required depth.
Installation of fence posts using the hammering method during the construction of fences
According to the requirements of the technology, to drive the supports into the soil, it is necessary to perform the following work:
- Carry out protective and antiseptic treatment of racks.
- Mark the coordinates for installing fence posts.
- Drill holes of reduced diameter for subsequent driving of supports.
- Check the verticality of the holes and compact their base.
- Place a layer of sand and gravel backfill at the bottom of the well.
- Hammer the posts into the prepared cavities.
Installation of fence posts using the driving method
Experts focus on important points:
- mandatory control of the vertical position of supports;
- placing the ends of the pillars in the same plane;
- making pits of the required depth for driving posts;
- maintaining a constant pitch between columnar supports.
To perform the work, you need to prepare a tool.
What tool is used
The list of tools for impact diving is small:
- a massive sledgehammer or mechanized driving device;
- level and tape measure;
- nylon fishing line and stakes for marking.
When the height of the supports is no more than 2 m, the manual immersion method is used. Three-meter posts are driven in using a special device.
The manual immersion method is used when the height of the supports is no more than 2 mWe are going to install a fence with hammered supports - the preparation stage
Before starting driving, do the following:
- Apply an antiseptic solution to the surface of the wood posts.
- Tar or coat the submerged part of the wooden post with bitumen.
- Clean the surface of the steel pipe and cover the support with soil.
- Mark the places where the posts will be driven.
How to construct a fence support structure - technology for driving posts
After completing the preparatory activities, begin the process of installing the pillars.
The work is easy to do on your own using the following algorithm:
- Drive the first support at the corner of the site.
- Check the driving depth and check the position of the post with a level.
- Place the remaining posts along the contour of the fence being constructed.
- Stretch the twine between the corner posts.
- Check that the height of the pillars corresponds to the marked level.
How to hammer fence posts using a hammer drill: an idea from a Homius reader
How to drive fence posts
The summer season is approaching. Along with it, there arises the need to solve many problems on the site. It is clear that cleaning and clearing cannot be avoided. But with our snowy winters, other questions may arise. Today, in our “Stories” section, we want to tell our dear reader about an interesting device - an attachment for a hammer drill. It will help you hammer in posts for a fence that has sagged over the winter without any extra effort. The story was sent to us by Dmitry Olegovich Loschinsky from the village of Abakano-Perevoz, Bogradsky district, Republic of Khakassia.
Back in the fall, I had the idea that in the spring I would have to fix the fence. The point is that making good, permanent fencing is a cost I can't afford at this time, so it's easier (and much cheaper) to fix it once a year. And here I thought about an interesting problem. I don’t have any assistants, so driving a three-meter reinforcement rod into the ground with a sledgehammer to a depth of two meters with a sledgehammer is quite problematic. When struck, such a column begins to sway. And then a rather interesting idea came to my mind - to make an attachment for a hammer drill that would help me solve this problem. I want to talk about her now.