A fence surrounding a house or cottage provides security, but also gives it a certain attractiveness. Therefore, it is important to choose the appropriate material for its installation. In this article we will talk about fence supports. The best option for this are concrete pillars, which give the fence stability and strength and are combined with various materials.
What concrete pillars are you thinking of using?
FactoryHomemade
There are two traditional options for concrete fence posts: factory-made and home-made. There is a difference between them. The quality of a factory product is higher than a handicraft one, although this is not a fact. But the fact that the industrial version is more expensive is clear. It is possible to make concrete pillars of various configurations at home, and if you buy or rent a vibrating table, the task is simplified several times.
Advantages and disadvantages of concrete pillars
There are many options for installing a fence. You can use ordinary wooden poles, metal or brick supports. More interesting solutions are also used - for example, gabions. One way or another, the fence should organically fit into the design of the site and serve you for many years. Therefore, the more reliable the materials you select, the longer the fence will not require repairs.
Pros of concrete pillars
- Strength Concrete is one of the most durable materials in construction. It is not without reason that multi-storey buildings and complex engineering structures such as dams, bridges and so on are built from it.
- Ability to withstand heavy loads Concrete can maintain its structure under pressure of 400 kg per square centimeter. Of course, this applies to high-end brands that are not used in the average garden. But less durable concrete can easily withstand the weight of any fence fabric - be it chain-link mesh, polycarbonate, boards, corrugated sheets or other material.
- Wear resistance In principle, any materials sooner or later become unusable. The only question is how much time will pass before that. Take a look at the old Soviet concrete buildings? Yes, somewhere they have lost their aesthetics, but they still perform their functions. A properly made wooden fence will serve you for 20 years. Metal is more reliable, but it also has a weak point - it is susceptible to corrosion. For the first five years, metal supports will stand quietly in any climatic conditions. But then they will begin to “rot.” The rate of rusting can reach half a millimeter per year. That is, with a column thickness of 3 mm, corrosion will destroy it within 6-7 years. In this sense, concrete is much more reliable. It does not rust or rot, insect pests do not grow in it, it tolerates heat and cold well, and is not afraid of fire. In fact, if the concrete was prepared according to the correct recipe, its service life will be at least 50-70 years.
- Possibility of decorative design Concrete can be given almost any shape - round, square, with protrusions or recesses. In addition, finished poles can be further decorated by applying decorative plaster, epoxy, acrylic, rubber or polyurethane paint. If you are embarrassed by the look of bare concrete, you can cover it with decorative panels or line it with stone.
Cons of concrete pillars
Although there are not many disadvantages of concrete, they do exist.
- Heavy weight of structures. Concrete density reaches 2,500 kg/m3. One pillar will weigh from 80 to 100 kg or even more (this depends on the composition of the mixture). Working with concrete pillars alone is difficult.
- The importance of maintaining proportions When preparing the solution, it is very important to correctly measure all components. After all, if, for example, you overdo it with water, the pillar will turn out to be fragile. And if you pour too much cement, the mixture will not compact well and voids will remain inside. Later in the article we will present the proportions of concrete for fence posts. With their help, you can prepare a solution of the desired consistency.
- Long setting time Concrete gains strength in 28 days. Only after this is it able to withstand the design loads and not collapse. Of course, the pillars can be installed earlier (without installing a fence on them), but even here you will have to wait. The concrete will take 2-3 days to set, during which time it should not experience any stress.
Our own concrete production and laboratory, as well as a large fleet of equipment guarantee high quality products and accurate delivery times
Concrete - production and delivery
Concrete pumps - rent
Read more about us here
7 904 179–31–56
Valentin Yurievich Shvets
Director of BetonStroy
Filling with solution
Pouring concrete is the final stage of making pillars with your own hands. Complete the forms in the following sequence:
- Apply a lubricant to the inner surface, which allows you to later remove the finished product;
- place the reinforcement frame in the mold;
- fill the formwork with concrete solution;
- compact the mass by placing the filled formwork on a vibrating table. It is allowed, using reinforcement, to remove air inclusions and compact the form using a hammer drill;
- ensure that the concrete can be hydrated throughout the day;
- Carefully remove the post to dry.
The use of ready-made fence posts is possible after hardening for 2-3 weeks. Remember the need to daily moisten hardening concrete and install embedded parts before pouring the solution into the formwork. It is also necessary to clean reusable molds from any remaining mixture for reuse.
Components for preparing concrete
The concrete mixture consists of aggregates, binder and water. Sometimes various additives are added to provide additional properties. They can increase the frost resistance of concrete or increase the setting time of the solution.
Fillers
This is mainly crushed stone and sand, less often gravel and screenings. These are materials of natural origin, obtained by natural or artificial destruction of rocks. Concrete aggregates are divided into large and small.
Coarse aggregate
It has grain sizes from 5 to 20 mm. For crushed stone these are fractions 5-10, 10-15, 10-20, 15-20. But most often they use 5-20. This fraction is always in demand in construction, therefore it is produced in most quarries. As for the rock, it is better to choose granite, serpentinite or amphibolite varieties for concrete. Limestone, marble, gabbro and others are not suitable.
Gravel in its pure form is rarely used for concrete. This is due to its low strength indicators. This material has been subjected to weathering processes for hundreds and thousands of years, and its grains have too low structural connections. Crushed gravel is suitable for concrete: crushed river or sea pebbles. In terms of strength, it is somewhere between natural gravel and crushed stone produced in a quarry.
It happens that when making concrete pillars they do without coarse aggregate at all. This reduces the strength of the structure, but not critically. In addition, the absence of large grains contributes to better compaction of the mixture.
Fine aggregate
Sand with a particle diameter of 2 to 3 mm works best. You should not use very fine sand - during the preparation of the solution it will precipitate and be unevenly distributed over the concrete. The fine aggregate should not contain clay, silt, dirt or other foreign components. Washed quarry sand meets these requirements. You can also take river or sea.
As an alternative to sand, screening of crushed stone from granite or serpentinite is used. Fraction – 0-5 or 0-10 mm. This material never contains foreign impurities, and its rough grains provide good adhesion to other components of the mixture.
You can read more about coarse and fine aggregates in the following articles:
- Crushed stone for concrete
- Sand for concrete
- Screening for concrete
Astringent
In order for the concrete solution to set, a substance is needed that will bind the grains of crushed stone and sand. This substance is cement. Fence posts are graded M400, in some cases - M500. Cement, like other components, must not be contaminated. Please note that it has a shelf life, and it is very short - only 2 months. After this time, the material begins to lose its original properties.
Water
Clean running water, without sediment or impurities, not contaminated with oils and without a strong odor. You can use water from a well or well. By the way, to prepare concrete in factories they use only water that meets the requirements of GOST 23732-2011. It undergoes special laboratory tests, during which the chemical composition and other indicators are examined. In the case of private construction, such tests will not be possible. Therefore, it is enough just to use ordinary water.
Types
The following shapes are available for sale:
- triangular;
- square;
- multifaceted;
- round.
Photo: support with a groove 2900x140x140 made of reinforced concrete.
They also differ in the way they are attached to the fence sections:
- With longitudinal grooves. Used for monolithic structures.
- With metal loops. Universal fastener. Suitable for both forged spans and those made of corrugated sheets, siding or polycarbonate.
- With mortgages made of wooden blocks. Used for sections made of picket fence, unedged or edged boards.
According to the manufacturing method and structure, they are also divided into several types. Let's look at each of them in more detail.
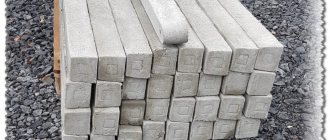
Whole
A solid reinforced concrete column is poured independently or purchased ready-made and installed with special equipment.
To make a solid support with your own hands, you will need to build a foundation, create vertical formwork, insert a reinforced frame inside and fill it with concrete mortar.
An alternative is to prepare the forms for pouring and fill them horizontally, but this will complicate the delivery and installation of supports to the construction site.
Photo: fencing the territory of a medical institution
Among the advantages of solid pillars:
- strength;
- long service life;
- ability to withstand high loads;
- lower price than stacked supports.
Of the minuses:
- labor intensity of the process;
- long hardening period (up to a month);
- heavy weight of elements.
Photo: the foundation and fence posts are made of monolithic concrete
When making solid pillars, it is important to follow the process technology, choose the appropriate brand of cement, and prepare a solution of the correct consistency.
Any violation will lead to the formation of cracks, deformation of the support and a damaged appearance of the fence.
Made
It is built from ready-made hollow concrete blocks. The supports are formed directly at the construction site of the fence.
A metal profile pipe or a bundle of reinforcement rods is mounted into the foundation, onto which blocks are strung to the required height level. The internal cavity is filled with concrete mortar.
Advantages of prefabricated pillars:
- light in weight;
- assemble quickly;
- The installation process is simple;
- no need to involve special equipment or assistants.
Of the minuses:
- inferior in strength to solid ones;
- If the masonry is not vertical, the post will collapse over time.
There are decorative elements on sale that do not require additional finishing. Their surface imitates marble, wood, stone.
Recommendations for the selection and stages of construction of supports made of concrete blocks.
With concrete poured at the installation site
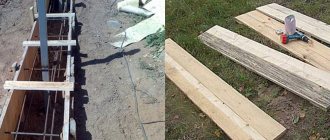
When creating pillars of a rectangular or square shape, you should prepare in advance a formwork made from wooden boards and durable plywood.
In order for the frozen product to better detach from the walls, the inside is coated with machine oil.
Photo: installation of formwork from boards for pouring pillars
To obtain round racks, it is possible to use a profile pipe of a suitable diameter.
Regardless of the shape, a frame made of reinforcement is placed inside future fence posts, which will strengthen the reinforced concrete products, giving additional strength.
Proportions and concrete recipe for fence posts
The concrete solution for making pillars should be thick and not watery. All components must be evenly mixed in it. Lumps of cement are not allowed.
Below we present several recipes that are optimal for preparing such a solution.
Proportions for concrete based on M400 cement:
| Components | Proportions |
| Sand | 3 parts |
| Crushed stone | 4 parts |
| Cement | 1 part |
| Water | 0.5 parts |
| Components | Proportions |
| Dropout | 4 parts |
| Crushed stone | 4 parts |
| Cement | 1 part |
| Water | 0.5 parts |
Proportions for concrete with M500 cement:
| Components | Proportions |
| Sand | 2 parts |
| Crushed stone | 2 parts |
| Cement | 1 part |
| Water | 0.5 parts |
By parts we mean a certain volume. Usually, for this, they focus on the volume of the bucket, since it is from this that the components are poured. Let's assume we are using 10 liter buckets.
In this case, to prepare one portion of concrete you will need:
- 3 buckets of sand
- 4 buckets of crushed stone
- 1 bucket of cement M400
- 0.5 buckets of water
Or:
- 4 buckets of screenings
- 4 buckets of crushed stone
- 1 bucket of cement M400
- 0.5 buckets of water
Or:
- 2 buckets of sand
- 2 buckets of crushed stone
- 1 bucket of cement
- 0.5 buckets of water
By the way, you need to be careful with water. The main thing is not to add too much of it (because it will not be possible to remove it from the solution). It is better to gradually add as you mix.
Main Dimensions
The length of factory posts ranges from 1.7 to 4.2 m, which allows you to select the height of the supports taking into account the purpose of the fence. The minimum cross-section is from 13*13 cm and above.
Photo: size guide and various shapes of reinforced concrete pillars from the manufacturer
If the list of products does not contain sizes suitable for you, you can place an individual order.
How to mix concrete for fence posts
To prepare the solution you will need the already mentioned buckets. It is advisable to have at least two of them. You will pour dry materials into one, and pour water into the other. A container for mixing components is also useful. A construction basin or trough is quite suitable for this. The main thing is that their volume is sufficient to prepare one portion of the solution: this is approximately 80-85 liters. Accordingly, the capacity should be at least 90-100 liters.
It is most convenient to mix the components with a bayonet shovel or hoe. To make the process go faster, it is better to work together: one will pour the materials and add water, and the other will mix. If you have a manual or automatic concrete mixer, then everything will be much simpler.
It is advisable to reinforce concrete pillars with reinforcement. To do this, buy steel rods with a diameter of 8-10 mm. You will need at least 2-3 of them for each pillar. Instead of rods, you can use a mesh.
It is advisable to choose a place for mixing closer to the future fence. This way you won't have to carry heavy concrete poles over long distances. A wheelbarrow may be useful for transporting aggregates.
The order of adding components
To ensure that the concrete turns out to be of high quality and the mixing process is not difficult, use the following instructions:
- Pour cement and fine aggregate into the container. Stir until smooth. This will take no more than 3 minutes.
- Pour some water into the mixture. There is no need to fill in all the water at once. It is better to add it in small portions as you stir.
- Add the coarse aggregate and mix the ingredients thoroughly again for at least 5 minutes. If you decide to prepare concrete without crushed stone or gravel, you can skip this step.
Why this particular sequence? It's simple. Firstly, when making concrete mortar manually, you need to follow the main rule: all components are added one by one; Moreover, you first need to mix the previous materials well, and then add new ones. Secondly, it is better to add coarse aggregate at the very end. This way you will spend less effort. However, if you prepare the solution in a concrete mixer, you can fill in the crushed stone right away.
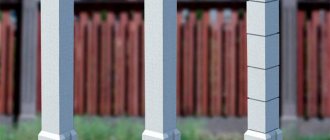
Decoration
In addition to its direct purpose, the fence also has decorative functions. If straight pillars do not satisfy the refined taste of the owner, then concrete pillars “cubes” are ordered, which are original designs with a four-sided ornament. Reliability and ease of installation are ensured by reinforcing reinforcing rods, seats for the base panel and a pair of through holes for fastening plates.
There are many types of sections of fences and posts with decor: wood, brick, patterned ornaments, etc. In addition, concrete structures are puttied and painted. Prefabricated concrete pillars, which are quickly assembled, are popular today. Even one person can do this.
How to make concrete fence posts
Well, now let's talk about the process of making the pillars themselves. Here you will have several options to choose from.
In general, there are two different technologies:
- Production of pillars in special forms
- Pouring concrete into formwork
In the first case, you will need a special container - like a cast of a pillar. Concrete is poured into it, and after hardening, a finished pillar is obtained. All you have to do is install it where it should be. The second option involves installing formwork at the installation site of the pillar. Concrete solution is poured into it, and after setting, the formwork is dismantled.
Now let's look at each option in more detail.
Production of concrete pillars in casting molds
This is the simplest way to make any number of pillars of absolutely identical sizes and shapes. You will only need a special trench into which you will need to pour concrete so that it takes on the desired shape.
A casting mold can be purchased at a hardware store. They are usually made from ABS plastic; At the same time, there are different design options to choose from. Just keep in mind that these forms are expensive: the cost starts from 2,500-3,000 rubles per piece. And plastic is a rather fragile thing (even despite the fact that the shock-resistant variety is used here).
To save money, you can make the mold yourself. For example, you can weld it from steel sheets or knock it together from boards. The first option is more reliable, just don’t use flexible metal: it won’t hold its shape and the pillars will turn out crooked.
Casting mold device
The design resembles a cone-shaped gutter with the following dimensions:
- Length: 2,500 mm
- Height: 200 mm
- Width of the lower part of the first end: 150 mm
- Width of the upper part of the first end: 200 mm
- Width of the bottom of the second end: 100 mm
- Width of the upper part of the second end: 150 mm
The outer side of the form has the greatest width, and tapers towards the bottom. This is done to make it easier to remove the finished concrete pillar. For the same purpose, two technological holes are drilled at the bottom of the mold. Plugs are installed on them (for example, made of plasticine), which are removed when the mold is removed. Air gets inside and the concrete, under its own weight, separates from the form.
Wooden forms are tightened with self-tapping screws. In this case, the removal of the concrete structure occurs by loosening the screws in one or more places. In addition, the boards are less rigid than metal. To prevent the concrete from bursting, a removable bracket is installed in the middle of the form.
Here is a diagram with the dimensions of the form:
A jumper can also be produced as an option. It will allow casting pillars of smaller height (for example, not 2.5 meters, but 1 meter).
How to use the form
To cast concrete pillars, you will need to equip a site. As we said earlier, it is better to mix concrete in the same place where the pillars will be installed. When pouring concrete into a mold, it is important to compact it as much as possible. Otherwise, air voids may form inside, which will greatly reduce the strength of the structure.
Ideal - if you have a vibrating table. It will allow you to evenly distribute the concrete solution over the form in a few seconds. A deep vibrator is also suitable: it is immersed in the mixture and passed along the gutter several times. Craftsmen advise using car tires. A casting mold is placed on them, and vibration is created by hitting the mold with a rubber hammer. As a last resort, you can use a hand tamper.
The work order is as follows:
- Treat the inside surface of the casting mold. This is necessary to isolate the concrete. At the same time, if you use a wooden mold, you need to spill it with water. Otherwise, after pouring, the boards will begin to take moisture from the concrete - the proportions of the mixture will change, which will negatively affect its qualities. In the case of a metal form, everything is more complicated. On the Internet you can find advice that before use the mold should be lubricated with used automobile oil. In principle, this is logical: in this way a layer is created that prevents concrete from sticking to the metal. But we also need to remember that many petroleum products contain surfactants (additives and resins). Getting into the open pores of concrete, they cause an adsorption decrease in strength. And the more such pores, the stronger the effect. True, studies have shown that concrete loses strength only when it is in contact with such substances for a long time (very long time). We are not talking about one-time lubrication, but about keeping the structure in oil solutions for 6 months, a year or more. It turns out that there won’t be much harm from processing the form? That's right. But only if you use high-quality oil, and not “working off”. The fact is that the latter contains weak acids that can react with cement stone. As a result, the strength of concrete can be greatly reduced. The conclusion is this: you need to lubricate the mold. But not used oil.
- Place the concrete mixture on the bottom of the form. You can fill it with a shovel or a bucket. The layer should not exceed 8-10 centimeters. Next, it must be thoroughly compacted (manually or using a vibrator). Remember: the fewer voids there are in the concrete, the more reliable the pillars will be.
- Lay the reinforcing layer As mentioned above, you can use either ordinary steel rods or metal mesh. You can even tie or weld the reinforcement cage. Some builders use various scrap metals to strengthen concrete: rusty pipes, corners, channels, and so on. Heated debates flare up on Internet forums about how safe it is. Here it is worth remembering that cement contains 2-10% iron oxides. When they react with rust, they seem to “stick” and form a very strong bond. The situation is completely different with metal treated with anti-corrosion compounds. Yes, they protect the reinforcement from rot, but at the same time they reduce adhesive properties (that is, adhesion to other surfaces). The opposite effect occurs: we seem to be reinforcing the concrete, but in fact we are only reducing its overall strength. It turns out that you can put any rusty piece of hardware into the solution? No. Here you need to use common sense and pay attention to several criteria: - If rust is easily removed with a rag or a wire brush and does not eat deeply, then such reinforcement can be safely used for concrete. — If there is full-fledged corrosion (deep damage to the metal by rust, changes in weight and strength properties), if the reinforcement literally crumbles in your hands, you cannot put it in concrete. The reinforcement should be laid so that the distance between the rods and the edges of the form is the same. It will be enough to place one rod on the left and on the right.
- Lay the next layer. It should also be no more than 8-10 cm high. After laying, repeat compaction.
- Lay the reinforcement Just like the first time, you need to arrange a reinforcing layer.
- Pour concrete to the edges of the form. At this point, you can also install the mounting brackets. For this purpose, metal corners with “antennae” welded to them are used. The “antennae” are immersed in the concrete mixture by a third or half the thickness of the column.
- Turn the mold over. This should be done about an hour or two after pouring. Turn the mold over onto a clean, level surface, otherwise the concrete may be damaged.
- Remove the post If you have a metal mold, you need to print out the technological holes. Air will get inside and “unstick” the concrete, and due to the cone shape, the structure will easily separate from the mold. However, it is important to be careful: no sudden movements, lift the form strictly vertically. Remember that the concrete has not yet set and can be easily deformed. At this stage, the thickness of the mixture plays an important role. If your concrete is too liquid, it will simply spread over the coating. Remember how children use molds to make various shapes out of sand. The concrete should have approximately the same consistency.
- Dry the concrete. This may take 2-3 days. On the first day, it is better to cover the pole with film. Until the structure is dry, it is better not to lift it, move it or touch it at all.
- Carry out ironing. On the third or fourth day you need to treat the pillar with cement. The fact is that after pouring into the mold, concrete may have small pores on the outer surface. This reduces its strength: moisture, getting inside the structure and freezing, begins to expand. This can lead to the appearance of microcracks. Ironing allows you to eliminate such pores and make the coating even. You can use dry cement grout or a solution of cement and water. The pillar must be carefully processed so that its surface becomes smooth.
It takes approximately 6 buckets of sand and 2 buckets of cement to make one pillar. If you use large aggregate, you will need at least 3 buckets of sand, 4 buckets of crushed stone and 2 buckets of cement. Using only one mold, you will produce 1-2 pillars per week. Their cost will be about 150-200 rubles. Agree, this is not that much money. For comparison, the price of a finished pole will be at least 2 times higher. Yes, you will waste your time here, but you can save a lot of money.
And one last thing: you can hang a fence on such posts no earlier than two weeks after they are made. In general, concrete gains sufficient strength within a month.
Pouring concrete into formwork
Let us warn you right away: this method is more labor-intensive. The poles are made directly at the site of their installation, so the finished structures do not need to be moved anywhere. But you will have to put in more effort.
First, let’s clarify: formwork is a structure that forms the boundaries of the pour. It can be made of different materials: wood, plastic, metal, concrete and so on. When laying a concrete mixture vertically, the own weight of the solution causes it to spread. So, the formwork retains the shape of the pillars, preventing changes in their geometry.
Formwork options
The formwork can be:
- Wooden frame
- Plastic frame
- Metal pipes
- Asbestos cement pipes
Wooden frame
This is a traditional formwork option. Closely fitted boards are hammered together into shields, which mark the boundaries of the pour. The main advantages of this formwork are that you can give the concrete almost any shape, and after installing the post, the boards can be reused.
Plastic frame
Sold as prefabricated structures and more often used when pouring foundations. The advantages include ease of installation and the presence of fittings that allow you to adjust the width and diameter of the formwork. But here it all comes down to price: a fragment of plastic formwork 50-60 cm high can cost around 3-4 thousand rubles and more. If you are not involved in building fences professionally, you should think about how advisable such a purchase is.
Metal pipes
To fill the pillars in this way, you need to find a pipe of a suitable diameter and cut it lengthwise into two parts. If this is not done, then after the concrete has set, it will no longer be possible to dismantle the pipe. The formwork is fixed using metal clamps. First you need to lubricate its inner surface with oil.
This option has few advantages - except that if you have an abandoned pipe on your site, you can save money by using it. On the other hand, take into account the complexity of installation and the impossibility of giving the pillars any shape other than round.
Plastic pipes
Here everything is the same as in the previous case, but the formwork design is lighter. It is easier to mount and then remove, and cutting plastic is many times easier than metal. The main thing is to choose regular pipes, not corrugated ones. There should be no holes or cracks in them, otherwise fresh concrete may leak out.
Asbestos cement pipes
One of the most expensive and ineffective formwork options. The fact is that asbestos cement is a rather fragile material. It is unlikely that it will be possible to reuse it, because during dismantling it will most likely crack. Thus, you will have to buy a separate pipe for each pole (this will cost about 1,000 rubles apiece). Now imagine what the costs will be if you need to install 20 or 30 poles.
So, of all the options described above, the most effective is conventional wooden formwork. The boards are not very expensive (or perhaps you already have them, just lying around), and putting them together is not that difficult. And when the concrete hardens, you can dismantle the formwork and continue to use the wood. Another good option is plastic pipes. But you need to choose the right diameter. The optimal cross-section would be 150-200 mm.
The procedure for pouring concrete into formwork
The main problem with vertical pouring is that it will be very difficult to compact the concrete well. If, in the case of using a casting mold, you can even get by with manual tamping, then here you will have to use a hammer drill, the bayonet method, or the so-called “sliding” formwork.
In general, the process looks like this:
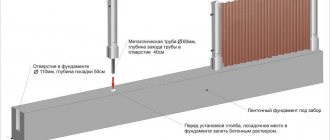
- Prepare a hole for installing the post. You can dig it with a shovel or drill it with a garden drill to the depth of freezing of the soil. The diameter of the hole should be 50-70 percent larger than the width of the post. The bottom should be leveled and compacted well.
- Install reinforcement You can drive several steel rods into the ground or use a specially prepared frame. Without reinforcement, concrete will have low bending strength and will not withstand loads from hanging elements. The reinforcement must be installed so that it protrudes at least 10-20 centimeters above the surface of the hole. You can further strengthen the base by driving several rods into the soil walls.
- Concrete the hole This way you will create a reliable and durable foundation for the future pillar. You can find out how to complete this stage in the article Concrete for pouring fence posts.
- Install the formwork This can only be done after the concrete in the base has gained sufficient strength (not earlier than 14 days from the moment of pouring). The easiest way to work is with wooden formwork. It is enough to put together shields around the future pillar and check them for the absence of cracks. The plastic version also does not require much effort: select the desired diameter, tighten the fasteners - and you're done. But with pipes the situation is more complicated. Here you need to install the structure and tighten it tightly with clamps. Due to the small contact area with the surface, the pipe may wobble and even fall. We will talk about how to avoid this further.
- Fill in the solution. Please note that the higher the formwork, the less stable it will be. Therefore, the “sliding” construction method is often used. Its essence is that initially the formwork is installed not at the entire height of the column, but, for example, at half. Then concrete is poured inside and allowed to set. Next, the formwork is dismantled and moved to a higher level - so that its lower edge is placed on the already poured part. The problem with this method is that it takes a lot of time. You will have to wait at least 2-3 days before you can start filling a new level. In addition, the structure turns out to be less durable, since the concrete at the joints may have different properties. On the other hand, if you are pouring two-meter posts without slipforms, you will have to lift the concrete up a ladder. This is not very convenient considering the weight of the solution.
- Compact and reinforce the mixture As mentioned earlier, compacting concrete in a vertical position is quite difficult. Manual tamping will not help here; vibrators will be ineffective. You can use a hammer drill by switching it to impact mode. Another method is bayoneting. To do this, take a long steel rod and plunge it into the formwork many times. Due to such movements, the concrete is more evenly distributed inside the structure. At the end, it is necessary to place several more reinforcement bars in the formwork. They will strengthen the top of the post.
It is recommended to remove the formwork no earlier than 28 days after pouring the concrete. Before installing the canvas, it is advisable to iron it. In addition, you will need to install fasteners for the crossbars.
To summarize, let's say that making concrete pillars using casting molds is a simple and accessible method for everyone. It requires minimal costs, and the end result is beautiful and durable supports. The option of pouring into formwork also has some advantages. But due to its labor-intensive nature, we do not recommend using this technology for those who are going to make fence posts for the first time.
Characteristics
It is worth saying a few words about the characteristics and features of concrete fence posts, what their pros and possible disadvantages are. So, the advantages of concrete pillars:
- Resistance to corrosion, dampness and temperature changes.
- Concrete pillars are massive, this quality makes them convenient for installation in the ground.
- Reliability and durability.
- Suitable for decorative processing, finishing with building mixtures, painting and processing with stone and tiles.
- Large selection of shapes and sizes.
- Easy to install, you can do without the involvement of specialists.
- Ease of internal wiring.
- Resistance to external weather and climatic influences, durability.
- Easy care.
Along with the undeniable advantages, we note some uncritical disadvantages:
- Installation requires preparation of the foundation, since without a good foundation the support loses balance and falls.
- Monolithic pillars are heavy. When purchasing in a store, there may be issues with loading and unloading, which will result in additional costs.
In the latter case, the solution would be to produce concrete pillars at home with your own hands. There are advantages here. The quality of the concrete is controlled and the product is manufactured even better than the factory one.