Home |Construction |How to make concrete fence posts with your own hands?
Date: March 1, 2017
Comments: 1
Owners of summer cottages and private houses, ensuring the safety of their own territory, install enclosing structures - fences - around the perimeter. Their basis, along with metal, brick, asbestos-cement pipes and wood, are concrete posts for fastening fence sections. You can, of course, buy ready-made columns, but it is more profitable to make them yourself.
It’s easy to make concrete support posts for your fence with your own hands. This will save financial resources and create a reliable foundation for the fence that fully complies with the developer’s plans.
By making concrete fence posts yourself, you can individually determine the profile and dimensions of the products and install embedded elements in the required places, which is important when constructing non-standard fences.
The article provides information about the stages of making concrete pillars with your own hands, design features, and manufacturing technology.
Before you start making concrete pillars, you should definitely decide for yourself whether this particular type of support is right for you.
Types of technologies
To make concrete pillars with your own hands, the following production technologies are used:
- Manufacturing in reusable structures in a separate site with subsequent removal of supports after hardening and installation of it in the enclosing structure, according to the developed scheme.
- Filling with concrete mortar individual shapes of the required cross-section (round, square, rectangular, etc.), pre-installed at the installation site of the supports along the perimeter of the fence.
Advantages and disadvantages
Before you start making concrete pillars, you should make sure you make the right choice. To do this, you need to know all the advantages and disadvantages of this type of support. Among the main advantages are:
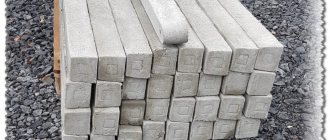
- Long service life - the service life of concrete products is determined by several decades, but only high-quality materials should be used for this.
- The ability to create almost any design - thanks to the use of various decorative materials, the only obstacle here can be the imagination of the owner of the site.
- Ease of installation - installation of concrete supports can be done independently without the involvement of specialists.
Main stages of manufacturing
Regardless of the specifics of the manufacturing technology, the set of measures according to which concrete pillars are made includes the following steps:
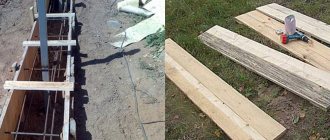
- assembly of formwork, the quality of which determines the presentation of the resulting products;
- production of a reinforcement frame that ensures the strength of the elements;
- preparation of a cement mixture, the strength of which after hardening determines the performance characteristics of the supports;
- filling with a solution, after hardening, ready-made fence posts can be removed.
It is worth remembering that the service life directly depends on the quality of the material used in the manufacture of supports
Alternative manufacturing methods allow you to pour a concrete pillar with your own hands directly on the site where it will be used in the enclosing structure. Let us dwell in detail on the features of the stages of work.
Types of concreting
When a fence, even from the simplest materials, rests on a solid foundation, it always looks dignified and presentable. Let's look at the most common technologies for concreting fence posts.
Partial concreting
This method is used when performing work on stable soils and under low loads. The essence of the method is as follows:
Sometimes the second method of partial concreting is used, in which the solution is poured into the lower part of the pit, and the top is covered with crushed stone or gravel with careful compaction.
If the presence of a ground part of the foundation is implied, then before concreting the fence post, it is necessary to install formwork for a kind of plinth.
Spot concreting
Dry concreting of pillars
Full concreting
This method is used not only when working with asbestos-cement pipes. It can be used as a basis for installing metal, profile or concrete racks.
Manufacturing of formwork
High-quality formwork allows you to ensure the presentation of products and guarantee their strength characteristics, provided that the appropriate cement mortar is used and the correct reinforcement is used. When thinking about formwork for fences and posts, pay attention to the following points:
- The choice of material intended for assembling the form. The material can be metal, wood, plastic and specially impregnated thick cardboard. When deciding on the material, remember that the structure must remain strong when poured and not deform.
- Production of formwork corresponding to the dimensions of the products. The structure must be rigid. It is advisable to weld sheet metal, and connect wooden blanks with screws or self-tapping screws.
Concrete supports have only one drawback - the need to create a foundation for their installation, without which the fence can bend and collapse
The design features of the formwork should allow easy removal of the finished product. This is ensured by the trapezoidal cross-section of the structure, poured on a separate site and the use of planed boards. To make it easier to remove concrete fence posts, use plastic film placed before pouring the concrete mass.
Forms made of wood and metal can be used repeatedly, are quickly assembled and easily dismantled. They allow you to reproduce the required geometry of the supporting elements of the fence.
When making formwork designed to form permanently installed fence posts, pay attention to the strength of the section located at the bottom of the column and supporting the weight of the concrete mass.
Circular support elements, poured on site, can be formed in disposable cardboard forms, reinforced on the outside with a wooden frame or steel mesh for reinforcement.
The formwork, poured with concrete at the installation site, takes up increased loads in the lower part and is distinguished by a vertical position when pouring. A vertically located, unstable structure requires the installation of reliable supports. When ensuring that a vertically positioned structure is stationary, avoid bending it, as it is susceptible to bending loads.
Having made concrete fence posts with your own hands once, you can do it at any time as needed
Installation of pillars
The process of installing decorative products on a metal pipe
The process of constructing a pillar from concrete blocks is vaguely reminiscent of assembling a children's pyramid. Prepare a solution in advance consisting of one part cement, four parts sand and water, and proceed.
The whole process can be divided into several stages:
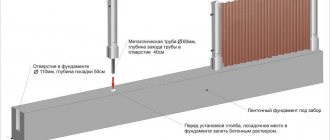
- The site is marked and in those places where the pillars will stand, holes are dug to a depth of no more than 1.5 meters. The width of the pit is equal to the width of the block plus another 5-10 cm.
- A cushion of tightly compacted crushed stone and gravel is created at the bottom of the pit.
- A metal pipe is installed strictly vertically in the center of the pit, which will act as a pillar support. The length of the above-ground part of the pipe is equal to the height of the column. The diameter of the pipe for ordinary pillars is 6 cm. For corner elements, as well as those to which the wicket and gate will be attached, a larger diameter pipe is taken.
- The pit is filled with concrete in several stages with the obligatory compaction of each layer.
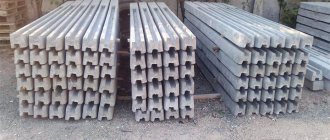
- The installation of concrete blocks is carried out only after the concrete has completely hardened and gained the required strength, while the modules are simply strung on a support. The thickness of the seams between them is from 1 cm to 1.5 cm. Do not forget to check the horizontal and vertical position of the masonry using a level!
- After 2 or 3 elements are installed, the space inside them is filled with concrete.
If electricity needs to be supplied to the pole, lay the cables inside in advance. Do not forget that if you are building a pillar from blocks without grooves, then every 3 or 4 rows between them you need to lay a reinforcing mesh. Release it beyond the border of the post on the side where the fence section will subsequently adjoin it.
After the masonry of the pillar is completed, the cavity inside the support pipe is filled with concrete. The top of the post is covered with a special cap to prevent moisture from penetrating into the structure during rain. That's all, you can start installing the fence sections.
And one last piece of advice. If this is your first time making a block post, don't be overconfident! Despite its apparent simplicity, it is not always possible to do everything correctly the first time. For your first pillar, choose the one that is located in the most inconspicuous place, so the flaws that are inevitable in an inexperienced master will be less noticeable. And then skill will appear, and the second pillar will be made according to all the rules.
Reinforcement
Concrete columns for the enclosing structure will be strong if you take a responsible approach to the manufacture of the reinforcement frame. Concrete pillars absorb compressive loads and bending forces. That is why a frame made of steel reinforcement is needed.
Structurally, it represents a spatial system, the basis of which is the following elements:
- four longitudinally located rods with a diameter of 12-18 mm, corresponding to the length of the future post;
- transverse elements with a diameter of 8-10 mm, located at intervals of 100-150 mm, fixed to the longitudinal rods with binding wire or welding.
When installing the reinforcement cage, ensure a fixed distance of 2-2.5 cm from the steel bars to the walls. This will protect the reinforcement elements from the destructive effects of corrosion.
PIX panels
PIX panels for a fence are a panel imitation of a brick pillar, according to the abbreviation. Polypropylene blocks are accurate in size, easy to install, durable and easy to maintain. You can wash the brick decor with soap and water, and the appearance will always be perfect, and in terms of the device, PIX panels are unrivaled in the speed of assembly on site.
You can put up a decorative pole in 20 minutes; no powerful base is required, but only precise markings and strong fixation with the base and sections. As for the brick decor, it is quite authentic, and you will never have to worry about efflorescence or chipped corners.
The PIX decoration post is practically an overlay for a load-bearing post and is assembled like a construction set. Assembling the segments using a tongue-and-groove method and fastening them to the base using screws or rivets, you can create decor only from the inside or on both sides of the fence. PIX panels can be dismantled and installed as often as necessary in a new location, which is very convenient when rearranging fences in summer cottages.
The only difficulty in installing PIX is the corners that need to be formed in place using additional strips. This false pillar does not have the strength of a brick pillar, but it is possible to replace just one damaged segment without dismantling the entire pillar.
Which is better: heated floors or radiators?
Warm floorBatteries
PIX panels are perfectly combined with brick filling sections, and with wooden ones, and with chain-link mesh, and also favorably complement and enhance fences made of corrugated sheets, and look decent in all seasons.
Preparation of concrete solution
Preparing concrete composition for pillars is a critical operation performed after installing the reinforcement cage. The quality of the mixture and increased strength characteristics of concrete products will be ensured by the following components:
- Portland cement grade M500.
- Pre-sifted river sand.
To make the pillars as strong as possible, use only high-quality cement
- Small crushed stone up to 10 mm in size.
- Water.
The optimal ratio of crushed stone, sand and cement is 2:2:1. When preparing concrete, mix the ingredients using a concrete mixer. This will ensure a uniform consistency of the mixture. Having prepared the solution, you can start pouring.
Foundation marking
In order for such massive supports to serve for a long time, and the entire structure to be reliable, it is necessary to pour the foundation. Its width should be 4-5 centimeters larger than the future fence on each side. Load-bearing supports are usually wider than the fencing sections. And the depth is made at the rate of 20 centimeters for a structure 80 centimeters high.
The outline of the future foundation is marked with pegs and twine, or simply sprinkled with sand. The distance between columns should not exceed two and a half meters.
Preparation of strip foundation
Filling with solution
Pouring concrete is the final stage of making pillars with your own hands. Complete the forms in the following sequence:
- Apply a lubricant to the inner surface, which allows you to later remove the finished product;
- place the reinforcement frame in the mold;
- fill the formwork with concrete solution;
- compact the mass by placing the filled formwork on a vibrating table. It is allowed, using reinforcement, to remove air inclusions and compact the form using a hammer drill;
- ensure that the concrete can be hydrated throughout the day;
- Carefully remove the post to dry.
The use of ready-made fence posts is possible after hardening for 2-3 weeks. Remember the need to daily moisten hardening concrete and install embedded parts before pouring the solution into the formwork. It is also necessary to clean reusable molds from any remaining mixture for reuse.
Installation of hollow modules
The most important thing when laying a support made of hollow elements is to lay out the first row evenly and without errors. The lower element must be positioned so that the fittings or pipe are in the center. Cement is poured inside the first laid module (the solution should cover the edges of the lower element).
The next block is placed on top.
The gaps between blocks should not be thicker than 12 millimeters. Jointing must be done simultaneously with laying, before the solution hardens. After installing the upper module and hardening the solution, apply plaster.
When it dries, treat the surface with a special grater and install a protective top.
Concrete module elements
Features of alternative manufacturing technology
In a number of situations, it is advisable to manufacture supporting elements for the enclosing structure at the installation sites along the perimeter of the future fence. For these purposes, builders use sliding formwork, the elements of which are parts of a steel pipe cut along the longitudinal axis, with a diameter of about 1 meter. The components of the form are equipped with brackets with holes that allow you to fix the structural elements. Carry out the process of pouring support elements for the fence with your own hands according to the following algorithm:
- Lubricate the surfaces of the sliding mold with a special emulsion.
- Connect the mold elements using fastening brackets.
- Install the formwork in a pre-prepared pit, controlling the verticality with a level.
- Place the reinforcement frame into the mold.
High-quality formwork is the key to creating smooth and strong concrete pillars - Fill the slipform with concrete mortar.
- Compact the mass using an in-depth concrete vibrator or vibratory pressing.
- Ensure that the form does not move for 2-3 days.
- Loosen the tightening bolts.
- Move the sliding form up 75% of its length, ensuring that the bottom portion is secured to the pre-cast concrete column.
- Repeat the operations until the vertical support is completely formed.
Developers also use PVC pipes of increased diameter and asbestos cement formwork as a form for the construction of support posts. The technology makes it possible to cast supports of round, square, rectangular and rhombic cross-sections.
Round supports
To do this, you will need a piece of pipe about one meter long, which will act as formwork. It must first be cut into two parts with a grinder and “ears” with holes for bolts must be welded to each of them. They are necessary to connect two parts of the formwork. The reinforcement frame will be mounted in the pit where it is planned to install the support.
After this, the pit is filled with concrete to the level of the ground surface, and the support is made using the sliding formwork method. The pipe should be lubricated with machine oil to simplify the process of subsequent disassembly and installed on the ground. Having leveled its position in a vertical plane, all that remains is to pour the solution and leave for several days.
After the concrete has hardened, the bolts must be loosened slightly and the formwork must be moved up three-quarters, and then filled again with mortar. This process must be repeated until the support reaches the required height.