At first they treated it with great caution, so they used it for the construction of small utility buildings and garages.
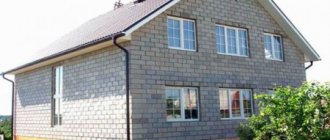
But over time, all its advantages were appreciated and began to be used for individual housing construction.
However, many developers still have conflicting opinions about the benefits of such wall material. In order to dispel them, before making a decision you need to familiarize yourself with the characteristics of this wall material and the basic principles of constructing buildings from it.
Is it possible to build private housing from cinder blocks?
It must be admitted that cinder concrete blocks contain undesirable and even toxic substances . Its main ingredient is considered to be slag. In this regard, it is necessary to build residential buildings from this material with extreme caution.
Since there is no direct ban on the construction of such structures from cinder blocks, more and more developers are building their houses from it. To protect yourself and your loved ones from the harmful effects of slag, before choosing a wall material supplier, you need to familiarize yourself with its certificates.
Cinder blocks are produced in different compositions due to the different origins of the slag. Blast furnace slag, which in most cases is radioactive, is considered especially undesirable for housing construction.
Coal slag from thermal power plants and boiler houses contains sulfuric acid, so for its safety it will be necessary for the material to stand in ventilated open areas under canopies for at least a year so that the acidity erodes from the fresh slag, and only after that they begin to manufacture blocks for construction walls of the house.
Making cinder block
The key to durable and resistant to various influences is a properly prepared solution. If using a tamping machine, it must be sufficiently dry. If you incorrectly calculate the proportions of water, then after lifting the container it will simply disintegrate. As a filler, you can use ash from burnt coal, broken bricks, small crushed stone, slag, etc. Plasticizers are used to provide additional resistance to moisture. The first version of the mixture will be like this:
- 9:1 - cement and slag, which is well sifted so that there are no unnecessary inclusions;
- water should make up about half of the cement.
Second cooking method:
- 4:4:1 - industrial granulated slag, fine crushed stone, cement;
- water the same ratio as for the first option.
The best consistency can be roughly determined as follows: you need to take the prepared solution and squeeze it in your hand. It must keep its shape. If you then throw it on the ground, it should spread. Once you squeeze it again it should hold its shape again.
The best place for work will be open air. Under such conditions, the solution will dry and set faster, which will increase productivity. It is advisable that the place be level. This could be a concrete path or a lining made from sheet metal, boards knocked together into panels, etc. The block preparation process will be as follows:
- The unit is installed in the place from which the laying will begin.
- The prepared mixture is poured inside. Its quantity should be greater than the actual capacity.
- The vibrator motor turns on for a few seconds. Some of the solution shrinks, so you need to add more.
- The vibrator starts again for a few seconds. A finishing bedding is made and the upper end is closed with a lid.
- Compaction is performed. If the lid has reached the stops, you can lift the container.
- Complete setting takes 4 to 9 days.
- Finished products can be stored indoors. You need to move them there after a day of drying outside. If the composition contains a plasticizer, then after 6 hours.
- For greater convenience, they can be stacked on top of each other.
- They will be ready for the construction process in 1–2 months.
Material requirements for construction
Over time, instead of the basic component - slag from coal, they began to add granite chips, broken bricks or hardened concrete mortar, expanded clay or crushed stone.
Cement and sand, clay and gypsum, as well as plasticizing additives are used as a binding element . Competently selected complex cinder block compositions, processed by vibrocompression on a specialized vibroforming machine, make it possible to produce wall material of high industrial quality.
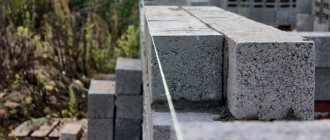
For the production of mass-produced individual houses, technologists have developed optimal sizes of cinder blocks:
- 400x200x200 mm;
- 390x190x190 mm.
Such wall material can be solid or have hollow forms from 28 to 40% . This percentage of voids affects the weight of the block and strength properties. For the manufacture of partitions, blocks are used with a smaller thickness.
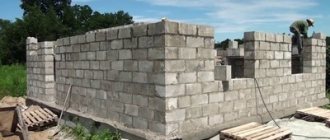
Features and rules for constructing walls
Cinder blocks are used in the construction of various structural elements of a house: foundation, plinth and walls. The requirements for them will depend on this appointment. The strength parameter is the most important of them. According to GOST, slag concrete blocks are produced with modifications M10 - M125.
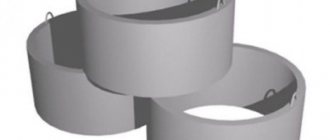
The foundation for cinder block houses is built from monolithic blocks M100 and M125, which have increased endurance to withstand a one-story house and a wall of at least 40 cm. It is important to carry out preliminary high-quality waterproofing of the foundation , since cinder block is capable of strongly absorbing moisture.
The basement is also erected from monolithic blocks M100 and M125, no earlier than 7 days after completion of the foundation work. Before laying the 1st row of basement walls, waterproofing is carried out. The height of the seam is no more than 1.5 cm, otherwise it will certainly reduce the heat-insulating characteristics of the basement walls. Work on the plinth is carried out during warm weather.
The walls are erected after the base has stood for a month . For non-load-bearing walls, cinder blocks M25/M35 are used, and for load-bearing walls - M50 or more. To create a separate heat-protective layer of walls, the use of M10 cinder blocks is allowed.
Important! To increase the strength of the walls, they are reinforced. After the walls are erected, construction of the roof begins immediately to protect the cinder blocks from the negative effects of natural precipitation. This requirement also applies to finishing work, both on the outside of the house and on the inside.
How is a project compiled?
According to the current urban planning legislation, the construction of houses without a design is prohibited . The project can be carried out by a specialized organization that has all the permits to carry out such work. As a rule, projects are tied to a standard version. The customer can choose a standard project he likes, after which it will be tied to real construction conditions.
Factors that will be taken into account when designing a private house made of cinder blocks:
- climatic characteristics of the construction area;
- soil type;
- soil freezing depth;
- location of utility networks and roads in the construction area.
After working through the main sections of construction, performing a technical and economic comparison and selecting building materials, the project will obtain the main characteristics of the house: building area, height, number of floors, area and thickness of load-bearing/non-load-bearing walls and partitions, windows, doors and roofing.
Project sections include specifications for building materials and a set of drawings:
- Architectural planning and floor plans, including roofing.
- Structural on the foundation, roof, walls, stairs with specification of key details.
- Communications, including wiring and connection of utility networks: water, heat supply, sewerage, gas and electricity.
Additionally . The specifications indicate the brand, manufacturer, type and quantity of wall blocks, according to which the developer must purchase cinder block and consumable masonry materials.
Photo
An example of a two-story cinder block house project:
Project of a one-story house:
Project of a house with a terrace and parking:
What do you need to prepare for work?
All materials that the developer will need are indicated in the summary specification of the project; as a rule, these are different types of cinder blocks for various wall structures, as well as masonry mixtures.
If the customer has construction experience, has assistants and wants to build a house from cinder blocks with his own hands, he
will need to prepare the following tools :
- an ordinary construction trowel, for masonry mortar;
- measuring instruments for smooth wall laying;
- container for preparing masonry mortar;
- buckets and ladles for collecting and carrying mortar to the construction site;
- a pick to level cinder blocks;
- stretchers for carrying loads;
- individual protection means.
To build a house, you will need a concrete mixer and scaffolding, which are usually rented.
How to calculate the cost if you decide to build a house from cinder blocks yourself
There is nothing special about budgeting for a cinder block home. We talked about calculating the amount of wall material, so calculating the cost of building materials for this part of the construction will not be difficult. But remember that, in addition to the walls, you will need to invest in the foundation, roofing, interior and exterior decoration, and necessary communications.
You won't find a calculator that will do the full calculation for you. The budget will depend on the prices of materials in the region, the cost of construction services, or, if you are going to do this work yourself, the purchase of the necessary tools.
If you don’t have a plot for a house, add the cost of purchasing it to your total budget
In a word, if you want to estimate future costs, look among your friends and acquaintances for those who have recently mastered a similar construction project. Inquire about turnkey costs from local construction companies. You can safely reduce their amount by a third - approximately how much it will cost you to build such a house with your own hands.
Step-by-step instructions with technology features
After the customer purchases the wall material and stores it at the construction site, you can begin preparatory work before starting construction of cinder block walls:
Specify the number of cinder blocks by assortment according to the design specifications.- Check the availability of the required tools.
- Become thoroughly familiar with masonry technology for different types of walls and the method of knitting rows.
- Choose a construction time: with positive temperatures and no precipitation.
- Check the quality of the foundation and its waterproofing.
Laying cinder blocks is carried out in various variations: 1.1/2, 1.5 and 2 blocks. Close attention is paid to the first rows, on which the overall evenness of the wall will depend . Each row is controlled by a plumb line and a building level.
Technology for constructing walls from cinder blocks:
- Laying out the blocks begins with the installation of 4 corners, leveling them with a building level.
- Stretch the twine around the perimeter along which the walls will be installed.
- The method of tying cinder blocks is standard.
- When installing hollow elements, the voids are not filled with mortar. They can install vertical rods or frames for reinforcement for buildings with a height of 3 floors.
- Horizontal reinforcement of walls is carried out every 4th row.
- Plasticizers are added to the masonry mortar to increase the strength of the wall structure. This component also inhibits the thickening process of the masonry mortar and makes it possible to make thin seams so as not to create “cold bridges.”
- After applying the solution, lay the block and beat it with a mallet.
- The mortar that will be squeezed out by the block must be removed using a trowel.
- In areas of technological openings for windows and doors, as well as in areas where floors are installed, a reinforcing belt is made of a reinforced concrete monolithic structure or red brick. After completing the construction of the walls, they give them time to dry and begin the construction of the next floor and roof.
Laying the foundation
Recessed strip foundation
As mentioned above, a structure of this type requires a high foundation. In addition, it must be very durable so that cracks do not begin to form, which will certainly pass through the entire wall. The work will be carried out in the following order:
- The area selected for construction is carefully inspected. It is better to find out in advance in which part of the site the groundwater is at a lower level. That's exactly what she'll do.
- Everything that clutters it is tidied up, the grass is mowed to the minimum possible level. This is necessary to assess the overall slope and make markings.
- According to the drawing, guidelines for the size of the future building are transferred to the area.
Site marking
- One peg is driven into each corner.
- The correct dimensions are checked. In addition to length and width, diagonals are also measured - they must match so that the shape is regular and not trapezoidal (if this is not provided for by the project).
- Holders for the guide line are made. To do this, you will need 16 wooden blocks of arbitrary size, but with a length of at least 90-100 cm. You will need 8 more small boards. Their length should be 10–15 cm greater than the width of the foundation. A crossbar for two bars is made from boards. The result should be a P-shaped design.
- Two self-tapping screws are screwed onto each crossbar. The distance between them should be equal to the width of the foundation.
- All elements must be driven into the ground. It is important to do this at such a level that the screws are at a height of 70 cm above the surface. The order of the stands is two at each corner so that they are opposite each other in pairs.
- A fishing line or twine is stretched between the elements. It is more convenient to use fishing line that has a bright color. It does not get lost against the background of surrounding objects.
- At this stage, it is necessary to once again check the diagonals between the corners formed by the stretched thread.
- A trench is dug. Its depth should be 50 cm below soil freezing.
- Sand is poured to a height of 25 cm. It is leveled and compacted well. After this, you need to wet it with water and let it dry. If necessary, you need to supplement the level.
- Another 25 cm is filled with crushed stone. This layer also compacts well. Tamping is best done using a special electric or gasoline tool.
Foundation reinforcement
- Next, a metal grate is made. For a foundation of the planned height, two or three elements will be required. To work, you will need ribbed reinforcement with a diameter of 10–12 mm. It is better to assemble the structure on the surface. Its dimensions should be such that it is immersed in concrete by 5 cm on each side. That is, the total length and height must be at least 10 cm less than the length and height of the foundation. Several rods are laid out over the total length. The distance between the horizontal components should not exceed 30 cm. If there are no strips of the required length, then you can get from several. In this case, the binding between them must be at least 1 m. Staples are made from smaller rods. Their height should be equal to the size of the planned sheathing, and the folded elements should be the width of the structure. They are attached to the laid out elements every 30-40 cm. Instead of brackets, you can make ordinary vertical jumpers. They are fixed to each other with knitting wire. The same number of longitudinal rods is attached to the inside from above as from below.
- Typically, the height of one such structure is 40–50 cm.
- Stands are laid at the bottom of the pit, which will allow the concrete to cover the reinforced base from below. For these purposes, you can use bricks or other homogeneous elements. The minimum height is 5 cm.
- Formwork is made from edged boards knocked into panels, plywood or other durable material. It must be strong enough to withstand the pressure that the concrete will exert. Be sure to install jibs that will be stops on the outside. The distance between the panels must be the same so that the foundation is formed without sagging.
- After the preparatory work, you need to prepare a solution for pouring. You need to make sure in advance that you have an assistant and a productive concrete mixer; you can use several. This is very important because it is necessary to ensure good volume. Thanks to this, the structure will turn out to be monolithic and not layered, which will reduce strength. The composition of the mixture will be 3:1:3 - crushed stone, Portland cement, sand. Portland cement is perfect for such purposes. The fact is that it contains calcium silicate and gypsum additives. Thanks to this, quick setting occurs and strength is ensured. Be sure to add a plasticizer, this will improve the fluidity and filling of voids, increase frost resistance, and also moisture resistance.
Advantages and disadvantages of such designs
The most key advantage of a cinder block structure is its low cost. The purchase of building materials and the construction of a “cinder block box” will not require significant financial and labor costs from the developer.
In addition, the main advantages of a house made of cinder blocks include :
Possibility to implement any design project.- The blocks are light in weight and do not weigh down the walls, so the house does not require a strong foundation.
- High fire-resistant characteristics of the wall material.
- Easy installation due to precise block shapes and large dimensions.
- Low specific costs of masonry material and low labor intensity of work.
- No special lifting and transport mechanisms are required.
- When using cinder blocks that meet the requirements of GOST and maintaining the technology of masonry work, the house turns out to be reliable and durable.
- Cinder block does not create an environment for mold to grow and is not susceptible to rodents.
- It is immune to ultraviolet degradation and can be exposed to chemical environments without damage.
The disadvantages of cinder block walls include:
- Difficulty in carrying out installation work on introducing utility networks into the house.
- Increased ability to absorb moisture; hydro and vapor protection of walls is required.
- Low thermal and noise insulation characteristics, requires mandatory installation of external thermal protection.
- Increased fragility of walls, and therefore it is not recommended to install heavy equipment on the walls, for example, wall-mounted boilers or water heaters.
- Low environmental characteristics of the material.
In order to reduce the risk of purchasing low-quality cinder blocks, before choosing a wall material manufacturer, you will need to carefully read the quality certificates.
Experts recommend paying attention to the following points when purchasing this building material::
- The material must have environmentally friendly fillers: shell, crushed stone and shavings.
- The integrity of the blocks with binders and fillers - there should be no crumbs or broken pieces.
- The characteristics of raw materials must comply with GOST, especially in terms of strength, thermal conductivity and frost resistance.
- Blocks for residential buildings must be made using vibrating machines.
Attention! The production quality of the blocks can be checked by color; gray color characterizes the presence of cement, black and brown indicate a high slag content.
You can also check the density of the block with a nail 1.5 cm long ; if it fits easily into the block, the quality of the building material is unsatisfactory. Another practical method for checking the quality of a cinder block is to drop it from a height of 1.5 m; if it does not break into pieces, but remains intact and unharmed, then the quality is good.
You can learn more about all the pros and cons of houses built from cinder blocks in another article.
Insulation
The most common materials for insulating a cinder block building are mineral wool, expanded polystyrene, fiberglass or extruded polystyrene foam.
It is better to insulate a house from the outside than from the inside. If you insulate the inside, the walls will constantly become damp and moldy, but in some cases it is necessary. For example, if you decide to insulate a long-constructed building with blocks in the initial stages of destruction. To eliminate such an oversight, the damaged areas are first repaired with a special solution, after which plaster or reinforcing mesh is applied to the patched wall. If desired, the façade can be additionally covered.
Inside, all walls are stitched with pyrazolone. Plasterboard sheets are installed on it, and decorative finishing is carried out.
The basement is also insulated from the inside. For this purpose, the walls and the upper part of the floor are also sheathed with pyrazolone, on which a thin layer of mineral wool is laid. If the building is new, then its insulation is enhanced only on the outside using any of the above materials.
Possible difficulties and errors
The biggest problems for the developer are created by poorly manufactured blocks .
In order for them to comply with GOST, the materials that make it up must also have a quality certificate. It is better if the cinder block for a residential building is purchased from a manufacturer, and not produced using a handicraft method.
In addition, a house made of cinder blocks will have poor characteristics, a short service life, and sometimes belongs to an emergency facility if the developer made the following mistakes during construction:
- violation of construction technology;
- low professional level of builders;
- improper waterproofing of walls and foundations;
- low-quality thermal protection of the house;
- violations of the wall reinforcement scheme and lack of armored belts;
- cinder block walls remained roofless in the open air for a long time.
What can reduce the advantages of cinder block houses, and how to solve problems with disadvantages
We found out what cinder blocks are and their advantages and disadvantages. How to make the most of the useful qualities of this building material and minimize losses? The main way is to choose the right product, avoiding widespread defects. How to do it:
- Buy blocks only from a reputable seller. Such a retail outlet must have quality certificates for the product indicating all its technical characteristics.
- Find out what filler is used in the production of blocks. Do not buy material with granite screenings for residential buildings; it may have an increased radioactive background.
If possible, check the product with a Geiger counter.
- A high-quality block must have clear geometric shapes. Carefully inspect the batch for cracks and chips, selectively measure several elements to see if they correspond to the declared parameters.
- A simple test of the block’s strength is to stick an ordinary nail into it. If the nail goes in without using a hammer, don't buy it. Try to manually break one product - if the production technology is violated, the blocks crumble with little effort.
- Transport purchased building materials only on pallets.
Build a secure shed to store blocks