Cinder block is one of the most affordable and simple building materials. Being inexpensive in comparison with others, it creates a reliable fastening for your building. In addition, you can make cinder blocks yourself. To get a very good laying of cinder blocks with your own hands, it is enough to follow the sequence of laying. Even if you are a beginner, you will be able to freely build walls, reliably and efficiently, no worse than a professional. Cinder block is divided into kinds, which differ in weight and density in terms of internal filling.
Cinder block laying
The main, most applicable types of cinder block
- hollow cinder block
- solid cinder block
- decorative
Hollow cinder block is mainly used for laying walls because it is lighter and retains heat better. When constructing a cinder block building higher than one floor, it is worth taking care of a reliable interfloor ceiling. An excellent and quick installation option would be lightweight foam floor slabs, the thickness of which is 160 mm. In order to properly distribute the load on cinder block walls, the depth of support of the floor slab should be 10-15 cm on each end side. You also need to pour a monolithic concrete reinforced belt under the slabs.
Solid - for foundations and plinths. Decorative cinder block is used to increase the moisture resistance of the outer side of the wall. We will tell you about the intricacies of the techniques of different types of installation and also about the features of this material, what it is and what it consists of.
Price category
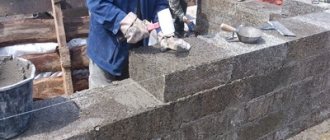
A construction site is a high-risk place. Therefore, it is necessary to observe safety precautions and work with gloves and a helmet.
Before laying cinder block walls, you need to find out the price for the work. Builders usually charge 20 rubles for laying one cinder block . Based on this, you can find out how much it will cost to build the required building, knowing its dimensions. Of course, it is better to lay cinder blocks yourself, and you can save a lot. In this case, the costs will only be for the material itself.
Price for 1 piece of cinder block:
| Type of cinder block | Price for one |
| Full-bodied | 36-42 rub. |
| Hollow | 22-30 rub. |
| Semi-block | 22-24 rub. |
| Decorative block | 60-65 rub. |
To determine how much material will be used for construction, you need to know the dimensions of the future building, as well as the dimensions of the cinder block itself, which are 390x190x188 mm. It can be seen that the dimensions are quite large, so the construction speed increases significantly compared to ordinary brick .
Features of cinder block
Cinder block is an artificial stone made from a mixture of slag and concrete. Initially, due to the large amount of slag, which is formed as waste from the melting of iron and other metals, toxic substances were formed in the composition of cinder blocks. Naturally, this was unsafe for human health. Therefore, they weathered for a long time before being used in construction.
Of course we all know what a cinder block looks like
Since this is unprofitable, manufacturers began to change the composition of their products. Now they have reduced the mass fraction of slag and instead added sawdust, sand, and broken bricks. These changes in no way affected the properties of the material, but it became more environmentally friendly. Cinder block is quite durable, fireproof, and is not damaged by rodents or insects. The most important advantage is ease of installation. In size, these are large blocks with the correct shape, which are easy to lay with your own hands.
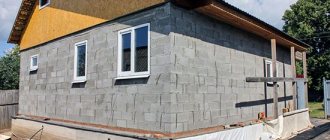
Cinder blocks are vulnerable to moisture. Water easily penetrates deep into parts and quickly destroys them. Therefore, facades must be clad. The strength of the material is relative. There are restrictions on its use.
Cinder block also has its disadvantages. If you take them into account and do everything correctly, the result of the masonry will be exactly as you intended. The stone is massive. The average weight of a standard part is 25-30 kg. Cinder blocks are vulnerable to moisture. Water can destroy them quite quickly by penetrating inside. Therefore, facades must be clad. The strength of the material is relative. In this regard, there are some restrictions on its use.
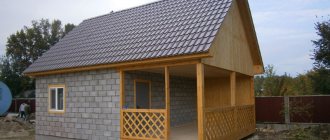
It is prohibited to construct buildings higher than 3 floors from slag concrete. Usually they build houses with 1-2 floors, and then only if there is a safety certificate for this material. If there is no such thing, only non-residential buildings can be erected from it.
Wall reinforcement
When building a cinder block house for a summer holiday, the walls must be reinforced. A slag block is less strong than one made from heavy concrete, so it is not advisable to lay it without reinforcement. Mesh products with cells of 50x50 mm are used as a reinforcing material. It is placed between the rows: on top of the first, and then between every fourth and fifth.
This is all the basics you need to know about how to build a house from blocks or an auxiliary structure yourself. To build residential premises, you need to use other products, for example, made from cellular concrete, since they do not contain toxic substances. The principle of their installation is the same.
Cinder block laying - tools
List of tools for laying cinder block
- Cord - mooring for marking. It is advisable to choose a brighter color for the cord so that it catches the eye for marking, for example, red. It is better not to use transparent materials, such as fishing line, as they will be difficult to see during the work process.
- Building level and plumb line, tape measure. You will need a hydraulic level. This is the so-called water level - a mandatory tool in any repair and construction work. Using a level and plumb line you will control the evenness of the masonry, both vertically and horizontally.
- Construction pencil or chalk. Tool for preparing the solution. Any metal container is suitable for mixing mortar, delivering sand, water, cement: buckets and carrying mortar, concrete mixer, construction cart. If it is possible to use a concrete mixer, this will facilitate the process of preparing the solution. Stock up on a couple of metal buckets in which you will deliver water and other things to your laying site.
- Hammer or pickaxe. Since cinder block is a heavy stone, when laying it there may be a discrepancy with the row. To adjust the geometry of your masonry, you need to use a hammer and string. Using a hammer, the stone can be leveled with a level and string.
- Construction trowel (trowel). Necessary for collecting and applying the solution to the cinder block. Of the three types of shapes for the metal part of the trowel, the most convenient for masonry is considered to be a trapezoid-shaped trowel.
You will also need
Grinder for working with cinder block
- Grinder with a circle of at least 150 mm . It is necessary for cutting cinder blocks, because you will not be able to cut a cinder block evenly using other means.
- Perforator with mixer attachment. Necessary for mixing the solution if you do not have a concrete mixer.
- Shovels: shovel or bayonet. Both of these shovels are needed to load sand and cement into containers: buckets or a concrete mixer. They can also be used as an analogue of a concrete mixer for mixing the solution.
- Template for laying cinder block. With its help, in order to make it easier to lay cinder blocks with your own hands, you will significantly speed up the work and make it more accurate. You can, of course, do without using a template, but if you plan to lay out a large square, it will still be easier with its help. You can make it yourself from lumber, metal corners, or you can purchase it at hardware stores.
- Overalls and construction gloves. This is a mandatory element of special clothing and protection. Your hands are constantly in contact with the mortar and cinder block. And when carrying blocks, you can inadvertently damage the skin of your legs and abdomen. It is recommended to protect body parts with durable used clothing or construction clothing.
Freezing method
In this case, even despite the negative temperature, brick laying is carried out in the open air, while the mortar has a fairly high temperature.
This method is based on the fact that the mortar in the seams is frozen and gradually hardens in the spring (partly directly during the laying process). Thus, thermal energy is constantly released during the chemical interaction of cement and water.
Important! This method allows you to build walls with a height of no more than 15 m. Given the technical safety standard, the strength can be calculated in accordance with the spring period of hardening of the cement mortar.
Cinder block laying, types of masonry
There are 4 known types of styling:
- two stones
- one and a half stone
- also in one stone
- to the floor of a stone
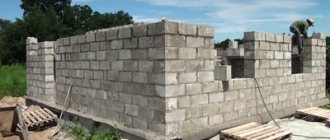
Depending on the intended construction site, you choose the type of installation that corresponds to the future construction. When planning a living space, follow the rule - the thicker the wall, the warmer the building will be. That is, the method of laying in two stones is exactly what is needed. If you plan to build a small outbuilding, for example, a barn, then in this case you can use the stone floor method. In this case, you can use half blocks. Masonry mortar, if possible, can be purchased at a special store, or you can prepare it yourself. The basis of the composition is a mixture of three parts sand and one part cement. After mixing these parts into one, dilute them with water to form a viscous paste. And in order to increase the porosity, frost resistance, and density of the solution, it is advisable to add a plasticizer. It's better to buy it. We recommend mixing in a concrete mixer, since manually you will not achieve the desired effect of a homogeneous mass, which will significantly reduce the quality of the solution. Moreover, you will need a large amount of it.
Errors during operation
Cinder block is afraid of water and moisture.
Therefore, masonry work must be carried out in the warm season. Otherwise, in winter and during the rainy season, the blocks will absorb moisture and collapse. If construction takes place in winter, then anti-frost chemical additives and additives need to be added to the mixture.
It is better to veneer the finished building right away . Plaster is not suitable for this purpose because it has poor adhesion to the surface of the cinder block. After a short period of time, the plaster will begin to crack, peel and crumble.
Attention! If there is absolutely no other cladding option other than plaster, then you must definitely use reinforcing mesh.
Laying cinder block requires foundation preparation
- Elimination of foundation unevenness. Before starting masonry, the surface of the foundation should be cleared of excess debris and dust. Knock down and eliminate existing irregularities as much as possible in those areas of the foundation where the masonry will be done. This can be done with a pick, hammer, or special spatula. Then thoroughly sweep away all debris and dust from the surface of the foundation.
Wall foundation
- Foundation waterproofing. If your foundation has not been waterproofed, then the masonry areas must be covered with mastic or a layer of waterproofing material. This protects the cinder block from excess moisture from below.
- Height and width of the foundation. Ideally, the width of the foundation on which the cinder block will be laid should be 40 cm wider than the width of the wall itself. And the height of the foundation under a cinder block wall should be at least 70 cm from the ground level. This height is necessary so that the cinder block, which absorbs moisture well, is as high as possible from the ground. Unfortunately, in practice such proportions are often not observed. If the facade of a cinder block building is additionally protected from the external environment, then the proximity to the ground will not cause harm to the cinder block, or it will be insignificant.
- Provide easy access to cinder block laying areas. Access to the perimeter of the masonry must be free both from the inside and from the outside of the foundation. This will make it easier to bring the cinder block and mortar to the masonry areas where the work will be carried out.
Laying cinder block, preparing the solution
Which mortar is suitable for laying cinder block depends on the type of building you have. Based on what you are building, there are different proportions for preparing the solution. You can buy a ready-made dry solution in the store, to which you just need to add water and stir. Or you can prepare the solution yourself, follow the following proportions:
- 3 parts sand;
- 1 part dry cement;
- 3 water.
The basis of the composition is a mixture of three parts sand and one part cement. After mixing these parts into one, dilute them with water to form a viscous paste. The solution should not spread much when laying the cinder block. In order to increase the porosity, frost resistance, and density of the solution, it is advisable to add a plasticizer. It's better to buy it. We recommend mixing in a concrete mixer, since manually you will not achieve the desired effect of a homogeneous mass, which will significantly reduce the quality of the solution. Moreover, you will need a large amount of it. By adding a plasticizer to the solution, you get the following properties:
- plastic;
- stickiness; homogeneity;
- frost resistance;
- self-sealing;
- strength;
- moisture resistance.
Laying cinder blocks in rows
The principle of laying cinder blocks with your own hands looks the same as laying bricks. Since the masonry begins from the first row, it naturally receives the greatest attention, since this is the basis of the future building. The durability of the building and the evenness of its walls depend on the laying of the first row.
You need to start this business with markings, which are carried out along the base. One block is laid at each corner of the foundation. We will take four right angles as a basis (although there are buildings of different angles) But most often there are buildings of a regular rectangular shape.
- To create a marking guide for yourself, you need to select one cinder block with the correct geometric shape for each of the four corners. They should be the same, because you won’t be able to rely on them later.
- So you place cinder blocks - beacons on the foundation in the corners. Use a level to mark the highest corner of the foundation. A normal difference is considered to be a difference in the height of the corners of the foundation of no more than 3 cm. Subsequently, the difference in height is eliminated by the amount of mortar in the masonry.
Marking devices
- Mooring lines. Control the horizontal row.
- Plumb. Controls the vertical of the wall.
- Building level. Control the planes.
Moreover, they use squares, rulers, and long slats. If you are an experienced cinder block layer, then this set of tools will be enough for you. For those who have no previous masonry experience, we recommend using additional devices.
When marking blocks, you must use colored crayons. Such markings are best visible on cinder blocks, compared, for example, with a regular pencil. To increase plasticity, you can add a little detergent to the solution. The amount of solution must be calculated so that it is used all at once. The remaining unused solution soon hardens and is no longer suitable for construction. To make it easier for you to calculate this very amount: for an hour and a half of work on average, you will need about a bucket of composition to lay four elements. Take this rule as a guide, it will be easier to calculate the batch consumption.
How to markup
It is advisable to plaster the outer walls, because cinder block is afraid of moisture. In this case, the plaster will protect the material. But there are a number of additional circumstances, such as reinforcement (we’ll talk about it later). This is necessary to prevent the plaster from collapsing over time. Also, to prevent it from falling off, the interior walls can be lined with plasterboard.
Laying cinder block - first row
This way you get a regular quadrilateral. After checking the row planes on which the marks are applied, they are securely fixed. The guideline for even laying is ready. You need to stretch cords between the rows; they will be used to control the height of the elements. The cord is pulled very tightly, without sagging.
After marking, begin laying the first row of cinder blocks.
- Laying the first row of cinder blocks begins from the corners of the foundation to the middle of the wall row.
- The prepared cement mortar is laid out on the foundation along the width and length of the cinder block. The optimal thickness of the solution is 1.5-2 cm. The solution is also applied to the end of the cinder block.
- Using a stretched cord from the corners, place the cinder block with your own hands on the already laid mortar. Using a hammer or pick, the top is knocked into the same plane as the corner cinder block. The correct horizon from above is measured by the building level.
- After the blocks are as close as possible in the central part of the row, you need to measure the length of the last block along the foundation and cut it with a grinder to the appropriate size. In the same way, lay the remaining block in a row along the cord horizontally.
Step-by-step instructions for installing the first row
- First, you take the solution and apply it to the foundation, spreading it evenly over the base. It is important to remember: according to the instructions, the seam thickness is 10-15 mm. We take this into account when applying the mixture.
- Next, take the cinder block by the middle and bring it to the place of work. Unfold it in the desired direction and place it on the foundation.
- Determine the installation height of the part. If the top edge protrudes above the tensioned cord, take a mallet and, tapping it lightly, lower the element to the desired height.
- The weight of the stone will force some of the adhesive out of the seam. It must be carefully removed and put away.
- Place the second and then the third part in the same way.
Installation of cinder block
Using a level and plumb line, check the horizontal and vertical of the wall being built. If there are errors, remove them immediately. And so we continue throughout the first paradise, not forgetting to periodically monitor the location of the blocks.
Laying cinder block - second and subsequent rows
You can start laying the second row only after the first row has completely hardened and gained strength. Note the time. It should take approximately 2 hours, depending on the weather. We continue to lay all subsequent rows from the corners, moving towards the center of the row. At the same time, the location of the edged cinder block in the rows should be constantly different from the previous one, this is normal.
You need to start laying the second, as well as all subsequent even rows, from half of the part. This ensures the necessary shift. You will have to cut the element yourself. To do this, you can use a hacksaw or a hand-held circular saw. Otherwise, the installation technology does not change. First, the cord is pulled at the desired height, then, guided by it, stones are placed. After laying two or three elements, control of the planes is required.
As for the subsequent third or fourth rows, for the reliability of the structure, the masonry row should be reinforced. For this purpose, reinforcing mesh or reinforcement is used - metal rods.
Lay hollow cinder blocks in a row with the voids facing down.
The side seams between the cinder blocks should be well filled with mortar so that no voids are visible. Loose seams will easily allow moisture and air to pass through, through which cold currents will penetrate.
Wall reinforcement
In order to increase the strength of walls, distribute the load and reduce the risk of cracks, reinforcement is used. It is required in the first row, as well as in every fourth. The following materials are most often used for reinforcement:
- reinforcing mesh (reinforced mesh) for masonry. Usually this is a mesh with a cell of 50x50 mm. It is placed between the rows; reinforcement or reinforcement cage. The first row of masonry must be reinforced. Every fourth row of the wall is also reinforced. In addition, door and window openings must be reinforced.
- steel rods, metal mesh with 5x5 cm cells or reinforcement frame made of galvanized steel. They are required for additional reinforcement for all openings for doors and windows.
Working at height with heavy parts is quite difficult. Before you start laying them, make sure you have something to support them. These must be very stable devices that can withstand not only the weight of an adult, but also the fittings. Therefore, the option that first came to your hand in the form of a stepladder or ladder is absolutely not suitable. They are too unstable and unsafe to work on.
Devices for laying cinder blocks
To get a good cinder block laying you need to prepare the following:
- Master OK. Looks like a small spatula. They apply and level the paste, remove its excess. By tapping the handle, the position of the part is aligned.
- Special hammer . One striker is flat, the other is pointed. Use a sharp tool to chip the cinder concrete element. With a blunt they split it in half.
- Joining . A tool for removing part of the mortar from a seam.
In order for your building to have an attractive, even-sided appearance, it is necessary to check the evenness of the masonry from time to time. Regarding the cord and the building level, it is necessary, you need to control the laying of the cinder block as often as possible in order to avoid curvature of the walls and rows in the future. Even if you do not plan to decorate the walls with anything in the future, they should still have an attractive appearance. To do this, you can use a small rounded stick, which you need to slightly press the seams after each laid row, while the solution has not yet had time to harden.
Composition requirements
The mortar for laying cinder blocks must meet the following requirements:
- Spreadability , which allows it to be evenly distributed over the surface.
- Viscosity , due to which it does not flow from the building material.
- Strength after drying, on which the reliability of the erected structure depends.
- Consistency . It should not be too thick and not too runny. By analogy, it can be compared with sour cream.
- Lack of lumps , which is necessary for uniform laying of blocks.
A solution that meets these requirements guarantees the strength of walls and partitions.