Beton-House.com
Website about concrete: construction, characteristics, design. We combine the experience of professionals and private craftsmen in one place
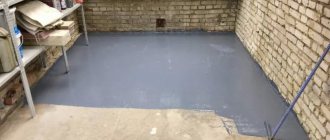
Ready base
Concrete floors are the best base option for any facility: be it residential sector, industrial enterprises, public spaces, supermarkets or warehouses. Properly constructed, they will serve faithfully for decades. The final coating of the concrete floor is selected taking into account the conditions of use of the room: climatic factors, the load that will be placed on the surface.
- Floor construction
- Linoleum
- Porcelain tiles
Concrete floor: pros and cons
This coating has its advantages and disadvantages.
On the one hand, it is characterized by:
- strength;
- practicality;
- durability;
- environmental friendliness.
On the other side:
- such a floor is dusty (the top layer is subject to destruction, mechanical and chemical influences lead to the formation of cement dust over time);
- has poor sound insulation and unattractive appearance;
- The material in question is cold;
- it absorbs moisture because it is a hygroscopic material. This can lead to the formation of fungus and mold, and, over time, to the appearance of cracks.
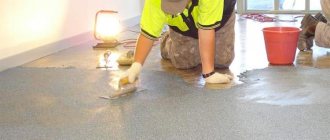
Regardless of what coating will be used, the surface must be sanded (if this has not been done previously) and vacuumed. This way we will remove the weak top layer.
Grinding the concrete base
Let's consider what coatings are used for the floors in question:
Additional materials and tools for pouring
If there are significant holes or cracks in the floor, they must be repaired before major work begins.
This can be done using putties selected for a specific base material or a quick-setting repair mortar.
Immediately before pouring, the base should be primed to improve adhesion to the solution.
If the surface absorbs the primer very strongly, it is recommended to carry out this operation again.
To carry out the work you will need:
- Drill with a mixer attachment for mixing the composition. Carrying out this operation manually may not provide sufficient mixing and will also require more time.
- Container for diluting the solution. Recommended volume – 40 l.
- A long metal spatula to evenly distribute the composition over the surface.
- Needle roller with long handle to remove air bubbles. The length of the needles should be approximately equal to the thickness of the fill layer + 2 mm.
- Paint shoes, in which you can walk without damaging the coating on a freshly poured surface for further filling and leveling work.
Coating options
Depending on the purpose of the room and taste preferences, there are different types of treatments and materials for flooring.
The use of concrete coating products is regulated by GOST 31384-2008, as well as recommendations for the construction of floors to SNiP 3.04.01-87 “INSULATING AND FINISHING COATINGS”, SNiP 2.03.13-88 “FLOORS”
Applying primer
Primer is the easiest way to control dust build-up, harden and protect the top layer, and make the floor more attractive. The compositions can be used as the sole coating of the base.
The following types of primers can be used as a primer:
- Epoxy. They have good waterproofing properties. The epoxy coating is resistant to detergents. Drying time is an hour.
- Polyurethane. Penetrate deeply into pores and have good adhesion to concrete. Drying time - 12 hours.
- Acrylic. The most budget option. Dries within 4 hours.
Surface after applying primer
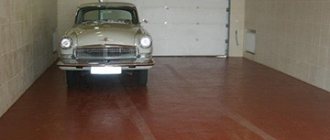
Painting the concrete base
Paint is an excellent coating for concrete floors, for which there are no increased requirements for noise and heat insulation:
Important! For application, paint should be used that has a composition similar to the applied primer.
- Epoxy paint . It is resistant to aggressive environments, durable, and the painted coating looks good.
- Polyurethane enamel . Forms a perfectly smooth surface, is a well-covering, environmentally friendly coating.
- Acrylic enamel. Has high moisture resistance.
Painting: work process
Briefly about the main thing
Before leveling the concrete floor, specialists determine the zero level using a bubble, laser tool or level. Then they choose the method of carrying out the work. The concrete base can be leveled using a “wet” cement-sand or semi-dry screed, as well as by applying a self-leveling mixture or fixing gypsum fiber sheets.
The materials used in all methods differ in the technology of laying on an uneven base. Professionals know this well. Therefore, their help is often used by homeowners who want to have perfectly smooth floors in their premises.
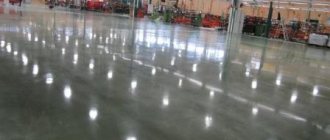
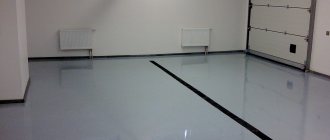
Self-leveling floors
A very popular wear-resistant coating, characterized by a stylish appearance, durability and hygiene.
It has its drawbacks:
- high cost;
- non-ecological (but it practically does not manifest itself in any way, since there will be no harmful emissions);
- excessive smoothness (you should be careful with this type of flooring in areas where elderly people and small children are present).
The photo shows what self-leveling floors can look like if you use 3D design.
Depending on the coating requirements, you can select a composition with the desired characteristics.There are self-leveling floors:
- Polyurethane . Due to the inclusion of plasticizers, they have good sound absorption. Available in glossy and matte finishes. Resistant to aggressive environments. Good resistance to impacts. Best suited for residential use.
- Epoxy . Transparent, which is used in decoration. They are resistant to abrasion, but have low strength.
- Methyl methacrylate . They dry quickly and have good strength characteristics. But they can release toxic compounds, so they should not be used in crowded places.
- Polymer-cement . They have waterproof and antistatic properties.
- Acrylic . The least durable of all options.
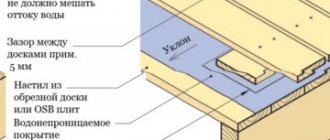
Floor construction
You will need the following tools:
Let's look at the step-by-step process of covering a surface with a self-leveling mixture:
| To compensate for possible expansion and protect the coating from cracks, we glue the perimeter of the room with damper tape. |
| Pour the solution prepared according to the manufacturer’s instructions onto the primed concrete base. Pour out a little, each time about 2 sq.m. |
| Level it with a spatula. Coating thickness 1.5...8 mm. After leveling, pour in the next portion. You should work without interruption. |
| Using a needle roller, remove air bubbles. We perform this procedure after each portion of the solution. |
| We control the correct filling using a manual or laser level. |
| To protect the floor and give it shine, we coat the surface with polymer varnish. This should be done after the surface has dried. |
To create a 3D effect, a film with a printed image is placed under the finishing layer. Concrete floors coated with a leveling mixture are an excellent option for home and public buildings. If necessary, you can install thermal insulation under it or install a “warm floor” system.
Materials for finishing screed
To install the final floor screed, solutions based on cement or gypsum binder with polymer additives are used. Such mixtures are called self-leveling floors; some “levelers” are suitable. The general name is self-leveling mixtures.
Levelers
Many manufacturers produce, under the “Levelers” label, both mixtures for rough leveling (up to 100-120 mm) and self-leveling mixtures for final leveling from 2 to 20 mm. You need to read the descriptions here.
Self-leveling floor
Some manufacturers produce products for finishing leveling under the label “Self-leveling floor”. These are the same mixtures based on gypsum-polymer binder, which are self-flowing and do not require the installation of beacons during installation. Here we draw your attention to the fact that there are simply “Self-leveling floors”, they can be applied in a layer from 5 to 20-30 mm, and there are “Finish self-leveling floors”, they can create a layer from 2-3 mm, for a completely ideal surface.
Conclusion
A large number of different manufacturers force you to give advice; carefully read the product description on the packaging.
Parquet
This material has always been popular. When the question arises of how to cover a concrete floor in an apartment, this option often turns out to be the most advantageous.
Laying parquet:
- Glue sheets of moisture-resistant plywood onto the primed base. It is imperative to provide deformation distances of 1.5-2 mm between the sheets.
- Attach the plywood using dowels.
- Lay out the soundproofing underlay.
- Attach the parquet using a tongue-and-groove joint, glue, and in some cases, nails.
Parquet laying
To correctly form the drawing, it is best to first do this on paper. The planks should be placed in such a way that the cut parts are located at the edges of the room.
The laid parquet should be sanded, and if defects appear, they should be repaired with putty. After this, apply several layers of varnish. Each layer is applied after the previous one has completely dried.
Parquet floor
Laying parquet is a troublesome task, but the result should please you.
The feasibility of finishing screed
In the construction of any floor screeds, there is such a thing as expediency. It can be found in regulatory documents on the thickness of the cement-sand screed (read Correct floor screed in an apartment), the need for screed reinforcement (read Screed reinforcement in an apartment), etc.
The concept of feasibility can also be applied to the finishing floor screed. Let me explain this idea with specific examples.
Example 1. You are planning or have already made a cement-sand screed in an apartment using beacons. It is almost impossible to obtain an ideal DSP surface. The cement-sand screed shrinks and “clings” to the beacons as it shrinks, resulting in a surface unevenness of the cement-sand plasterboard. Why does this happen? Read the errors in the device of the ties.
As a result, the screed needs to be leveled. However, if you are planning to lay tiles, and the unevenness of the screed is within 5 mm by 2 meters, then there is no need to level such a screed and it is not advisable to make a finishing screed.
Example 2. You have made a screed for laying parquet. In this case the situation is similar. The screed for laying parquet will be leveled with layers of plywood, which is required for laying parquet.
Conclusion
Finishing floor screed in an apartment is advisable if the following finishing options are planned:
- Laying linoleum and similar PVC coverings;
- Laying laminate;
- Parquet board;
- Laying mosaics.
Roll coverings
Linoleum
This material has excellent characteristics, and it also has an affordable price.
Laying flooring on a concrete floor with your own hands is not a very complicated process:
- Before installation, the roll must be brought into the room and laid out on the floor for 12 hours.
- After this, cut it according to the size of the room, making allowances of 10 cm in case it shrinks.
- Apply glue to the inside of the covering and carefully glue the linoleum, smoothing the surface.
- When laying several strips of material, they are glued together using special glue.
- In small rooms it is permissible not to glue linoleum. It is enough to fix it with skirting boards.
Floor with laid linoleum.
Carpet
Carpet installation is simple. If you put an elastic backing under the carpet, you should first glue it, and then the carpet.
When laying the covering in a large room, even without a backing, you need to glue it to the base. In small rooms you can lay carpet without using glue, simply pressing it with a baseboard.
Floor with carpet
Preparation of the solution
There are several rules, the observance of which will protect you from mistakes and hassle with alterations.
- For mixing, use clean tools and clean running water.
- The water should be warm, within +20C. Hot water speeds up the setting of the solution.
- Manufacturers indicate the proportions of the mixture and water for mixing the solution on the packaging. Observe them strictly! Excess water will lead to stratification of the mixture, slow drying and loss of strength of the floor; too little will lead to poor fluidity of the solution.
- When mixing, pour water into the container, and then pour the mixture into it, stirring constantly, but not vice versa!
- You need to stir the solution for about 5 minutes using a mixer or drill with an attachment. Then it is advised to leave the mixture for a few minutes, and then stir for another 2-3 minutes.
- Sometimes manufacturers indicate the amount of liquid needed for a certain amount of mixture, ranging up to a liter. How to be in this case? Experiment. To begin with, you can use the average. If you have doubts about the resulting consistency, do a test: cut a 5-liter bottle into a ring, place it on glass or tile, pour the solution over the top and put it away. If the mixture, spreading, covers an area three times the diameter of the ring, the consistency is considered good.
- Never add water to a hardening solution! You cannot mix the solution “for future use”; a portion is made for one pour.
Laminate
Reliable and affordable material. Laminate is an excellent covering. A substrate should be laid on the concrete base (usually foamed polystyrene 3 mm thick is used). The rows of backing can be secured together with tape. The panels can be laid longitudinally, transversely or diagonally.
Important! The laminate should extend 1 cm from the wall (damper indentation).
The dies are attached to each other using locking connections. The ridge of the first row of panels should be cut off (on the side closest to the wall). Assembly is carried out in rows. If necessary, parts of the panels are sawed off with a hacksaw or jigsaw.
Laying laminate
Carrying out finishing
There are quite a lot of types of finishing work that can be done after screeding the floor, because preparing the ideal base removes all restrictions on the choice. Let's look at the most common of them.
Linoleum finishing
A very practical and fairly common solution for finishing. With the help of a huge selection of materials presented on the markets, you can choose any interesting pattern. After screeding, the linoleum will look ideal both in the kitchen and in the living room. It is very easy to care for and keep clean. Linoleum is comfortable and durable.
Scheme of cement screed
Before you start finishing with this material, you need to prepare a tool: marker, tape measure, drill or hammer drill, construction knife, blades for it, screwdriver, brush.
When cutting the material, it is necessary to take into account how it will be located in the room. If there are several sheets, they are connected according to the pattern. Only after the material has straightened out on the surface can you begin to fasten it and install skirting boards.
Laminate coating
Laminate floors are very beautiful, practical and popular. Doing this kind of floor finishing is quite simple and does not take long. But you need to remember that such floors do not like temperature changes and high humidity.
When creating laminated floors, you will need the following tools: a hacksaw, a jigsaw, a rubber hammer, a drill or hammer drill, a square, a pencil, a tape measure, a screwdriver, and a construction knife.
It is most convenient to lay laminate flooring on polypropylene foam. Once the floor is screeded and it becomes fairly level, the joints of the panel edges will not require special adjustment. You can cut the panel using an electric saw. You can make the fastening using a simple design - tongue and groove. High-quality installation of the coating on a flat floor will have a very long service life.
Ceramic tile
Tiles are often chosen for installation. Based on the purpose of the premises or simply at the request of the owner. This material is characterized by low abrasion and low water absorption coefficient.
Let's look at the stages of its installation:
- Using a notched trowel, apply a layer of diluted glue to the prepared surface.
- The tiles are embedded in the glue. To improve the fit, tap it with a mallet.
- The following tiles are laid side by side, with plastic crosses installed between them to form a gap. Periodically check the horizontal position with a level.
- If necessary, cut parts of the tiles using a tile cutter.
- After an hour, the crosses can be removed.
- Every other day, the seams between the tiles should be grouted.
- Use a damp sponge to remove excess grout and stains.
Laying tiles
Porcelain tiles
Porcelain stoneware is actively used to cover floors in homes, supermarkets, and public spaces. It is more durable than ceramic tiles, wear-resistant, durable.
Its installation is similar to that of ceramic tiles, with the only difference being that a different adhesive is selected and cutting of the slabs is a much more labor-intensive process due to the size of the material.
Laying porcelain tiles
Choosing a floor covering is extremely important and not easy. It needs to be taken responsibly, having analyzed all the pros and cons. Properly selected and installed coated concrete floors will serve you faithfully for many years.
Why is alignment necessary?
Nowadays people often do indoor renovations on their own - why overpay when you can find a lot of tutorials on how to carry out the work and just follow step-by-step instructions? But sometimes the technology can be violated by novice craftsmen - somewhere they neglected to add a component to the building composition, and somewhere they skipped a whole step, considering it unnecessary. The result can be sad - for example, when pouring a new screed, you end up with an uneven base, on which you should never lay tiles or laminate flooring, as this will cause them to deform very quickly. And the result is wasted money and time.
Cracks in floor tiles
Attention! To prevent this from happening, it is important to always strictly follow the installation instructions, including those for arranging the floor. This will save both money and time, and as a result, the finish coating will delight its owner for many years and will not require replacement for a long time.
Also, wooden floors may require additional leveling of the base if there are cracks and gaps between the floorboards, but in general the floor is quite strong, does not creak and does not require disassembly and repair.
How to Measure the Curvature of a Wooden Floor
Finishing leveling is also used when installing the floor on an old but reliable screed. It’s just that over time, the rough base may become rough, cracks will appear on it, and finishing leveling will help get rid of these irregularities.
Old screed after sanding
Floor leveler consumption per 1m2
Before using the floor leveler, please note that after mixing it is usable for no more than 20 minutes. Therefore, the reasons need to be determined.
So, first, the required amount of water is determined. Its consumption will be approximately 0.13-1.15 liters per 1 kg of “Plitonit” or “Vetonit”. As for the amount of the finished mixture, its average consumption depends on the type. For example, if “Plitonit”, “Horizon” or a universal solution is used for rough leveling, then about 2-2.5 kg/m2 will be required. In this case, the layer thickness is 1 mm. If Vetonit or another universal bulk solution (finishing leveler) is used, then approximately 1.5-1.7 kg/m2 (layer thickness 1 mm) will be required.
If we summarize this information, then the average consumption of the mixture per 1 m2 of area, taking into account a layer thickness of 10 mm, is about 20 kg. The temperature of pouring the solution should be taken into account. The installation procedure must be carried out in the following range: 5-20 degrees. If these conditions are not met, the mixture consumption may increase.