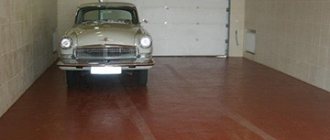
The safety of any car in a garage depends on various factors. Having strong walls, a strong, non-leaking roof and reliable gates are just some of them. The last and perhaps most important thing is a reliable and hard floor in the garage. Durability depends on its type, insulation method, materials used and design. You can create or repair a garage floor with your own hands, as can be seen in the photographs.
The main requirements for the floor in a garage
When creating a garage floor on your own, you need to know the characteristics and features of a particular type of floor, as well as focus on specific requirements determined by the specific location or use. The criteria for choosing a floor type include:
- resistance to chemical products (oils, gasoline, solvents, etc.);
- resistance to mechanical loads;
- fire safety and moisture resistance;
- high level of surface strength;
- simplicity of design and its arrangement;
- service life (durability).
Types of floors
The following types of floors best meet the listed criteria:
- ceramic tiles or porcelain stoneware;
- concrete floor;
- poured polymer floors.
It should be noted that wooden floors are also quite common. However, their compliance with the requirements for reliability, fire hazard, durability and strength as a floor base in a garage is approaching zero. For this reason we will not consider them.
The main reasons for the deformation of a concrete base
The main reason for the formation of cracks and other defects, of course, is the uneven distribution of load and excessive penetration of moisture into the garage floor covering. In this regard, owners prefer to use concrete as a material for pouring floors.
It has a low cost and a simple filling method, which makes it easy to use and low restoration costs.
If the aesthetic side of the issue is important to the owner, so that the floor can be shown in a photo for sale or simply show off the new garage to friends, then there is a huge number of different facing materials and mixtures on the construction market.
True, there are certain factors that influence the performance characteristics of the floor.
To avoid the need for garage floor repairs, you should avoid:
- penetration of moisture into the internal structure. Concrete in constant contact with wet soil can become saturated with water, swell and collapse;
- The level of coverage may vary depending on seasonal ground movement and temperature changes. This can lead to the formation of cracks in the concrete base;
- Mechanical pressure on a concrete floor can lead to the formation of chips and potholes. It is worth minimizing the impact on the surface, which cannot be avoided when carrying out repair work in the garage.
If you inspect the concrete base in a timely and correct manner, you can independently get rid of existing problems, as well as protect yourself from the appearance of new ones. The standard procedure for installing a concrete floor implies that a layer of crushed gravel about 1 decimeter thick will be poured onto a previously leveled earthen base. The next layer is sand of the same thickness.
Next, a hydraulic barrier is laid, for which you can use roofing felt and thick polyethylene. Now you need to install the reinforced mesh and fill it with concrete mortar. It is recommended to lay a cement screed with the addition of expanded clay on top of the resulting concrete base. Thus, the owner can independently install the floor in the garage on the ground, naturally with strict adherence to the instructions and recommendations.
Need to repair old concrete floor in garage
You may not think this is practical, but I would like to give a few arguments in favor of painting. Firstly, a concrete floor generates dust during its operation. Approximately 7 g/m2, multiplying this figure by the area of your floor, you will be surprised to understand how much dust flies in the air of your garage, for example. And this dust settles not only on the floor, but also on all surfaces and on the car, not to mention the fact that you have to breathe this air. Although the concrete floor is durable, the surface layer is not very durable.
This actually causes concrete floors to become dusty during use. Secondly, concrete has a porous structure that absorbs various liquids and small particles very well. This means that wood dust, motor oil, or simply dirt brought from the street onto the floor will accumulate in these very pores, making your floor dirty and untidy. Thirdly, again due to the above reasons, concrete floors are very difficult to clean. Literally after a short time, the dust lies in an even layer, and some stains from liquids and dirt remain in the concrete floor forever. How to solve all these problems? That's right, paint the surface of the concrete floor!
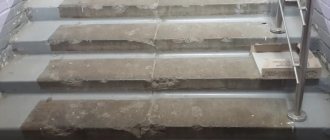
Sanding the screed before impregnation
In case the arrangement of the floor in the garage does not allow raising the surface level even higher, there is a grinding method. The grinding machine is designed for surface treatment. With its help, you can remove the defective layer of concrete and thereby level the floor without applying special means. Of course, if there are deep potholes, you will need to use a sealant or resin to make the surface perfectly level.
If cracks are detected, additional surface treatment will be required. The walls of such a cavity break off to open access to its bottom. Having reached the bottom edge, it should be primed and then filled with a cement mixture with the addition of glue or special polymers. Once the mixture has hardened, leveling can be done using special tools.
If the cracks form a whole network or have several branches, then the easiest way would be to cut out a piece of concrete containing them. The formed cavity is cleaned and filled with an appropriate solution, and after drying, the concrete floor is polished, as it should be.
Once the garage floor is finished, a protective layer of polymer can be applied to the surface. This composition is a liquid that is used as an impregnation for the surface layer of concrete. It penetrates to a depth of about 5 millimeters and increases strength without changing the height of the coating.
There are two main types of impregnations:
- organic - liquid solutions containing acrylic, polyurethane or epoxy resin. This product is evenly distributed throughout the pores of the concrete base, tightening the surface due to its viscosity. The advantage of use is that the liquid repulsion rate increases, absolute resistance to aggressive environments and chemicals is formed, as well as blocking the intense dust formation characteristic of concrete. The most popular are polyurethane compounds;
- inorganic - do not penetrate the pores of the base, but transform the soluble molecular compounds that make up the concrete. As a result, such substances become insoluble and give the concrete coating the same characteristics as in the case of using organic impregnations.
Ways to eliminate the shortcomings of a concrete floor
If the above conditions are met, changes in the level of the concrete floor in the garage occur in extremely rare cases. If minor differences in height up to 2 cm are detected, then a leveling mixture can be used. Special plasticizers are added to such mixtures to prevent the appearance of cracks even with a small layer of coating. With this method of repairing a garage with your own hands, you not only level the surface, but also plug all the potholes and defects.
The process of grinding the screed before applying impregnation
In cases where it is undesirable to raise the height of the floor, the grinding method of leveling can be used. You can rent a sander and process the entire surface, removing the top damaged layer. Particularly problematic chipped areas will have to be filled with sealing mastic or epoxy resin. If you find cracks, you will have to make a more in-depth correction of the situation. For small cracks, you should use a chisel and hammer to break off the walls to get to the bottom edge of the crack and reveal hidden damage to the structure of the concrete. Then the entire surface of the fracture is covered with a special primer and filled with a mixture of cement and PVA glue or a purchased mixture of cement and polymer additives. After drying, the surface is leveled using abrasive devices.
Technology for laying concrete floors in a garage
If there are noticeable branched cracks, when repairing a garage with your own hands, they do it more radically - they cut out part of the concrete along the crack to remove the deformed area. Moreover, if the concrete has partially failed, not only the cracks themselves should be repaired, but also the adjacent area within a radius of 30 cm, which is removed by a few millimeters with an abrasive device. The cleaned void inside the concrete and the adjacent surface are filled with a solution of the appropriate brand and sanded after drying.
After leveling and sanding the surface when repairing a concrete floor, you can apply a protective polymer composition. Polymer impregnations penetrate to a depth of up to half a centimeter and increase the surface strength of concrete, while making it possible not to raise the height of the floor. The main types of impregnations are presented in two groups:
- Organic-based impregnations are liquid compositions made from components such as acrylic, polyurethane, epoxy resins. They act by filling the concrete pores with a binder, thus increasing the water-repellent properties, creating an inert attitude to the effects of chemicals and removing dust from the concrete. As a result, the concrete coating crumbles less and pollutes the environment. Polyurethane impregnations have the widest range of tasks to be solved, and therefore are more in demand.
- Inorganic impregnations do not fill the pores of concrete, but convert soluble molecular compounds into insoluble ones, giving concrete new properties, including strength, water resistance, and dust removal.
Applying polymer impregnation to the screed to strengthen it.
Organic impregnations are completely safe for human health and are sold at an affordable cost. Colored impregnations for concrete can replace painting because they penetrate several millimeters deep and retain the color texture for quite a long time. A strengthening or water-repellent impregnation is also applied on top of the colored impregnation.
There are several rules for applying polymer impregnations during construction and repairs:
- if you made a fresh cement screed or applied a leveling mixture, then you need to wait until it dries completely for at least two weeks;
- all impregnations are applied in the temperature range from +5˚C to +40˚C, otherwise not only the impregnation may lose its declared qualities, but the concrete base will also suffer;
- Use a powerful water vacuum cleaner to remove as much dirt and dust as possible from the surface of the concrete base before applying the sealer.
Important! Despite the presence of hygienic certificates, when applied in liquid form, impregnations have a strong unpleasant odor, so it is better to use gloves and a respirator when handling them as a precaution.
Waterproofing concrete in a garage.
Waterproofing in a garage is quite an important point in building a screed. This is an important issue that certainly should not be ignored. As you know, concrete is not afraid of moisture or temperature changes. But it’s worth considering that high humidity in the garage will harm your car, or rather its body, as well as other objects in the room.
To choose the right material for waterproofing in a garage, you need to take into account how far away the groundwater is and how high it can rise during the rainy season. If they are located high, then it is necessary to cover the sand with dense polyethylene film, the density of which should be from 250 microns, you can choose reinforced film. In this case, it will protect the sand from moisture. It is also worth noting that it is necessary to use good and dense materials for waterproofing. In any case, the film will be layered on top of each other by about 15 centimeters, this will help prevent water penetration.
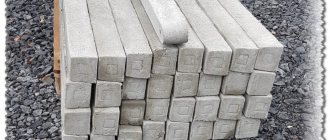
Materials for backfilling.
The next step is to select materials for the cushion under the base. This is no less an important stage, because the more firmly everything is done, the better quality and more durable it will be. Therefore, if you are going to do it, do it well. For a good coating, it is better to use crushed stone; gravel is not suitable for such work, as it will be difficult to compact. Therefore, we buy and fill it with medium and fine crushed stone. The average should be somewhere around 60-70%; the rest is fine crushed stone.
It is important that the sand is free of clay impurities, otherwise you will violate the technological instructions and this may subsequently lead to the appearance of cracks and potholes. And of course, sift the sand before filling it.
Reinforcement.
The floor in the garage, as you know, will be heavily loaded, so to prevent destruction, the appearance of cracks and holes, the concrete sheet is reinforced. A ready-made mesh is used, where the cell should be 15x15; the meshes are attached to each other, overlapping one another for one cell. Do not lay the mesh on the film, it must be in the thickness of the concrete, so as not to create corrosion, it must be placed at a depth of at least 3 centimeters. To do this, use bricks that you place under the mesh, thereby raising it by about 6 centimeters, but keep in mind that the mesh should not sag.
The next thing we do is calculate the ASG layers.
Now you have a foundation pit and a zero floor level, and at this stage you need to calculate how thick the layers should be to reach this floor level. And of course, check the necessary parameters with what you already have and, if necessary, modify them.
- The first thing you should pay attention to is what kind of car will be in the garage. If this is a passenger car, then the optimal thickness of the concrete pad should be at least 10 centimeters. Such a base layer will definitely cope with the load and will last a long time.
- The layer of crushed stone is also 10 centimeters thick.
- A layer of sand of at least 5 centimeters.
And then in the end it turns out that your pit should be at least 25 centimeters deep, and this does not take into account the floor covering. If you do not plan to cover the concrete screed with tiles, for example, but simply impregnate or paint it, then 25 centimeters of depth will be enough for you.
Now you can easily calculate how much sand and crushed stone you need. If suddenly your pit is larger, you can fill the bottom and compact the soil; otherwise, if the depth is not sufficient, dig more.
Also, don’t forget to mark the height of your floor on the walls. And proceed to the next step.