- 1 How is pouring slabs done?
- 2 Pouring stages
- 3 Insulation
- 4 Features of the construction of the foundation slab
- 5 Scope of application of the slab base
- 6 How to properly pour a concrete base for structures?
- 7 How to make a concrete batch correctly?
- 8 Pouring concrete mixture in winter
- 9 Conclusion
A common building material used in the construction of buildings, structures or garages is concrete. It has many advantages that are valued when installing construction projects. Concrete floors must have strength, reliability, water resistance, fire resistance and longevity. Concrete slabs are used when installing foundations, since this option is suitable for a plot of land with poor soil conditions. Pouring a concrete floor can be done with your own hands, even if you have no experience in this matter.
How is slab pouring done?
It is recommended to carry out monolithic concreting immediately and prepare the concrete solution once - immediately before pouring. Monolithic slabs have high strength and can withstand heavy loads and negative temperatures. The thickness of the slab depends on the type of structure; its dimensions range from 2 cm to 6 cm.
Before you start pouring a concrete slab, you should install the formwork, prepare the reinforcement and select the necessary materials and tools. Next, they begin to prepare a solution of sand, cement, crushed stone and water.
Formwork is a form of certain dimensions into which concrete mixture is poured. The formwork is made from wood or metal panels. For easy dismantling, the formwork is made collapsible. Reinforcement is a structure that can strengthen buildings: house, bathhouse, garage, basement and others. The reinforcement is made of steel rods and has the appearance of a lattice.
The concrete mixture must have the correct proportions and contain quality ingredients. The composition includes: water, cement, sand, gravel, crushed stone. In the process of making the mixture, the ratio of cement to water should be taken into account. A large amount of water reduces the grade of concrete and makes it less durable.
After the preparatory stage, they begin laying the concrete mixture. The slab is poured gradually, filling the free space of the formwork. It is important not to leave empty spaces and to fill the gaps between the reinforcing mesh and the formwork walls. After the solution has been laid, they begin to compact the mixture and remove excess water and air. The compacted solution is left to dry until it reaches maximum strength.
Return to contents
Component calculation
If the volume of poured concrete is more than 4 cubic meters, it is more practical to order ready-made concrete.
When smaller volumes are needed or machine access to concrete is not possible, batches are made independently. To calculate the required amount of cement, sand and crushed stone, I suggest that you familiarize yourself with the table below. Table of proportions of cement, sand and crushed stone for different grades of concrete
| Concrete grade | Mass ratio cement: sand: crushed stone (kg) | Volume of components for 1 m³ of concrete C:P:SH (m³) |
| M100 | 1 : 4,6 : 7,0 | 0.13(≈3.4 bags) : 0.53 : 0.79 |
| M150 | 1 : 3,5 : 5,7 | 0.156(≈4.1 bags) : 0.5 : 0.78 |
| M200 | 1 : 2,8 : 4,8 | 0.185(≈4.8 bags) : 0.46 : 0.78 |
| M250 | 1 : 2,1 : 3,9 | 0.232(≈6.1 bags) : 0.44 : 0.79 |
| M300 | 1 : 1,9 : 3,7 | 0.243(≈6.4 bags) : 0.41 : 0.78 |
| M400 | 1 : 1,2 : 2,7 | 0.322(≈8.5 bags) : 0.35 : 0.77 |
| M450 | 1 : 1,1 : 2,5 | 0.345(≈9 bags) : 0.34 : 0.76 |
*Table is for M400 cement
Many people are accustomed to using the data from the second column, measuring components with buckets during batches. This is a slightly incorrect method: the proportions are given in kilograms, not liters. And the volumetric weight of the ingredients is completely different. In addition, the weight of sand can vary greatly depending on its moisture content. It is much more correct and accurate to use the third column of the table, where the components are given in fractions of a cubic meter; for those who don’t know: there are 1000 liters in one cube.
The third column is initially convenient for calculating the final amount of materials, but the numbers are easily transformed into proportions for the batch: brand M200 - 0.185 cubic meters is 185 liters, reduce by 10 times - 18.5 liters per batch, sand and crushed stone also need to be reduced by 10 times. Need to adjust the proportions for a small concrete mixer? It’s easy - all three numbers of the volume of cement, sand and crushed stone can be divided by any number of times, the main thing is to divide all three volumes by one number.
The numbers in the third column can be used as a coefficient when calculating the final quantity: just multiply the required amount of concrete in m³ by the volume fraction of the required component. For example, consider the most common brand M200: you need to get 3 m³ multiplied by 0.185 (≈4.8 bags) 3 * 0.185 = 0.555 m³ of cement = 555 liters or 3 * 4.8≈14.4 bags of 50 kg. I think anyone can handle such calculations.
Cement is indicated in approximate terms per liter 50 kg = 38 liters. It is problematic to make an exact calculation, because the volumetric weight of cement can vary from 1100 kg/1m³ to 1500 kg/1m³, so the average density is taken as 1300 kg/1m³. It is worth noting that density depends on freshness - older, caked cement weighs more.
Sand and crushed stone are often sold in tons, not cubes, so for correct calculation you need to know the volumetric weight of these rocks. A cubic meter of sand weighs about 1700 kg. I completely forgot to mention: river sand is used for concrete, in fact, as for all construction and finishing work.
The weight of a cubic meter of crushed stone is considered to be 1360 kg. The weight of crushed stone depends on the fraction and humidity, so the figure is very approximate. For concrete, a fraction of 10-20 mm is more suitable. In general, I think it’s useless to accurately calculate crushed stone: when buying several tons, it’s unlikely that kilograms will be counted. Therefore, a reserve of 15% -25% should be added to sand and crushed stone.
Pouring stages
After pouring the next day, be sure to water the new foundation.
When working with a monolithic slab, you should adhere to the technological sequence of laying concrete mortar:
- examine the soil and identify possible differences in height;
- remove the top unnecessary layer of earth of the required thickness;
- level the site for construction;
- prepare the cushion components (sand, crushed stone) and fill the cushion with the required thickness;
- a waterproofing layer is laid on the cushion layer;
- install formwork;
- install a reinforcement structure and fix it with wire;
- fill the slab with concrete mortar and level the surface;
- the filled surface is covered with film and left to harden for a month, while during the first week the filled surface is periodically moistened with water.
Correctly pouring the foundation will ensure high quality and long service life of the structure (garage, bathhouse, basements, multi-story buildings and other buildings where a strong foundation is required).
Return to contents
Formwork
Since our vertical posts are already hammered in and the horizontal concrete level is marked on these bars, installation of the formwork will be very simple. It is better to take boards in the range of 20-50 mm in thickness and any width that is available. Naturally, the board needs to be edged.
The top boards are installed according to the marks on the rack bars. To make it easier to dismantle the formwork, it is better to screw the board from the side of the block - when removing it, the screws can be unscrewed without breaking.
After placing all the upper boards around the perimeter, the lower ones are screwed in if the width of the first ones is not enough. For formwork, it is enough for the board to extend just below the level of the external soil. All gaps between the soil and the formwork are covered with earth from the outside. Since concrete exerts considerable pressure on the boards during pouring, the formwork must be reinforced with oblique struts. Spacers are installed next to the posts, and if the board is thin, then spacers should be installed more often.
The formwork is ready!
Features of the construction of the foundation slab
For a solid foundation, it is necessary to use a strong reinforcing mesh.
To build a high-quality foundation, you should use durable reinforcement mesh and concrete mortar. Slab bases are recommended for structures with low floors to ground level. The concrete coating will be reliable and durable if you follow the proportions for preparing the building mixture and adhere to the rules when pouring the solution. The strength of structures is compromised due to errors made in the technological process of constructing buildings.
Return to contents
What you need to knit a frame
A correctly assembled reinforcement cage is an important part in answering the question of how to pour a slab under the foundation. Of course, it is also necessary to familiarize yourself with the description of the technology for performing this procedure before starting to build the foundation of the house.
How to assemble the frame correctly? In addition to concrete and shock-absorbing materials, to pour a high-quality floating foundation under a house, you also need to choose the right reinforcement. For foundations, reinforcing frames are usually made of ribbed rods. Smooth ones are not very good for this purpose. The reinforcement of a floating foundation, like the concrete layer itself, must be as strong as possible. Therefore, it is recommended to use only fairly thick rods for knitting.
If the foundation is poured for a 1-2 storey building, to strengthen it, it is better to knit the reinforcement from 8-10 mm rods. For a gazebo, 6-8 mm material is also suitable.
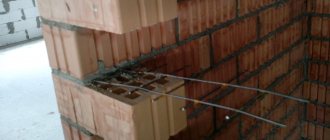
Sometimes the reinforcement cages of floating foundations are assembled into a single structure using welding. However, it is believed that it is better to use 1.2 mm binding wire for this purpose. In places of welding, the reinforcement made for the foundation may subsequently begin to rust in the thickness of the concrete.
How to properly pour a concrete base for structures?
The slab should be poured in one go; you can also lay the concrete solution to half the volume along the full height of the formwork. The solution should be laid immediately after preparation and, during the pouring process, ensure uniform coverage of the working surface. After the mixture is laid, you need to remove excess water and air bubbles from it. Compaction is carried out with a deep vibrator. A well-compacted concrete mixture has high strength characteristics, which improves the quality of the constructed structure.
When pouring a slab foundation, you will need the following tools:
- building level;
- roulette;
- drill;
- pencil;
- screws;
- hacksaw;
- screwdriver;
- concrete mixer;
- shovel;
- pliers.
Return to contents
Preparation for concreting
Next, a monolithic reinforcing belt is provided along the entire perimeter of the floor, in its plane.
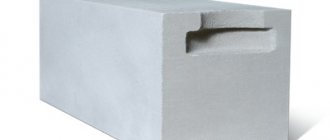
It allows you to reliably connect the floor with the load-bearing walls, as well as impart spatial rigidity to the entire building and prevent the appearance of cracks in it. A frame of four longitudinal rods with a diameter of 8 to 12 mm is attached to the reinforcement outlets at the ends of the beams. The reinforcement is connected to each other with metal wire with a diameter of 6 mm, the distance between the clamps is 200 mm. The reinforcing belt will be concreted simultaneously with the entire ceiling. Then formwork is constructed around the perimeter of the floor. It is made from aerated concrete blocks with a thickness of 100-150 mm. They are fixed to the walls in the same way as wall blocks - using thin-seam glue. On the inside, thermal insulation slabs made of expanded polystyrene - regular or extruded - are glued to the blocks. The standard thickness of the slabs is 50 mm. They serve as a thermal break - they prevent the building from freezing through the ceiling.
Aerated concrete blocks are laid between the beams, tightly joining them to each other. A welded reinforcing mesh with cells 100 x 100 mm is rolled out on top of the blocks and armored belt, its wire diameter is 5 mm. The mesh will be located approximately in the middle of the concrete slab (at a height of 20-25 mm), since it rests on the upper reinforcing belt of the beams, and it rises above the blocks. If necessary, plastic clamps are placed under the mesh, which prevent it from sagging and thereby guarantee a uniform layer of mortar under it during concreting. The mesh can be simply laid, or for greater reliability it can be attached to the reinforcing belt with knitting wire.
How to make a concrete batch correctly?
The concrete mixer makes the solution homogeneous, without lumps.
It is possible to prepare a solution from cement, water and aggregate yourself. This method is more economical and not very labor-intensive, especially if you have a concrete mixer. In a concrete mixer you can immediately produce from forty to two hundred liters of working mixture. In addition to the fact that a concrete mixer will make work easier and reduce the time for preparing the solution, its use will also improve the quality of the finished mixture. Mixing the ingredients in a mixer will eliminate the formation of lumps and combine the ingredients perfectly.
You can prepare the solution yourself, using a shovel and a container in which the mixture components will be mixed. This is a more labor-intensive process that requires a lot of physical effort and time. The inconvenience lies in transferring the finished solution to the site where the base is laid. This method is ideal only for preparing a building mixture in a small volume. When using a special mixer to prepare the concrete mixture, it should be installed near the pouring site, this will reduce physical costs and work time.
Return to contents
Marking
It is more convenient to mark on the ground by pulling a cord, such as a nylon cord. The ends of the cord can be secured with wooden stakes or pieces of reinforcement stuck into the ground. It is more advisable to stick pegs outside the marked area.
If the marked area has a rectangular shape, then right angles are checked by comparing the diagonals - for a square and a rectangle, both diagonals must be equal. For unequal diagonals, one base side is taken, which will remain unchanged, the other three are moved until equal diagonals are obtained.
However, it is not always possible to measure the diagonals; moreover, the geometry of the concrete slab can be complex. A ninety-degree right angle can be set aside in a fairly simple and effective way.
The diagonal of a right triangle with two sides of 100 cm is equal to 141.4 cm. The principle of marking and checking right angles is based on this. The larger the conditional triangle we can put aside, the more accurate the marking will be. The main thing to remember: for every meter of right angle there are 141.4 cm of diagonal. At a right angle, with sides of 5 m, the diagonal will be equal to 141.4 * 5 = 707 cm. This method is applicable in all construction and finishing work, I highly recommend that you learn it well
.
Pouring concrete mixture in winter
The process of laying concrete mortar is not difficult under optimal temperature conditions, so it is recommended to start working with concrete in the warm season. But if there is a need to fill the foundation in winter, then you should take into account the property of concrete, namely its ability to freeze and increase in volume. To prevent this, they resort to the thermos method. It consists in hardening the laid mortar, on top of which there is a material with low thermal conductivity. Slag, sawdust and other materials can act as protective material. The covered solution retains the original heat; added hot water during the preparation of the mixture helps to retain heat. In addition to this method, there are the following methods for heating the solution:
- inductive;
- electronic;
- heating using electric heating devices.
Methods for heating the building mixture when pouring the base in the cold season are not universal and are only suitable for specific concrete structures and arrangement of the construction site.
Return to contents
Soil sampling and backfilling
When excavation to a certain depth is planned, it will be useful to install the formwork posts first. A block of 50mm*50mm or more is used as racks, depending on the height of the pour above the ground level. The block is sharpened with an ax and driven to a depth below the expected level of soil removal. The racks must be installed taking into account the thickness of the formwork boards, with a distance of 1-1.5 m from each other.
When the rack bars are hammered around the perimeter of the future formwork, the marking cords can be removed.
Before sampling the soil, it is very useful to mark the concrete pouring level on the hammered blocks. This will make it easier to control the depth to which the earth is removed.
Sometimes the question arises: why go deep into the ground at all? If this is done by 10-20 centimeters, then in order to prevent washing away by melt and rain water. To prevent movement of the slab during frost heaving of the soil, the concrete must be buried below the freezing depth of the soil.
There is a lot of controversy about backfilling under concrete, and this question can only be answered unequivocally by knowing exactly the properties of a particular soil. In the case of monolith concrete, in general, bedding is not required - the concrete will fill all unevenness and deviations from the level. If sand predominates in the soil, a small layer of gravel will be useful. Gravel will allow you to compact the soil well, partially penetrating into it. Five centimeters of gravel padding will be more than enough. You need to understand that here we are talking about concreting a concrete site, and not about a strip foundation - competent preparation for the foundation should be carried out by a specialist, based on the geology of a particular place.
Regardless of the use or absence of bedding, it is necessary to thoroughly compact the soil. This operation is performed with a vibrating plate or a manual tamper - a piece of heavy timber with handles.
Conclusion
Pouring a concrete slab is not difficult; you can do it yourself. However, in order for the structure to have strength, reliability and a long service life, the rules for preparing the concrete mixture, the laying sequence must be followed, and the conditions for hardening of the solution must be provided. Hardening of the mixture takes a long time and requires additional care. Thus, in hot seasons, poured concrete should be constantly moistened and hidden from direct sunlight, ensuring natural hardening.
As for the time of year with negative temperatures, the concrete solution requires additional heating and laying a layer of material with low heat transfer. If you follow the recommendations, the concrete mixture you make yourself will be of high quality and will last for decades.
general information
The essence of the slab base is a reinforced concrete slab, which is placed on a layer of soil up to 300 mm. Crushed stone or sand is mixed with the soil. The thickness of the monolithic foundation slab itself is 20 - 40 cm.
For the construction, monolithic slabs or prefabricated slabs can be used, which are poured at the construction site. Slab foundations on heaving soils, as well as slab foundations on bulk sandy soils, show themselves to be the most effective compared to other types of construction.
Despite the fact that the monolithic type of slab is considered more reliable, when choosing how to make a slab foundation, it is preferable to pour the slab on site. This is explained by the fact that the process of transporting and laying a monolithic base is quite labor-intensive and expensive, but building a pie slab is very simple.
This type of foundation is suitable not only for the construction of large industrial or residential facilities: it is also suitable for small outbuildings, for example, you can make both a slab foundation for a bathhouse and a monolithic slab foundation for a garage with your own hands.
A separate article on our website discusses all the pros and cons of a slab base. Sometimes, in addition to the slab, combined types are used, for example, a pile-slab foundation or universal ones, for example, from road slabs.
Monolithic floor thickness
In accordance with the calculations performed, we can recommend, for the installation of monolithic floors, in private houses, a floor thickness of 150 mm, for spans up to 4.5 m and 200 mm up to 6 m. It is not advisable to exceed the span of 6m. The diameter of the reinforcement depends not only on the load and span, but also on the thickness of the slab. The often installed fittings with a diameter of 12 mm and a pitch of 200 mm will form a significant reserve. Usually you can get by with 8mm at 150mm pitches or 10mm at 200mm pitches. Even this reinforcement is unlikely to work to the limit. The payload is assumed to be 300 kg/m2 - in a home it can only be formed by a large closet completely filled with books. The actual load in residential buildings is, as a rule, significantly less.
The total required amount of reinforcement can be easily determined based on the average reinforcement weight coefficient of 80 kg/m3. That is, to install a floor with an area of 50 m2 with a thickness of 20 cm (0.2 m), you will need 50 * 0.2 * 80 = 800 kg of reinforcement (approximately).
Advantages
High load-bearing capacity
– the main advantage of this type of design. Thanks to the large support area, the foundation is able to ensure the stability of even a very heavy structure on weak and heaving soils. When the soil vibrates, the monolithic reinforced concrete slab smoothly “drifts” on the sand and gravel cushion, ensuring high reliability and integrity of the structure.
Durability
to severe deformations and deflections.
Variability of house configuration
– such a foundation can be erected for cottages of any geometric shape.
Reinforcing reinforced concrete floors - we reinforce reinforced concrete floors with our own hands
To strengthen the overlap you should prepare:
- linings for reinforcing bars. Clamps are installed to ensure a constant distance between the frame and the concrete surface;
- rods with a cross section of 12-18 mm and annealed wire for tying reinforcement. A crochet hook will speed up the connection of elements.
You will need a device for bending rods, as well as a grinder with a circle for metal.
To ensure that the lower mesh is located at the required distance, special plastic clamps are placed under it
When assembling the reinforcement cage, follow the given sequence of operations:
- Cut the reinforcing bars into pieces of the required sizes.
- Tie the rods with wire, forming a mesh with cells 15x15 or 20x20 cm.
- Place the bottom mesh on the supporting elements.
- Install vertical bars in 1 m increments.
- Assemble the top tier of the frame and attach it to the vertical rods.
When assembling the reinforcement cage, pay attention to the amount of overlap, which is 35-40 times greater than the cross-section of the rods
Types of floors
Horizontal floor slabs are mainly necessary to provide separation between the floors of the structure. In this case, one side of such a platform serves as the floor for one floor, and the other as the ceiling. Floors are classified according to their purpose:
- Basement. Such slabs separate the first floor of the building from the basement.
- Interfloor. These floor platforms divide the floors of the building into different levels.
- Attics. In this case, floor slabs separate the space that is located under the roof of the building and the rest of the residential part of the building.
In addition, floor slabs also differ depending on the manufacturing technology:
- Monolithic. Such platforms are cast directly at their location and installation. Their special feature is reinforcement with steel rods.
- Prefabricated. Such structures are manufactured at the factory and are installed using separate elements.
- Prefabricated monolithic. A special feature of the design is the structure, which consists of blocks that are empty inside and a lightweight version of metal beams.