The floor in the garage is subject to serious stress, so it must be durable, resistant to wear, abrasion, mechanical and chemical stress. A properly made concrete screed can satisfy all these requirements. Concreting in a garage is carried out in strict accordance with technology, otherwise the durability and reliability of the structure will remain in doubt.
General requirements
The master must obtain a high-quality floor that has the following characteristics:
- strength – lack of response to abrasive and impact loads;
- wear resistance - the base surface must withstand pressure and high loads;
- moisture resistance - the surface should not react to moisture. The same applies to the chemical effects of liquids such as gasoline, auto chemicals, and oils.
If the garage is located in a low area, you should not place concrete floors in it. The foundation will be flooded when groundwater rises and will not meet the operating requirements
When carrying out work in a private garage with moderate loads it is recommended to equip one reinforced slab - its strength is sufficient to ensure high-quality operation of the floor, after which the necessary finishing treatment of the coating is carried out.
Below are recommendations that you can follow to make a reliable concrete floor in your garage with your own hands, saving on materials and labor costs.
Implementation methods
As practice shows, only a concrete floor can withstand such loads. It can be created in two ways:
- Lay the reinforced concrete floor slab.
- Pour a thick concrete screed (up to 10 cm) over the ground.
Let's just say that the first option is faster, but more expensive. The floor slab is not cheap; its installation can only be done with the help of a crane, for which you will have to pay for its services. But even a beginner can do concreting on the ground with his own hands. The main thing is to know the technology and nuances of the process.
Zero level mark
We received a shallow pit and marked it with a cord, which will allow us to evenly lay the cushion of sand and crushed stone. Before filling the pillow, you need to set the thickness to which the materials will be poured under the base of the screed. For this purpose, the zero floor level is determined. Often the floor screed is aligned with the gate threshold, this facilitates convenient entry of the car.
It is necessary to determine the thickness of the future concrete base and not occupy it before pouring. If you have chosen a screed with a thickness of 10 cm, then 10 cm is counted down from the gate threshold using a tape measure. After determination, the zero level is marked along the entire perimeter of the walls. To do this, builders use a laser level. It makes it easy and simple to mark the distance, but this process can also be done using a regular building level.
Preparatory stage for installing concrete floors in the garage
Before pouring the floor in the garage with concrete, it is necessary to equip a high-quality foundation, for which a number of preparatory work is carried out.
The master needs to understand that the future floor covering has a multi-layer structure:
- construction sand;
- fine crushed stone;
- waterproofing layer;
- insulation;
- reinforced concrete slab;
- finishing treatment.
Manipulations begin with excavation . The depth of the resulting trench should be 60-90 cm. If this stage of work is neglected, the coating will not be resistant to seasonal temperature changes.
The bottom of the excavation is covered with a layer of crushed stone (50 cm), and the material is compacted. Why is this necessary? Under the monolith, crushed stone increases the load-bearing capacity of the base; the second function is to remove moisture from the concrete pad.
Next, a layer of sand is poured - 10-15 cm. During the work, a certain slope is set for the floor , and the horizontality of the substrate is checked. The sand is watered with water, for which you can use a watering can. This helps compact the material.
Functions of the sand layer:
- uniform load distribution;
- it is easier for the master to display the level;
- when pouring a monolith, the drawdown will be minimal;
- the result is a rigid, durable structure.
If you rely on building codes, when installing a concrete garage floor with your own hands, the deviation along the horizon line can reach up to 20 mm. This should be taken into account at this stage of work.
If there is an inspection hole in the garage, before pouring, its lining is constructed from simple formwork boards
Zero level mark
As a result, you get a pit of some depth. Crushed stone and sand will be poured into it, but in order to understand whether its depth is sufficient or excessive, you need to decide on the “zero” level of the floor. It is convenient if the floor is level with the gate threshold. Often they do it just below the threshold, but then they will have to somehow drain the water, and it will definitely be there, if not in spring-autumn, in winter, from melted snow, for sure.
Mark the zero floor level along the perimeter of the walls. The most convenient way to do this is with the help of a plane builder (electronic level or level). Turn on the device to display the horizontal plane, set it at the desired level and draw along the beam.
It's easier to work with a laser level
If you don't have a laser level, use a water level. It’s not so convenient: you have to move the mark many times across all four walls. These marks are connected by a straight line; instead of a ruler, you can use a bubble level, at the same time you can check whether all the marks have been placed correctly.
The water level will have to transfer marks to all walls
Calculation of the thickness of ASG layers
As a result of this work, we have a foundation pit and a zero floor level. Now you can calculate how thick the layers are needed to reach the desired height. You need to start from the following dimensions:
- the optimal thickness of the concrete floor in the garage (if there is a passenger car or lighter vehicle) is 10 cm;
- the thickness of the crushed stone layer is at least 10 cm;
- sand - at least 5 cm;
In total, it turns out that the pit should be no shallower than 25 cm deep. And this does not take into account the floor covering. If you simply treat the concrete floor with impregnation or paint, then no additional centimeters are required; for any other coating, add the required thickness.
Structure of a concrete floor in a garage
Having received a specific figure, you can plan the amount of sand and crushed stone. If the layers turn out to be very large, you can add soil to the bottom and compact it (but not the fertile layer). If the depth of the pit is not enough, we remove some more rock.
You can put marks on the walls of the garage, which will help you control the thickness of the layers. If the width of the garage is small - 2 meters or so - these marks are enough. If the garage is wider, you need to put a few more stakes in the middle and mark them too. It is clear that all marks must lie in the same plane. This is again convenient to do using a level. Another way is to take a flat plank or board and apply it to the marked marks. Place a level on top of the bar/board. If everything is set correctly, the bubble will be in the middle.
If you are planning to make a hole in the garage, now is the time to dig a pit for it. If the pit has brick walls, you can immediately pour a concrete floor in it. While you are pouring concrete under the garage, it will gain the required strength and you can lay out the walls. They can be driven out after filling the floor with a cushion of crushed stone and sand.
Materials for backfill
For a normal concrete floor in a garage, it is better to use crushed stone rather than gravel. Gravel, with its rounded edges, you will never compact to the required degree. And if the foundation under the concrete is unstable, even a thick reinforced slab will burst. That’s why we import crushed stone, medium and fine fraction. Average 60-70%, the rest - small.
The cushion consists of compacted crushed stone and sand
There are no special requirements for the quality of sand for pillows. It is important that it is free of clay inclusions, but it can (and should) be sifted before laying.
Making a pillow for a concrete floor
The first step is to level the bottom of the pit. We remove uneven surfaces, fill in depressions, and raise the level to the horizon. Do not think that the concrete floor in the garage can be damaged. It can be done, but then the slab will crack and you will have to redo it.
Now we take a vibrating platform (you can rent it) or a manual tamper and compact the soil. Along the way, once again leveling the plane. When the soil is compacted, crushed stone can be poured. They don’t fill the entire volume at once - it’s normal not to compact 10 cm. The maximum layer is 5 cm, but 3-4 is better. We fill in the required part, distribute it, level it (with a rake) until it reaches approximately the same thickness. We take a tamper or vibrating plate and tamp it.
It is better to compact with a vibrating plate
This compaction of crushed stone when installing a concrete floor in a garage is very important - a certain amount of crushed stone is driven into the ground. As a result, it becomes even more dense, the load-bearing capacity increases, and the possibility of subsidence is eliminated. Tamping is considered sufficient if you step on the surface and leave no traces. In the same way, all portions of crushed stone are compacted, bringing them to the required thickness.
Sand is poured onto the compacted crushed stone. It is also divided into parts of 2-3 cm. The peculiarity of compacting sand: it must be moistened, they also say - spilled. The wet sand is compacted, again focusing on the layers.
Now you can start forcing out the walls of the pit, if there is one. They are brought to the level with the finished floor or even slightly higher - so that you can wash the car right in the garage without fear of water getting into it.
Preparing for the screed device
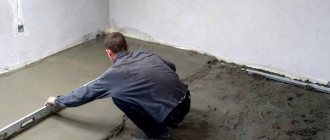
After completing the construction of the inspection pit, construction of the floor structure begins. At the first stage, the earthen base is brought to one level . To do this, the soil is loosened and evenly distributed over the surface. If necessary, excess soil is removed.
If you do not approach this issue particularly carefully, a large number of differences will form on the surface and leveling with a screed will be more problematic. During leveling and compaction, it is necessary to ensure that after completion of the work the structure should be flush with the edges of the inspection pit.
After the soil is leveled and compacted, do the following:
- The base is backfilled with sand . Layer thickness - 5-8 cm. The sand is moistened and compacted;
- a layer of crushed stone is poured . Thickness – 7-8 cm. The material should be leveled, rolled, compacted. At this stage, mechanical tampers or special rollers are used;
- A polyethylene film is laid on the crushed stone , which acts as a waterproofing layer. It is permissible to use roofing felt instead of film. The material should extend 20-25 cm onto the walls of the room. After pouring, the excess is cut off with a carpenter’s knife. The insulation should be secured with masking tape at the joints (where an overlap of 10-15 cm is maintained). This will create a sealed system and moisture will not escape into the crushed stone;
- A damper tape is placed around the perimeter . The material should rise above the finished structure by 15-20 mm, subsequently it is covered with a plinth or cut off with a carpenter's knife. The damper will protect the screed from cracks that arise from deformation due to temperature changes.
Damper gap
A concrete floor on the ground is often called “floating”. This is because it is made incoherent with the walls of the building. In this case, the walls and floor can sink or rise independently of each other, maintaining integrity.
To prevent the floor in a concrete garage from being connected to the walls, a damper tape (sold in hardware stores) is laid around the perimeter or thin sheets of foam plastic (10 mm thick) are cut into strips. The width of the strips is 12-15 cm - they should protrude slightly above the finish of the floor. The excess height of the damper is then cut off flush with the floor.
Damper tape
Which brand of concrete is better to choose?
Before choosing concrete, read the SNiP requirements
To install the floor in the garage, you can order factory-made concrete or prepare it yourself using a concrete mixer. When choosing a concrete grade, they are guided by the requirements of SNiP:
| Coverage type | Minimum thickness (mm) | Concrete grade | Hardening time (grade strength gain, days) |
| Screed with reinforcement | 50-70 | M200-M350 | 28 |
| With voluminous topping | Not less than 40 mm | M600-M700 | 7-8 |
| Reinforced concrete floors | Not less than 40 mm | M500-M550 | 7-8 |
| Reinforced sand concrete floors | Not less than 40 mm | M400-M500 | 7-8 |
| Fiber concrete | Not less than 40 mm | M200-M350 | 28 |
According to reviews from garage owners, for passenger cars it is enough to pour a reinforced concrete floor 70 mm thick (excluding the shock-absorbing “cushion”) . Then apply 2 layers of primer and renew the coating every six months. The optimal grade of concrete is M300.
Waterproofing a concrete floor in a garage
Concrete itself is not afraid of moisture; high humidity is harmful to the car body, as well as to things and equipment, of which there is a lot of accumulation in the garage. The choice of materials for waterproofing depends on how close the groundwater is and how high it can rise during the season.
If the groundwater is high, no special measures for waterproofing can be taken, but a dense polyethylene film (with a density of 250 microns, maybe reinforced, maybe not) is laid on the sand. in this case, the film is more needed to prevent moisture from the concrete from escaping into the sand, which cannot be allowed. If there is a lack of moisture, concrete will not gain the required strength and will crumble.
The waterproofing film is spread
If the groundwater level is high, it is better to take a denser and more reliable waterproofing - hydroisol or its analogues. In any case, the film panels are spread overlapping - they overlap each other by 10-15 cm. To minimize the possibility of water penetration, the joints are taped with double-sided tape, maybe twice (at the beginning of the joint and at the end).
Waterproofing is applied to the walls, above the damper tape. She is temporarily detained there. Once the concrete has been poured and it has set, it can be trimmed.
Installation of beacons
Control beacons under the floor screed allow the floor to be poured as evenly as possible. Ordinary wooden blocks can become beacons. After installing the reinforcing mesh, we take the bars and align them parallel to the walls. Beacons are set to zero level. The distance between the beams should be convenient for leveling the concrete mixture as a rule.
After installation, the two parallel beacons are leveled with a water level and the beams are leveled as much as possible. Some builders use a thread during the pouring process, which will control the evenness of pouring concrete. Beacons are installed in stages during the pouring process.
Any flat and long objects can be used as beacons
Reinforcement
Since the loads are expected to be serious, the concrete floor in the garage is reinforced. For passenger cars, you can use a ready-made mesh made of wire 7-8 mm in diameter, the cage size is 15 cm. To obtain a single reinforcing system, pieces of the mesh are laid overlapping each other by one cage. The two meshes are connected to each other with plastic clamps or special knitting wire.
The garage floor is waterproofed with waterproofing and the reinforcing mesh is installed on the bricks.
One more point - the mesh should be located in the thickness of the concrete, approximately in the middle. Simply laying it on a film would be wrong - the metal does not corrode inside the concrete only if it is located at a depth of at least 3 cm. To ensure that the concrete floor in the garage lasts a long time and does not crack, the mesh is raised above the waterproofing by 3-6 cm. There are special stands for this, but more often half bricks are used. They are just 6 cm thick. Place them under the reinforcing mesh so that it does not sag too much.
How to measure thickness?
Many private developers who ordered the construction of the structures discussed in this article to companies or individuals, and who do not have the opportunity to observe the work personally, are interested in the issue of quality control of work in terms of contractors’ compliance with the designed concrete thickness.
In this case, you will need a device to measure the thickness of concrete. Considering the high cost of such equipment (250-260 thousand rubles), it makes sense to rent it during acceptance tests.
Concrete thickness gauge TC300
One of the optimal equipment options for monitoring the thickness of concrete structures is the TC300 Concrete Thickness Gauge device. The cost of renting such devices is affordable and ranges from 300-500 rubles per day with an appropriate refundable deposit.
Pouring concrete
The components have been purchased and everything is ready for concreting and flooring. It remains to decide on the implementation methods: mix the solution manually or using a concrete mixer. The latter option will improve the quality of concrete and increase labor productivity. It is not at all necessary to buy a new unit for this; you can rent it.
Do not forget about the ratio of concrete components - crushed stone, sand and cement, as well as the amount of water added.
The liquid mixture fits better, but its grade will be lower, the hard mixture is more difficult to work with, but the slab will be strong and reliable. As a compromise, it is possible to purchase a ready-made mixture at a concrete mixing plant - it will be produced and delivered directly to the site, in the required quantity and with the required quality. It is highly advisable to use a vibrator or vibrating screed to fill voids well.
Strengthening the concrete floor in the garage
Since the garage floor is subject to serious loads, hardening it should not be avoided. The main task of this process is to bind the concrete particles together so that it does not crumble or gather dust. Let's look at several technologies.
Chemical
For this purpose, special chemical compounds called sealers are used. When they are applied to a concrete floor, a chemical reaction occurs between the components of the sealer and the components of concrete (carbonate and lime). A gel-like substance is formed on the floor, which penetrates deeply (up to 10 mm) into the concrete body. Here it hardens, binding the particles of the mixture together.
Applying chemicals to the floor to harden it
- Sealers are simple poured out
onto the floor and spread evenly with a squeegee or roller.
- Add
some water.
- It starts in half an hour gel formation
.
- After a couple of hours, the remaining composition remove with water
using a squeegee.
Using toppings
Topping is a powder based on cement, chemical additives and fine-grained filler (quartz sand, corundum, metal dust). This technology is quite complex. This requires the presence of a trowel, as well as knowledge of some of the nuances of filling the floor. For example, plasticizers should not be added to concrete mortar for a garage floor. The hardening process itself is carried out 3-6 hours after pouring the screed.
Grout topping
It is at this time that the first filling of the powder is carried out, which begins to absorb moisture from the floor. They immediately go through it with a trowel. Then add another layer of powder and grout. If necessary, the process is carried out a third time.
5-8 kg of powder is needed per 1 m². A floor reinforced with topping must be covered with a protective compound: varnish, paint, etc.
Coloring
Today, manufacturers of paint and varnish products offer a huge range of paints for concrete. For a garage, it is better to choose polyurethane compounds or those based on epoxy resins. They can withstand significant loads.
The method of applying paints is simple. They are applied only to the concrete floor surface, which is treated twice with a deep penetration waterproofing compound. Apply paint with a roller.
Staining a concrete floor in a garage
This might be interesting!
In the article at the following link, read about options for arranging lighting in the garage.
Pit in the garage
If you are planning to make a hole, then first of all dig a foundation pit of the required depth and width under it. Concrete the floor of the pit, and then work on a sand and gravel bed throughout the entire garage. When the floor has gained sufficient strength and the backfill is ready, you can remove the brick walls of the pit.
- Level the bottom of the pit. Compact it using a hand tamper or vibrating platform.
- Fill and compact crushed stone. This must be done in 2–3 steps in layers of 3–5 cm, since it is impossible to compact the entire volume of crushed stone efficiently. Crushed stone of medium fraction is poured underneath, and fine crushed stone is poured on top. Before compacting, each layer is leveled with a rake, and the level is checked by markings on the walls. Tamping should be carried out until no trace remains of the person’s weight on the surface.
- Fill and compact sand. It is also poured in several steps, 2-3 cm each. The poured sand is leveled and moistened (shed), and then compacted.
- If there is a hole, then it’s time to line its walls. They should be slightly higher than the floor level so that water does not collect in the hole.
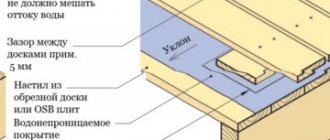
Insulated concrete floor in garage
There are two options - insulate an already poured slab by pouring a screed on top (the structure in the figure below) or do the insulation immediately by laying it under the main slab.
Insulated garage floor
When choosing the second option, the insulation is laid on top of the waterproofing layer, and a reinforcing mesh is placed on it. The rest of the process of pouring a concrete floor in a garage is similar, only it is necessary to take into account the thickness of the insulation when calculating the depth of the pit.
For this case, it is recommended to use extruded polystyrene foam (EPS) with a density of at least 35 kg/m3 as insulation. It has very good characteristics, can withstand heavy loads, does not absorb or allow water or steam to pass through. So this is also an additional vapor and waterproofing.
To be sure that the insulation will not be pressed under the wheels, it makes sense to lay a layer of geotextile on top of it. This is a non-woven membrane that is used in the construction of roads. Its function is load distribution, which is exactly what we need.
The minimum thickness of EPS is at least 5 cm, preferably 8 cm. It is better to lay in two layers, shifting the seams when laying - in order to isolate the floor from the ground as best as possible.
The final stage of concreting the floor
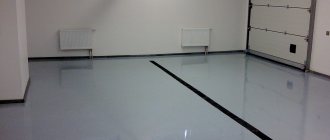
After the screed has completely cured, an additional coating can be applied to the concrete floor in the garage. To do this, the surface is coated with polyurethane or epoxy compounds, as well as special paint for concrete coatings. Some motorists lay tiles on concrete. In this case, there is no need to talk about any restrictions - it all depends on the preferences of the garage owner and his financial capabilities.
Finished concrete floor in garage
It is important that the surface of the floor in the garage should be rough
to ensure good traction with car wheels.
Thus, a concrete garage floor is an option that can last quite a long time. Excellent performance characteristics and low cost are the main criteria for choosing this mixture.
Categories Garage Post navigation Is it possible to pour a strip foundation in winter? How to fix a dowel in a hollow brick? Search:
Curing
After pouring the concrete, if it is not very hot outside, you can simply close the garage doors. If there is a window, it must be covered so that the sun's rays do not fall on the concrete. If it is too dry and hot outside, the concrete is covered with plastic film or damp burlap.
During the week, the stove must be watered daily. It’s more convenient to do this over burlap - without much pain, you can water the burlap in relatively small streams, and it will transfer moisture to the concrete. If the concrete floor in the garage is covered with film, it is removed before watering and then stretched again. When watering in this case, you need to make sure that the drops are small - you need a nozzle with a large number of holes. In any case, the degree of watering is to a uniformly moist state (determined by the dark gray color of the surface), but without large puddles.
How to make a self-leveling floor
This wear-resistant coating consists of two layers: a thin cement-based self-leveling screed (for example, Cerezit CN-76) and a two-component epoxy-based paint. Preparing concrete for application is carried out in the same way - removing dust and thoroughly priming. Then follow this algorithm:
- Prepare the construction self-leveling mixture, following the instructions on the package, mix it with a drill and a mixer attachment.
- Pour the resulting mixture onto the floor and level it with a wide spatula. Using a needle roller, lightly compact the screed. Pour the next portion with an influx of 30-40 mm onto the laid layer.
- After 1-2 weeks (exactly indicated on the package), work on the protrusions and other defects using an emery cloth and remove the dust again.
- Mix the coloring composition with the hardener and wait the prescribed time (from 0.5 to 1 hour).
- Apply paint with a brush or roller at a time, starting from the corners.
Note. The surface can be made rough by sprinkling so-called decorative chips in the form of multi-colored crumbs onto fresh paint.
Complete hardening, or more precisely, polymerization of the epoxy coating occurs within 7 days. After this, the floors are allowed for use.
Possible problems
After some time of operation, cracks may appear in the concrete floor.
During the period of operation of the concrete floor, surface defects such as cracks and cavities may form. They are eliminated by filling with cement-sand mortar. Pre-embroider, removing all loose particles, remove dust and apply 1-2 layers of primer.
One of the troubles when using concrete surfaces is the formation of specific fine dust. It can be removed by priming, ironing or finishing with facing materials.
The hygroscopicity of concrete is reduced using special means - water repellents. One of them is Penetron. The solution is prepared in accordance with the manufacturer's instructions and applied to the floor surface with a paint brush or roller. For these purposes, you can use other compositions:
- "AQUATRON";
- "HYDROHIT";
- "KALMATRON";
- "HYDROTEX";
- "WASCON"
They all work on the same principle: they fill the smallest pores of concrete, crystallize and form a moisture-proof layer.
Concreting
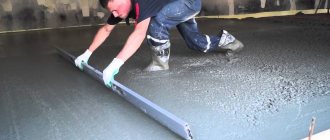
The principle of leveling the concrete mixture
Concreting work is carried out accurately and at a fast pace, since the solution hardens within two hours. During the concreting process, the prepared solution is carefully poured onto the prepared base. To remove unnecessary air from concrete, a deep vibrator is used, lowering it in different places, according to the checkerboard principle, until “cement milk” appears on the surface of the solution. If there is no deep vibrator, the cement mortar is evenly leveled with a shovel; bayonet movements will help the air to quickly reach the surface. Depending on the weight and nature of the items that will be in the garage, the concrete coating layer can be from 40 to 80 mm.
The concrete must be leveled along the top edges of the installed guides.
The alignment tool can be a long, even wooden strip so that it rests confidently on both guides. By making progressive movements towards the slope you need to create a perfectly even surface. During the leveling process, you will have to constantly monitor the appearance of holes or imperfections in the solution; if they occur, you should add the solution and level the surface again. To avoid sagging, it is better to complete all the work in one approach; in addition, a monolithic base will give additional rigidity to the coating. The solution will harden in 5 hours.
A frame made of reinforcement will help avoid cracking
The curing coating must be moistened every 10 hours.
This must be done because when concrete hardens, water quickly evaporates from its surface. Too intense evaporation during concrete shrinkage leads to the formation of cracks. Bright sun and drafts will increase the rate of moisture evaporation. To slow down this process and saturate it with moisture, the coating needs to be watered every 10 hours. You can use a small watering can for this.
If it is not possible to constantly maintain concrete moisture, you can use a special water-retaining material. The composition forms a membrane on the surface of the concrete, which seals the pores and prevents water from evaporating quickly. The optimal time for applying the material is from 2 to 5 hours after pouring; it is at this time that the maximum outflow of water occurs. The material is applied in a thin, even layer using a roller or spray, in strict accordance with the consumption recommendations.
When drying the concrete floor, it is necessary to exclude exposure to sunlight and drafts.
When the protective layer has dried, the entire surface must be covered with plastic film. The film will protect against dust, prevent accidental staining and damage to the surface. You need to protect the concrete surface for 7 days. The total curing time can vary from 6–7 to 30 days.
Concrete floor
Crushed stone floor in the garage: thickness of layers
The ideal base for the floor is a reinforced concrete slab, which rests on the base of the building. Most often, concreting the surface occurs directly on the ground. Its base must be equipped with a protective “cushion”.
The “cushion” layer saves the concrete floor from deformation if the soil underneath is characterized by high humidity.
Before pouring, the surface must be deepened and compacted. The first layer of the “cushion” is made of crushed stone. The material must be small. Seeding cannot be used. If the garage is not used often, the floor can simply be covered with crushed stone. But it is worth remembering that this material is quite expensive.
Layer thickness:
- Concrete – 10 cm;
- The thickness of the crushed stone layer is 10-15 cm;
- Sand layer – 5 cm.
It is better to compact the floor with crushed stone, not gravel, which has rounded edges. The crushed stone compacts well, making the base stable. To fill the surface, it is better to choose crushed stone that has a medium and fine fraction.
The floor in the garage is exposed to daily stress, so the first requirement for a floor screed is strength and reliability. You can fill it with concrete - this is one of the most common options for arranging a garage. The filling must be done according to all the rules, otherwise the surface may become deformed after a while. Pouring the surface includes not only the production of a concrete mixture, but also waterproofing and insulation.
Preparatory work
If you cheat at the preparatory stage, further work may go down the drain
Every step of installing a concrete garage floor is important. There are no trifles in this matter. The quality of further work largely depends on how correctly the preparatory work is completed.
Step 1. Calculation of the pit depth. On average, to fill a floor with a thickness of 10 mm, you will need to go 20-30 cm deep into the ground.
Step 2. Marking the floor level. Using a level, find a point 10 cm above the level of the existing floor in the garage. Focusing on it, horizontal lines are drawn along the walls (or marks are made) with chalk or a marker.
Step 3. Preparing the pit. Includes a set of works for excavating soil to the calculated depth.
Step 4. Level the bottom using shovels.
Step 5. Compact the soil using a vibrating plate or heavy objects. If necessary, dig a pit for an inspection hole. Its parameters:
- width 75-80 cm + thickness of waterproofing layer 30 cm;
- depth - they are guided by the height of the person who will be repairing the car + 30-40 cm;
- length is equal to the length of the car + 120-150 cm.
Types of waterproofing materials for garage floors
There are restrictions on materials used for waterproofing: you should not use membrane or film products, since they do not have the required elasticity and are not able to cope with the amount of groundwater in spring and autumn.
Experts consider inexpensive roll coatings with good consumer characteristics to be the best choice of materials for the waterproofing layer in the above-described pie. Professionally performed waterproofing work in a room will protect it from dampness, prevent the appearance of mold and the spread of fungus, and thereby prevent the building from collapsing, and the property located in the garage will not deteriorate.
There are several types of waterproofing floors in a garage building:
- anti-pressure, which protects against the ingress of groundwater;
- non-pressure - prevents the harmful effects of flood runoff and rain;
- anti-capillary – protecting the structure from the negative effects of capillary moisture.
In addition to creating waterproofing in the garage, it is necessary to install an effective ventilation system.