Making arbolite blocks does not require particularly great skill or overly complex tools. As with conventional concrete, the main thing here is the correct choice of composition and mixing stage. But it is precisely when producing wood concrete that it is important to obtain the necessary raw materials.
Equipment for making wood concrete with your own hands
The technological line for the production of wood concrete consists of several units: obtaining chips of the required size, mixing them with other ingredients, feeding them into molds and curing them in the molds. Such a line can also be implemented in private construction.
And first we will look at a mini-machine for grinding wood chips in the production of wood concrete with our own hands, and present drawings of such a device.
Wood chipper
So, how to make a wood concrete chipper with your own hands? When making wood concrete, this stage is the most difficult. The fact is that wood concrete requires chips of a certain size - no more than 40–45 mm in length, or better yet even less, no more than 25 mm. A conventional wood chipper produces chips that are much longer and wider.
Any type of crusher can be purchased. However, its cost is quite high, and to build one house, even with extensions, such high productivity as a factory installation offers - a shredder, for example, is not needed. It is quite possible to make a wood chip cutter with your own hands if you have the skills to work with metal and a welding machine.
This video talks about how to make a machine for producing wood concrete with your own hands at home:
Basic structure of the device
The basic structure of the device is as follows:
- a frame is made with an electric motor attached to it. The power of the latter depends on the volume of work;
- a rotor made of flanges, blades and hammers is installed on the engine shaft;
- a sieve is placed around the rotor, the entire device is located inside the cochlea;
- When the rotor rotates, a vacuum is formed at the central entrance to the cochlea, due to which wood fragments are sucked in. Hammers break up the wood chips and force them through a sieve. From the space between the sieve and the walls of the cochlea, the chips are carried by an air flow to the exit.
Assembly
Parts for such a machine are usually found at scrap metal collection points.
- First of all, a massive disk is made, 16–20 mm thick and about 30 cm in diameter. It can be cut from sheet iron or made from a machine flywheel.
- 4 areas are cut on the disk where the knives are secured. Holes for fastening are drilled near the platforms. It is almost impossible to install hammers at home.
- Knives are secured to the platforms. They are machined from steel of the appropriate grade - 50 HGA, for example. Fastening with countersunk bolts: this way you can avoid “licking” the grooves.
- On the opposite side, 4 strips are welded - perpendicular to the plane of the disk: they will push the chips through the sieve.
- Parts for the snail are cut out of sheets of iron 5 mm thick. The diameter of the circle, excluding the outlet pipe, should be 3–5 cm larger than the diameter of the flywheel.
- The body is assembled: first, a curved strip is welded to the side plate, the flywheel is “tried on” and, if it rotates freely in the body, the curved wall is reinforced with rods made of a metal rod. Holes for bolts are first made in the rods, since the second side panel will be bolted and not welded. Accordingly, holes are also made in the plate.
- Both plates have holes for the electric motor shaft and for mounting bearings.
- Weld the inlet parts at an angle.
- The apparatus is assembled - the first part of the housing is placed on the shaft, then the flywheel with knives, then the second part is bolted. Bearings under the flywheel hold it in the correct position, so that the bars do not touch the walls of the housing when rotating.
- Welds a frame from a corner and a channel; you can use a ready-made one from a walk-behind tractor, for example. A chip cutter and an engine are installed on the frame, and belt feed pulleys are put on the rotor.
A device of this kind may not include a sieve. But if the dimensions of the chips need to be made absolutely accurate, then the diameter of the plates is increased by another 3–5 cm, and a perforated curved tape is welded inside the snail
.
Drawings of a wood chip cutting machine for making wood concrete with your own hands
Wood chipper 1
Wood chipper 2
Wood chipper 3
Wood chipper 4
Concrete mixer
In principle, concrete and even wood concrete can be mixed in a regular trough. However, the productivity of such labor is very low and for the construction of even one extension is no longer sufficient. Moreover, for wood concrete, mixing is a very important stage. Cement and shavings are materials that do not combine well with each other, and therefore, even in industrial conditions, mixing takes at least 10 minutes.
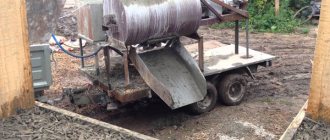
You can make it yourself either mechanically or with an electric motor. The latter, of course, is much more convenient. Its design is as follows: a mixing container, a gearbox, an electric motor and a turning mechanism.
- A metal barrel with a volume of 200 liters is used as a container. For private construction, this is usually sufficient. You can weld a tub from sheet iron 1.5 mm thick.
- Three blades are welded inside. To do this, use metal corners curved in the shape of a barrel.
- A ring gear is welded to the bottom of the barrel from the outside - this is part of the future gearbox. The number of teeth depends on the engine power. So, with a power of 220 W, the gear ratio is 48.
- The frame is welded from channels, angles and pipes. It can be made mobile - then an axle for the wheels is also attached to the bottom, or stationary.
- A bearing is machined from a pipe of suitable diameter into which ball bearings with spring rings are mounted. The shaft is inserted here. A hole is drilled in the bottom of the barrel for it and the entire device is secured with a nut and two washers.
- The simplest version of a rotary handle is to tip the entire barrel over a form or concrete trough, like a wheelbarrow. A platform is provided for the gearbox.
- The motor is attached with strips of steel to the rotating device. On the other side there is an intermediate roller, which rotates on two bearings. A starter gear is installed at its second end - from a GAZ 51, for example. Clinging to the teeth on the crown, it causes the barrel to rotate.
On average, it is believed that 30–50 revolutions are required for optimal mixing. And to obtain 1 liter of concrete - with an inclined placement of the barrel, 20 W are required, with a horizontal placement - 15 W.
As a rule, the difficulty is to find a gearbox that provides the required gear ratio and is suitable in size.
This video will tell you how to make a mixer for making wood concrete (concrete mixer) with your own hands:
Forms
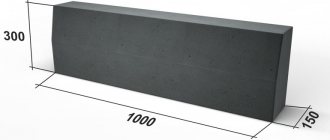
Forms for wood concrete are made from ordinary boards. To prevent the wood from sticking to the mixture, the inside of the box is lined with linoleum. You can use plywood for the mold: its surface is smooth and its water resistance is much higher. The dimensions can be any, but optimal for laying walls, for example, blocks of 30*20*50 cm are considered.
When making wood concrete with your own hands, the process of laying it into molds is eliminated. This operation is performed manually using ordinary shovels. The mixture must be compacted. To do this, you will need a pitchfork to settle the solution, and a wooden rammer covered with iron.
How does it work
A homemade concrete mixer will be created correctly if a person understands the principle of operation of the mechanism. For proper functioning, the drum will need to be placed on ball-bearing crossheads. For operation, a special plate is additionally installed under the engine. The shaft is driven by bearings. Additionally, the device includes a structure with teeth and a V-belt. During the period of interaction they will set the systems in motion. This stage involves checking the functioning and safety of the device.
A drum mechanism is used as a mixer. To hold it, a small radius rim is used. A certain number of cloves are also additionally applied to it. Manufacturers provide for the need for transportation, so the tubular part can be removed.
For better fixation of the device, supports are installed. The rotating element will be constantly in motion, so it is given a free position. Using the flywheel, you can quickly select the required position.
Technology
The scheme for producing wood concrete at home is no different from the industrial one except equipment and productivity.
- Wood chips are made. Croakers, board fragments, even bark and pine needles are suitable for this, but only in small quantities - up to 5%. Not all wood is used: poplar, birch, pine, spruce, beech.
- Wood contains sugary compounds that destroy cement. Therefore, before use, wood chips are kept in the air under a canopy for 3–4 months. It needs to be turned over periodically.
You can speed up the process by soaking the wood chips in lime milk for 3-4 days. Milk is prepared at the rate of 50 kg of lime per 200 kg of wood chips. After treatment, the material is kept in air for another 3 days.
- Cement of at least M400 is used as a binder - it is this that provides strength. The proportions are chosen as recommended by GOST. On average, for the production of 1 cubic. m of wood concrete you need 250-300 kg of wood chips, 300-350 kg of Portland cement and 400 liters of water. Water is supplied with dissolved additives: calcium chloride, aluminum chloride, aluminum sulfate - 2–4% by weight.
- First, wood chips are placed in a concrete mixer, poured with the solution and mixed manually: it is necessary that the solution is distributed evenly. Then add Portland cement and the remaining water and mix.
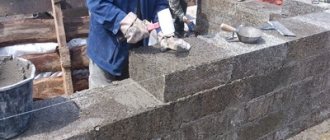
- The finished wood concrete is placed in molds, upset with a pitchfork and compacted with a manual tamper. Compaction on average reaches 20%. Lay in 2-3 layers to achieve uniform compaction.
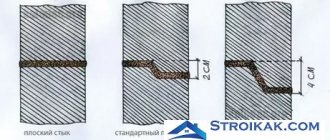
- If the blocks are intended for external walls, then the form is not filled entirely, calculating so that the compacted mixture does not reach the edge of the sides by 2 cm. This gap is filled with plaster mortar or decorative concrete.
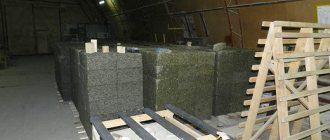
- The block remains in shape for 24 hours. It is then removed and left under cover for 2–3 weeks, depending on weather conditions.
We will talk further about what mistakes are encountered when making wood concrete blocks with your own hands.
The technology for making wood concrete with your own hands is presented in this video:
Flaws
Each type of concrete mixer for wood concrete has advantages and disadvantages. Before construction, the needs and further scope of use are analyzed. Remember that the result is a homogeneous solution. In this case, it can be used. Disadvantages of models:
- Impossibility of repairing the rotating part.
- The cylinder's mass is not fully utilized.
- Incorrect choice of aggregate.
- Inconvenience or time-consuming unloading of finished material.
A concrete mixer for wood concrete is a convenient device. With its help, it is possible to obtain the required amount of solution in a short time. The device is simple, so you can do it yourself. You will need to use a welding machine. The person must have relevant experience and skills in this field.
Errors when making blocks
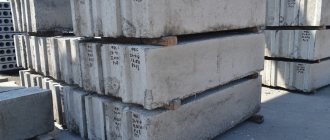
Making the blocks themselves is quite simple. The blocks do not require particularly careful adherence to geometry. Even industrial wood concrete “bricks” vary noticeably in thickness and length. The main mistakes here are related to the compaction and curing process.
- If a wooden mold without upholstery is used, it must be lubricated with cement, otherwise it will be difficult to remove the block.
- When tamping, be sure to pierce the composition with a fork, like a pie: the wood chips “grab” a lot of air, and some of it should be removed.
- When tamping, you should not be zealous: 20% is the maximum by which the mixture should be reduced.
- The use of vibration installations is not always useful. When vibrating, the cement begins to slide off the chips and the material delaminates. For example, a mold with wood concrete is placed on a vibrating table for 10–20 seconds and no more.
- The less dense the material is made - for thermal insulation, for example, the longer the block must remain in the mold.
- At a temperature of +25 and dry weather, the block gains strength in at least 10 days. At lower temperatures, and even more so with rain, the period increases to 3 weeks. If this requirement is not met, there can be no talk of any strength.
Making wood concrete with your own hands is more than a feasible task. The rather labor-intensive and lengthy process of obtaining finished blocks is compensated by the speed of construction of buildings from it.
Features and technical characteristics of concrete mixers for wood concrete
The construction of houses within the city and beyond is becoming more active every year. Wood concrete is used as part of load-bearing and thermal insulation structures. To obtain the necessary mixture, you should stock up on materials and devices. A concrete mixer for wood concrete significantly speeds up the process of applying the mixture and makes it homogeneous. She will become a reliable assistant. You can always rent it out and get additional money for it. Selfless owners will be able to help their family and friends carry out the work.
Required tools and materials
There are two types of mixers for concrete materials: electrical and mechanical. The latter type requires the use of great effort. To successfully work with a mechanical stirrer, the efforts of one person will not be enough; this will delay the construction process.
Let's look at how to make an electric concrete mixer for the production of wood concrete with your own hands. To make it you will need the following materials:
- Barrel 200 l. The choice of its volume is not accidental; these are common containers that are used for transporting fuel oil, paint and other building materials. In private homes, it is often used as a reservoir for collecting rainwater.
- Wheels. They are necessary for transporting the device; parts from old children's bicycles, strollers and other similar vehicles can be useful. For a stationary structure they are not required.
- Angles, channels and pipes. All metal parts that may be useful for making the frame.
- Fittings.
- Old style washing machine. You can use its electric motor, V-belt, or pulley.
- Gearbox. It is necessary so that the device can rotate at the optimal number of revolutions.
- Electrical wire.
- Small fasteners: nuts, bolts, washers, wire.
- Bearings.
The mixer cannot be assembled without suitable tools, these include:
- hacksaw;
- welding machine;
- Bulgarian;
- drill;
- pliers;
- a set of keys.
The given materials can be replaced with suitable analogues. You can ask your friends for the tool. Armed with everything you need, you can proceed directly to assembly.