When planning the installation of a fence, the question always arises about how to fix the supports. But for each site, the solution is selected individually, since it is necessary to take into account the type of soil, the depth of groundwater, the type of fence structure, and more.
For massive fences on stable soils, it is recommended to choose concreting of pillars - this guarantees that the fence will last a long time. Concreting is done using several methods. By following the recommendations, you can do this yourself.
We recommend that you read:
- At what distance can you build a fence from your neighbor's house?
- Standards for planting trees in relation to the fence of a neighboring plot
Why is concreting necessary?
The main goal of this fastening method is to extend the service life and increase the stability of the structure.
Installation of supports with concrete mortar:
- Prevents the structure from loosening and makes the fence more resistant to wind loads.
- Increases the load-bearing capacity of the structure.
- Protects metal poles from corrosion.
But it is important to understand that supports can only be concreted on stable soils.
If you do this on heaving soil, then when it gets cold, they will simply start to be pushed out and the surface will become cracked.
You should not use the solution even if the groundwater level is high; in swampy areas it is better to choose other options.
It is important to maintain the proportions of the ingredients when mixing the solution so that it does not turn out too liquid or thick.
Factors affecting the installation depth of racks
Correctly determining the depth of the fence support posts means maintaining its integrity under unfavorable operating conditions. When performing calculations, the following factors should be taken into account:
- design features of the structure and its functional tasks;
- the magnitude of the maximum load taking into account external influences;
- characteristics and topography of the soil in a given area;
- level of occurrence and possible rise of groundwater;
- the degree of greatest soil freezing in a particular area.
To ensure better operating conditions and structural strength, fence posts must be buried below the freezing point of the soil.
Important! Correct calculation of the installation depth of fence posts is the main indicator of the stability of a structure. Since negative environmental influences and increased loads can cause partial or complete destruction of the entire structure.
In addition to determining the depth of the racks, it is equally important to secure them correctly. Depending on the operating conditions, there are several methods. Today we will talk about how to properly concrete pillars.
But this option is not always justified. If the site for the construction of a fence is located on soils with a high level of soil moisture, then when freezing, the water expands and can literally squeeze the concrete post upward. Thereby compromising the integrity of the overall structure. In this case, it is better to use the method of driving pillars, following the example of working with piles.
Types of fence posts
They are selected based on whether the fence will be temporary or permanent and what kind of fabric will be used to fill the sections.
Popular types of supports:
- Wooden. Recommended for lightweight fences made of picket fences, unedged or edged boards, and timber. Suitable for fences made of chain-link and PVC mesh. But even with proper treatment of wood against rotting and insects, its service life is limited. Follow the link to see detailed recommendations for choosing and properly installing wooden fence posts.
- Asbestos cement pipes. Less popular because they require careful installation. The pipe cavity is filled with concrete or left empty. Plugs are attached to the top, otherwise water that gets inside in winter will freeze and lead to the formation of cracks. Asbestos-cement pipes are used for fences made of concrete, welded or chain-link mesh.
- Brick. For this type of support, you will need to competently draw up a masonry scheme and estimate the consumption of materials. For reliability, a metal pipe or a bunch of wire rods must be installed inside the trench, which will serve as reinforcement and strengthen the supports. Then cover them with bricks. Concreting of such fence posts should not be done spot-on, but rather poured together with a strip foundation. They are used for sectional fencing made of brick, stone, corrugated board, metal picket fences, and forged structures. Instructions for choosing materials, different masonry technologies, step-by-step installation of brick pillars.
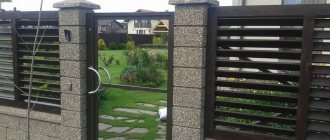
- Concrete. It can be delivered to the construction site in finished form or can be created at home. They look good in combination with spans made of concrete, stone, corrugated board, and forging. In the last two cases, to fasten the sectional material, even during the construction of the supports, it is necessary to fix special embedded parts. Concrete pillars must be installed on stable soils in warm weather so that they have time to shrink.
- Metal. The basis is taken from profile pipes of round or rectangular cross-section. The average section is 60*60 mm with a wall thickness of 2–3 mm. These are optimal supports for both lightweight and massive fences. In the absence of an anti-corrosion coating, they require pre-treatment with protective solutions. Tips for choosing metal poles.
When installing temporary fencing at a dacha, poles made of wood or metal can be driven into the ground. Hammering is also suitable as the main method of fixing small-diameter supports under a chain-link fence or PVC mesh.
But in order for a massive decorative structure to last longer, it is still better to concrete the pillars.
Technology for constructing a foundation for a fence
Preparing a trench for installing a reinforced fencing belt
First, you need to make a choice of the type of foundation, material of pillars and lintels, and it is also necessary to conduct geodetic reconnaissance of the territory in order to determine the type of soil and the depth of their freezing:
- Then the locations of the future fence are marked with an accuracy of half a meter, milestones and guides are installed.
- If necessary, the construction site is leveled.
- After installing all the poles and guides, you need to dig a trench along the entire length of the fence and fill the bottom with a sand and gravel cushion.
- The depth of the trench, as well as the width of the formwork, depends on the stability of the soil, climatic conditions, the depth of soil freezing and the height of groundwater. The weight of the structure also plays an important role, because monolithic brick fences on a concrete base weigh much more than columnar fences with wire fencing.
- Then you need to reinforce the future foundation. As a rule, rows of longitudinal and vertical reinforcement are used, which are connected to each other. The reinforcement must be installed in such a way that it is covered with concrete mortar and does not come into contact with open air or water.
Then the formwork is erected. For this purpose, wooden boards, ready-made panels or sheets of roofing material are used. The formwork is installed at a height of more than 30 cm from the ground level, strengthened with spacer bars and covered with soil or sand from the outside. The finished formwork along with the reinforcement must be filled with concrete.
We carry out calculations
For sectional fencing made of corrugated sheets, siding, or metal picket fences, it is worth choosing a distance between spans of no more than 2.5 m, or better yet, less, in order to reduce the windage of the structure. A large distance between the posts will gradually lead to the skew of the fence.
The number of transverse or longitudinal logs is determined by the height of the structure. For a 1.5–2 m fence, two pieces, located 25 cm from the top and bottom of the canvas, are enough.
The consumption of the solution depends on the depth of pouring the pillars.
Determining the depth of concreting the supports
It is considered to be the soil level below the freezing point. For example, if the soil freezes to 1 m, then the depth should be taken with a margin of 1.1 m.
For most regions, the optimal depth is considered to be 1.5 m.
It is important to take this value into account when selecting the height of the pillars. So, for a two-meter fence it is necessary to take supports 3.5 m high.
To ensure the job is done well, you can order the services of craftsmen. They will not only install the posts, but also the entire fencing on a turnkey basis.
Useful tips
Many people use a regular crochet hook when working with reinforcement. When, while tying the reinforcement, a loop is twisted with a hook around the second end of the wire, the end is held under tension.
But you don't need to pull too hard. The wire may not hold up and break. You can make a reinforcing hook with your own hands from wire. Steel d 0.3-0.5 cm is suitable.
Using a screwdriver helps speed up the knitting process. It must first be adjusted, otherwise the tool will break the wire during operation. If you work with large volumes of reinforcement tying, use a gun. It makes work much faster. Pistols reduce human involvement during mating to almost zero. The connection quality is higher.
We recommend watching this interesting video:
One of the most dangerous reinforcement mistakes is incorrect installation in overlap areas. When the foundation begins to bend over time, cracks may appear at the reinforcement points under load.
To avoid mistakes, special attention is paid to the joints and corners of the entire structure.
Preparing the site, materials and tools
The construction area is cleared of debris and vegetation. Markings are made using rope and wooden pegs.
Since metal supports are the most convenient to install, let’s consider the concreting process using them as an example.
To work you will need:
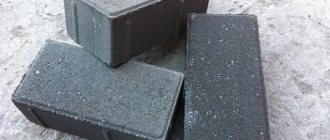
- Crushed stone of small or medium fraction. Used as a filler for concrete mortar.
- Clean sand.
- Cement grade M300 or M400.
- Drill with a diameter of 160–180 mm, length up to 2 m.
- A grinder and several metal discs.
- Hacksaw for metal.
- Construction level from 60 to 120 cm long.
- Marker and tape measure 5 m.
- Wire rods for reinforcement.
- Waterproofing material.
- Plastic sewer pipe with a diameter of 110 mm. For one pillar you will need a piece of 75 cm.
A wheelbarrow and a shovel will come in handy.
For a small amount of work, the solution is mixed manually in a trough or with a construction mixer. For a larger amount of solution you will need a concrete mixer.
How to tie reinforcement
Of the variety of reinforced meshes and frames, several methods of connecting them are used. Knitting is the easiest way to join.
Important! The material is connected with a 1.2–1.4 mm knitting wire made of elastic low-carbon steel at the joints. You will need a special hook
- Bend a wire 25-50 cm long in half;
- Pass a loop at the junction and hook it with a hook;
- Use your hook to twist a loop around the other end of the wire.
The reinforcing bars are tied with specially designed wire so that the sides of the square cells are equal to 30-40 centimeters. It is knitted horizontally to a vertical rod 10-15 cm from the bottom of the trench. The horizontal reinforcement runs in a continuous line with an overlap at the bottom and top.
Sometimes welding is used for small loads, but welding work has disadvantages:
- Welding can reduce the strength of the structure;
- Due to the increasing rigidity of the frame, connections may fail.
- A reinforced product cannot be welded if its diameter exceeds 20 mm;
- You have to hire and pay for the work of a welder. Accordingly, cash costs increase.
The structure is tied every meter. Squares are made with high reinforcing bars so that the formwork frame is firmly tied and well reinforced. Fiberglass is tied with plastic clamps. You must have patience in your work.
Otherwise, the process is not particularly difficult.
Types of concreting and pouring pillars
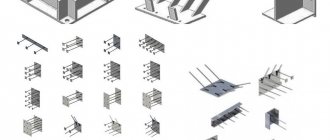
Let's look at the methods of fastening supports that are suitable for different fences, and evaluate the advantages and disadvantages of each of them.
Methods of fastening supports: from left to right. 1 – driving method, 2-3 partial and full concreting, 4 – crushed stone butting, 5 – installation on screw piles.
Dry
Quite a simple fastening method. Significantly reduces construction time. It is used to install a temporary or permanent fence in a country house, around a private house.
Suitable for lightweight fabric such as chain-link, boards, picket fence.
Sequence of work:
- Use a drill to make a hole of the required depth.
- We wrap the post with roofing material or coat it with mastic.
- We level the support and, if necessary, attach spacers to the sides.
- Fill the hole to the top with a mixture of sand and cement.
- Sprinkle with water and tamp.
Among the advantages of this method:
- This is the optimal solution for clay soil or loam. The pillar will not stick out of the ground under the influence of frost.
- Installation speed. In a day you can secure all the supports for the country fence.
- The simplicity of the work allows you to do it yourself and not use special equipment.
For reliability and stability of the installation, it is recommended to weld a metal plate or spacers to the bottom of the posts.
Dry concreting is not suitable for wet, moving soils and massive, heavy fences.
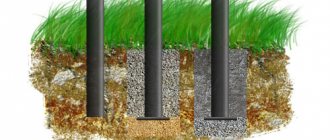
Spot
Performed in the following sequence:
- Using a drill, we make 1.5 m deepenings. We tamp the bottom.
- We fill the bottom with a 30 cm sand cushion.
- We roll a piece of roofing felt into a sleeve and place it in the hole. It turns out to be a waterproofing glass.
- We insert a pillar into it. We check the verticality with a level.
- Mix a solution of M300 cement, crushed brick, and crushed stone.
- If necessary, we weld spacers to the post.
- Pour the finished mixture into the hole.
You can continue working with concrete pillars only after the solution has completely hardened.
Pros of spot filling:
- Suitable for any type of soil, with the exception of swampy ones.
- The supports can withstand heavy loads, so this is how you can fix fence posts made of corrugated sheets, bricks, or metal profiles.
- Resists well to environmental influences.
- If the technology is followed, the service life exceeds 20–30 years.
Among the disadvantages of spot filling, the labor-intensive process and the need to strictly adhere to the level of installation of supports are noted.
If you make holes in heaving soil that are not deep enough, the pillars will simply begin to be pushed out of the ground under the influence of frost.
Partial
This type of concreting should only be used on stable soil for structures that do not carry a high load on the pillars. Suitable for fence:
- made of PVC mesh;
- chain-links;
- welded gratings;
- picket fence;
- boards;
- polycarbonate.
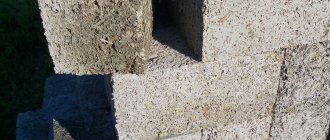
Photo: partial concreting of a square profile pipe
Unlike spot or full concreting, such fixation significantly reduces material costs and construction costs.
To secure the poles into the prepared holes, they can be rammed or simply driven into the ground.
The technology is similar to spot pouring, but only the lower part of the hole is filled with concrete. Time is given for hardening - up to 5 days, after which the top is covered with crushed stone and sand.
A second option for partial concreting is possible, when the bottom of the pit is compacted with a cushion of crushed stone and sand, and the top is filled with mortar.
If you want to make a small plinth for the fence, then you should build formwork for each post in advance.
Complete
This method has many modifications. Most processes are similar to partial concreting, only the well under the support is filled to the top with one solution.
There is another option for complete filling, when in addition to the well, the internal cavity of the column is also filled with concrete. In this case, it is important to place plugs on the support on both sides so that water does not accumulate inside.
3D model of the installed support
The bottom of the pillar must be waterproofed with roofing felt and wrapped in plastic film.
Used on stable soils under heavy fences. This method is reliable, ensures the durability of the structure, but requires a lot of materials and labor.
Using a strip foundation
Arranging the tape will take longer than any of the concreting methods, but the integrity of the foundation and pillars will make the fence more resistant to weather influences and wind loads. Suitable for rocky, sandy, heaving soil.
On stable soil, a shallow tape will suffice.
Regardless of the chosen method of fastening the poles, it is important to take a responsible approach to each stage of the work: from the purchase of building materials to the completion of installation. Then the fence will last a long time and will not need repairs.
Solid slab
The thickness of the ceiling is most often taken to be 200 mm. The reinforcing frame in this case includes two meshes located one above the other. Such meshes must be knitted from rods with a diameter of 10 mm. In the middle of the span, additional reinforcement bars are installed in the lower part. The length of such an element is 400 mm or more. The pitch of the additional rods is taken to be the same as the pitch of the main ones.
Additional reinforcement must also be provided at the support points. But they place it at the top. Also, at the ends of the slab, U-shaped clamps are needed, the same as in the foundation slab.
Example of floor slab reinforcement
Calculation of floor slab reinforcement by weight for each diameter should be performed before purchasing the material. This will avoid overspending. A reserve for unaccounted expenses is added to the resulting figure, approximately 5%.
Tying reinforcement for a monolithic slab
To connect frame elements to each other, two methods are used: welding and binding. It is better to knit reinforcement for a monolithic slab, since welding under construction site conditions can lead to weakening of the structure.
To perform the work, annealed wire with a diameter of 1 to 1.4 mm is used. The length of the blanks is usually taken to be 20 cm. There are two types of tools for knitting frames:
- hook;
- gun.
The second option will significantly speed up the process and reduce labor intensity. But for building a house with your own hands, the hook has become very popular. To complete the task, it is recommended to prepare in advance a special template similar to a workbench. A wooden board with a width of 30 to 50 mm and a length of up to 3 m is used as a blank. Holes and recesses are made on it that correspond to the required location of the reinforcing rods.
Partial
When using this technology, not only the base is filled with cement mortar. The installed support is also partially poured. The stages of work are as follows:
The essence of the method is that the support is not completely covered by the solution.
- First, a hole is dug under the post, but its diameter should be slightly smaller.
- Next, the column is driven in with a hammer, after which it is filled with concrete mortar.
Builders assure that if this type of foundation is properly concreted, the structure will be reliable, strong and durable.
Reinforcement procedure
Before starting work, you must prepare the following materials and tools:
- Wire for tying.
- Steel rods, the size and quantity of which must be optimally selected.
- Hook for weaving twigs.
Reinforcement involves the installation of a mesh of steel rods, which are fastened with wire using a hook. Tying the rods is carried out as follows:
- Fold the wire in half;
- A hook is inserted into the resulting loop;
- The edges are wrapped diagonally, hooked and tied.
The procedure described is basic, but there are many other, more modern methods. In some cases, reinforcement is fastened with special attachments. An electric hook helps speed up the reinforcement process.
It is not recommended to use welding to bind rods, as it can damage the building materials.
Additional measures to protect against heaving forces
If you live in a region where frost heaving forces work wonders and break records, take note of the following information. In order to protect the pillars from bulging, you need to take care of eliminating at least one of the factors - the presence of water or exposure to severe frosts. That is, you need to protect a certain space near the pillars from saturation with water and/or freezing. Of course, compared to conventional methods, this is more labor-intensive. But for some, such actions will help save the fence and protect themselves from unnecessary expenses in the future.
You can limit the flow of water using a drainage system, similar to the one used to drain water from the foundation. And reduce the impact of frost by insulating the soil around the pillars using polystyrene foam. Not all builders and home owners know about these secrets. Wrap it around and apply it.
Join our Facebook group
Tape
This type of filling is used for fencing materials that have a small mass. It is important that the soil under the fence is heaving, capable of changing properties when filled with sedimentary water. For this type of foundation, a ditch 4 cm deep and 2 cm wide is formed.
A well is drilled at the installation site of the pillars, around which an armored belt is installed.
Then the bottom of the pit is filled with a sand-crushed stone cushion 2.5 cm high, watered with water and compacted well. At the next stage, formwork is formed, which is filled with concrete mortar. After 7-10 days the base dries out.
Before further arrangement of the fence, the foundation should be waterproofed with mastic, roofing felt or a special polymer mixture. The remaining gaps are filled with sand and compacted well.
The method requires mandatory reinforcement of supports.
Suitable grade of concrete
In order to properly pour the foundation and securely fasten the fence posts, it is important to select the correct concrete strength class. During selection, the type of base should be taken into account. There are 3 types of foundation:
- Pile. Designed to carry light weight. The main task of this type of foundation is to hold the metal piles in a vertical position. The load on such a base is small, so it is recommended to use concrete grade M100-200 for pouring.
- Tape. It is laid under a massive structure built from heavy materials. The trench for the foundation is dug to a depth of at least 50 cm. In order for the foundation to withstand the loads, the grade of concrete for the fence foundation must be at least M250.
- Columnar. A simple and cost-effective type of foundation, which consists of stone or wooden pillars buried 50-70 cm into the ground. To securely anchor the foundation in the soil, experts advise using mixtures of the M300-400 class.
In this case, a strip foundation can be used.