Concrete sculptures are an excellent solution for decorating the courtyard of a country house, a personal plot, or the territory of a summer cottage. Despite the fact that real sculptors do not really like concrete due to some features, the material is perfectly suitable for making simple sculptures at home.
A correctly poured concrete sculpture is strong and durable, can be painted in any shade, is not afraid of external aggressive factors, and is heavy, which makes it impossible for the product to be stolen. It is also important that the production of concrete sculptures is relatively inexpensive, and all stages of the work do not require any special skills, knowledge, tools, or materials.
Everything you need to make a concrete figure with your own hands can be found in a workshop or bought at the nearest supermarket. There are several technologies for creating sculptures from concrete mortar, and each master chooses the one that is most suitable for his purposes and allows him to obtain the best result.
Every craftsman can make simple and uncomplicated concrete figures. The main stages are the preparation of everything necessary, the correct mixing of the concrete solution, quick and high-quality pouring, drying in optimal conditions. After the monolith gains strength, it is no longer afraid of anything and will stand for a long time, maintaining its ideal appearance.
Necessary materials
Before making a concrete sculpture, you need to take care of everything that may be needed during the work process: tools, materials, sketches, containers, additional funds.
Plan for preparing everything needed to create concrete figures:
- When choosing a sketch and method for creating a sculpture, it is better to start with simple and accessible options, since not everyone can implement large-scale projects. When choosing a figure, be sure to take into account the size and landscape of the territory, the design of the architectural ensemble, and the ability to harmoniously fit the sculpture into the exterior. So, for children's playgrounds they make cute figurines of gnomes or animals, for the garden - mushrooms and stands for flower beds, lions are often chosen for gates, etc.
- Creating the sketch itself - if you don’t have the ability, it is advisable to draw the future figure at least schematically. The more accurately the idea is conveyed on paper, the easier it will be to calculate the dimensions and determine the order of actions.
- Experienced craftsmen advise creating 3D models of figures in a reduced form from plasticine or a piece of clay. This way it will be possible to more realistically imagine the process of creating a figure, calculate everything correctly, and accurately determine the size and scale.
- Tools - a concrete mixer and containers for preparing concrete mixture (or a mixer, a special attachment for a drill), shovels of various sizes, a spatula, a trowel, wire cutters, pliers. If you plan to fill the sculpture, you will need a mold (you can buy it or make it yourself).
- Materials - water, sand, cement, plasticizer for preparing a concrete mixture, polyethylene film to protect the yard, steel or aluminum wire for the production of a frame for three-dimensional figures, primer and paint to give the figure an aesthetic appearance.
History of park sculpture: from the Greeks to Peter
The park sculpture probably originates from the temples of the pagan gods, and probably no one can name the exact time of its appearance. As a cultural phenomenon, it appears to the world in Ancient Greece, during the heyday of Hellenism.
It was then that the foundations of sculpture in the modern sense of the word were laid.
- Ancient Rome also did a lot in this direction. And if at first, during the construction of the empire, the accumulation of the sculptural fund occurred, first of all, due to war trophies and primitive copying of Greek primary sources, then in the subsequent stages of the development of Rome we can talk about the formation of its own school.
- In Medieval Europe, the large-scale manifestation of sculpture as an applied and cultural phenomenon occurred during the Renaissance.
- The sculpture came to Russia and spread widely through the efforts of Peter the Great, a great admirer of European values. Until now, the sculptures of the Summer Garden of St. Petersburg delight the eye of the modern man in the street, gently and unobtrusively instilling a sense of beauty in both mature people and the younger generation.
- The Russian nobility brought European garden sculpture to their own estates and made it a truly mass phenomenon.
About women and children
It must be said that in addition to the heroes of ancient mythology, children were very popular characters in park and landscape design in tsarist times. Back in 1869, the famous Russian sculptor Fyodor Kamensky created the plaster sculpture “Children in the Rain” on the outskirts of Naples.
The idea so inspired and captivated the 33-year-old master that after some time, based on a rough plaster cast, he created a work from beautiful Capri marble of stunning purity, which, as a motive for imitation, became extremely popular throughout the Russian Empire. At the same time, a more romantic and touching name appeared for it - “First Love”.
The immortal composition of F. Kamensky still does not lose its relevance
Venus, or in the Greek manner Aphrodite, the patroness of love, was also widespread as an independent artistic object. Prussian masters reserve the lead in its discovery to the world as a fountain decoration. The Germanic peoples have very strong associations with pre-Christian religions.
And German sculptors successfully embodied in bronze the classical type of the appearance of a goddess from sea foam, which received an equally classic name - “The Birth of Venus.” The celestial being generated by them in the form of copies of varying quality quickly spread across two hemispheres from San Francisco to Sydney.
Production technologies
When planning to create a future concrete sculpture with your own hands, it is important to choose the right production technology. At home, you can implement three methods: hand modeling, frame, pouring into molds.
Modeling by hand is a method that does not require special devices and tools, but requires certain skills and the importance of preparing a solution of the correct consistency. Provided that the mixture is not too liquid and not very thick, it is convenient and easy to sculpt from it, it is quite possible to create small crafts. Typically, this option is chosen to create a mass of small figures to decorate the garden, flower pots, stands for flower beds, etc.
The frame method is the most complex, but it makes it possible to create real masterpieces. So, first they create a three-dimensional frame of the future figure from wire, then they cover it with a concrete mixture (they stick it on, roughly speaking), give the mixture a shape, wait for it to dry and paint it, giving the desired color, drawing certain elements (when creating animals, they draw eyes, ears , nose, etc.). The method is suitable for creating sculptures of any size.
The technology of pouring into a mold is the simplest, as it only requires the presence of a mold and strict adherence to all stages. It is important to correctly and accurately pour the concrete solution into the container, then wait for it to dry and carefully remove the finished product. Afterwards it is allowed to fully gain strength, painted as desired, etc.
You can make the molds yourself or buy ready-made ones. Typically this method is used to create figures of small size but high complexity.
Composition of the solution
To sculpt concrete sculptures with your own hands, you will need a plastic mixture that will cling well to the frame and pre-laid layers. As a rule, decorative concrete with additives is used for such purposes. It differs from the usual material in its white color and the content of multi-colored granite chips.
The main additives include clay and lime. They are the ones who make sculptural concrete from ordinary concrete and allow you to create various products with your own hands. It is recommended to use kaolin clay. Because other types of clay give a gray tint.
You also need to purchase plasticizers that will reduce the mixture’s need for water. For these purposes, PVA emulsion or CMC is used. They also provide the solution with good adhesion. For the first balls, polypropylene fiber will be required, which will ensure greater adhesion of the first layers and provide the material with protection from cracks and resistance to low temperatures.
Note! The gypsum mixture will increase the setting. Its only drawback is a decrease in the resistance of concrete to temperature changes.
Let's look at the approximate composition of concrete for DIY garden sculptures:
- sand – 500 grams;
- cement – 250 grams;
- water – 110 milliliters;
- lime – 70 grams;
- crushed stone - 1 kilogram;
- clay – 110 grams;
- gypsum – 20 grams;
- fiber – 30 grams;
- PVA – 9 grams.
Attention! PVA emulsion must be pre-mixed with water and then added to the main solution. The remaining ingredients are used in dry form. The consistency of the finished solution should resemble thick sour cream.
Subtleties of the frame method
Frame making of sculptures, despite the presence of certain nuances, does not involve any special difficulties. The sculpture is made on the basis of a wire structure, which serves as the basis of the product. A wire model usually repeats only the basic elements of the structure, since it has the goal of creating a base on which all the necessary details can be sculpted.
Despite the fact that often any unnecessary elements (boxes, rags, wood) are used to create figures, it is best to make a frame from aluminum/steel wire. There are several ways to create a model. Small and medium-sized figures are made from an aluminum base using a regular bond due to the elasticity of the material.
But steel wire involves the implementation of a combined method - certain parts of the frame are connected with pliers, others are connected by welding. It is best to make figures using frame technology hollow.
Advantages of creating a hollow sculpture:
- Possibility to save materials - when it comes to the production of large figures, too much concrete will be needed (when choosing a pour, also inside).
- Lightness - if it is necessary to transport a figure, a product weighing several hundred kilograms will have to be moved using special equipment.
- More efficient coating of the frame with concrete, accuracy.
A concrete sculpture using frame technology is created quite simply: first, a frame is made of wire, it is covered with a construction mesh with an accurate transfer of volumes and shapes. Then concrete is applied to the frame with a trowel and spatula. A new layer is added only after the previous one has dried. Concrete should be applied to the sculptural frame using gentle and light movements.
Then the concrete is allowed to dry completely and gain strength. If there are any shortcomings, they are corrected before the mixture finally sets - smudges, unevenness, etc. are removed.
Flowerpot
Working with cement is difficult, but this craft is just for those who have never encountered such a material as concrete. To make a flowerpot you will need the following consistency: cement + sand + water, two buckets and unnecessary towels.
Take a towel and dip it into the solution so that it thoroughly absorbs the mixture. The entire fabric must be covered with concrete mass.
Attention! Use rubber gloves to keep your hands safe.
Prepare a second bucket in advance, select the length of the towel and turn it over. Throw the towel over it.
An example of how to cover a bucket with a cloth
If suddenly the rag is larger than the bucket, then it can be cut, but this must be done at the initial stage, while the concrete is wet. Remember: how you arrange the fabric on the bucket has a huge impact on the final result. So use your imagination and arrange the fabric the way you like.
Let the future product dry, this will take a little more than a day.
Then take out a bucket, fill the concrete pot with soil and plant a flower. Ideas for such cement pots can be seen in the photo below.
Flowerpots can be made of any size and not only from fabric. To do this, prepare any two suitable containers, one larger and the other smaller. Insert one into the other, and fill the space remaining between them with cement mortar. After drying, you will get a suitable, attractive product for planting flowers.
If you wish, paint the craft or varnish it - this will make the pots look more beautiful. We invite you to look at photos of original ideas for such products.
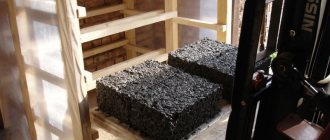
Pouring into ready-made molds
The concrete mixture can be poured into a mold that will allow you to obtain a figure of a certain volume and configuration. You can buy ready-made forms or make them from some containers with your own hands. Most often, craftsmen do what they need themselves, since the assortment in stores is quite limited. As in the case of the frame, it is not at all necessary to pour any complex structures into the molds - it is enough to make the general shape, and then do the rest by hand.
So, small mushrooms are poured using an old basin or a plastic bottle. The cap is poured into a basin, the leg is made by pouring the mixture into a plastic bottle (after the material has hardened, just cut the bottle). By showing ingenuity and imagination, you can create a variety of interesting shapes from available materials, which can then be simply processed.
Preparation of concrete mixture for pouring into a mold:
- The sand is carefully sifted to eliminate the possibility of large fractions and debris getting into the solution.
- Sand and cement are mixed in a ratio of one to three; if it is possible to choose between gray/white cement, color wishes are taken into account. On a white base, all colors look brighter and more saturated, but gray cement costs less.
- Clean water is gradually added to the mixture of sand and binder; a plasticizer can be added (based on the proportion of 200 milliliters per 50 kilograms of cement).
- The solution is mixed very carefully and thoroughly; the consistency of the finished mixture should be similar to thick sour cream.
After the concrete is poured into the mold, it is covered with film and allowed to dry for 12 hours. It is advisable to protect from moisture and rain. Then the product can be removed from the mold, allowed to gain strength and painted.
Types of garden sculptures
Some sculptural solutions, as in the photo presented, are distinguished by a very original conceptual style
- A statue is a life-size figure of a person or animal.
- Monument - made in the form of figures of people, animals, busts, arches, memorial plates, columns.
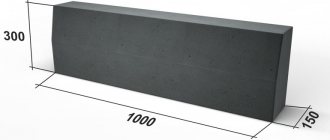
- A stela is a massive slab containing memorial or informational inscriptions and installed perpendicular to the ground. Additionally, it can be decorated with small additional elements.
- An obelisk is a massive tetrahedral pillar, in projection resembling a pyramid, the pointed top of which is directed into the sky.
Others perform completely justified applied tasks
Very often sculptures are made in composition. This solution was widely used in the design of fountains. A classic example is the well-known and in many ways legendary fountain near the Holy Transfiguration Cathedral, in the town of Yuzovka, present-day Donetsk, founded by the British.
The central place of the fountain was given to the sculpture of a half-naked woman in the image of the ancient deity Aphrodite.
Interesting! Connoisseurs of Donetsk antiquity unanimously assert that among the then local proletariat, represented for the most part by miners and metallurgists, there was a rather vulgar, but at the same time completely ineradicable legend.
Allegedly, if a man touches the breast of a stone beauty with his right hand, he is immediately guaranteed dizzying success in amorous affairs for a whole year. Love for a truly working person is by no means the last thing, so a certain part of the sculpture in early Soviet times began to stand out significantly against the background of the rest of the body with a slightly dark color, precisely from the numerous touches of the laboring palms of loving, but irresponsible citizens.
A complex composition composed of separate independent elements “Birth of Venus” and “Children in the Rain”
Craft ideas for beginners
It’s worth starting with the simplest figures and sculptures. These can be mushrooms, gnomes, animals, various characters from fairy tales. Moreover, when it comes to bright figures, it is worth considering not so much the complexity of making the sculpture itself, but rather giving it brightness and compliance with the sketch. So, an ordinary mushroom is a stalk and a semicircle, but the correct coloring gives it a similarity with the idea.
The same applies to animals and characters from fairy tales - the shapes themselves are simple, but not everyone knows how to beautifully paint the figures they make. Below are many options for simple crafts with which you can start creating sculptures and concrete products.
What to focus on
In stores, prices for plaster figurines sometimes reach several tens of thousands of rubles. However, the cost of material for an entire army of funny gnomes or mushrooms will barely reach several thousand.
To save money on purchasing additional equipment or travel, it is advisable to familiarize yourself with new ideas for garden crafts.
Today the figures can be divided into several components:
- Stands - there can be funny turtles on which small pots of flowers are comfortably placed.
- To decorate a pond, these can be clay frogs or other inhabitants.
- For decorating beds - for example, gnomes, which do a good job of scaring away birds and animals.
- For lighting, in tandem with lighting you can create a fabulous atmosphere.
You can use all options, but experts recommend not to overdo it. To make everything look harmonious, it is advisable to follow the general style.
Concrete fungus
Mushrooms can also be different - you can make a boletus or fly agaric from concrete, decorating your garden and backyard area. It is unlikely that you will be able to obtain an exact copy of the mushroom model, and this is not necessary. Mushrooms are not ideal in nature. It is much more important to ensure that the figure resembles the idea itself and gives it a beautiful look. For the sculpture, concrete is used, the consistency of which resembles slightly melted butter.
Step-by-step instructions for creating a concrete mushroom:
- Make a hole in the sand with a deep bowl.
- Place a burdock leaf on the bottom (it will make the surface rough).
- Take a plastic bottle or rolled roofing felt/linoleum into a tube.
- Fill both parts with concrete.
- After all the elements have dried, you can fill the top with a new solution and combine both elements.
- Wait 2 days until completely dry, during which the figurine should be covered with film.
Usually, for a complete composition, several mushrooms of different sizes are created and placed around the territory. You can make real mushroom meadows that look very beautiful on a green lawn.
Important Rules
The concrete mixture is prepared as follows: Part cement and twice as much sand (if increased strength is needed, you can take 1 part sand), part glue. Next, add a little water and you need to achieve a thick consistency. The solution will be ready for use and will not cause any trouble.
All crafts require warm conditions and a lot of time to harden. Hardening time can vary up to two weeks. To prevent cracks from appearing, the figure is covered with bags.
After the hardening time has passed, the figure must be covered with a primer, then varnish or paint. If irregularities appear that interfere aesthetically and create inconvenience, use a file and sandpaper.
Cement can be replaced with plaster; this material allows you to make figures hollow and more decorative.
Choosing a good location for decorative figures
The principles for placing sculptural decor include the following positions:
- a minimum number of statues are installed in a compact area. A good solution for garden owners with a creative nature is a solitary setting in the form of an art sculpture, and for practical owners - a functional sculpture, for example, an idol with a built-in street spotlight;
- When landscaping a spacious area, compositions of various formats are appropriate. Decorate the seating area with cute statues of ancient deities or abstract shapes. Near the playground, make a place for a plastic mushroom meadow. Next to the garden barbecue complex, install a plaster figure of a gin with a jug on a cement pedestal;
- along the path it is worth placing several decorative accents with a battery-powered lamp;
- do not arrange flower beds on banal beds; it is better to use bowls made of concrete or polystone.
To veil the rough finish of a stone garden sculpture, it is easy to create a frame of climbing green crops. Or place the statue under a flowering bush so that the branches hide part of the statue. Small wooden sculptures for the garden with a colorful design looking out among the tall grass also look interesting.
Choose statues and figures to decorate the area, taking into account the features of the space. If you are planning a large-scale landscaping project, invite specialists: this requires a professional eye and very skillful hands.
Concrete flowers
Such products fit harmoniously not only on concreted recreation areas, but also in areas with green spaces.
To make artificial flowers you will need a special matrix. It is best to choose a ready-made silicone mold, which housewives often use for baking, or use special decorative formwork. If there is no mold for filling, take a cut plastic bottle or an old rubber ball.
To make more realistic flowers, use ready-made silicone molds
To create a flower arrangement, prepare:
- already known cement mortar (1:3);
- oil or acrylic paint (the main thing is that the label says “For exterior use”);
- drying oil (usually machine oil or Vaseline will do);
- polyethylene.
After that:
- Lubricate the walls of the matrix with oil to extend its service life.
- Add a little expanded clay to the cement mortar to lighten the weight of the future decorative element.
- Fill the mold with the solution and shake it a little to compact the mixture.
- Add the mixture until it reaches the edges of the matrix and cover it with plastic.
- Place the workpiece in a dark place for 2 days.
- Take out the frozen product and place it on a flat surface.
- Wait 4-6 days.
- Treat the flower with strengthening impregnation.
- Apply paint.
Healthy! To prevent concrete figures from cracking during the drying process, they must be moistened with water daily.
There is little left, including TB
Stucco work does not create any particular dangers. But basic safety rules must be followed here too.
A unique concrete sculpture - a monument to Artyom in Svyatogorsk
Avoid contact of exposed skin with liquid concrete - use spatulas and polymer-coated gloves. When working with an angle grinder, a hammer drill, or even just a chisel and hammer, wear safety glasses. When sanding dry, do not forget about a respirator.
For serial crafts, the sculpting method is inconvenient. It is for unique, “one-piece” sculptures and compositions.
Of course, you shouldn’t immediately take on large and complex sculptures. Start with small products up to half a meter in size.
As for the principles set out in the article, remember the behest of Peter I: do not adhere to the regulations - “...like the walls of a blind man, for the orders are written there, but the times and occasions are not.”
Leave your tips and comments below. Subscribe to our newsletter. Good luck to you and good luck to your family!
What will be required for production?
In order to decorate your local area, garden or landscape design with concrete sculptures, no special education, special equipment or special skills are required. What you will need is desire, spatial thinking, ability to work with concrete and a sense of beauty. Ability to operate a welding machine may be required.
Depending on the sculpture technology adopted, the following materials and tools will be required:
- Container for mixing mortar or concrete mixer;
- Entrenching tools: shovels, spatula, trowel;
- Steel or aluminum wire;
- Pliers and wire cutters;
- Portland cement M400 (white or gray), sand, water, plasticizer for concrete (for example, Fairy detergent or PVA glue);
- Polyethylene film;
- Plastic construction mesh;
- Paint and primer for external work “on concrete”;
- Molds for pouring (an option for making sculptures by pouring into molds).
Figure options
The advantage of concrete as a material for garden crafts is its enormous ability to create the most bizarre shapes. If a person does not have the skills for such creativity, then it is worth starting with the simplest figures, gradually improving your skills.
DIY flowerpots
The first simple figure can be a fungus. A small craft of this type can be made using the injection molding method using available molds for pouring. A plastic bottle with a capacity of 1.5-2 liters works well for the mushroom stem. The neck is cut off from it, and then a cement-sand mortar is poured inside (proportion 1:3 or 1:4). After the mass hardens, the bottle is simply cut and removed. You can use a metal or plastic bowl as a shape for the hat. Before filling, it must be lubricated with oil or grease. After pouring the solution, a hole is formed in the lower part along the diameter of the leg with a depth of 5-6 cm. The leg is fixed in this hole. The edges of the cap are carefully processed with sandpaper. Then the finished fungus is primed with a thin layer and painted with the desired color.
In a simple way you can make a cute turtle. The armor is made by casting concrete into a bowl or basin. The head and paws are formed from a solution with the consistency of plasticine. After assembling the figurine, a mosaic of pieces of ceramic tiles or multi-colored glass is attached to the shell.
Stone idols are made quite easily if the form is created from a rolled sheet of metal or thick plastic. In this way, a cylinder of the desired size and height is formed. To save concrete, you can make a hollow figure. To do this, a pipe of smaller diameter is inserted inside the rolled cylinder. The cylinder is rotated until the solution has completely hardened, which makes it possible to sculpt the head and other elements.
Garden figurines made of concrete will provide original design and comfort on the site. They will bring special joy to children. Everything can be done with your own hands, starting from elementary forms and gradually moving to more complex frame sculptures
Concrete has an important advantage: with its help you can make any fantasy come true