My home is my castle. But building walls and installing windows and doors is not enough. For complete protection from prying eyes and strangers, a fence is necessary. The modern construction industry offers many options and types of fencing: wooden, forged, combined, stone. A special feature in this list is the concrete fence.
There are many options for building sand concrete fences. You can pour the foundation yourself, install support columns, and fill the gaps with corrugated sheets, forged gratings or wood. The second, faster and relatively easier way is to purchase ready-made blocks and install them around the perimeter of the site.
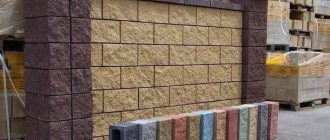
Modern industry offers a wide variety of concrete sections: from monolithic slabs from 2 to 4 meters long with a minimal design to stacked, decorative ones. When choosing, consider the tasks to be solved:
- preventing access to the territory by unauthorized persons. Solid, solid blocks without design elements or gaps are used;
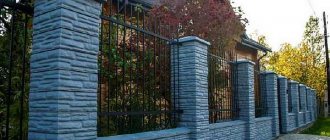
- addition to landscape design. The concrete structure is accompanied by an “open” top, imitation carvings, balustrades, and painted in all possible colors;
- marking the boundaries of the territory. You can choose to imitate wood or natural stone.
The minimum height of sections is 500 mm, the maximum reaches 2500 mm.
What to look for when choosing a fence
If you decide to isolate yourself from the outside world with a reinforced concrete fence, when choosing sections, pay attention to the following points:
- brand of concrete. Optimally, M200 or M300 is used. There is no need for a higher one;
- compare prices for the same model from different sellers and manufacturers. Too low a cost may indicate non-compliance with the technology;
- There should be no cracks, scratches, chips or pores on the surface. Defects that seem minor at first glance may indicate accelerated drying or a large amount of sand;
- No reinforcement should be exposed to the surface. Under the influence of atmospheric moisture, the metal will sooner or later begin to rust and the structure will collapse;
- If possible, find out how many layers of reinforcing mesh are laid. The more there are, the better, provided the previous point is met;
- On an unpainted product, take a closer look at the shade. Predominance of blue is preferable, but not faded gray.
How to make sections for a concrete fence yourself
Have you checked all the construction markets, but have not found sections that fully satisfy your needs? Try making them yourself. It is important to immediately emphasize that the process is labor-intensive and requires significant practical skills. You will have to purchase equipment (concrete mixer, vibrating table for large plots). If we are talking about 2-5 sections, then the costs will not pay off. In this case, it is better to stick to ready-made samples.
Additionally, you will need a winch or crane to lift the finished slabs and several assistants. Keep in mind that concrete structures are heavy.
In addition to a concrete mixer and a vibrating table, before starting work, purchase forms (made of fiberglass or PVC). 3-4 is enough. It’s difficult to manage a lot at once. For reinforcement you will need a metal mesh with a wire thickness of up to 6-8 mm. For concrete mortar, you need cement grade M400 and higher, seeded river sand and gravel (waste).
Sergey Yurievich
Construction of houses, extensions, terraces and verandas.
Ask a Question
The tools you will need are a shovel, a crowbar, a building level, pegs and a cord to mark the installation locations for the supports.
Problems and their solutions
Reinforced concrete is a very durable material, and repairs to fences made from it are rarely required.
However, a couple of typical problems are still worth mentioning.
- On soft ground the pole may sway. You can straighten it with the help of a cable and a pulley attached to a tree, or a couple of comrades. Then the pillar is dug in on all sides, re-filled with crushed stone and concreted again.
- A careless driver can damage the decorative panel with the bumper. Thanks to the reinforcement, it will not collapse, but will look rather untidy. As you might guess, repairing the fence in this case will come down to replacing the panel with a similar one.
If there is no complete analogue, it is easy to move the panel from any area hidden from the eyes of viewers, and install another one of suitable size there.
The modular design of the Eurofence and the absence of rigid fastening of the panels will make replacing any of them a simple matter.
Stages of manufacturing sections
Before pouring the mixture, the molds must be greased with a greasy composition to facilitate subsequent separation. If you were unable to purchase a vibrating table, you will have to stand nearby during the setting process and knock (not too hard) with a hammer on the pile or surface on which the forms are placed.
The semi-dry mixture for pouring is prepared in the same proportion as for the foundation. It is important not to overfill the water, otherwise the drying process will be lengthy. In the standard version, the period of setting and initial strength development takes up to 48 hours. Important: the surface should not dry out too quickly. Moistening is carried out periodically to avoid the future appearance of cracks and internal voids.
The finished parts are removed from the molds and left for further drying. Do not forget that concrete reaches full maturity within 28 calendar days. You won't be able to build a fence in a week with your own hands.
How to install a concrete fence with your own hands
At the initial stage, a site is placed. It is important to clearly observe the boundaries of the site, so as not to have to redo everything again later by court decision.
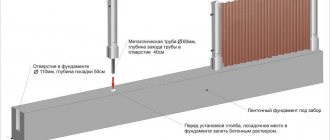
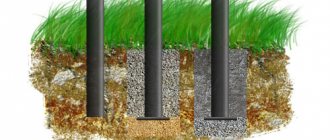
Places for vertical supports are selected taking into account the size of the sections. It will be quite difficult to move “a little” in the process. Using a drill or manually, holes up to a meter deep are prepared.
The bottom is covered with sand. Next comes a layer of crushed stone. Support columns with temporary spacers are installed on top. Pour concrete after carefully measuring all distances and heights of pillars. You must be sure that the slabs will fit into the grooves and there will be no distortions.
Sections of the fence are hung, and after that concrete is poured into holes with supports. The concrete mixture is prepared at the rate of 1 part cement to 2 parts fine crushed stone and 3 parts sifted sand. Primary setting will occur within 24 hours in summer and 96-120 in autumn.
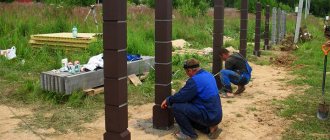
If the above method seems too long, then the sections are assembled simultaneously with the major installation of supports. Once the first one is installed, the first section is hung and the second support is mounted.
Preparing the area
Installation of fencing and fencing begins with the preparation of the work front.
What is it?
- If you have an old wooden fence, the first step is to dismantle the fence. The poles can be easily pulled out of the ground using any lever and a wire loop.
- The future fence line is cleared of bushes and tall grass.
- On a slope, terracing has to be done: the inclined surface turns into horizontal sections of equal length with constant differences in height.
- With a step corresponding to the length of the span, holes are dug for the pillars. On dense soils, a depth of 70 centimeters is sufficient; on a weak foundation it is better to bury a meter deep. In addition, it is highly desirable to go below the freezing point.
- The bottom of the pits is covered with a 5-7 cm layer of sand. Then the sand is generously spilled with water to shrink and five centimeters of crushed stone is poured on top.
How to make a fence more attractive
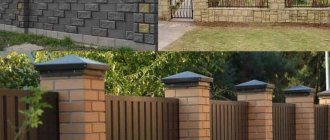
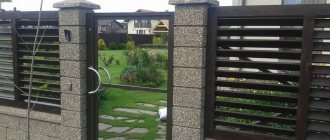
Standard concrete blocks are not the most aesthetically pleasing option. If you believe that your site deserves better design, build supports from special building hollow blocks. Advantages of this option:
- a wide variety of shapes, finials, imitations of natural materials;
- an electrical cable is placed in the cavity in compliance with safety regulations and in the presence of waterproofing;
- less weight per block than a standard support.
After laying all the blocks and installing the electrical wiring, the cavities are filled with concrete made from M500 cement to increase the strength of the entire structure. Supports of this type will support not only intermediate sections, but also forged gates and additional design elements.
Tips for installing block fencing
When installing a concrete fence made of blocks, you must first carry out markings and calculate the amount of material. The calculations take into account the height of the fence (recommended up to two meters), width, and dimensions of one block. In addition, you must immediately select a mortar for masonry.
If decorative sections will be used for the fence, you need to calculate the number of individual slabs and support posts based on the length of the fence minus the gate and wicket. For example, the length of the fence will be 20.75 m, taking into account the first and last support pillar (support dimensions 15-15 cm) without installing a wicket or gate. For such a fence you will need 10 slabs, each 2.06 m long.
How to paint a concrete fence
A concrete fence, while reliable and durable, has a number of disadvantages:
- the surface absorbs water. In winter, ice forms in the pores, contributing to the destruction of the structure;
- wet concrete takes a long time to dry, the surface becomes spotty and not very attractive from an aesthetic point of view.
The listed disadvantages can be mitigated by periodically painting the sections. When choosing paint, determine what problem you are solving:
- create a general landscape and architectural solution for the house and site;
- want to get a background for bright flowers, shrubs, trees;
- hide from the prying eyes of neighbors.
Paint and paint coating must meet the following requirements:
- resistance to ultraviolet radiation, moisture, mechanical stress;
- there is no need to apply additional protective coatings.
Optimal protection is provided by paints based on acrylic, polyurethane, and epoxy resin. They will not only retain their original color for many years, but will also protect against the damaging effects of water.
How to paint concrete fence elements
Before painting begins, all surfaces are degreased and cleaned of dust, dirt, branches and leaves. Wet areas and mold are treated with special compounds. Cracks and places where reinforcement comes to the surface are covered with mortar and dried.
For better adhesion, all fence parts are coated with a layer of primer. Important: the base of the paint and primer must be the same. Drying is carried out in accordance with the manufacturer's recommendations.
New concrete blocks can have a perfectly smooth surface. Adhesion is improved by sanding or sandblasting. The paint will not “slip” on a rough surface. The first layer is applied manually with a roller or brush. The optimal temperature outside is 15-250C. It should be painted a second time 24 hours after the first layer has completely dried. They are painted with a spray gun to obtain a smooth, shiny surface.
If you are not satisfied with the depth of the color, apply several more layers, making sure to let each layer dry for 24 hours. After this, the concrete fence is ready for use.
Installation work with supports
If you install a concrete fence yourself without additional specialized tools, then a cord or rope is pulled at a height of 0.5 m from the surface. This will provide additional precision to avoid side deviations.
A cushion based on sand, gravel and crushed stone is installed in the pits. It allows you to subsequently ensure the outflow of moisture entering the ground and increases the reliability of the overall structure. The pillars are lowered inside. It is important to place them in an even vertical position with minimal deviations due to the level.
In some cases, it will be necessary to backfill with stones, concrete waste and pieces of broken brick to secure the posts in the recesses. Filling is carried out to half the total height of the pits.
Slats the length of the concrete slabs are placed in the grooves of the supporting objects. This stage will further help to verify the correct location of the supports. The grooves must necessarily be located in the direction of the slats. To check the evenness of the location, use a hydraulic level.
View this post on Instagram
Posted by Retro Zabor (@retrozabor) Sep 22, 2022 at 12:06 pm PDT
If mistakes are made, it is necessary to deepen the hole where it was found and add soil components in order to reduce the current depth.
- The supports are leveled using a level. After this procedure, they are additionally fixed in the recesses. The slats remain in place, since before laying the slabs, their ends are located inside the grooves.
- After installation and fastening, a mixture of cement and sand is prepared in a ratio of 1:4. Next, the evenness of the fence structure is checked again and then the solution is poured.
- The location of the pillars is considered by the hydraulic level due to the potential displacement from the impact of the poured mixture. Elimination of inaccuracies is done before complete hardening.