DIY concrete decor: materials, shapes, how to prepare the mixture?
The most important thing you need to remember is that you need to work quickly. The solution hardens within a few minutes. If you made a mixture of Turkish putty, it can harden within a few seconds, that is, instantly. Therefore, prepare all the necessary forms and materials in advance, and only then get to work. It’s easy to make a mixture for decorating concrete with your own hands:
- Dilute the dry substance with water to make a “gruel” or until it becomes thick sour cream. All is ready.
All that remains is to pour it into the mold and wait until it dries well. So let's get started.
Advantages of cement crafts
- One of the most important advantages of this substance is its relative cheapness.
- Durability and strength of finished structures, resistance to weather conditions.
- Concrete can be painted in a variety of colors. Decorating also does not bring any problems.
- Ease of use of concrete. The main difficulty is creating a stencil design for pouring.
DIY concrete garden decor: instructions, photos
-yourself concrete decor
such a cute pumpkin , a concrete garden decor, with your own hands from a concrete mixture and an old stocking. Materials you will need:
- Concrete mix
- old stocking
- Plastic plate
- Rubber bands for shaping
Let's get started - instructions with photos:
- Cut off the top of an old stocking and fill it with solution.
Cut off the stocking
- Tie the stocking in a knot to prevent the solution from spilling out.
Tie a knot
- Secure with rubber bands to make it look like a pumpkin, as shown in the photo below.
Attach elastic bands
- Let the pumpkin dry. Then cut off the elastic bands with scissors.
Cut off the elastic bands
- The concrete pumpkin turned out like a real one. This is an excellent decor for landscape design, as well as for the interior of a country house.
Concrete decor is ready
Ease of execution
Interesting DIY cement crafts can transform even the most unprepossessing area. In addition to their spectacular appearance, such products will cost you much less than store-bought ones.
It’s not for nothing that such a solution falls into the budget category. The variety of shapes is endless. Here it is enough to use your imagination and bring your ideas to life.
Simple designs do not require special skills or tools.
Beautiful concrete products - decor for the kitchen: hot stand, photo
Beautiful products made of concrete
You will need a pastry mold, a cocktail tube, which needs to be cut into pieces with a length equal to the width of the cell, and a mixture. The result will be a beautiful concrete product, albeit very simple. This is an original decor for the kitchen - a hot stand. Here are the instructions with photos:
- Cut the cocktail tube and insert the resulting parts into the molds.
Cut the cocktail tube and insert into the mold
- It will turn out like this, as shown in the photo below.
It will turn out like this
- Now pour the concrete mixture into the mold.
Pour the mixture into the mold
- When the solution dries, remove the products from the mold.
- Insert laces into the holes on both sides.
Insert laces into the holes
- Pull the laces together to keep the pieces close together.
Tighten your laces
- The result is such a stylish stand for hot food.
Stylish hot stand
What is cement and how to work with it
Cement does not require professional skills or additional complex tools. It is one of the main materials used in construction work.
When cement interacts with water, the result is a plastic mass, which after a certain time hardens and becomes a stone-like body. Strong and durable.
To work with such raw materials, you need to choose a special place (preferably a larger one). Then lay plastic film everywhere and secure it well with something. This is necessary so that the cement does not spoil other surfaces. After all, everyone knows: once this material thickens, it will be difficult to dispose of it.
What tools and additional materials will be required:
- In order to dilute cement, you need a container with a volume of at least 10 liters. You will need a metal container or utensils made of other durable materials.
- To make the cement mortar homogeneous, you will need a mixer. A drill is also suitable, but only its attachment must be a screw one.
- Water. This is one of the main components, since all tools will need to be constantly washed under high pressure of water.
- For your comfort and safety, you need to purchase small things such as rags, rubber gloves and an apron.
- Forms for figures, which can be found in construction stores, as well as in special shops that sell various goods for creativity.
- Spatulas (preferably of different sizes), they will be very useful in your future work.
- Primer. Will be needed to cover crafts after drying. It acts as the main material for the coloring composition.
- Sand. It should be small and free of unnecessary debris.
- Cement. In this case, we offer brands M-200 or M-300.
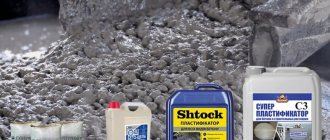
Preparing cement mortar
An example of what the mixture should look like
The most important thing is that the mixture should be a homogeneous mass with a consistency reminiscent of thick sour cream. It is this density that will be ideal for pouring cement into molds or using it for necessary crafts.
Procedure:
- Pour sand into a pre-prepared container, followed by cement. These components should be mixed thoroughly.
- Add water.
Proportions per 1 kg of cement:
| Cement brand | Fine sand | Water |
| M-200 1 kg | 2.9 kg | 900 ml |
| M-300 1 kg | 2 kg | 750 ml |
- If you want to make your craft colored, then at this stage add water-dispersion color. Thanks to this component, the products no longer necessarily need to be painted.
- Mix thoroughly and bring to a homogeneous mass.
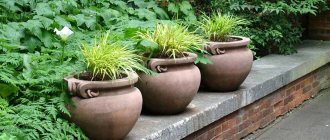
Concrete decor in a loft-style interior: pots for candles
Concrete decor in a loft-style interior
You probably have an old crocheted napkin at home. Is it lying somewhere in the closet and are you going to throw it out? Take your time and make a pot for candles. This loft-style concrete decor will be an interesting addition to any interior. All you need is a solution and a napkin. Also prepare a bowl on which the future pots will dry. Let's get started:
- Soak a napkin in the solution.
Wet the napkin
- Place it on an inverted bowl and leave it there to dry.
Place on an inverted bowl
- After a couple of days, you can remove the bowl - the pot is ready.
- Create a composition and light the candles.
- Look how beautiful it is.
Concrete decor
What else goes into the solution?
Concrete has performed well. True, it is most often used for the basis of platforms for fountains, sculptural pedestals, etc.
You can also make crafts from cement and plaster. It is added to the solution to impart plasticity to the material. When working with this duet you need to be more careful, since the plaster sets quite quickly.
DIY concrete and plaster decor for the site: cute gnomes for decorating the landscape
Do-it-yourself concrete and plaster decor for a site
To make this DIY concrete or plaster decor for a site, you will need old stockings, elastic bands and colored acrylic or oil paints. Have another plastic plate ready. You can use a solution of Turkish putty, especially if you do not want to paint the “gnomes”.
These cute figures will perfectly decorate the landscape at the dacha or near a private house. To make them, follow these instructions:
- Pour the mixture into an old stocking. Place a plate to avoid spilling concrete on the surface of the furniture.
Pour the mixture into the stocking
- Form a nose with your hands and secure with an elastic band.
- Make a hat visor from the top of the stocking.
Form a nose with your hands
- Leave to dry.
- Then remove the stocking. You can paint the faces of the gnomes, or you can leave them as they are.
- Pour the mixture into another stocking in parallel and hang it to form a cap, as in the photo below.
- Then remove the stocking and paint the cap red.
- Place it on top of the white gnomes. The original landscape decor is ready.
Concrete decor
Mushroom glade
After the product is completely dry, it can be coated with paint and decorated with various elements.
On the site, such mushrooms look much more impressive if they are made in different sizes. By the way, you can make them from a variety of containers: bowls, jars, etc.
DIY concrete decor in the interior: candle stands
Do-it-yourself concrete decor in the interior
Such candle stands can decorate the interior for the New Year or other holiday. This DIY concrete interior decor will perfectly complement the atmosphere for a romantic dinner - beautiful and interesting. Materials you will need for work:
- Chips box
- A mixture of Turkish putty or concrete
- Glass or plastic disposable cup
Let's get started:
- 5-6 cm from a box of chips .
Cut the top off a chip box
- Fill the prepared mixture almost to the top.
Pour the prepared mixture
- Place a glass on top and press down slightly to create a recess for the candle.
Place a glass on top
- When the mixture is dry, remove the glass and box.
Remove the glass and box
- You can paint the candlestick, but you don't have to. Concrete itself looks very interesting.
- Insert the candle into the candlestick and light it. Ready.
Concrete decor is ready
Master class: making a flowerbed cat figurine for the garden
A cat flower bed is a simple solution for decorating a garden and growing small flowers. For work you will need wooden planks with a cross section of approximately 2×3 cm. The length is determined depending on the height of the future craft. The wire is necessary for attaching a plastic rectangular container to the boards. Main stages of work:
- The legs of the future cat are attached to the plastic container using screws. They should be the same size and located in the corners.
- From the side of the head, a short stick of small length is attached to the wall of the container with screws, which will be the cat’s neck, and on the opposite side a longer board is also attached for the tail.
- You need to make holes throughout the entire container and thread the wire through them in any order. This is necessary to fix the cement.
- After preparing the frame, cement is applied with gloved hands. The layer should be at least 1 cm. The inner surface of the pot is also treated with a cement mixture.
- Drying lasts about 48 hours, and then the product is treated with sandpaper, dust is removed and painted.
The cat can be painted in bright colors
Decorative concrete in the interior: original do-it-yourself decorative stand for a floor lamp
Decorative concrete in the interior
If you make such an original stand for a floor lamp with your own hands, you will definitely be able to surprise everyone who comes to visit you. It looks very stylish and original. To make such decorative concrete for the interior, you only need a mixture and old books. Here are the instructions:
- Prepare a mixture of regular or decorative concrete.
- Soak old unwanted books in this concrete mixture. Get it.
Soak old books in concrete mixture
- Let dry. Stack them on top of each other in a chaotic manner. Ready.
Let it dry
You can make a solid stand by folding wet books, or you can let them dry and then assemble the decorative element.
How to make a mushroom figurine
To make a mushroom figurine you will need:
- an unnecessary children's rubber ball for a hat;
- plastic bottle (sour cream cup) - for the leg;
- a metal rod (several screws or nails) for attaching the cap to the leg;
- bucket of sand.
The manufacturing process consists of the following sequential steps:
- the ball is cut in half with a knife;
- take 1 half, place it in a bucket of sand and press it in;
- cement-sand mortar is poured into the resulting form and the surface is leveled;
- cut off the neck and bottom of the bottle (if using a plastic cup, the bottom), stick it into the center of the cap, plunging it about 2 cm;
- a metal rod or 3–4 self-tapping screws (nails) are placed in the center of the leg, connecting the 2 parts of the mushroom with them;
- pour the solution into the bottle (glass) to the top;
- wait a few days until it hardens completely, then remove half of the ball and the container from the leg;
- after a few more days, the fungus is decorated - painted, pasted over with decorative elements.
An interesting solution could be to paint the mushroom cap “fly agaric” - bright red with white specks.
Photo holder with fastening: material - concrete
Photo holder with fastening: material - concrete.
Photo holder with fastening is very simple to make. Thanks to such stands, you can perfectly decorate your interior, complementing it with such unusual things. The only materials you need are concrete mixture and multi-colored paper clips, which can be bought at any office supply store. Also prepare a regular ice tray and a piping bag. Let's get started:
- If you don't have a pastry bag, you can use a regular plastic bag.
- Make a concrete mixture in it.
Make a concrete mixture in a bag
- Cut off the corner of the bag with the mixture and pour the mixture into ice cube trays.
Place mixture in ice cube trays
- Insert a paperclip into each cell. Let dry.
Insert a paper clip into each cell
- Now you can take out ready-made holders and use them when installing photos.
Get ready holders
- It turned out very beautiful. You can use such holders not only for photos, but also for various notes and so on.
Concrete decor
Ideas for beginners
If you have no experience working with cement at all, then you need to start with the simplest elements. Cement crafts for the dacha in the form of mushrooms, multi-colored balls, flower pots are quite acceptable even for amateurs in this interesting business.
We recommend reading:
Crafts made from epoxy resin - stylish, original and beautiful products and decorations made from epoxy (110 photos)Crafts from seeds: step-by-step instructions and tips for choosing the most beautiful ideas for crafts
Crafts from airy plasticine - ideas for creating beautiful crafts, the main steps and a description of how to make a craft correctly (100 photos)
“Yak garneau paint a concrete block for landscape decoration”: ideas
“How should I paint a concrete block for landscape decoration?” - such a request can be found on the Internet today. It is written in Ukrainian. Residents of Ukraine are increasingly decorating their garden plots with concrete figures. If in Russia this is a loft style, then in Ukraine it is a simple rustic style that is popular. Figurines and images of birds on the facades of houses or in gardens are purely Ukrainian folklore. Here are some ideas for such decor:
- The photo below shows how easy it is to make a swan from concrete.
- The top is painted with ordinary lime or white paint, and a flower is planted inside.
- The beak, eyes - everything is like a real bird.
Concrete decor
- But on the flower bed there is a figurine of a sparrow, painted white.
Decor from concrete Decor from concrete Decor from concrete Decor from concrete Decor from concrete Decor from concrete Decor from concrete
Have these ideas inspired you to create something interesting and original? Don’t be afraid to fantasize, be creative and create beautiful decor with your own hands. You will find even more ideas in the video below. Good luck!
How to make swan figures
Beautiful white swans will become a real decoration of the site. An unnecessary plastic basin installed upside down is suitable as a frame base. The neck is made of intertwined metal wires, bent in the shape of the letter S. The wire is attached to the basin by drilling a hole in it.
The basin is coated with cement; rags and pieces of foam plastic are used to form the necessary bends. Form wings and tail. The wire for the neck is wrapped with rags soaked in cement, and cement is gradually applied on top, in thin layers, forming a neck of the required thickness and a head.
Decorative adjustments are made on the wings and tail, imitating plumage using scraping. The eyes and beak are outlined on the head. Leave the swan to dry for at least a week. After this, the product is sanded, primed, and painted.
Tip: the figure of a white swan can be used as a flower bed. For this purpose, the frame made of a plastic basin is not installed upside down, but usually. The resulting depression is filled with earth and flowers are planted.
Candlesticks
You can make original candlesticks from cement. There are several interesting options. Products with a cylindrical shape look traditional. They are a cylinder made of cement into which a candle is inserted. During production, 2 cylinders of different diameters are used, and a solution is poured between them. First, a large cylinder is taken and a cement bottom is formed in its lower part. After this, a smaller one is inserted inside and the walls are poured.
The second option is a spherical lamp. It is made by placing a layer of cement mortar on a ball-shaped base, which can then be removed. A balloon, a ball chamber, and an old rubber ball are used. The solution covers approximately 2/3 of the entire surface in an even layer, leaving a window for a candle. Its edges are made jagged (imitation of a broken ball). After the cement has hardened, the base is removed, and a flat platform is formed in the lower part for the stability of the candle and the entire structure.
Tips and recommendations from experienced craftsmen
What do craftsmen and designers advise so that homemade figures decorate and not spoil the territory:
When decorating a site, use one style - do not combine characters from folk tales with classical-style sculptures or angels. Balance the size of the figures with the size of the plot - in small dachas large products look ridiculous. Don't chase quantity
An excess of figures distracts attention from the main thing - greenery, flowers, for which they go to the country. Select figures in the general style of the house, garden, and territory. They will enhance the overall impression. If you lack experience and imagination, start with the simplest figures, master one technique
Install the product and make sure it makes the area better, not worse.
Use common sense and moderation. When making figures from cheap materials (bottles, old tires), carefully process and paint the products with good paint, otherwise they will look cheap and will only spoil the overall impression of the site.