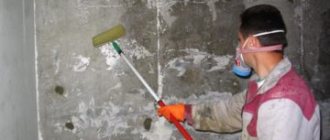
Liquid glass is one of the few materials used that can work in the presence of high moisture. Liquid glass is used for flooring as a penetrating type of insulation. The resulting film protects the floor from moisture penetration and the formation of mold and fungi. Before starting work, familiarize yourself with the application technology and operating rules.
Functions of liquid glass for floors
Silicate belongs to alkaline solutions. Manufacturing proceeds by calcining materials containing silicon for 15 minutes at 600 degrees. This is followed by treatment with lye at temperatures up to 95 degrees. The mixture is ready.
When liquid glass is applied to the floor, a moisture-proof layer is formed, which prevents bacteria from multiplying and prevents the spread of mold and mildew. This layer can withstand the effects of acids and grinding elements, has antistatic properties, is non-flammable and prevents the spread of fire. But it will not be possible to resist open fire for a long time, since at high temperatures and time of more than 20 minutes, it spreads.
The finished mixture from different manufacturers has different degrees of viscosity. In the open air it quickly hardens.
What it is?
Waterproofing floors is necessary during the construction of any building. It can also be done during screed repairs in an apartment or house. To create a layer that protects against water and condensation, a variety of materials can be used, differing in their physical and chemical characteristics, as well as in the type of action they provide.
Liquid glass - what is it
Laying roll waterproofing in the bathroom
Liquid glass belongs to the category of coating waterproofing agents. It is easy to use and has high protective qualities. Liquid glass contains sodium silicates or potassium compounds and water. During production, soda and quartz sand are used, which are fired, or silicon dioxide, treated with alkali in an autoclave. When frozen, glass becomes very hard and neither air nor water can penetrate through it. But it itself, on the contrary, is capable of penetrating into the thickness of the base or other structure being processed.
Liquid glass ELKA AK
On a note! Externally, liquid glass for waterproofing strongly resembles ordinary stationery silicate glue. And, in general, the substances are very similar in their properties; they differ, in essence, only in some components. For example, waterproofing liquid glass contains special modifiers that significantly increase the protective properties of the material.
Liquid glass application process
Prices for liquid glass for waterproofing
Advantages and disadvantages of use
The operational warranty is 5 years. During this time, there is a gradual decrease in the thickness of the protective layer, up to approximately 1 mm per year. To extend the life, experts recommend applying a layer of paint over the glass.
The composition completely penetrates into the structure of the coated material, filling the cracks and pores.
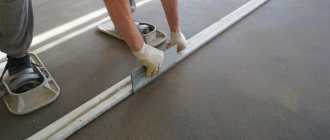
It is beneficial to add silicate directly to the concrete solution itself. At the same time, it becomes more transparent and stable. But the setting and hardening time is reduced, which is very important if the work is being done for the first time and leveling takes a lot of time. The frozen mixture is not suitable for reuse. Therefore, it is advisable, when pouring screeds over large areas, to prepare the solution in portions.
If more than 10% silicate is added to concrete, it will become weak and easily damaged by mechanical influence.
When the floor is filled with liquid glass, the result is a very even, smooth plane, a beautiful appearance, and maximum resistance to mechanical stress is achieved. This surface is easy to clean and prevents the emergence of pathogenic microorganisms. Therefore, such spraying is often used in hospitals.
The coating can be carried out independently, without the involvement of labor. This is an inexpensive material.
In certain options, additional materials are added that extend the service life of the interlayer.
The process of creating a glass floor
If there is no space to organize a volumetric glass covering, you can use liquid glass for floor screed, which looks no less beautiful than traditional coverings. However, we will talk about a more complex method of creating a glass floor.
The speed and quality of work performed depends on the availability of pre-prepared materials, tools and consumables:
- directly glass coating in the form of a panel, which can be manufactured by specialized companies;
- metal structure for panel mounting;
- finishing materials for cladding the base: wood, tiles, laminate, etc.;
- decorative elements;
- silicone for the sealing layer;
- sealant;
- consumables: screws, bolts, etc.;
- grinder and screwdriver.
The work is carried out in a certain sequence:
- Initially, it is necessary to create a cavity in which the base will be installed. For these purposes, either a niche is made in the floor, or the surface of the subfloor must be located higher. According to the standard, the thickness of the entire glass covering structure is at least 15 centimeters.
- The metal frame is located near the walls of the recess and is fixed with self-tapping screws. After installing the fastener, you can begin finishing the recess.
- The lighting system can be installed on the prepared surface. For example, the LED strip should be glued to the bottom of the metal profile, and the wiring can be routed through a small hole in the covering. You can lay a larger section of wiring along a previously prepared channel, which is created by gating.
- Next, a layer of sealant must be applied to the metal profile. You cannot refuse to use this material, as this will significantly reduce the service life of the glass panel that will be laid on this layer. It is very important that the glass has no points of contact with the metal profile at all.
- The final action should be laying decorative elements and securing the glass panel to the surface. All seams in the structure must be sealed with sealant so that it looks aesthetically pleasing not only in the center of the room, but also along the perimeter. This is especially important for pre-sale photos or meetings with potential buyers who may doubt the quality of the work performed. And the owner will not be very pleased if some dirty spots or defects behind the glass are clearly visible on the floor.
Comparison of potassium and sodium based glass
Potassium and sodium solutions are available. They have almost identical properties, but there are also differences. General properties:
- Dilutes well with water.
- When completely dry, they form a durable waterproof film.
Differences:
- The sodium mixture is cheaper.
- The potassium layer is more resistant to atmospheric changes and chemicals.
- The sodium layer has better fire resistance and antiseptic properties.
- When processing a surface, the potassium mixture does not leave whitish spots and has an anti-reflective property. The sodium type does not have such properties.
- The potassium product is more viscous, but the sodium product is used for strength in the cement composition.
Types of paint
There are four main types of paints: water-based, water-dispersion, acrylic and alkyd.
Water-based paint
The composition of water emulsions is a suspension of an aqueous solution with particles of polymers and pigments in suspension. There are the following types:
- Silicone. Thanks to vapor permeability, it can be used in rooms with high humidity: kitchens, bathrooms.
- Acrylic. Universal paint with particles of synthetic polymers. Can be used to paint walls in any room of a living space.
- Mineral. Cement or slaked lime based material.
- Latex emulsions are moisture resistant. Composition: aqueous dispersion with natural juice of rubber plants. The properties correspond to acrylic paint.
- Silicate. Paint based on liquid glass, with the addition of coloring pigments. Stable and high-quality material for finishing any premises.
- Polyvinyl acetate hydrophobic. A type of finishing material that contains an emulsion with coloring pigments and other substances. You can paint walls in residential areas.
The properties of the finishing material depend on the binding component.
Water-dispersion paint
Water-dispersion paints include compositions with vinyl acetate, butadiene styrene and acrylic copolymers. After applying the coating, water evaporates and the copolymer particles stick together, resulting in a uniform film.
The scope of application of the finishing material depends on the type of copolymers in the dispersion:
- styrene butadiene is used for painting walls and ceilings in rooms with dim lighting, due to their tendency to fade;
- vinyl acetate - used for painting walls in dry rooms;
- acrylic is the most popular type of coating for application to indoor walls and facades.
Floor waterproofing
Floor insulation with liquid glass is much cheaper compared to other types of material. This method is being used more and more often.
The composition is similar to liquid rubber, but when the silicate hardens, a sealed layer is formed. With such insulation, moisture and air will not enter the treated surface. The basis of the substance is potassium and sodium silicate with the addition of quartz sand and soda.
When applying waterproofing in the form of liquid glass, the fact that after five years the layer gradually degrades itself is taken into account.
Before starting work, you will need to prepare materials and tools:
- Liquid glass.
- Water for diluting the solution if the purchased mixture is viscous.
- A clean rag for removing excess material or quickly wiping down a surface that has not been prepared for treatment.
- Container for silicate.
- Brush, roller.
- Tools for pre-cleaning the floor: vacuum cleaner or broom, dustpan.
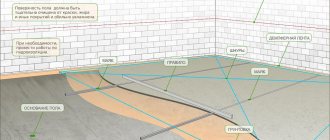
Technology for applying a waterproofing layer:
- Thorough preparation of the surface: remove the previous layer, clean it from dirt, dust and other debris. It is better to use a vacuum cleaner to completely eliminate dust.
If dust is not removed, it will prevent the absorption of the insulating composition.
- Spread the mixture evenly in a thin layer using a roller or brush. The distribution is carried out in stripes along the wall.
- To remove bubbles and unevenness, use a needle roller.
- Wait for the first layer to dry (1–2 hours), then apply the second.
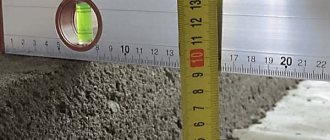
Preparing the surface for insulation
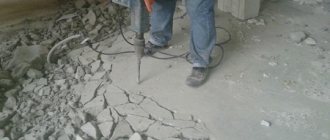
In order for the floor surface to be ready for impregnation with an insulating composition, it must be cleaned of dirt, grease stains, rust, loose old screed, paint or glue. This can be done using a stiff brush, a sander with attachments and chemicals.
After cleaning, construction debris and dust should be removed from the floor surface. For the last operation, you can use a household or industrial vacuum cleaner. Cleaning the floor makes it possible to identify all its hidden defects.
These include cracks, chips, loose expansion joints, and the like. In addition, thorough cleaning of the base cleanses its pores, which subsequently ensures deeper impregnation of the floor surface with a waterproofing solution of liquid glass.
Detected cracks and similar damage to the base must be carefully repaired with construction cement mortar. This will reduce heat loss in the room and protect the floors below from leakage.
Further treatment of the floor surface should be carried out taking into account the method of its finishing. For example, applying putty is done to maximally level the plane of the structure for painting, and priming is done to ensure adhesion of the base to the material being glued.
Use with concrete
Silicate is used with concrete in 3 directions:
- To waterproof it, spray it in a number of layers.
- Additive during the production of concrete mortar.
- Admixture for the purpose of creating several types of marks. When dry, a monolithic state is achieved.
Concrete should especially be supplemented with liquid glass, which is used to fill floors in buildings located in damp lowlands, where groundwater is located directly in the upper layer of the earth. It is also worth making a foundation with such an additive in such buildings. This will help protect the building from moisture, even without treatment with other antiseptics.
With the appropriate knowledge, it is possible to prepare such solutions yourself at home.
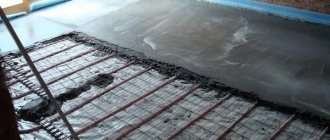
When the composition is added to the concrete mixture for pouring the screed, it will make the base stronger and acquire waterproofing and heat-resistant properties. The coating with such concrete is created in swimming pools, furnaces, and wells.
The addition of silicate is permissible in cement grades M300, M 400.
It is unacceptable to add more than 10% glass to the concrete mixture; the best option would be 7%. The higher the percentage, the faster the initial setting occurs.
Silicate is not added to the ready-mix concrete. First, if necessary, dilute the glass with water, then add the dry cement mixture.
When sodium silicate is added to cement, its mass increases by 25%.
We recommend watching the video instructions:
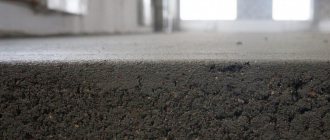
Concrete has a disadvantage - porosity. It is in them that moisture, water, etc. can penetrate. Untreated concrete pavement will encounter problems over time. To avoid them, they are treated with a silicate compound.
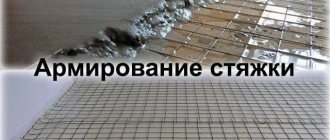
Strengthening weak screeds with primer, liquid glass and silicate impregnations.
The reasons why the screed will be weak are different:
But if this happens, then something needs to be done about it - because with further finishing, difficulties are possible.
It is also impossible to leave it unchanged. Dust constantly forms on such a floor. The weak layer is easily destroyed by feet.
First way. Strengthening with primer.
The first thing most people come to is to strengthen it with a primer. The option is real, affordable and on everyone’s lips. But it rarely gives results:
A short comment on the video.
Judging by the nail test, the screed is quite suitable for tiling indoors. There are examples of a more deplorable state of the foundation, which they tried to strengthen with a primer:
For what reason did the tile bounce off the screed?
They tried to strengthen the loose screed with a primer. But primer, primer is different. Judging by the color and the resulting film, a concentrate primer was used in shock proportions. Or primed several times, allowing each layer to dry completely (as written on the canister). This gave a film on the surface. A tile with glue was attached to it. But under the film the same weak layer remained. The tile came off along it.
Alternatively, you need a deeply penetrating primer and pour it in buckets at a time. To consolidate a weak layer to a greater depth. Deep penetration primer (according to the manufacturers) has smaller particles and therefore can penetrate deeper without creating a film on the surface.
Strengthening the screed with a primer is difficult to come across as a recommended technology. This is the creativity of the masses. There is also a similar solution - strengthening with liquid glass.
Strengthening cement screed with silicates (liquid glass).
The idea of using liquid glass to repair weak surfaces did not come out of nowhere. Liquid glass has been used in construction for a long time:
There are three main types (depending on composition) of liquid glass: potassium, sodium and lithium. They have different properties, which provide different benefits and different prices.
Sodium is more common. They use it to strengthen screeds in garages and basements:
You can experiment with this method. It’s useful to have at least some other people’s experience.
Below are the most interesting details of the use of liquid glass. It’s hard to call this quality material for drawing conclusions. But still:
One could call all this fuss with liquid glass a collective farm and forget about it, if not for such a detail as recommendations for strengthening loose screeds with silicates from many manufacturers of mixtures. One of them from “MAPEY”:
Important points in the video:
It is clear that the Prosfas strengthening primer does not consist of silicate alone. Therefore, its price differs from the price of liquid glass. If we compare the cost of strengthening a loose screed with silicate from “MAPEY” and ordinary liquid glass, taking into account its consumption and the similar consumption of liquid glass, the discrepancy will be significant:
Prosfas and liquid glass.
But Mapei is not the only company that prepares impregnations for concrete and screeds.
dinner on the roof in Rostov
An entire industry has been created around this problem. Million dollar businesses have been built on a simple chemical reaction (Ca(OH)2 converts to CSH) between silicate in the impregnation and calcium hydroxide in concrete. The composition of the impregnation is not disclosed, except for the name of one of the silicates on the basis of which it was created.
Similar to different types of liquid glass, various strengthening impregnations based on potassium, sodium, magnesium and lithium have been created. An important difference between them is the size of the molecule. This determines how deeply the silicate can penetrate the screed:
Impregnations based on sodium silicates.
Here are selected examples of sodium impregnations. That's not all. New ones may appear that are cheaper and more efficient. Some are cutting production and leaving the market:
All impregnations are similar in the method of application:
Apply so that the entire surface remains wet for 30-60 minutes. No puddles or drying out in certain areas. This is achieved using a soft whisk, redistributing the liquid throughout the screed. The excess is moved to adjacent areas and removed with a water vacuum cleaner.
Some impregnations are diluted with water (Lithurin I). Some have features - Ashford Formula is not effective on concrete grades below M 300 and on cement-sand screeds:
Strengthening impregnations based on lithium.
According to the American Concrete Institute (ACI Concrete Institute), lithium-based impregnations have a number of advantages:
Lithium based impregnations.
ULTRALIT HARD (1)
The production of three varieties Ultralit Hard Standard, Ultralit Hard Premium, Ultralit Hard Extra has been launched.
Mapecrete LI Hardener (2)
Lithium-based liquid for new and old concrete floors from MAPEI.
"Concria Super Hard" and "Concria Hard" (5)
In addition to these two impregnations, others are produced for strengthening, for coloring, adding gloss....
The first impregnations appeared on the American market about 50 years ago. The search for new compositions does not stop. Competition is growing. Without experience, it is difficult to understand the features of each and the veracity of the declared properties. The instruction in some of those maps of strengthening impregnations is alarming: “Do not apply to dusty, crumbling and fragile substrates.” Marketing wars lead to even greater confusion:
A good warning was placed before purchasing one of the impregnations:
As a solution, you need a test area 1.5m x 1.5m. If there are different surfaces, then for each type of surface there is a separate platform. After doing everything according to the instructions, let it dry for 3-7 days. Then draw a conclusion based on consumption, costs, obtained and expected surface strength.
Add a comment Cancel reply
This site uses Akismet to reduce spam. Find out how your comment data is processed.
Source
Decorating a liquid glass floor
Since covering a concrete floor with liquid glass becomes transparent, through which the gray base is visible, and afterward there is no provision for covering it with a beautiful finishing layer, decoration is created before the waterproofing layer. Decoration is created by painting, drawing, and adding additional elements. Then layers of silicate are applied.
Decoration is also carried out using paper phlox: apply the first layer of silicate, then lay out pieces of torn paper for wrapping or any other, apply two more layers of liquid glass.
When the 3D effect is achieved, translucent drawings are laid out on top of each other on the floor. Then the mixture is carefully poured. This coating will give superiority to the design.
Conditions for painting the garage floor
In order for the painting of a concrete floor to be of truly high quality, it is necessary to meet a number of requirements for the base:
- Parameters of concrete screed . A cement-sand screed in a garage is absolutely necessary, since this is the only way to level the garage floor. The reliability and durability of the painting depends on the quality of this base. To screed the floor in the garage, it is recommended to use mortars with maximum strength (the grade of cement must be no lower than M 400). This is due to the fact that the garage floor is subject to serious loads, and shock impacts are not uncommon among them. Even small flaws in the screed can lead to rapid cracking of the coating.
- Humidity and cleanliness of the base . Before you paint your garage floor, you need to thoroughly clean the subfloor. It is best to do this with a vacuum cleaner to get rid of the slightest dirt. Cracks in the foundation must be repaired, as well as any unevenness in the concrete screed. In addition, the humidity of the floor has a serious impact on the quality of the coating: if it is too high, then any colorant will not adhere well. Before painting, the screed should be dried, for which you can use a fan or a heat gun.
- Compliance with painting technology . Each manufacturer of coloring materials provides them with specific instructions for use. These instructions should be followed to ensure that the coating is reliable. You should not bypass these recommendations and try to save time - the result may turn out much worse than expected. In addition, usually to paint the floor it is necessary to treat it with a primer, which protects the paint from moisture and improves adhesion.
- Choice of paint . The correct selection of painting materials largely depends on the operating conditions of the garage. It is important to choose the right way to cover the concrete floor so as not to create dust, taking into account all the nuances. You can find a variety of materials on the market that are suitable for any situation, so the choice should be as thoughtful and informed as possible. You need to learn more about how to paint a concrete floor in a garage.
Safety precautions during operation
The material used is safe and does not contain any harmful elements, but during preparatory or glass coating work itself, alkaline reactions occur when the product comes into contact with exposed areas of the skin.
Therefore, PPE is used during work. Work with rubber gloves and boots.
In the room where the work is being carried out, there should be a container with clean water in case of immediate washing of the skin area if glue gets on it. And the damaged area is treated with a vinegar solution, which acts as an anti-alkaline compound.
Painting a garage floor with sand
Modern paints have very high performance and meet all technical standards, but their cost is often too high. In this case, painting the concrete floor in the garage can be done using an alternative technology, which requires any paint (even the cheapest one will do) and regular sand, which must first be dried.
The work on applying paint to the floor will look like this:
- First the paint is prepared. As mentioned above, the cheapest one you can find on the market will do. You will need a lot of paint: you will have to apply it in a millimeter layer, and this point must be taken into account when purchasing.
- The paint is simply poured onto the prepared base, and to level it you need to use special levelers. You need to smooth out the paint quickly, because the work does not end there.
- It is best to carry out the work in studded shoes, which will allow you to calmly walk on the poured layer of paint. When the entire floor is covered with paint, you need to evenly sprinkle prepared sand on top of it, which will sink into the paint and stick to the base.
- After filling, the surface is left until the paint hardens completely (usually this time takes no more than a day). Then, using a broom, the remaining sand is swept away, and it can be used for other purposes.
Rules for working with material
Carrying out work on covering floors with liquid glass requires compliance with the rules for working with the material used:
- The room temperature is maintained within the range from -5 degrees to 30 degrees.
- For large areas, the mixture is prepared in portions to avoid premature hardening. Since this composition is not reused.
- The composition is not added to the finished mixture; it is first diluted with water and then poured into the dry mixture.
- When pouring, avoid drafts and the use of air conditioning and heating devices. Drying also occurs under the same conditions.
- The concrete surface must be degreased and, if necessary, puttied.
- Liquid glass can penetrate into a concrete floor to a depth of 2 cm, so for maximum surface protection, the treatment is carried out at least 2 layers.
- Upon completion of the process with the material, you should definitely wash off the remaining mixture from the devices and hands.
We recommend watching the video instructions:
After the screed has dried
As soon as the waterproofing base is completely dry, it is treated with varnish so that the surface becomes glossy and durable. 24 hours after completion of work, the coating can be used.
As soon as the waterproofing base is completely dry, it is treated with varnish so that the surface becomes glossy and durable.
Liquid glass has a lot of advantages that make the floor not only visually attractive, but also moisture-resistant and antibacterial. And the low cost of the material makes it accessible. Using the recommendations of experts, you can make a floor covering with liquid glass with your own hands.
Paints for bathrooms, kitchens and hallways
Kitchens and bathrooms are characterized by high humidity levels. Therefore, it is necessary to choose a paint that is vapor permeable and resistant to abrasives.
Alkyd compositions
Alkyd paints are based on mixtures of drying oil and varnish, with an oily consistency. Advantages of enamels:
- low cost;
- moisture resistance;
- resistance to fading and high temperatures;
- choice of coating type.
- Strong smell;
- loses color brightness over time;
- may peel off during prolonged use;
- well prepared surface for painting.
The enamel is suitable for painting heating radiators, bathrooms or corridors.
Paints based on silicates (liquid glass)
A finishing material based on liquid glass is suitable for concrete and brick surfaces. It contains substances that prevent the formation of fungus and mold. Advantages of silicate paint:
- material strength;
- vapor permeability;
- alkaline resistance;
- ease of care;
- resistance to temperature changes.
Disadvantages of silicate-based coatings:
- the surface of the walls must be thoroughly cleaned if they were previously painted with acrylic or alkyd;
- toxicity upon application;
- It is difficult to remove a layer of paint when updating the decor.
The silicate suspension can be given any color using a tint. If the solution is too thick, it can be diluted with water.