When organizing a concrete floor, creating a screed becomes an important process. This procedure is necessary to ensure the durability of the floor, its strength, evenness, and resistance to wear. In most cases, concrete floors are laid on prepared soil, but it may be necessary to pour bedding under the floor screed. This is true for basements, garages, and a number of other non-residential premises.
Using expanded clay as bedding
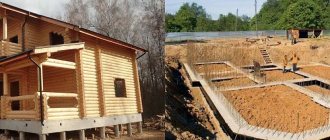
Concrete floor on the ground
There are two ways to make a concrete floor on the ground. The first method is more reliable, but expensive. It involves backfilling and a concrete base. The second is cheaper, but less reliable. It cannot be used under any coating. Only for those types that do not require strength.
The good thing about a concrete floor in a private house is that you can put any coating on it... and it doesn’t creak
This type of concrete floor pie allows you to lay any finishing coating - ceramic tiles, vinyl flooring, parquet, and allows you to install underfloor heating. It provides a high level of protection against moisture and a good level of thermal insulation. Everything looks like this layer by layer (bottom/top):
- compacted soil;
- gravel 40-60 mm;
- concrete preparation (B 7.5);
- steam and moisture insulation;
- insulation;
- reinforced screed (floating), grade M 100 or M 150.
Next, any type of flooring can be laid. If the screed is not level enough, you may need another layer of leveling screed from a series of self-leveling floors. Pipes for water floor heating or electric heated floors can be laid in a reinforced screed.
How to pour floors in a house onto the ground: sequence of layers
Next, let's take a closer look at each of the layers. What is it for, what is its role, what materials can or should be used.
In order for the floor screed in a private house to be correct and meet all the requirements of SNiP, it is carried out in 8 stages. The result is a “pie” of the following layers:
- Prepared clay. This layer must be poured to create a barrier to groundwater.
- Sand pillow. In this case, you can use any sand, even unwashed.
- Crushed stone with fractions of 40-60 mm.
- Polyethylene film that prevents the solution from pouring onto the pillow. The material is laid without cutting it, like a sleeve, so in fact you get two layers of polyethylene.
- Rough screed, at least 80 mm thick. For the solution, a mixture is prepared from washed or quarry sand, crushed stone (fraction size 10-20 mm) and CP, grade no lower than 300. Reinforcement for this layer is not necessary, just add steel fiber to the solution.
- Waterproofing with roofing felt.
- Insulation. As thermal insulation for screeds in a private home, it is necessary to use only EPS (extruded polystyrene foam) with a thickness of at least 50 mm.
- Finish concreting. For the final pouring of the floor screed, a mixture is used, which includes exclusively river sand and concrete of a higher grade. Also, this layer must be reinforced.
Important! The order of the layers should not be changed, since if you pour sand on top of crushed stone, after a while it will begin to sink down, which will certainly lead to subsidence and destruction of the entire floor. By the way, here PC floor slabs can be ordered very cheaply.
The first three layers make it possible to cut off the capillary rise of water. First, the clay takes the “brunt of the blow,” then the sand weakens the water rise and reduces the pressure, and the crushed stone does not allow rise at all. If you are interested in how to properly make a floor screed on the ground, then lay out each of these layers with a thickness of at least 100 mm. It is also necessary to take into account compaction, which is usually performed using homemade devices weighing up to 80 kg.
If you make a floor screed for your home with your own hands following this sequence, then you can lay any “flooring” material on the resulting slab.
Areas of use
The scope of use of dry screeds is quite wide. In fact, this type of flooring has only one drawback - the hygroscopicity of the dry backfill. The material tends to absorb moisture, so dry screed is not used in rooms with high levels of humidity (bathroom, shower, bathhouse, sauna). Moisture getting into the subfloor can lead to the spread of mold. This feature must be remembered before installation. Without high levels of humidity, dry screeds are used to perform the following tasks.
Layer arrangement in dry screed
- Leveling the base - the finished floor cannot be placed on an uneven surface, so the screed allows you to level the surface.
- Insulation and sound insulation of the room - the porous structure of the backfill provides good thermal insulation.
- Laying communication elements such as pipes, electrical wiring, underfloor heating elements, etc.
Advantages and disadvantages
At its core, a ground floor is a “cushion” of fine crushed stone or expanded clay, on which lies a reinforced slab of monolithic concrete. Ballast bedding performs two tasks:
- raises the level of coverage to a given height;
- transfers the weight of the structure to the ground.
The floor is protected from soil moisture and heat loss by insulation laid on a layer of waterproofing.
We suggest you familiarize yourself with How to fry shish kebab on a grill over coals: how long to cook and how to fry
The load-bearing basis of such a coating is a layer of soil. Therefore, the main risk factors when installing a floor on the ground in a private house are frost heaving and moisture. The first threat is blocked by insulating the foundation base from the outside with sheet foam. It cuts off the cold bridge that causes water to freeze.
It should be noted that if you live permanently in a house, the temperature of the soil underneath never drops below zero degrees. If the building is empty in winter, then the forces of frost heaving can cause cracks in the concrete screed and deform it. In this case, you cannot do without insulating the base.
Protection from soil moisture is a relatively simple measure only when the groundwater level is low (2-3 meters). In damp and swampy areas, it is better to avoid installing such a covering. The cost of waterproofing and strengthening the foundation in this case increases significantly.
For pile and columnar foundations, a slab on the ground is not the best solution. In this case, the cost of protecting the bedding from frost is higher than when using a foundation “tape”.
When planning to lay a floor on the ground, you need to know what its advantages are over other types of foundations:
- Reasonable cost;
- Readiness of the base for laying any floor coverings;
- There is no need to ventilate the underground space to avoid the appearance of fungus;
- Greater durability compared to wooden and reinforced concrete floors.
The disadvantages of this design include:
- Loss of useful room height (up to 60 cm);
- Labor intensity of waterproofing work at high groundwater level;
- Poor compatibility with columnar and pile foundations;
- High cost of repairing hidden communications.
A monolithic slab has characteristics that give it advantages over other types of subfloors:
- Strength. Concrete is able to withstand high loads and the total weight of furniture and household appliances.
- Durability. When properly filled, the service life of the screed is several decades.
- Resistant to rotting and corrosion. Concrete is not a breeding ground for microorganisms and does not react with alkalis, acids, or moisture.
- Non-flammability. Concrete does not burn, does not melt, and does not emit caustic or harmful substances.
- Environmental friendliness. When making the solution, only natural materials are used: crushed stone, sand, cement and water.
- Moisture resistant. Concrete floors are made in the wettest areas: bathrooms, toilets.
- Versatility of use. The screed can be given different shapes (for example, to form a drain in a bathhouse or bathroom, to make a podium or steps in the hallway, etc.). It is convenient to install coverings made of linoleum, laminate, parquet boards or tiles on a flat base.
Among the main disadvantages is low thermal insulation ability. Concrete floors in a private house must be insulated.
In addition, concrete work is physically difficult and requires a lot of money. On interfloor floors, it is necessary to take into account the considerable weight of the screed itself.
Plank flooring
The most budget-friendly ground floor on a strip foundation is constructed from boards. Wooden structures have a large number of advantages. They can be built in houses made of wood, stone, brick and concrete blocks.
Advantages of wooden structures:
- are cheaper than concrete screed;
- Wood beams can be installed independently;
- for the construction of a supporting structure and a plank floor, complex specific materials and tools are not needed:
- Wood structures put less pressure on the foundation of a house than a concrete screed.
Negative aspects of rough plank flooring:
- Wood degrades faster than concrete. It rots under the influence of moisture and fungus.
- The boards catch fire quickly.
- Wood is not resistant to moisture.
To protect wood from harmful insects and infections, building materials are treated with antiseptics, resins and other impregnations. Well-dried wood lasts up to half a century.
Preparing the base
The first stage of preparation is to create the foundation. To do this, it is necessary to determine the level for the finishing layer of the floor. Usually in this case they are guided by the doorways in a private house, taking into account the thickness of the coating that will be laid on the floor. Also, before screeding the floor, using chalk, draw on the walls the level of the future screed in increments of 50 mm.
After this, do-it-yourself concrete floor screed is done as follows:
- Cut off the fertile soil from the soil and moisten the surface generously with liquid glass and water in a ratio of 1:4.
- Lay down a layer of clay.
- Level, moisten with water and compact the resulting area. For tamping, you can use a 200 x 200 mm beam about 1.5 m long. Or better yet, make a homemade device from a piece of pipe (sand must be poured into the pipe), to which the channel is welded. The lower zone of the channel should be 200 x 300 mm.
- Moisten the clay layer with concrete milk (2 kg of CPU per 10 liters of water).
- Wait a day for the clay to react with the liquid glass.
We suggest you read How to easily get rid of grass and weeds in the garden: the most effective methods
Noise insulation
Sound insulation is necessary for residents of apartment buildings, starting from the second floor. Music, children's screams, loud TV, etc. become a problem for the upstairs neighbor for many years. This can be solved by laying soundproofing material on the floor. In this case, depending on the type of flooring, soundproofing material is placed under the screed on the slab (floating screed), or on the screed itself.
Various materials are used for floating screeds:
- polystyrene;
- mineral wool;
- perlite;
- expanded clay
Its device is not very complicated, but it requires certain knowledge and skills. Not applicable for certain types of floors. In such cases, soundproofing materials are laid between the screed and the floor. Instructions for soundproofing a floor screed are given in the article: “Soundproofing the floor in an apartment under a do-it-yourself screed.”
Important: carrying out soundproofing work almost always solves another problem - floor insulation.
Construction technology
There are two ways to install floors on the ground:
- For concrete preparation;
- Without a rough layer of concrete directly onto the compacted base (pillow).
The first method is rarely used today. It was developed at a time when roofing felt was used to protect floors from moisture. To glue it, a layer of concrete preparation (subfloor) was made.
The second option is simpler and cheaper. Modern waterproofing materials can be laid directly on the ballast pad without sticking to a solid base.
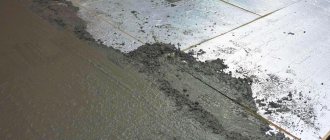
The process of installing a concrete floor on the ground begins with pouring the underlying layer. Before this, the installation of water supply and sewerage networks must be completed.
For backfilling, you can use any well-compacted soil. Fine crushed stone (fraction 5-10 mm), coarse river sand or sand-gravel mixture are suitable for this. The pillow is poured in layers of 15 cm, spilling each with water and compacting with a manual or mechanical tamper.
Compacting the bedding with a vibrating rammer
To improve thermal insulation, the upper level of the pillow can be made of expanded clay gravel (10 cm). The total thickness of the ballast “pie” should be in the range from 30 to 40 cm.
Film waterproofing laid under the insulation needs to be protected from damage by sharp gravel and pressing through expanded clay. Therefore, the backfill is completed with a 5-centimeter layer of compacted sand. The thickness of the film laid on the ground must be at least 0.4 mm.
When laying film insulation, its strips are spread with an overlap of 10-15 cm, fixing them with construction tape. The edges are let down onto the masonry to a height equal to the total thickness of the insulation, concrete screed and finishing coating. A thermal gap 2-3 cm wide is left between the structural “pie” of the floor and the walls and partitions. It is filled with scraps of polyethylene foam or special thermal tape.
To insulate the base, you can use EPS (extruded polystyrene foam), sawdust concrete or perlite concrete. Often, waterproofing is not laid under foam plastic, since it practically does not absorb moisture. It is covered with a polymer film on top. It protects the insulation from the destructive effects of the alkaline environment of the cement mortar.
Under lightweight concrete on sawdust and perlite, a plastic film is needed. The thickness of the listed heat insulators is not the same. For XPS it is 50 mm. The layer of sawdust and perlite concrete should be at least 10 cm.
Having laid the thermal insulation, a concrete screed is made on its surface using fine-grained filler (fraction 5-10 mm, thickness 10 cm). The work is carried out in two stages. First, pour a layer 5 cm thick and lay a steel mesh on it (mesh 10x10 cm, wire diameter 3-4 mm). After this, the thickness of the screed is adjusted to the design level, determined by calculation of the expected loads. Recommended concrete class B12.5.
This is how you get the correct flooring on the ground when the soil water level is low. Rough concrete preparation for rigid insulation is not done. There is no real benefit from it, and the increase in the cost of 1m2 of the finished structure is very noticeable.
Installing a heating system (warm floor) changes the technology and sequence of work. In this case, first a rough concrete preparation is poured over the compacted pad and a layer of waterproofing is laid out. Having laid the insulation (EPS), pipes are fixed to it and a leveling screed is made of concrete. The reinforcing mesh is laid over the pipes or heating cable.
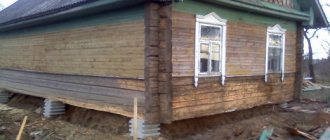
In passing, we note that floors on the ground can be made not only in brick, block, but also in wooden houses. With the right approach, ballast backfill does not have a negative impact on the wood.
We suggest you read why garlic leaves turn yellow in spring, what to do and how to fight
One of the options for properly pairing such a structure with chopped walls is shown in the diagram below.
Interface with a wooden wall
At low groundwater levels, a concrete slab lying on clay or on a layer of compacted waterproofed bedding is made in the basement. This is a very common option in cottage construction.
The right “pie”: layer-by-layer guidance
If wooden subfloors do not require much effort - a sand backfill with a layer of geotextile is enough for them, then for a concrete screed you will need to create a more multi-layered “pie” .
Experts advise reinforcing the finishing layer, as this helps prevent cracking after hardening. In the finishing layer you can place communications of the “warm floor” system.
Experts recommend following this technique:
- The first layer is compacted sand.
- Next, a gravel cushion is poured.
- A reinforcing mesh is installed, which can be made of either fiberglass or metal.
- A ten-centimeter layer of concrete mortar is poured.
- A waterproofing layer is created.
- A layer of insulation is laid, for which expanded clay or penoplex, or other insulating materials can be used.
- Another layer of waterproofing is laid.
- A clean concrete screed is poured.
The last layer of the “pie” can hide any utilities, for example, sewerage or water supply , but it is recommended to provide a backup system that will help avoid destruction of the concrete layer when repair work is required.
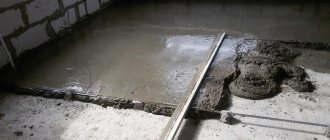
Rough screed, hydro- and thermal insulation
It is best to wait about 10-15 days before performing subsequent work, since this time is required for the crystallization of liquid glass.
After that:
- Pour sand in several layers (approximately 200 mm each) and thoroughly wet and compact each of them. In this case, it is advisable not to walk on the first layer.
- Lay out crushed stone (you can add expanded clay to it) and tamp it down as well.
- Lay polyethylene with a bend of 20-30 mm on the walls. At the same time, you should not walk on the film in boots with hard soles.
- Perform a rough screed. Before pouring it, prepare a “weak” concrete solution from CP, sand and crushed stone in a ratio of 1:3:4. It is also recommended to add steel fiber to it to obtain reinforcement. For 1 cubic meter of concrete you will need 1 kg of fiber.
- Wait 48 hours and “harden” the hardening concrete using liquid glass and water, in a ratio of 1:10, as well as cement, which must be practically rubbed into the slab in a thin layer.
- Treat the surface with liquid bitumen and lay roofing material with an allowance of 30-50 mm.
- Solder the joints of the roofing felt with a hair dryer.
- Take 30 mm thick EPS to create a thermal insulation layer and glue the joints with specialized tape. It is better to lay two layers of material at once.
Remember that the room loses up to 35% of heat through the floors, so special attention must be paid to the thermal insulation layer. In pursuit of savings, you will ultimately end up overpaying for heating your home.
Recommendations for concreting
Before installing the screed, the area of the room must be divided into strips 80-100 cm wide using a steel U-shaped profile or wooden beacon boards placed on edge. The damper tape is attached to the walls before pouring begins so that it protrudes 1.5-2 cm above the design mark of the finishing surface.
Pouring concrete begins at the far end of the room and moves towards the front door.
Laying is done in strips, filling the cells slightly above their level. For leveling, use a vibrating screed or a metal rule, moving it along the beacons.
After allowing the mixture to dry, the beacons are removed from it, filling the resulting seams with fresh concrete. After this, the concrete is covered with film and given 4 weeks to gain strength, periodically moistening it with water.
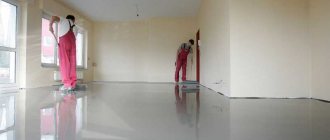
Finishing screed
The final floor screed should be done as follows:
- Along the entire perimeter of the room, glue a special damping tape 1.5-2 cm thick so that it “catches” the EPS boards.
- Using a mesh with cells 10 x 10 cm and a wire thickness of about 3 mm, lay the reinforcing layer. At the same time, it is placed on stands (caps from ordinary plastic bottles are suitable).
- Dilute the solution of CPU M 500 and sand (ratio 1:3).
- Pour in the finishing layer and level it using a rule or trowel.
After this, the layer will “mature” for about 35 days, during which the surface must be moistened with water daily so that it does not crack.
In the process of creating a screed described above, there is no stage of installing guides. The fact is that if you screed the floor using beacons, you will have to create an unreliable and rather cumbersome structure. In addition, the beacon can change its position due to the fittings. Therefore, the easiest way during the formation of the “pie” is to follow the chalk marks on the walls, and after the concrete has completely hardened, cover the floor with a self-leveling compound.
Types of insulation
When preparing the base for a heated floor, thermal insulation material plays an important role. When choosing it, the characteristics of the room and the type of base are taken into account.
The bulk of insulation has the same degree of thermal conductivity, but its thickness should be selected individually.
Let's look at the most common types of thermal insulation.
Expanded polystyrene and foam plastic
The production technology of polystyrene foam insulation is the formation of channels in the texture of the material for air movement. The products are durable and can withstand heavy mechanical loads. Foam insulation is lighter, it “breathes” well - it allows water vapor to pass through better.
Penoplex is available in different sizes: 120 X 240 cm, 50 X 130 cm, 90 X 500 cm. These products differ in density: polystyrene - 150 kg/m³, polystyrene - 125 kg/m³. Since foam plastic is less dense, it is deformed under physical influence, which reduces its thermal insulation properties. Therefore, it is more often used when laying between joists.
Cork
Natural material, the main raw material for production is oak bark, so the product is expensive. It is produced in sheets and rolls, but the characteristics are the same, the only difference is in thickness.
Cork gasket is:
- low thermal conductivity;
- waterproof;
- elasticity;
- light resistance;
- fire safety;
- resistance to temperature changes;
- chemical resistance.
If funds allow, this substrate is the best option - it saves heat resources.
The material does not shrink or deform under mechanical stress. Mold does not form on the cork and does not attract insects. The only negative is that it steals the height of the room.
Mineral wool
A long-known type of insulation with increased fire safety. Available in slab form, which is convenient for installation. In the presence of an aluminum substrate, the useful coefficient of mineral wool increases several times, even when installed on the ground.
The structure of the material is rigid, so it is not susceptible to chemicals. In addition, it retains heat well and absorbs noise.
Despite many advantages, there are also disadvantages:
- contains toxins and carcinogens;
- Mineral fibers are hygroscopic and require protection from moisture.
Foamed polyethylene
Today, penofol is often used as thermal insulation. The thickness of the product reaches 3 - 10 mm, the surface is foil with reflective properties. This layer eliminates the need for waterproofing material.
Foamed polyethylene is:
- with one layer of foil - grade A;
- with two - B;
- self-adhesive (foil on one side, self-adhesive base on the other) - C;
- combined (foil on top, special film on bottom) - “ALP”.
All of these insulation models are excellent for preparing the basis for a water-heated floor. It should be said that this material absorbs moisture, which leads to a decrease in thermal insulation properties.